


How to Access Cameras and Scan Documents in a Salesforce Lightning Web Component
Salesforce is a famous CRM platform. We can use it to manage our sales and customers.
Salesforce comes with great customizability. We can write apps to extend its features. Its latest technology is the lightning web component, which helps us use modern web technologies to build apps.
Build a Salesforce Lightning Web Component that opens the device camera, captures a frame, and uploads it to an ASP.NET Core server for document detection and cropping. The component then writes the cropped-image URL back to a Lead record, which is useful for attaching ID cards or scanned documents to Salesforce records.
To illustrate how to access Salesforce’s data, the component can upload an image to a server (written in a previous article), get the URL to the cropped document image, add the URL to a lead and display the document image. This is useful if we need to attach a user’s ID card.
Demo video:
What you’ll build: A Salesforce Lightning Web Component that opens the device camera, captures a frame, sends it to an ASP.NET Core server for document detection and cropping, and writes the cropped-image URL back to a Lead record.
Key Takeaways
- Salesforce Lightning Web Components can access device cameras via the standard
navigator.mediaDevices.getUserMediaAPI. - Captured frames are sent as base64 to an external server for document detection and cropping, then the result URL is stored on the Lead record using the
updateRecordwire adapter. - Camera permissions in Salesforce require adding the external server URL to the Trusted URLs list to satisfy Content Security Policy (CSP) restrictions.
- This pattern applies to any scenario where you need to attach a photo or scanned ID card to a Salesforce record.
Common Developer Questions
How do I access the device camera inside a Salesforce Lightning Web Component?
Request permission with navigator.mediaDevices.getUserMedia, enumerate the available video inputs, and bind the selected stream to a video element inside the Lightning component. That is the browser-side camera access pattern the component uses before sending a captured frame to the backend.
Why does my LWC camera fetch request fail with a CSP error in Salesforce?
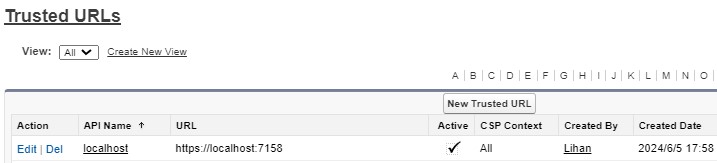
Salesforce enforces strict Content Security Policy, so a camera fetch request fails with a CSP error when the external server URL is not trusted. If you see “Refused to connect” errors, add your server URL (e.g. https://localhost:7158) to Setup → Trusted URLs with the “Connect” CSP directive enabled.
How do I update a Lead custom field from a Lightning Web Component after capturing a document image?
After the external service returns the cropped image URL, call Salesforce’s record update APIs with the Lead record id and the custom field payload you want to persist. In this sample, the camera capture flow ends by writing the processed document image URL back to the Lead.
Prerequisites
- Install Salesforce CLI.
- Install Visual Studio Code and extensions for Salesforce DX.
- Get a 30-day free trial license if you want to use Dynamsoft Capture Vision for advanced document detection.
You can find the detailed Salesforce DX setup guide here.
Step 1: Create a New Salesforce DX Project
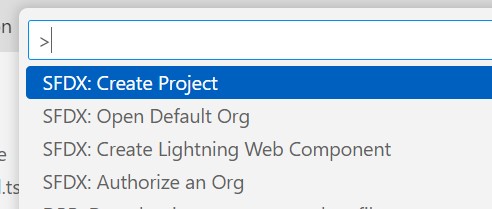
Open Visual Studio Code, open the Command Palette by pressing Ctrl+Shift+P (Windows) or Cmd+Shift+P (macOS) and input SFDX to select the Create Project operation.
Here, we use the standard option and use documentScanner as the name.
Then, run SFDX: Create Lightning Web Component to create a component named documentScanner.
Step 2: Deploy and Use the Component in Salesforce
- Run
SFDX: Authorize an Orgto log in to your Salesforce org. -
Edit
documentScanner.js-meta.xmlto make the following changes to make it available in lightning app builder.<?xml version="1.0" encoding="UTF-8"?> <LightningComponentBundle xmlns="http://soap.sforce.com/2006/04/metadata"> <apiVersion>59.0</apiVersion> - <isExposed>false</isExposed> + <isExposed>true</isExposed> + <targets> + <target>lightning__AppPage</target> + <target>lightning__RecordPage</target> + <target>lightning__HomePage</target> + </targets> </LightningComponentBundle> -
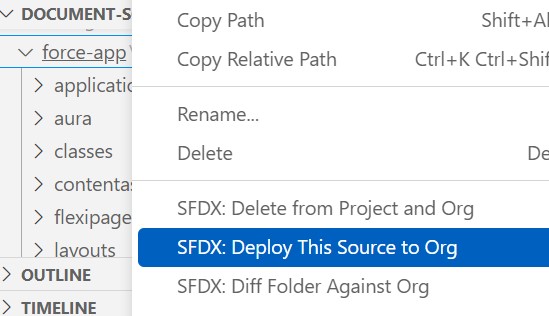
Deploy the component to the org.
-
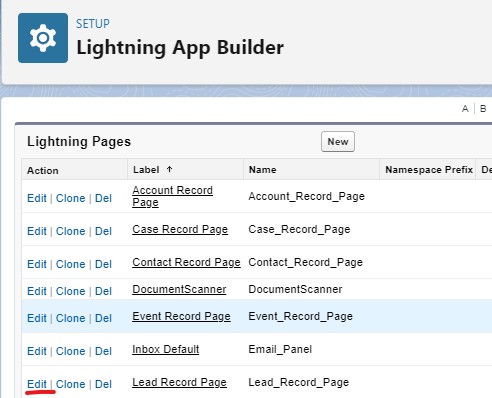
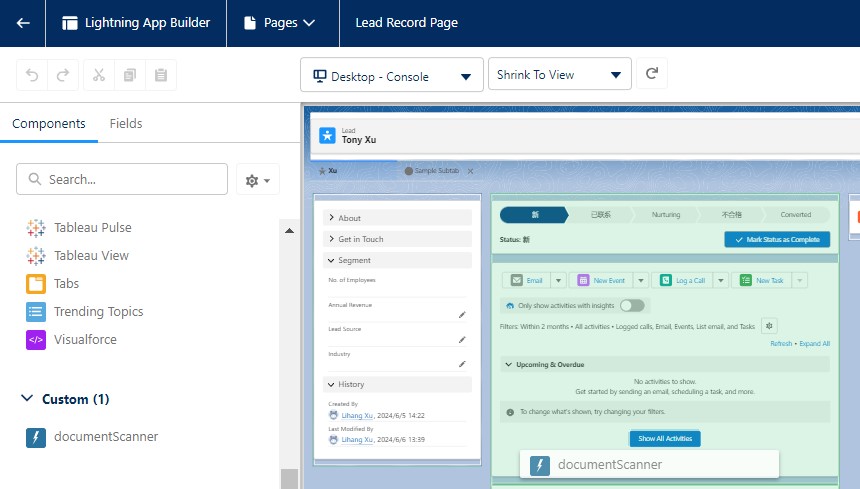
In Salesforce, edit the page of lead and you can add the component to the page to test it.
Step 3: Implement the Component
Next, let’s implement the component.
Set Up the Camera Stream
-
Add a lightning card element with two lightning select elements for selecting the camera and the desired resolution in
documentScanner.html.<template> <lightning-card title="Document Scanner"> <div class="slds-var-m-around_medium"> <lightning-button label={buttonLabel} onclick={toggleCamera}></lightning-button> <br/> <lightning-select name="camera" label="Camera:" value={cameraID} options={cameraOptions} onchange={handleCameraChange} ></lightning-select> <lightning-select name="resolution" label="Resolution:" value={resolution} options={resolutionOptions} onchange={handleResolutionChange} ></lightning-select> </div> </lightning-card> </template>Functions related to setting the resolution:
resolution = "1920x1080"; get resolutionOptions() { return [ { label: '640x480', value: '640x480' }, { label: '1280x720', value: '1280x720' }, { label: '1920x1080', value: '1920x1080' }, { label: '3840x2160', value: '3840x2160' }, ]; } handleResolutionChange(event) { this.resolution = event.detail.value; } -
In
documentScanner.js, addconnectedCallbackwhich is called when the component is mounted.async connectedCallback() {} -
Inside
connectedCallback, request camera permission and list the cameras.@api cameraOptions = []; cameraID = ""; async connectedCallback() { await this.requestCameraPermission(); await this.listCameras(); } async requestCameraPermission() { try { const constraints = {video: true, audio: false}; const stream = await navigator.mediaDevices.getUserMedia(constraints); this.closeStream(stream); } catch (error) { console.log(error); throw error; } } async listCameras(){ let options = []; let allDevices = await navigator.mediaDevices.enumerateDevices(); for (let i = 0; i < allDevices.length; i++){ let device = allDevices[i]; if (device.kind == 'videoinput'){ options.push({label: device.label, value: device.deviceId}); } } this.cameraOptions = options; if (options.length>0){ this.cameraID = options[0].value; } } handleCameraChange(event) { this.cameraID = event.detail.value; } closeStream(stream){ if (stream) { const tracks = stream.getTracks(); for (let i=0;i<tracks.length;i++) { const track = tracks[i]; track.stop(); // stop the opened tracks } } } -
Add a button to open the camera and a video element as the container for the camera.
<lightning-button label={buttonLabel} onclick={toggleCamera}></lightning-button> <video id="video" muted autoplay="autoplay" playsinline="playsinline" webkit-playsinline></video> -
Functions used for the button to open or close the camera.
@api cameraOpened = false; get buttonLabel() { const label = this.cameraOpened ? 'Close Camera' : 'Open Camera'; return label; } async toggleCamera(){ if (this.cameraOpened == false) { const width = parseInt(this.resolution.split("x")[0]); const height = parseInt(this.resolution.split("x")[1]); const videoConstraints = { video: {width:width, height:height, deviceId: this.cameraID}, audio: false }; const cameraStream = await navigator.mediaDevices.getUserMedia(videoConstraints); this.template.querySelector("video").srcObject = cameraStream; this.cameraOpened = true; }else{ this.closeStream(this.template.querySelector("video").srcObject); this.template.querySelector("video").srcObject = null; this.cameraOpened = false; } } -
Add
documentScanner.cssand add the following style to avoid the camera container being too large.video { max-width: 100%; }
Capture and Crop the Document Image
In our case, we need to upload it to a server, let the server crop the document image and display the document image in the lead’s page.
-
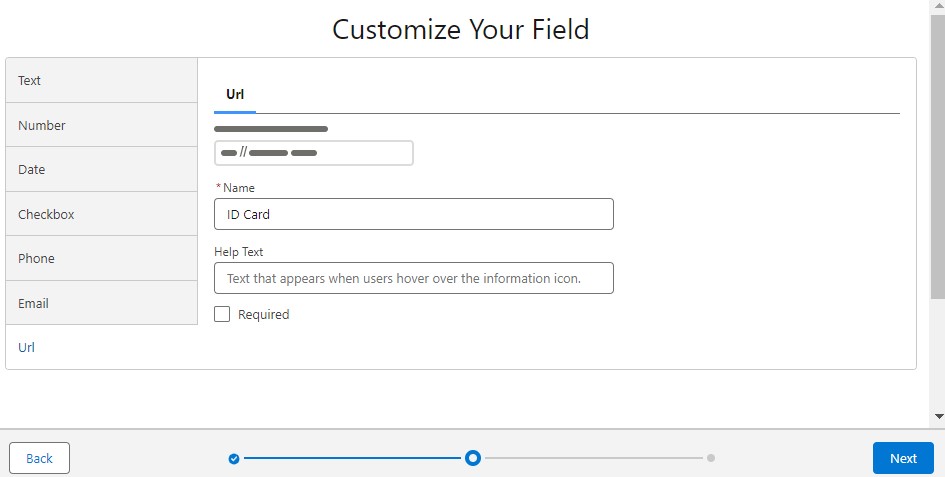
In Salesforce, add a custom URL-typed field
ID Cardto Lead.-
Open settings.
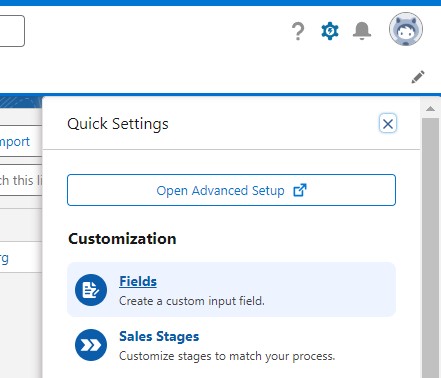
-
Add a URL custom field.
-
-
In the component, display the document image if the
ID CardURL is set. The URL field is retrieved through thegetRecordmethod.HTML:
<div lwc:if={IDCardURL}><div>ID Card:</div><img class="IDCard" alt="ID Card" src={imgDataURL}/></div>
<div lwc:else>No ID Card</div>
JavaScript:
import { LightningElement, api, wire } from "lwc"; import { getRecord, getFieldValue } from "lightning/uiRecordApi"; import IDCard_FIELD from '@salesforce/schema/Lead.ID_Card__c'; const fields = [IDCard_FIELD]; export default class DocumentScanner extends LightningElement { @api recordId; @wire(getRecord, { recordId: "$recordId", fields }) lead; @api imgDataURL = ""; fetchedURL = ""; get IDCardURL() { const url = getFieldValue(this.lead.data, IDCard_FIELD); if (url) { this.getImg(url); //get the image's base64 and display it } return url; } async getImg(url){ if (url != this.fetchedURL) { let response = await fetch(url); let base64 = await response.text(); this.imgDataURL = "data:image/jpeg;base64,"+base64; this.fetchedURL = url; } } } -
Capture a frame from the video using canvas and upload the base64-encoded frame to the server to detect and crop the document image. If the operation is successful, update the URL field for the record.
import { ShowToastEvent } from "lightning/platformShowToastEvent";
import { getRecord, getFieldValue, updateRecord } from "lightning/uiRecordApi";
import ID_FIELD from "@salesforce/schema/Lead.Id";

async captureAndUpload(){
  let url = "https://localhost:7158/api/document/detectAndCrop";
  let dataURL = this.capture();
  let base64 = dataURL.substring(dataURL.indexOf(",")+1,dataURL.length);
  let data = {Base64:base64};
  const response = await fetch(url, {
    method: "POST",
    headers: {
      "Content-Type": "application/json",
    },
    body: JSON.stringify(data),
  });
  let json = await response.json();
  this.imageID = json.id;
  if (json.success == true) {
    let url = "https://localhost:7158/api/document/cropped/"+this.imageID
    let response = await fetch(url);
    let base64 = await response.text();
    this.imgDataURL = "data:image/jpeg;base64,"+base64;
    this.updateURL(url);
  } else {
    alert("Failed to get the cropped Image.");
  }
}

capture(){
  const video = this.template.querySelector("video");
  const canvas = document.createElement("canvas");
  canvas.width = video.videoWidth;
  canvas.height = video.videoHeight;
  const ctx = canvas.getContext("2d");
  ctx.drawImage(video,0,0);
  return canvas.toDataURL("image/jpeg",100);
}

updateURL(url){
  const fields = {};
  fields[ID_FIELD.fieldApiName] = this.recordId;
  fields[IDCard_FIELD.fieldApiName] = url;
  const recordInput = { fields:fields };
  updateRecord(recordInput)
    .then(() => {
      this.dispatchEvent(
        new ShowToastEvent({
          title: "Success",
          message: "Record updated",
          variant: "success",
        }),
      );
    })
    .catch((error) => {
      this.dispatchEvent(
        new ShowToastEvent({
          title: "Error updating record",
          message: error.body.message,
          variant: "error",
        }),
      );
    });
}
You need to start the server first. In addition, add its URL to the list of trusted URLs or the requests will be blocked by CSP.
All right, we’ve now completed the component.
Common Issues and Edge Cases
- Camera permission denied in Salesforce: The
getUserMediacall may fail silently if the page is not served over HTTPS or if the user has blocked camera access. Salesforce orgs use HTTPS by default, but custom domains or sandbox configurations can sometimes cause issues. Check the browser console forNotAllowedError. - CSP blocks fetch requests to external server: Salesforce enforces strict Content Security Policy. If you see
Refused to connecterrors, add your server URL (e.g.https://localhost:7158) to Setup → Trusted URLs with the “Connect” CSP directive enabled. - Video element not rendering in Lightning App Builder preview: The camera stream only works when the component is viewed on an actual record page in a live org — the Lightning App Builder design-time preview does not support
getUserMedia.
Source Code
Get the complete sample project source code on GitHub
References
- https://developer.salesforce.com/docs/component-library/overview/components
- https://developer.salesforce.com/docs/platform/lwc/guide/reference-lightning-ui-api-record.html
- https://trailhead.salesforce.com/content/learn/projects/quick-start-lightning-web-components/create-a-hello-world-lightning-web-component
- Salesforce CRM Administration Handbook
- Ultimate Salesforce LWC Developers’ Handbook