


Dynamsoft Barcode Reader vs Google ML Kit: How to Choose the Right Android Barcode SDK for Accuracy-Critical Apps
When building Android applications that require barcode scanning capabilities, developers have several SDK options to consider. Two commonly used solutions are Google ML Kit Barcode Scanning and Dynamsoft Barcode Reader. ML Kit is a free, general-purpose machine learning SDK from Google, while Dynamsoft Barcode Reader is a commercial SDK specialized in barcode recognition. Both offer barcode scanning capabilities, but their approaches and performance characteristics differ.
This article provides a hands-on comparison of these two SDKs, with emphasis on detection accuracy across various real-world conditions. We’ll walk through creating a reproducible benchmark suite that you can use to evaluate both SDKs with your own test data.
What you’ll build: A reproducible Android benchmark app that tests Dynamsoft Barcode Reader and Google ML Kit side-by-side across image, video, and remote web server modes — so you can quantify detection accuracy differences with your own barcode samples.
Key Takeaways
- Dynamsoft Barcode Reader consistently outperforms Google ML Kit in detection rate for challenging conditions (blur, low light, damaged labels), in the 90%+ vs 75–90% range.
- Both SDKs can be evaluated side-by-side using the same image or video input, ensuring objective, repeatable benchmarks without camera variability.
- ML Kit suits cost-sensitive or prototype projects in controlled environments; Dynamsoft is the better choice when missed scans carry operational or safety risk.
- The benchmark supports three modes — image, video, and web server — enabling team-wide testing from any device on the local network.
Common Developer Questions
- How accurate is Google ML Kit barcode scanning compared to Dynamsoft Barcode Reader on Android?
- How do I benchmark two barcode SDKs objectively on Android without a live camera?
- Which Android barcode SDK works best for damaged, blurred, or low-light barcodes?
Why Barcode Detection Accuracy Matters in Enterprise Apps
In enterprise environments, barcode detection accuracy is non-negotiable. Consider these scenarios:
- Warehouse Management: Missing even one barcode during inventory scanning can lead to stock discrepancies and fulfillment errors
- Healthcare: Failing to scan medication barcodes can have serious patient safety implications
- Retail: Incomplete product scanning at checkout results in revenue loss and customer frustration
- Logistics: Undetected shipping labels cause package routing failures and delivery delays
While scanning speed is important, accuracy takes precedence. An SDK that scans slightly faster but misses 20% of barcodes is far less valuable than one that reliably detects 95%+ of codes, even if it takes marginally more time.
Demo Video: Dynamsoft vs. Google MLKit Barcode Scanner
What You Need Before You Start
- Obtain a free trial license for Dynamsoft Barcode Reader.
How Each SDK Works: A Side-by-Side Overview
Google ML Kit Barcode Scanning
ML Kit is Google’s machine learning SDK for mobile applications, offering barcode scanning among other vision capabilities:
- Licensing: Free to use with no licensing costs
- Integration: Simple API with minimal setup required
- Support: Community-based support through documentation and forums
- Customization: Preset configurations with limited tuning options
- Use Cases: Consumer applications, prototyping, projects with budget constraints
Dynamsoft Barcode Reader
Dynamsoft Barcode Reader is a specialized SDK focused specifically on barcode recognition:
- Licensing: Commercial licensing model with free trial period available
- Integration: Comprehensive API with extensive configuration options
- Support: Direct technical support from engineering team
- Customization: Fine-grained control over recognition parameters and algorithms
- Use Cases: Enterprise applications, scenarios requiring high detection rates, challenging scanning conditions
Set Up the Benchmark Project
Let’s create a comprehensive benchmark application that tests both SDKs side-by-side. This approach ensures fair, objective comparison.
Add Dependencies
dependencies {
    // Dynamsoft Barcode Reader
    implementation 'com.dynamsoft:dynamsoftbarcodereader:11.2.10'

    // Google ML Kit
    implementation 'com.google.mlkit:barcode-scanning:17.2.0'

    // For web server benchmark (optional)
    implementation 'org.nanohttpd:nanohttpd:2.3.1'
}
Project Structure
mlkit-dbr-benchmark/
├── app/
│   ├── src/main/java/
│   │   ├── fragments/
│   │   │   ├── ImageBenchmarkFragment.java
│   │   │   ├── VideoBenchmarkFragment.java
│   │   │   └── BenchmarkResultFragment.java
│   │   ├── server/
│   │   │   └── BenchmarkWebServer.java
│   │   └── BenchmarkConfig.java
│   └── res/layout/
└── README.md
Benchmark Methodology
Our benchmark suite includes three comprehensive testing modes:
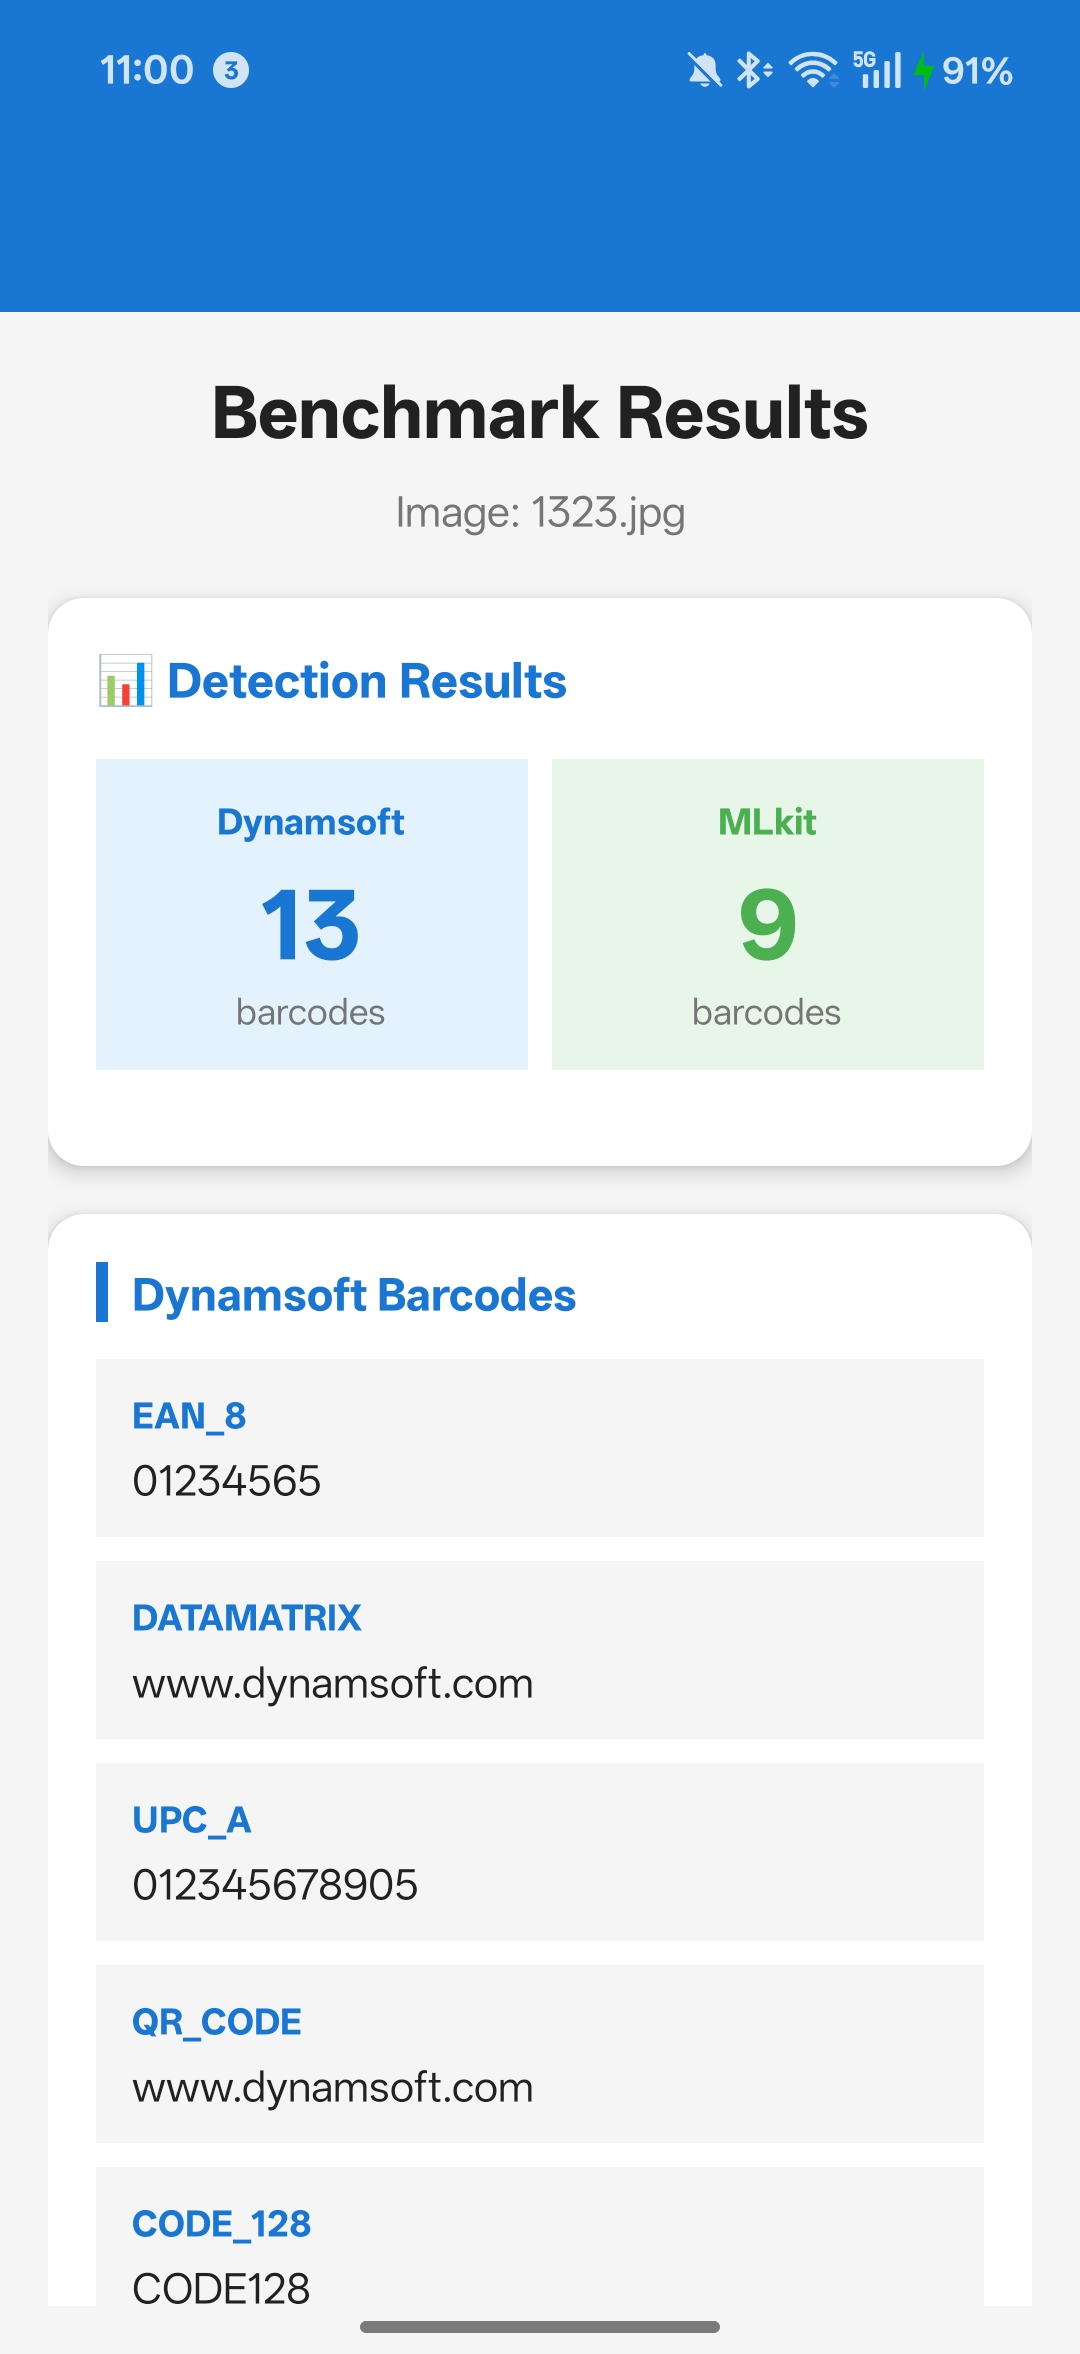
1. Image Benchmark
- Test with individual images containing various barcode types
- Evaluate detection under different conditions (blur, rotation, lighting)
- Compare detection counts and reliability
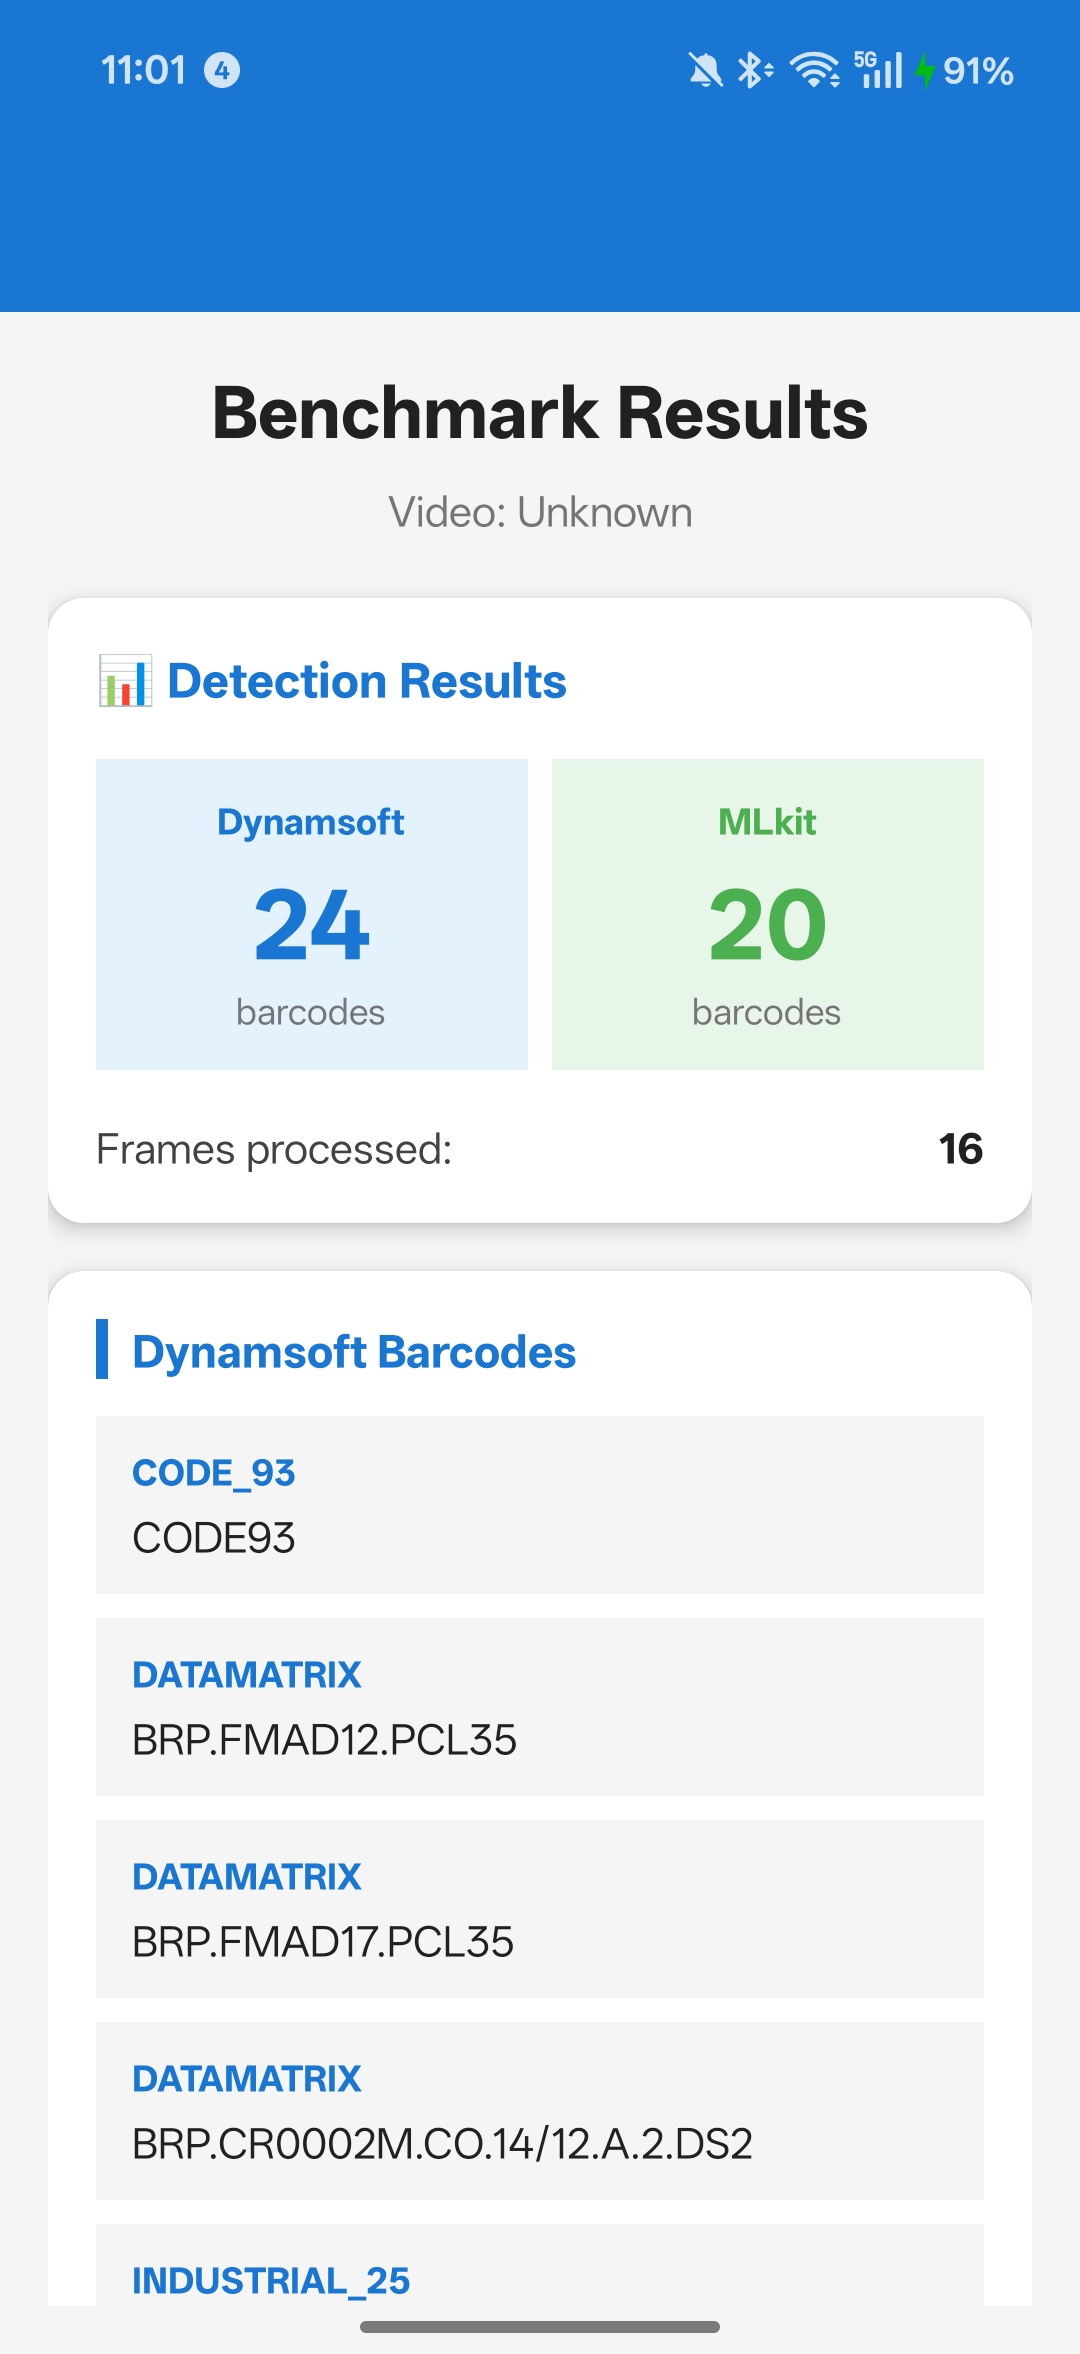
2. Video Benchmark
- Process video files frame-by-frame
- Test real-world scanning scenarios
- Measure consistency across frames
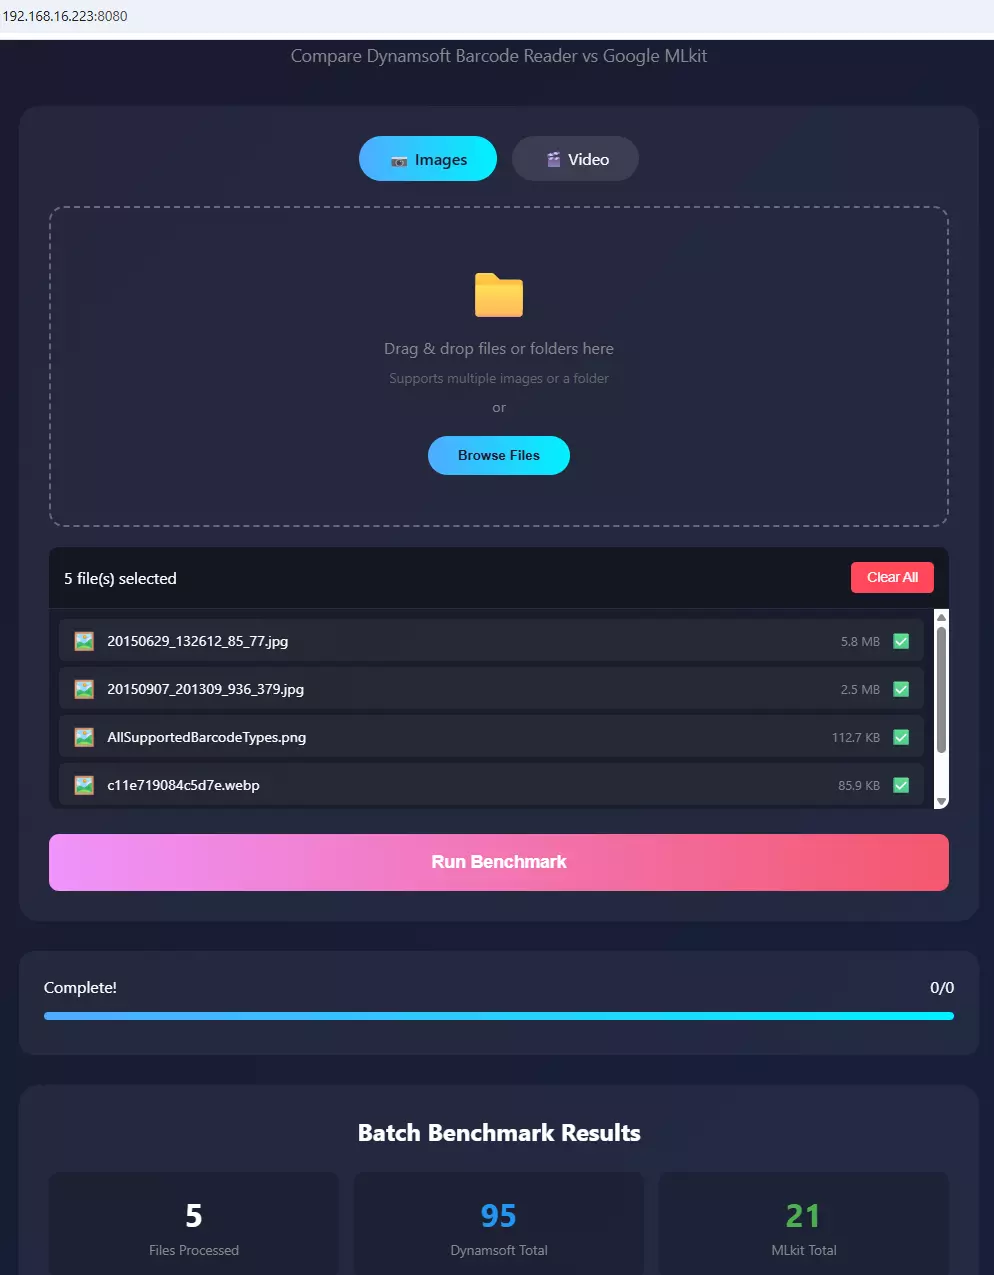
3. Web Server Benchmark
- Upload test images/videos from any device
- Batch processing capabilities
- Remote testing for team collaboration
Important: We intentionally exclude camera-based real-time scanning from this benchmark because live camera tests cannot provide objective, repeatable comparisons. Environmental factors (lighting, hand stability, device variations) introduce too many variables.
Image Benchmark: Step-by-Step Guide
Implementation
First, create a global configuration class to manage SDK settings:
public class BenchmarkConfig {
    // Control whether to use custom Dynamsoft template
    public static boolean USE_CUSTOM_TEMPLATE = false;

    // Dynamsoft template for optimized performance
    public static final String DYNAMSOFT_TEMPLATE_JSON = "{ /* template config */ }";
}
Initialize Both SDKs
public class ImageBenchmarkFragment extends Fragment {
    private CaptureVisionRouter cvRouter; // Dynamsoft
    private BarcodeScanner mlkitScanner;  // ML Kit

    private void initializeScanners() {
        // Initialize Dynamsoft
        cvRouter = new CaptureVisionRouter(requireContext());
        if (BenchmarkConfig.USE_CUSTOM_TEMPLATE) {
            cvRouter.initSettings(BenchmarkConfig.DYNAMSOFT_TEMPLATE_JSON);
        }

        // Initialize ML Kit
        BarcodeScannerOptions options = new BarcodeScannerOptions.Builder()
                .setBarcodeFormats(Barcode.FORMAT_ALL_FORMATS)
                .build();
        mlkitScanner = BarcodeScanning.getClient(options);
    }
}
Run the Benchmark
private void runBenchmark() {
    if (selectedBitmap == null) return;

    // Test Dynamsoft
    BenchmarkResult dynamsoftResult = testDynamsoft(selectedBitmap);

    // Test ML Kit
    BenchmarkResult mlkitResult = testMLKit(selectedBitmap);

    // Display comparison
    displayResults(dynamsoftResult, mlkitResult);
}

private BenchmarkResult testDynamsoft(Bitmap bitmap) {
    BenchmarkResult result = new BenchmarkResult("Dynamsoft");

    CapturedResult capturedResult = cvRouter.capture(
        bitmap,
        EnumPresetTemplate.PT_READ_BARCODES
    );

    if (capturedResult != null) {
        DecodedBarcodesResult barcodesResult =
            capturedResult.getDecodedBarcodesResult();
        if (barcodesResult != null && barcodesResult.getItems() != null) {
            for (BarcodeResultItem item : barcodesResult.getItems()) {
                result.barcodes.add(new BarcodeInfo(
                    item.getFormatString(),
                    item.getText()
                ));
            }
        }
    }

    return result;
}

private BenchmarkResult testMLKit(Bitmap bitmap) {
    BenchmarkResult result = new BenchmarkResult("MLkit");

    InputImage image = InputImage.fromBitmap(bitmap, 0);
    List<Barcode> barcodes = Tasks.await(mlkitScanner.process(image));

    if (barcodes != null) {
        for (Barcode barcode : barcodes) {
            result.barcodes.add(new BarcodeInfo(
                getBarcodeFormatName(barcode.getFormat()),
                barcode.getRawValue()
            ));
        }
    }

    return result;
}
Choose Image Test Scenarios That Reflect Production Conditions
Test with various image types to evaluate real-world performance:
- High-Quality Images: Perfect lighting, sharp focus, direct angle
- Blurred Images: Motion blur, out-of-focus scenarios
- Low Light: Dark environments, shadows
- Rotated/Skewed: Angled barcodes, perspective distortion
- Damaged Codes: Partially obscured, worn labels
- Multiple Barcodes: Several codes in one image
- Small Barcodes: Codes from distance or low resolution
Run the Video Benchmark to Simulate Continuous Scanning
Video testing simulates continuous scanning scenarios like conveyor belt scanning or mobile scanning workflows.
Process Frames at a Fixed Interval
public class VideoBenchmarkFragment extends Fragment {
    private static final long FRAME_INTERVAL_MS = 500; // 2 frames per second

    private void processVideo(Uri videoUri) {
        MediaMetadataRetriever retriever = new MediaMetadataRetriever();
        retriever.setDataSource(requireContext(), videoUri);

        String durationStr = retriever.extractMetadata(
            MediaMetadataRetriever.METADATA_KEY_DURATION
        );
        long videoDurationMs = Long.parseLong(durationStr);

        // Extract frames at regular intervals
        List<Bitmap> frames = new ArrayList<>();
        for (long time = 0; time < videoDurationMs * 1000;
             time += FRAME_INTERVAL_MS * 1000) {
            Bitmap frame = retriever.getFrameAtTime(
                time,
                MediaMetadataRetriever.OPTION_CLOSEST
            );
            if (frame != null) frames.add(frame);
        }
        retriever.release();

        // Run benchmark on all frames
        BenchmarkResult dynamsoftResult = testDynamsoftVideo(frames);
        BenchmarkResult mlkitResult = testMLKitVideo(frames);

        displayVideoResults(dynamsoftResult, mlkitResult, frames.size());
    }

    private BenchmarkResult testDynamsoftVideo(List<Bitmap> frames) {
        BenchmarkResult result = new BenchmarkResult("Dynamsoft");
        Set<String> uniqueBarcodes = new HashSet<>();

        for (int i = 0; i < frames.size(); i++) {
            CapturedResult capturedResult = cvRouter.capture(
                frames.get(i),
                EnumPresetTemplate.PT_READ_BARCODES
            );

            if (capturedResult != null) {
                DecodedBarcodesResult barcodesResult =
                    capturedResult.getDecodedBarcodesResult();
                if (barcodesResult != null && barcodesResult.getItems() != null) {
                    for (BarcodeResultItem item : barcodesResult.getItems()) {
                        String key = item.getFormatString() + ":" + item.getText();
                        if (!uniqueBarcodes.contains(key)) {
                            uniqueBarcodes.add(key);
                            result.barcodes.add(new BarcodeInfo(
                                item.getFormatString(),
                                item.getText(),
                                i // frame index
                            ));
                        }
                    }
                }
            }
        }

        result.framesProcessed = frames.size();
        return result;
    }
}
Video Test Scenarios That Reveal Real-World Differences
- Conveyor Belt Simulation: Items moving past camera
- Handheld Scanning: Natural movement and rotation
- Batch Scanning: Multiple items in sequence
- Varying Distance: Objects moving closer/farther from camera
Enable Remote Batch Testing via the Built-in Web Server
The web server mode enables team-wide testing and batch processing without requiring Android device access.
Implement the Server Endpoint
public class BenchmarkWebServer extends NanoHTTPD {
    private CaptureVisionRouter cvRouter;
    private BarcodeScanner mlkitScanner;

    public BenchmarkWebServer(Context context, int port) {
        super(port);
        this.context = context;
        initializeScanners();
    }

    @Override
    public Response serve(IHTTPSession session) {
        String uri = session.getUri();

        if (uri.equals("/api/benchmark") &&
            session.getMethod() == Method.POST) {
            return handleBenchmarkRequest(session);
        }

        if (uri.equals("/")) {
            return newFixedLengthResponse(
                Response.Status.OK,
                "text/html",
                getIndexHtml()
            );
        }

        return newFixedLengthResponse(
            Response.Status.NOT_FOUND,
            "text/plain",
            "Not Found"
        );
    }

    private Response handleBenchmarkRequest(IHTTPSession session) {
        // Parse uploaded file
        Map<String, String> files = new HashMap<>();
        session.parseBody(files);

        String filePath = files.get("file");
        File uploadedFile = new File(filePath);

        // Process with both SDKs
        JSONObject result = processFile(uploadedFile);

        return newFixedLengthResponse(
            Response.Status.OK,
            "application/json",
            result.toString()
        );
    }

    private JSONObject processFile(File file) throws Exception {
        Bitmap bitmap = BitmapFactory.decodeFile(file.getAbsolutePath());

        JSONObject result = new JSONObject();
        result.put("dynamsoft", runDynamsoftBenchmark(bitmap));
        result.put("mlkit", runMLKitBenchmark(bitmap));

        bitmap.recycle();
        return result;
    }
}
Web Interface Features
The benchmark includes a responsive web interface accessible from any browser:
- Drag & Drop Upload: Upload single images or entire folders
- Batch Processing: Test multiple files automatically
- Real-time Results: See detection counts as files are processed
- Cross-Platform: Test from desktop, tablet, or mobile
Steps to Run a Remote Batch Test
- Enable web server in the app
- Note the displayed IP address and port (e.g.,
http://192.168.1.100:8080) - Open the URL in any browser on your network
- Upload test images or videos
-
Review comprehensive results showing barcode detection for both SDKs
Common Issues & Edge Cases
- ML Kit returns no results on low-resolution frames: ML Kit requires a minimum image resolution for reliable detection. If frames extracted from video are smaller than ~640×480 px, use
OPTION_CLOSEST_SYNCwhen extracting frames and consider upscaling before processing. - Dynamsoft license not initialized before first scan: Calling
cvRouter.capture()before the license handshake completes will return an empty result silently. Always awaitLicenseManager.initLicense()completion before running benchmarks. Tasks.await()blocks the main thread for ML Kit: In the benchmark fragment, runtestMLKit()on a background executor or use aCountDownLatchto avoidNetworkOnMainThreadExceptionand ANR on slower devices.
How to Decide Which SDK Fits Your Project
Google ML Kit May Be Appropriate When:
- Cost is a primary factor (no licensing fees)
- Building prototypes, proofs-of-concept, or personal projects
- Scanning environment is controlled (good lighting, stable positioning)
- Barcode quality is consistently high
- Integration simplicity is prioritized
- Detection rates in the 75-90% range meet requirements
Dynamsoft Barcode Reader May Be Appropriate When:
- Higher detection accuracy is required (90%+ range)
- Scanning conditions vary (lighting, angles, distances)
- Processing worn, damaged, or partially obscured barcodes
- Missed scans have operational or safety implications
- Advanced customization is needed
- Direct technical support is valuable
- Cross-platform deployment is planned