


Remove Noise and Repair Scanned Documents in JavaScript Using Image Filters and Inpainting
After scanning documents, we often need to clean up and repair them to enhance their quality. There are several ways to do this:
-
Apply an image filter.
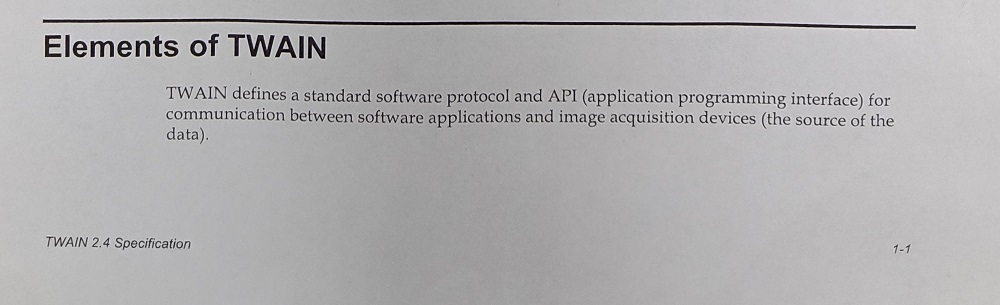
We can convert the image to black and white to clean the background and improve the contrast. In the following example, we can see that the noise and shadow can be removed.
Original image:
Black and white image:

Besides, the image size can also be reduced by converting to black and white.
-
Remove the unwanted objects using free drawing or inpainting. If we need to restore the background, the inpainting is a better choice. This technique is often used to remove punch holes and repair old photos.
The inpainting process is illustrated below.
Original image:

Mask:

Inpainted:

In this article, we are going to create a web app to clean up and repair scanned documents with the Dynamsoft Document Viewer SDK.
What you’ll build: A browser-based document cleaning tool that applies image filters (grayscale, black-and-white) and uses Telea inpainting to remove noise, punch holes, and unwanted marks from scanned documents — all in JavaScript with the Dynamsoft Document Viewer SDK.
Key Takeaways
- Dynamsoft Document Viewer’s
EditViewerprovides built-in image filters (grayscale, black-and-white, save-toner) that remove noise and shadows from scanned documents in one click. - JavaScript inpainting using the Telea algorithm can restore document backgrounds after removing punch holes, stamps, or stains — no server-side processing required.
- Ink annotations in the Document Viewer serve double duty: free drawing to cover objects, or as a mask layer that feeds directly into the inpainting pipeline.
- The entire cleanup workflow runs client-side in the browser, making it suitable for privacy-sensitive document processing.
Common Developer Questions
How do I remove noise and shadows from a scanned document using JavaScript?
Load the scanned page into EditViewer and apply built-in filters such as grayscale, black-and-white, or save-toner to clean the background and improve contrast. Those filters handle the common shadow and noise problems entirely in the browser.
Can I repair punch holes or remove stamps from scanned PDFs in the browser without a server?
Yes. The workflow uses an annotation or mask layer to mark unwanted areas, then applies Telea inpainting in JavaScript to reconstruct the underlying background without sending the document to a server.
How does image inpainting work in JavaScript for document cleanup?
The app first creates a mask for the damaged or unwanted region, then runs an inpainting algorithm that fills that region by extrapolating nearby pixel information. This is why punch holes, stains, and markings can be visually repaired while preserving the surrounding page texture.
Prerequisites
- A modern browser (Chrome, Firefox, Edge).
- Basic knowledge of HTML and JavaScript.
- A Dynamsoft Document Viewer license. Get a 30-day free trial license for Dynamsoft Capture Vision.
Step 1: Create the HTML Page
Create a new HTML file with the following content:
<!DOCTYPE html>
<html lang="en">
<head>
  <meta charset="UTF-8">
  <meta http-equiv="X-UA-Compatible" content="IE=edge">
  <meta name="viewport" content="width=device-width, initial-scale=1.0, minimum-scale=1.0, maximum-scale=1.0, user-scalable=no">
  <title>Clean up and Repair Documents</title>
  <style>
    .container {
      display: flex;
      align-items: center;
      flex-direction: column;
    }

    .container h2 {
      text-align: center;
    }

    #viewer {
      max-width: 1024px;
      width: 100%;
      height: 600px;
    }

    @media screen and (max-device-width: 600px){
      #viewer {
        width: 100%;
        height: 480px;
      }
    }
  </style>
</head>
<body>
  <div class="container">
    <h2>Clean up and Repair Scanned Documents</h2>
    <label>
      Select an image:
      <br/>
      <input type="file" id="files" name="files" onchange="filesSelected()"/>
    </label>
    <div id="viewer"></div>
  </div>
</body>
<script>
</script>
</html>
Step 2: Add the Required Dependencies
-
Add the Dynamsoft Document Viewer SDK.
<script src="https://cdn.jsdelivr.net/npm/dynamsoft-document-viewer@2.0.0/dist/ddv.js"></script> <link rel="stylesheet" href="https://cdn.jsdelivr.net/npm/dynamsoft-document-viewer@2.0.0/dist/ddv.css"> -
Add the
inpaintlibrary.<script type="text/javascript" src="https://tony-xlh.github.io/clean-and-repair-scanned-documents/inpaint.js"></script> <script type="text/javascript" src="https://tony-xlh.github.io/clean-and-repair-scanned-documents/heapqueue.js"></script>
Step 3: Initialize the Document Viewer SDK
-
Initialize the SDK with a license. You can apply for one here.
let oneDayTrialLicense = "LICENSE-KEY"; Dynamsoft.DDV.Core.license = oneDayTrialLicense; Dynamsoft.DDV.Core.engineResourcePath = "https://cdn.jsdelivr.net/npm/dynamsoft-document-viewer@2.0.0/dist/engine";// Lead to a folder containing the distributed WASM files await Dynamsoft.DDV.Core.init(); -
Create a document instance.
const docManager = Dynamsoft.DDV.documentManager; doc = docManager.createDocument(); -
Create an EditViewer and open the document instance.
Dynamsoft.DDV.setProcessingHandler("imageFilter", new Dynamsoft.DDV.ImageFilter()); let uiConfig = { type: "Layout", flexDirection: "column", className: "ddv-edit-viewer-desktop", children: [ { type: "Layout", className: "ddv-edit-viewer-header-desktop", children: [ { type: "Layout", children: [ "ThumbnailSwitch", "Zoom", "FitMode", "DisplayMode", "RotateLeft", "RotateRight", "Crop", "Filter", "Undo", "Redo", "DeleteCurrent", "DeleteAll", "Pan", "SeparatorLine", "InkAnnotation", ], enableScroll: true }, { type: "Layout", children: [ { "type": "Pagination", "className": "ddv-edit-viewer-pagination-desktop" }, "Download" ] } ] }, "MainView" ] } editViewer = new Dynamsoft.DDV.EditViewer({ uiConfig: uiConfig, container: document.getElementById("viewer") }); editViewer.openDocument(doc.uid); -
Choose an image or PDF file and load it.
async function filesSelected(){
  let filesInput = document.getElementById("files");
  let files = filesInput.files;
  if (files.length>0) {
    for (let index = 0; index < files.length; index++) {
      const file = files[index];
      const blob = await readFileAsBlob(file);
      await doc.loadSource(blob);
    }
  }
}

function readFileAsBlob(file){
  return new Promise((resolve, reject) => {
    const fileReader = new FileReader();
    fileReader.onload = async function(e){
      const response = await fetch(e.target.result);
      const blob = await response.blob();
      resolve(blob);
    };
    fileReader.onerror = function () {
      reject('oops, something went wrong.');
    };
    fileReader.readAsDataURL(file);
  })
}
Open the page and load a file and we can see the interface like the following:

Step 4: Apply Image Filters to Remove Noise
We can use the icon on the toolbar to apply an image filter.
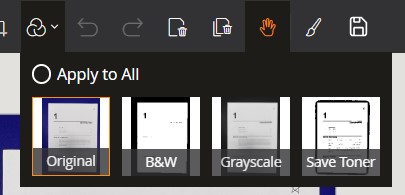
There are three filters by default:
- gray: convert the image to grayscale
- black and white: convert the image to black and white
- save toner: convert the image to black and white in a way that can save toner when printing
You can also apply the filter via code and even add your own filters. Check out the docs to learn more.
Step 5: Cover Unwanted Objects with Free Drawing
Using the ink annotation icon, we can draw shapes freely to cover objects.
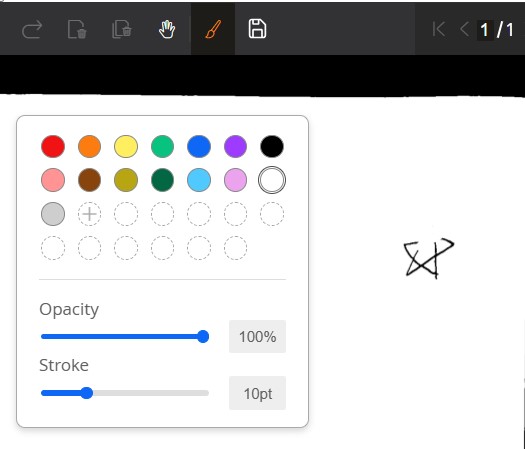
Step 6: Repair Documents with Image Inpainting
Next, we can use the ink annotation to draw the mask for inpainting.
-
Add a checkbox to enable inpainting using the ink annotation tool.
function addInpaintingModeCheckbox(){ const html = ` <div class="ddv-palette-mode-panel" style="width: 85%;"> <label> Inpainting mode <input type="checkbox" id="inpainingMode"> </label> </div> ` let container = document.createElement("div"); document.getElementById("viewer").getElementsByClassName("ddv-palette-box")[0].appendChild(container); container.outerHTML = html; } -
Monitor whether there is a new annotation added. If it is an ink annotation, then do the inpainting. We’ll discuss the inpainting part in the following steps.
Dynamsoft.DDV.annotationManager.on("annotationsAdded",(e) => { if (document.getElementById("inpainingMode").checked) { let uid = e.annotationUids[0]; let annotation = Dynamsoft.DDV.annotationManager.getAnnotationsByUids([uid])[0]; let options = annotation.getOptions(); let pointsOfStrokes = options.points; if (!pointsOfStrokes) { //not ink annotation return; } inpaint(uid); } }) -
Get the bounding rect of the ink annotation. Add some padding to it. We’ll use it to crop the image for inpainting.
function inpaint(uid) { let annotation = Dynamsoft.DDV.annotationManager.getAnnotationsByUids([uid])[0]; let options = annotation.getOptions(); let pointsOfStrokes = options.points; let borderWidth = options.borderWidth; let rect = await getRectForInpainting(pointsOfStrokes,borderWidth); } async function getRectForInpainting(pointsOfStrokes,borderWidth){ const pageIndex = editViewer.getCurrentPageIndex(); const pageUid = editViewer.indexToUid(pageIndex); const pageData = await doc.getPageData(pageUid); let halfLineWidth = borderWidth/2; let minX,minY,maxX,maxY; maxX = 0; maxY = 0; console.log(pointsOfStrokes); for (let i = 0; i < pointsOfStrokes.length; i++) { const pointsOfStroke = pointsOfStrokes[i]; for (let j = 0; j < pointsOfStroke.length; j++) { const point = pointsOfStroke[j]; if (!minX) { minX = point.x; }else{ minX = Math.min(minX,point.x); } if (!minY) { minY = point.y; }else{ minY = Math.min(minY,point.y); } maxX = Math.max(maxX,point.x); maxY = Math.max(maxY,point.y); } } maxX = maxX + halfLineWidth; maxY = maxY + halfLineWidth; let x = minX - halfLineWidth; let y = minY - halfLineWidth; //add padding x = Math.max(x - borderWidth, 0) y = Math.max(y - borderWidth, 0) maxX = Math.min(maxX + borderWidth*2, pageData.mediaBox.width); maxY = Math.min(maxY + borderWidth*2, pageData.mediaBox.height); let width = maxX - minX + halfLineWidth; let height = maxY - minY + halfLineWidth; return {x:x,y:y,width:width,height:height}; } -
The default coordinate unit is point. We have to convert the values using pixel.
function inpaint(){ //... let {scaleX,scaleY} = await getScale(); let rectInPixels = {x:rect.x / scaleX,y:rect.y / scaleY,width:rect.width / scaleX,height:rect.height / scaleY}; } async function getScale(){ const pageIndex = editViewer.getCurrentPageIndex(); const pageUid = editViewer.indexToUid(pageIndex); const pageData = await doc.getPageData(pageUid); const scaleX = pageData.mediaBox.width / pageData.raw.width; const scaleY = pageData.mediaBox.height / pageData.raw.height; return {scaleX:scaleX,scaleY:scaleY}; } -
Get the cropped source image into a canvas.
function inpaint(){ //... let srcImageCanvas = await getSourceImageForInpainting(rectInPixels); } function getSourceImageForInpainting(rect){ return new Promise(async (resolve, reject) => { const result = await doc.saveToJpeg(editViewer.getCurrentPageIndex(),{quality:100,saveAnnotation:true}); const canvas = document.createElement("canvas"); const img = document.createElement("img"); const url = URL.createObjectURL(result); img.onload = function(){ canvas.width = rect.width; canvas.height = rect.height; let ctx = canvas.getContext("2d"); ctx.drawImage(img, rect.x, rect.y, rect.width, rect.height, 0, 0, rect.width, rect.height); resolve(canvas); } img.src = url; }) } -
Draw the mask using canvas.
function inpaint(){ //... let maskImageCanvas = getMaskImageForInpainting(pointsOfStrokes,borderWidth,rect,rectInPixels,scaleX,scaleY); } function getMaskImageForInpainting(pointsOfStrokes,stroke,rect,rectInPixels,scaleX,scaleY){ let canvas = document.createElement("canvas"); canvas.width = rectInPixels.width; canvas.height = rectInPixels.height; const ctx = canvas.getContext("2d"); ctx.fillStyle = "black"; ctx.fillRect(0,0,canvas.width,canvas.height); for (let i = 0; i < pointsOfStrokes.length; i++) { const pointsOfStroke = pointsOfStrokes[i]; ctx.beginPath(); for (let j = 0; j < pointsOfStroke.length; j++) { const point = pointsOfStroke[j]; const x = (point.x - rect.x) / scaleX; const y = (point.y - rect.y) / scaleY; if (j === 0) { ctx.moveTo(x, y); }else{ ctx.lineTo(x, y); } } ctx.strokeStyle = "red"; ctx.lineWidth = stroke / scaleX; ctx.stroke(); } return canvas; } -
Perform inpainting.
function inpaint(){ //... let srcCtx = srcImageCanvas.getContext("2d"); let maskCtx = maskImageCanvas.getContext("2d"); let srcImageData = srcCtx.getImageData(0, 0, srcImageCanvas.width, srcImageCanvas.height); let maskImageData = maskCtx.getImageData(0, 0, maskImageCanvas.width, maskImageCanvas.height); let width = srcImageData.width; let height = srcImageData.height; let mask_u8 = new Uint8Array(width * height); for(let i = 0; i < maskImageData.data.length / 4; i++){ let r = maskImageData.data[4 * i]; let g = maskImageData.data[4 * i + 1]; let b = maskImageData.data[4 * i + 2]; if(r > 0 || g > 0 || b > 0){ let rad = 6 for(let dx = -rad; dx <= rad; dx++){ for(let dy = -rad; dy <= rad; dy++){ if(dx * dx + dy * dy <= rad * rad){ mask_u8[i + dx + dy * width] = 1; } } } } } let img_u8 = new Uint8Array(width * height) for(let channel = 0; channel < 3; channel++){ for(let n = 0; n < srcImageData.data.length; n+=4){ img_u8[n / 4] = srcImageData.data[n + channel] } InpaintTelea(width, height, img_u8, mask_u8) for(let i = 0; i < img_u8.length; i++){ srcImageData.data[4 * i + channel] = img_u8[i] } } // render result back to canvas for(let i = 0; i < img_u8.length; i++){ srcImageData.data[4 * i + 3] = 255; } let output = document.createElement("canvas"); output.width = rectInPixels.width; output.height = rectInPixels.height; let ctx = output.getContext("2d"); ctx.putImageData(srcImageData, 0, 0); } -
Insert the inpainted part as an annotation to the document.
function inpaint(){
  //...
  output.toBlob(
    (blob) => {
      insertInpaintedImage(blob,rect);
    },
    "image/png"
  );
}
async function insertInpaintedImage(blob,rect){
  const pageIndex = editViewer.getCurrentPageIndex();
  const pageUid = editViewer.indexToUid(pageIndex);
  const options = {
    x: rect.x,
    y: rect.y,
    width: rect.width,
    height: rect.height,
    stamp: blob
  }
  const stamp = await Dynamsoft.DDV.annotationManager.createAnnotation(pageUid, "stamp", options);
}
All right, we’ve now completed the demo.
Common Issues and Edge Cases
- Inpainting produces visible artifacts on large regions. The Telea algorithm works best on small, narrow areas (thin lines, small holes). For large stains or watermarks, break the mask into smaller strokes rather than painting over the entire area at once.
- Black-and-white filter loses fine print or light text. If the scanned document has low-contrast text, the binary threshold may drop some characters. Preview the filter result before saving, and consider using the grayscale filter instead for documents with faint text.
- Browser tab crashes on very high-resolution scans. Inpainting operates on raw pixel data in memory. For scans above 4000×6000 px, downsample the image before processing or crop to the region of interest to keep memory usage manageable.
Frequently Asked Questions
How do I remove punch holes from a scanned document in JavaScript?
Use the ink annotation tool to draw over the punch holes, enable inpainting mode, and the Telea algorithm will reconstruct the background automatically. This runs entirely in the browser.
What image filters does Dynamsoft Document Viewer support for scanned documents?
The SDK includes three built-in filters: grayscale, black-and-white, and save-toner. You can also register custom filters via the ImageFilter processing handler API.
Does this document cleanup solution require a server?
No. All image filtering and inpainting runs client-side in the browser using JavaScript and WebAssembly. No document data leaves the user’s device.
Source Code
Check out the source code of the demo to have a try.
https://github.com/tony-xlh/clean-and-repair-scanned-documents