


Convert an Image to Black and White with JavaScript: Canvas and OTSU Thresholding
A black-and-white binary image consists of pixels that can have one of exactly two colors: black and white. Converting an image to black and white has some usages:
- File size reduction: a 1-bit binary image requires less data for storage than a 24-bit color image.
- Image processing: many image processing algorithms have to work on binary images.
- For display and printing: some input/output devices, such as laser printers, fax machines, and bilevel computer displays, can only handle bilevel images.
- Aesthetics: we can see pixels vividly in a binary image which is a kind of pixel art.
The procedure of converting an image to black and white is called thresholding which usually does the following:
- Convert an image to grayscale
- Replace each pixel with a black one if its intensity is less than a threshold and with a white one if its intensity is larger than a threshold
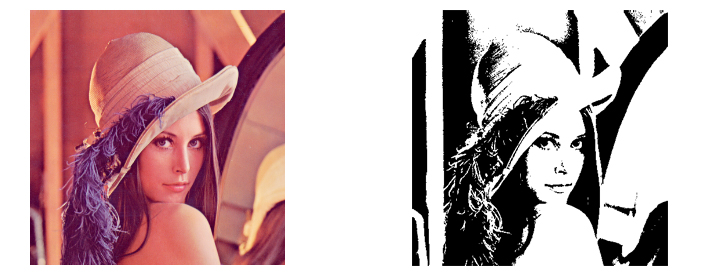
A sample image converted to black and white:
In this article, we are going to talk about two ways to convert an image to black and white with JavaScript.
- Canvas
- Dynamic Web TWAIN, a document-scanning SDK
What you’ll build: A browser-based image binarization tool that converts any color image to black and white using the HTML5 Canvas API with both manual and OTSU automatic thresholding, with an optional Dynamic Web TWAIN path for batch document processing.
Key Takeaways
- JavaScript’s Canvas API lets you convert any image to black and white by iterating pixel data and applying a grayscale threshold — no external library required.
- OTSU’s method automatically calculates the optimal threshold to separate foreground from background, eliminating manual trial and error.
- Dynamic Web TWAIN’s
ConvertToBWmethod offloads binarization to a native process, making it significantly faster for batch processing large volumes of scanned documents. - Black-and-white conversion (binarization) is a critical preprocessing step for OCR, barcode reading, and document archival workflows.
Common Developer Questions
How do I convert an image to black and white using the JavaScript Canvas API without any library?
Draw the image onto a hidden canvas, convert each pixel to grayscale, and then compare that intensity against a threshold to decide whether the output pixel becomes pure black or pure white. That gives you a real binary image in the browser without any third-party image library.
What is OTSU’s thresholding method and how do I implement it in JavaScript?
OTSU’s method analyzes the grayscale histogram and selects a single threshold that best separates foreground and background automatically. In JavaScript, that means computing pixel intensities first, building the histogram, and then applying the chosen threshold during the final black-and-white conversion pass.
How can I batch-convert scanned document images to monochrome for OCR preprocessing?
For high-volume document workflows, use Dynamic Web TWAIN’s ConvertToBW method so the browser page can send the work to the SDK’s optimized native process instead of looping through every pixel in JavaScript. That is the more practical path when preprocessing many scans for OCR.
Prerequisites
To follow this tutorial you need:
- A modern browser (Chrome, Firefox, Edge, or Safari) with HTML5 Canvas support.
- A code editor and a local HTTP server (e.g., VS Code with Live Server).
- (Optional) A Dynamic Web TWAIN license if you want to use the SDK approach. Get a 30-day free trial license for Dynamic Web TWAIN.
Build an HTML5 Page to Convert Images to Black and White
Create a new HTML5 page with the following template and then let’s add the color conversion function to it.
<!DOCTYPE html>
<html lang="en">
<head>
  <meta charset="UTF-8">
  <meta name="viewport" content="width=device-width, initial-scale=1.0">
  <title>Convert an Image to Black and White</title>
  <style>
  </style>
</head>
<body>
  <div class="home">
    <h2>Convert an Image to Black and White</h2>
    <button id="convertButton">Convert</button>
  </div>
  <script>
  </script>
</body>
</html>
Step 1: Load an Image File
Add an input element for selecting files and use a button element to trigger it. The image file will be loaded into two image elements, one for displaying the converted result and one for storing the original image.
HTML:
<button id="loadFileButton">Load a File</button>
<input style="display:none;" type="file" id="file" onchange="loadImageFromFile();" accept=".jpg,.jpeg,.png,.bmp" />
<div class="imageContainer">
  <img id="image"/>
  <img id="imageHidden"/>
</div>
<style>
  .imageContainer {
    max-width: 50%;
  }

  #image {
    max-width: 100%;
  }

  #imageHidden {
    display: none;
  }
</style>
JavaScript:
function loadImageFromFile(){
  let fileInput = document.getElementById("file");
  let files = fileInput.files;
  if (files.length == 0) {
    return;
  }
  let file = files[0];
  fileReader = new FileReader();
  fileReader.onload = function(e){
    document.getElementById("image").src = e.target.result;
    document.getElementById("imageHidden").src = e.target.result;
  };
  fileReader.onerror = function () {
    console.warn('oops, something went wrong.');
  };
  fileReader.readAsDataURL(file);
}
Step 2: Convert an Image to Black and White with Canvas
HTML5 provides a canvas element which provides a way to manipulate image data. We can use it to get an image converted to black and white.
-
Add a hidden
canvaselement to the page.<canvas id="canvasHidden"></canvas> <style> #canvasHidden { display: none; } </style> -
Add an
inputelement to set the threshold.<div class="thresholdControls" style="display:inline"> <label> Threshold (0-255): <input id="threshold" type="number" min="0" max="255" value="127"> </label> </div> -
Set the canvas’s size to match the image’s size.
const image = document.getElementById("image"); const canvas = document.getElementById("canvasHidden"); canvas.width = image.naturalWidth; canvas.height = image.naturalHeight; -
Get the context of the canvas to perform actions.
const context = canvas.getContext("2d"); -
Draw the image onto the canvas.
context.drawImage(image, 0, 0); -
Get the
ImageDataof the image:const imageData = context.getImageData(0, 0, canvas.width, canvas.height);ImageDatastores the pixel values in aUint8ClampedArrayin the RGBA order, with integer values between 0 and 255 (inclusive). The order goes by rows from the top-left pixel to the bottom-right. -
Create a function to get the gray value from the RGB values.
 //https://github.com/image-js/image-js/blob/9ab86a86f6c13a9a7d14c62566c1396c3c6f54f4/src/image/transform/greyAlgorithms.js
 function RGBToGrayScale(red,green,blue){
   //return red * 0.2126 + green * 0.7152 + blue * 0.0722;
   return (red * 6966 + green * 23436 + blue * 2366) >> 15;
 }
There are many ways to calculate the gray value. Here, we use
Rec. 709 luma coefficientsfor the conversion. The calculation speed is optimized using multiplication with integer and bit shifting. -
Create a function to infer whether to use black or white for the pixel based on the threshold.
//return true if the value should be black. return false if the value should be white function threshold(grayscale){ const thresholdValue = parseInt(document.getElementById("threshold").value); if (grayscale < thresholdValue) { return true; }else{ return false; } } -
Iterate all the pixels and set the RGB values to white (255) or black (0).
const pixels = imageData.data; //[r,g,b,a,...] for (var i = 0; i < pixels.length; i += 4) { const red = pixels[i]; const green = pixels[i + 1]; const blue = pixels[i + 2]; const grayscale = RGBToGrayScale(red, green, blue) if (threshold(grayscale)) { pixels[i] = 0; pixels[i + 1] = 0; pixels[i + 2] = 0; }else{ pixels[i] = 255; pixels[i + 1] = 255; pixels[i + 2] = 255; } } -
Put back the
ImageData.context.putImageData(imageData, 0, 0); -
Display the converted image.
document.getElementById("image").src = canvas.toDataURL();
Step 3: Determine the Optimal Threshold with OTSU’s Method
We can use OTSU’s method to automatically determine the optimal threshold to separate the background and the foreground.
-
Include the following JS file in the page.
//https://github.com/cawfree/otsu/ const histo = (data, bins) => data.reduce((arr, e) => { arr[bins.indexOf(e)] += 1; return arr; }, [...Array(bins.length)].fill(0)); const width = (hist, s, e) => { let v = 0; for (let i = s; i < e; i += 1) { v += hist[i]; } return v; }; const bins = data => Array.from(new Set(data)).sort((e0, e1) => e0 - e1); const weight = (hist, s, e, total) => { let v = 0; for (let i = s; i < e; i += 1) { v += hist[i]; } return v / total; }; const mean = (hist, bins, s, e, width) => { let v = 0; for (let i = s; i < e; i += 1) { v += hist[i] * bins[i]; } return v * width; }; const variance = (hist, bins, s, e, mean, width) => { let v = 0; for (let i = s; i < e; i += 1) { const d = bins[i] - mean; v += d * d * hist[i]; } return v * width; }; const cross = (wb, vb, wf, vf) => wb * vb + wf * vf; const otsu = (data) => { const b = bins(data); const h = histo(data, b); const { length: total } = data; const vars = [...Array(b.length)].map((_, i) => { const s0 = 0; const e0 = i; const s1 = i; const e1 = h.length; const w0 = 1 / width(h, s0, e0); const w1 = 1 / width(h, s1, e1); const wb = weight(h, s0, e0, total); const vb = variance(h, b, s0, e0, mean(h, b, s0, e0, w0), w0); const wf = weight(h, s1, e1, total); const vf = variance(h, b, s1, e1, mean(h, b, s1, e1, w1), w1); const x = cross(wb, vb, wf, vf); return !isNaN(x) ? x : Number.POSITIVE_INFINITY; }); return b[vars.indexOf(Math.min(...vars))]; }; -
Calculate the threshold with OTSU. We have to pass the gray histogram to the
otsufunction.function calculateThresholdWithOTSU(){ const image = document.getElementById("imageHidden"); const canvas = document.getElementById("canvasHidden"); const width = image.naturalWidth; const height = image.naturalHeight; const context = canvas.getContext('2d'); canvas.width = width; canvas.height = height; context.drawImage(image, 0, 0); const imageData = context.getImageData(0, 0, canvas.width, canvas.height); const pixels = imageData.data; //[r,g,b,a,...] const grayscaleValues = []; for (var i = 0; i < pixels.length; i += 4) { const red = pixels[i]; const green = pixels[i + 1]; const blue = pixels[i + 2]; const grayscale = RGBToGrayScale(red, green, blue) grayscaleValues.push(grayscale); } document.getElementById("threshold").value = otsu(grayscaleValues); }
Step 4: Convert an Image to Black and White with Dynamic Web TWAIN
Dynamic Web TWAIN is a document scanning SDK making it possible to scan documents in the browser. It provides various image processing methods. We can use its ConvertToBW method to convert an image to black and white.
The advantage of using it is that it can be used to batch process a large volume of images as the processing is done using a native process. The output image file also has a smaller size as native image libraries like libpng are used to optimize the size.
Here are the steps to use it:
-
Include Dynamic Web TWAIN in the page.
<script src="https://unpkg.com/dwt@18.4.2/dist/dynamsoft.webtwain.min.js"></script> -
Initialize an instance of Web TWAIN and use it to convert the images. You can apply for its license here.
let DWObject;
Dynamsoft.DWT.AutoLoad = false;
Dynamsoft.DWT.ProductKey = "LICENSE-KEY";
Dynamsoft.DWT.ResourcesPath = "https://unpkg.com/dwt@18.4.2/dist";

async function convertWithDWT(){
  if (!DWObject) {
    await initDWT();
  }
  DWObject.RemoveAllImages();
  let response = await fetch(document.getElementById("imageHidden").src);
  let buffer = await response.arrayBuffer();
  DWObject.LoadImageFromBinary(buffer,
  function(){
    const convert = async () => {
      const thresholdValue = parseInt(document.getElementById("threshold").value);
      await DWObject.RunCommandAsync({command:"convertToBW",parameter:{index:0,threshold:thresholdValue}});
      document.getElementById("image").src = DWObject.GetImageURL(0);
    }
    convert();
  },
  function(errorCode, errorString){
    console.log(errorString);
  })
}

function initDWT(){
  return new Promise((resolve, reject) => {
    const title = document.querySelector("h2").innerText;
    document.querySelector("h2").innerText = "Loading Dynamic Web TWAIN...";
    Dynamsoft.DWT.CreateDWTObjectEx(
    {
      WebTwainId: 'dwtcontrol'
    },
    function(obj) {
      DWObject = obj;
      document.querySelector("h2").innerText = title;
      resolve();
    },
    function(err) {
      console.log(err);
      document.querySelector("h2").innerText = "Failed to load Dynamic Web TWAIN";
      reject(err);
    }
  );
  })
}

Common Issues and Edge Cases
- Threshold too high or too low produces a mostly-white or mostly-black image. Use OTSU’s method to auto-calculate the optimal threshold. If OTSU yields poor results on images with uneven lighting, consider adaptive (local) thresholding instead of a single global value.
- Canvas
getImageDatafails with a security error. This happens when the image is loaded from a different origin without CORS headers. Serve images from the same domain or ensure the server sendsAccess-Control-Allow-Originheaders, and setimg.crossOrigin = "anonymous"before assigningsrc. - Large images cause slow processing or browser freezes. The per-pixel loop in JavaScript is single-threaded. For images larger than ~4000×4000 pixels, consider using a Web Worker to move the computation off the main thread, or use Dynamic Web TWAIN’s native
ConvertToBWwhich handles large files efficiently.