


How to Build a Document Scanner LWC in Salesforce with Dynamic Web TWAIN
This tutorial creates a Salesforce Lightning Web Component that connects to TWAIN-compatible document scanners through the Dynamic Web TWAIN SDK, giving users scan, edit, and PDF-export capabilities inside Salesforce.
What you’ll build: A Salesforce Lightning Web Component (LWC) that connects to TWAIN-compatible document scanners, lets users scan, edit pages, and saves the output as a PDF — all powered by the Dynamic Web TWAIN SDK.
Key Takeaways
- Dynamic Web TWAIN integrates with Salesforce Lightning Web Components via static resources and a local scanning service.
- Use iframe to bypass LWC restrictions.
Common Developer Questions
How do I use Dynamic Web TWAIN inside a Salesforce Lightning Web Component?
Host the scanning page as a Salesforce Static Resource, load it inside an iframe, and let that page initialize Dynamic Web TWAIN outside the stricter Lightning runtime. The Lightning component can then trigger scan, edit, and PDF-export actions by posting messages into the iframe.
Why do I need an iframe for document scanning in a Salesforce LWC?
An iframe is used here because the Dynamic Web TWAIN page needs more direct access to its local scanning service and related resources than a normal LWC allows by default. Moving the scanner page into a hosted iframe avoids those Lightning runtime restrictions while keeping the feature embedded in Salesforce.
How do I get a scanned PDF back from the iframe into Salesforce?
Convert the scanned pages to PDF inside the iframe page, encode the result as base64 or a data URL, and send it back to the parent component with postMessage. The LWC can then surface that PDF to the user or attach it to the Salesforce workflow.
Prerequisites
- Salesforce CLI installed.
- Visual Studio Code with extensions for Salesforce DX.
- A Salesforce org (Developer Edition or sandbox) with Lightning App Builder access.
- Get a 30-day free trial license for Dynamic Web TWAIN.
You can find the detailed Salesforce DX setup guide here.
Step 1: Create a New Salesforce DX Project
Open Visual Studio Code, open the Command Palette by pressing Ctrl+Shift+P (Windows) or Cmd+Shift+P (macOS) and input SFDX to select the Create Project operation.
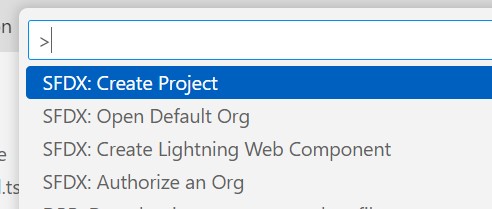
Here, we use the standard option and use webTWAIN as the name.
Then, run SFDX: Create Lightning Web Component to create a component named webTWAIN.
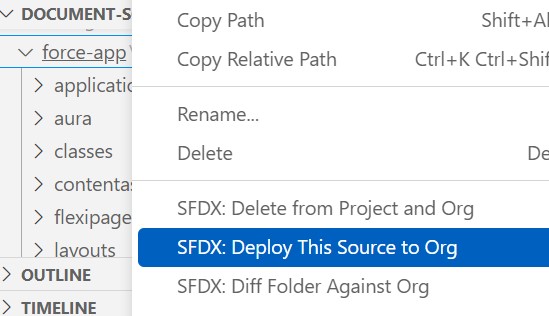
Step 2: Deploy the Component to Salesforce
- Run
SFDX: Authorize an Orgto log in to your Salesforce org. -
Edit
webTWAIN.js-meta.xmlto make the following changes to make it available in lightning app builder.<?xml version="1.0" encoding="UTF-8"?> <LightningComponentBundle xmlns="http://soap.sforce.com/2006/04/metadata"> <apiVersion>59.0</apiVersion> - <isExposed>false</isExposed> + <isExposed>true</isExposed> + <targets> + <target>lightning__AppPage</target> + <target>lightning__RecordPage</target> + <target>lightning__HomePage</target> + </targets> </LightningComponentBundle> -
Deploy the component to the org.
-
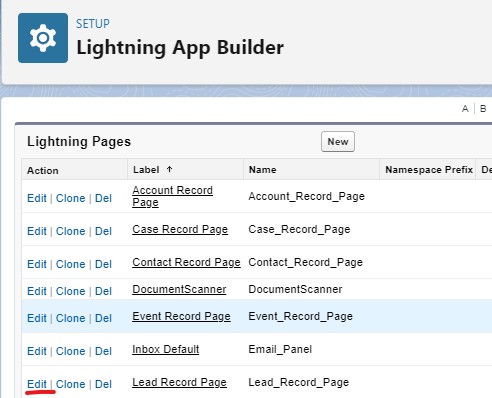
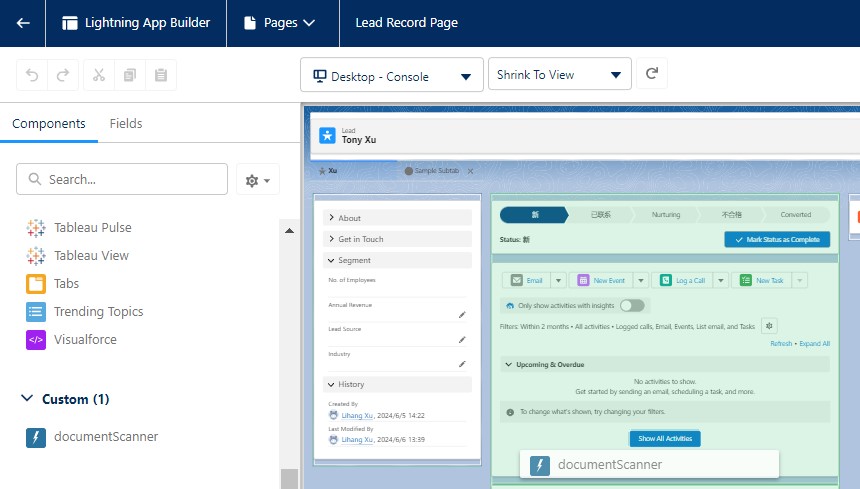
In Salesforce, edit one page and you can add the component to the page to test it.
Step 3: Implement the Document Scanner Component
Next, let’s implement the component. We need to create a static page to perform document scanning and embed it in iframe for the component to use.
The reason we use iframe is that the Dynamic Web TWAIN JavaScript library cannot run under Lightning Web Component by default and we have to add trusted URLs to make it have access to its local document scanning service. Using iframe does not have these problems.
Add Static Resources
-
Create a
scanner.htmlfile underforce-app-dwt\force-app\main\default\staticresourceswith the following content.<html> <head> <title>Hello World</title> <meta name="viewport" content="width=device-width,initial-scale=1.0,maximum-scale=1.0,user-scalable=0" /> <script src="https://cdn.jsdelivr.net/npm/dwt@latest/dist/dynamsoft.webtwain.min.js"></script> <style> #dwtcontrolContainer { position: absolute; left: 0; top: 0; width: 100%; height: 100%; } </style> </head> <body> <div id="dwtcontrolContainer"></div> <script type="text/javascript"> let DWTObject; init(); function init(){ Dynamsoft.DWT.ProductKey = "LICENSE-KEY"; Dynamsoft.DWT.AutoLoad = false; Dynamsoft.DWT.ServiceInstallerLocation = "https://unpkg.com/dwt@latest/dist/dist/"; Dynamsoft.DWT.ResourcesPath = "https://cdn.jsdelivr.net/npm/dwt@latest/dist"; Dynamsoft.DWT.Containers = [{ ContainerId: 'dwtcontrolContainer',Width: 270, Height: 350 }]; Dynamsoft.DWT.RegisterEvent('OnWebTwainReady', function () { DWTObject = Dynamsoft.DWT.GetWebTwain('dwtcontrolContainer'); DWTObject.Viewer.width = "100%"; DWTObject.Viewer.height = "100%"; DWTObject.SetViewMode(2,2); }); Dynamsoft.DWT.Load(); window.addEventListener( "message", async (event) => { console.log("received message in iframe"); console.log(event); if (event.data === "acquire") { AcquireImage(); } else if (event.data === "getPDF") { ConvertToPDFBase64(); } else if (event.data === "showEditor") { ShowImageEditor(); } }, false, ); } function ConvertToPDFBase64(){ const success = (result, indices, type) => { window.parent.postMessage(result); } const error = (error) => { console.log(error); } DWTObject.ConvertToBase64( DWTObject.SelectAllImages(), Dynamsoft.DWT.EnumDWT_ImageType.IT_PDF, success, error ) } function AcquireImage() { if (DWTObject) { DWTObject.SelectSourceAsync().then(function () { return DWTObject.AcquireImageAsync({ IfCloseSourceAfterAcquire: true }); }).catch(function (exp) { alert(exp.message); }); } } function ShowImageEditor(){ const imageEditor = DWTObject.Viewer.createImageEditor(); imageEditor.show(); } </script> </body> </html> -
Create a metadata file named
dwt.resource-meta.xmlin thestaticresourcesfolder with the following content to describe the resource.<?xml version="1.0" encoding="UTF-8"?> <StaticResource xmlns="http://soap.sforce.com/2006/04/metadata"> <cacheControl>Private</cacheControl> <contentType>application/zip</contentType> </StaticResource>
Create a Document Scanning Lightning Web Component
Now, go to the lightning web component we created.
-
Add elements in the HTML file.
<template> <lightning-card title="Web TWAIN"> <lightning-button label="Scan" onclick={scan} ></lightning-button> <lightning-button label="Show Editor" onclick={showEditor} ></lightning-button> <lightning-button label="Merge into PDF" onclick={merge} ></lightning-button> <div> <label> PDF dataURL: <a target="_blank" href={dataURL}>{dataURLLabel}</a> </label> </div> <div class="viewer" id="viewer" style="height:500px;width:400px;"></div> </lightning-card> </template> -
When the component is mounted, append the iframe. Also, add events for the buttons.
import { LightningElement } from 'lwc'; import dwt from '@salesforce/resourceUrl/dwt'; export default class WebTWAIN extends LightningElement { dwtInitialized = false; dwtFrame; dataURL = ""; get dataURLLabel() { if (this.dataURL) { if (this.dataURL.length > 15) { return this.dataURL.substring(0,10) + "..."; }else{ return this.dataURL; } }else{ return ""; } } renderedCallback() { if (this.dwtInitialized) { return; } this.dwtInitialized = true; this.dwtFrame = document.createElement('iframe'); this.dwtFrame.src = dwt + "/scanner.html"; // div tag in which iframe will be added should have id attribute with value myDIV this.template.querySelector("div.viewer").appendChild(this.dwtFrame); // provide height and width to it this.dwtFrame.setAttribute("style","height:100%;width:100%;"); this.dwtFrame.setAttribute("allow","local-network-access *"); } scan(){ this.dwtFrame.contentWindow.postMessage("acquire"); } merge(){ this.dwtFrame.contentWindow.postMessage("getPDF"); } showEditor(){ this.dwtFrame.contentWindow.postMessage("showEditor"); } } -
Receive the scanned PDF result which is encoded as base64.
window.addEventListener(
  "message",
  (event) => {
    console.log(event);
    this.dataURL = "data:application/pdf;base64,"+event.data._content;
  },
  false,
);
All right, we’ve now completed the component.
Source Code
Get the complete sample project source code on GitHub
References
- https://developer.salesforce.com/docs/component-library/overview/components
- https://developer.salesforce.com/docs/platform/lwc/guide/reference-lightning-ui-api-record.html
- https://trailhead.salesforce.com/content/learn/projects/quick-start-lightning-web-components/create-a-hello-world-lightning-web-component
- Salesforce CRM Administration Handbook
- Ultimate Salesforce LWC Developers’ Handbook