


How to Integrate Document Scanning into a FileMaker Pro Custom App with JavaScript
FileMaker is a cross-platform relational database application. It integrates a database engine with a graphical user interface (GUI) and security features, allowing users to modify a database by dragging new elements into layouts, screens, or forms.1 It has become a low-code tool to build apps for businesses.
There are some new features in FileMaker Pro 19 and one of them is the ability to call JavaScript functions in a web viewer using a FileMaker script and to perform a FileMaker script from within the web viewer code as simply as any other JavaScript function:
FileMaker.PerformScript("Script Name", "Optional Script Parameter");
In this article, we are going to add a document scanning function in a FileMaker custom app using Dynamic Web TWAIN. Dynamic Web TWAIN is a document scanning solution which makes it possible to scan documents in browsers. It can also work in the web viewer of FileMaker.
What you’ll build: A FileMaker Pro 19 custom app that scans physical documents directly from a TWAIN-compatible scanner using Dynamic Web TWAIN in the web viewer, then inserts the scanned image into a FileMaker database record.
Key Takeaways
- FileMaker Pro 19’s web viewer can run Dynamic Web TWAIN to scan documents from TWAIN-compatible scanners using JavaScript.
- The
FileMaker.PerformScript()bridge lets JavaScript in the web viewer trigger FileMaker scripts, enabling scanned images to be saved directly into database fields. - Dynamic Web TWAIN handles cross-platform path differences (Windows vs. macOS) for saving scanned images to disk.
- This approach turns FileMaker into a document management solution without requiring native plugins or external scanning applications.
Common Developer Questions
How do I integrate document scanning into a FileMaker Pro custom app?
Build a simple web scanning page with Dynamic Web TWAIN, serve it locally, and load it inside FileMaker’s web viewer. FileMaker Pro 19 can then use the same JavaScript scanning workflow as a browser page while still interacting with the database app.
Can I use a TWAIN scanner inside a FileMaker web viewer with JavaScript?
Yes. The web viewer can run Dynamic Web TWAIN and call the same TWAIN scan APIs used in a normal browser-based document app, as long as the local scanning service and scanner driver are available on the host machine.
How do I pass a scanned image file path from JavaScript back to a FileMaker script?
Save the current page to disk, then call FileMaker.PerformScript() and pass the saved image path as the script parameter. On the FileMaker side, the receiving script reads that parameter and inserts the scanned image into the target database field.
Prerequisites
- FileMaker Pro 19 or later installed
- A TWAIN-compatible document scanner connected to your machine
- A local HTTP server to serve the scanning web page
- Get a 30-day free trial license for Dynamic Web TWAIN
Step 1: Build a Document Scanning Web App with Dynamic Web TWAIN
Let’s write a simple document scanning web app first. The app can be served using an HTTP server and accessed in the web viewer of FileMaker.
-
Create a new HTML file with the basic template:
<!DOCTYPE html> <html> <head> <title>FileMaker Example</title> <style></style> </head> <body> <div class="app"> </div> <script type="text/javascript"> </script> </body> </html> -
Include the library of Dynamic Web TWAIN via a CDN in the head.
<script src="https://unpkg.com/dwt@18.0.0/dist/dynamsoft.webtwain.min.js"></script> -
Add a scan button and a container for the controls of Dynamic Web TWAIN.
<div class="app">
  <input class="scanButton" type="button" value="Scan"/>
  <div id="dwtcontrolContainer"></div>
</div>
The style:
.app { position: absolute; top: 0; left: 0; height: 100%; width: 100%; } .scanButton { height: 25px; } #dwtcontrolContainer { width: 100%; height: calc(100% - 25px); } -
Initialize an instance of Dynamic Web TWAIN. You may need to apply for a license to use it.
let DWObject; Dynamsoft.DWT.AutoLoad = true; Dynamsoft.DWT.ResourcesPath = "https://unpkg.com/dwt@18.0.0/dist"; //Dynamsoft.DWT.ProductKey = <you license key>; initDWT(); function initDWT(){ Dynamsoft.DWT.Containers = [{ ContainerId: 'dwtcontrolContainer',Width: 270, Height: 350 }]; Dynamsoft.DWT.RegisterEvent('OnWebTwainReady', function () { DWObject = Dynamsoft.DWT.GetWebTwain('dwtcontrolContainer'); DWObject.Viewer.width = "100%"; DWObject.Viewer.height = "100%"; DWObject.SetViewMode(1,1); }); Dynamsoft.DWT.Load(); } -
Set the
onclickevent for the scan button. When the user clicks the button, it will show a UI for the user to select the scanner and configure the scan settings to scan documents.HTML:
<input class="scanButton" type="button" value="Scan" onclick="AcquireImage();" />JavaScript:
function AcquireImage() {
  if (DWObject) {
    DWObject.SelectSource(function () {
      DWObject.OpenSource();
      DWObject.AcquireImage();
    },
      function () {
        console.log("SelectSource failed!");
      }
    );
  }
}
We can then start an HTTP server and access it at http://127.0.0.1:8000/scanner.html.

Step 2: Set Up a FileMaker Custom App with a Web Viewer
Open FileMaker and create a new FileMaker custom app using the inventory starter.
-
Simplify the database to a
Documentstable with two fields:NameandImage.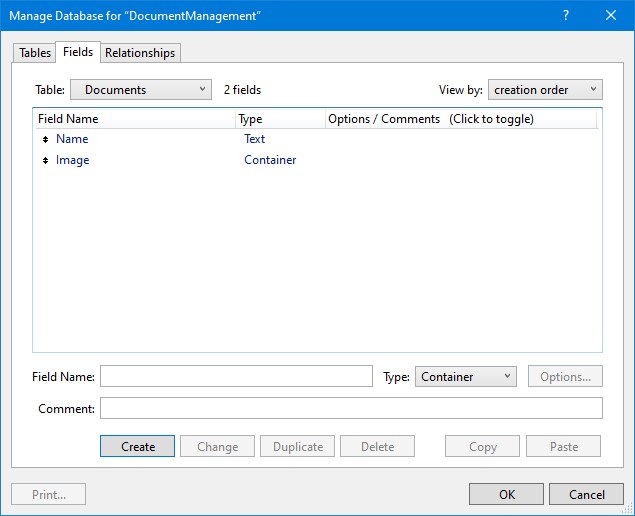
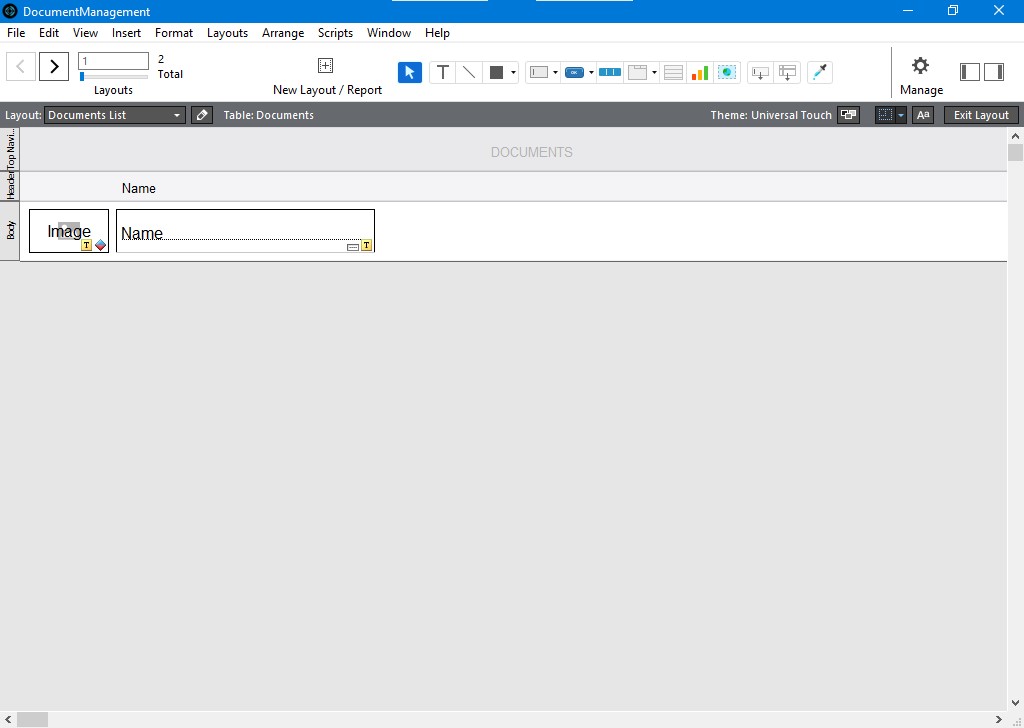
-
Simplify the list view layout and the form view layout to fit the database. Add a web viewer in the form view layout with its URL set to the web page we just made.

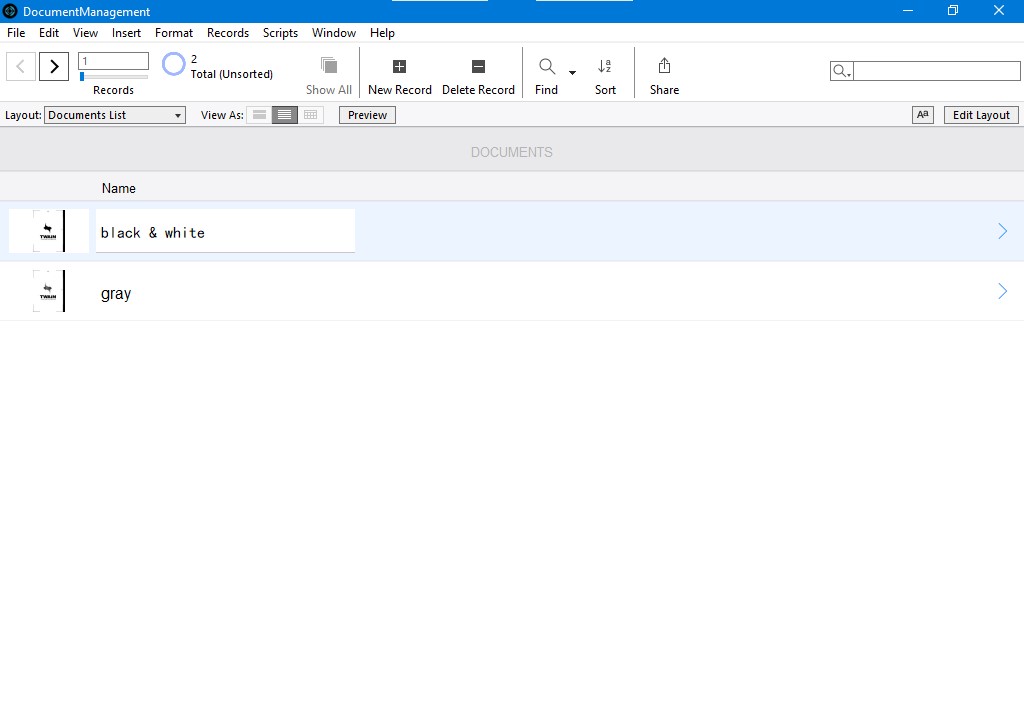
Now, we can open the web document scanner in the web viewer of FileMaker.
Next, we are going to add some scripts and modify the web app so that we can set the image field using the document scanned.
Step 3: Create FileMaker Scripts to Insert a Scanned Image
- Add a new script named
SetDocumentImage. -
Add a step to get the image file’s path from the script parameter.
Set Variable [ $path; Value:Get ( ScriptParameter ) ] -
Go to the
Documentstable’sImagefield.Go to Field [ Documents::Image ] -
Insert the picture with its path.
Insert Picture [ “$path” ] -
We can create another script named
TestSetDocumentImageto test it.Perform Script [ “SetDocumentImage”; Parameter: "imagewin:/c:/Users/admin/Pictures/Image.png" ]
Step 4: Save Scanned Documents and Trigger FileMaker Scripts from JavaScript
Next, add a set image button to save the selected document as an image file and call the FileMaker script we just made to set the image field.
-
Added HTML:
<input class="setButton" type="button" value="Set Image" onclick="SetImage();" /> -
The
SetImagefunction:function SetImage(){ if (DWObject && DWObject.HowManyImagesInBuffer > 0) { DWObject.RegisterEvent("OnGetFilePath", function (isSave, filesCount, index, directory, fileName) { var path = getFullPath(directory,fileName); DWObject.IfShowFileDialog = false; //If the current image is B&W //1 is B&W, 8 is Gray, 24 is RGB if (DWObject.GetImageBitDepth(DWObject.CurrentImageIndexInBuffer) == 1) { //If so, convert the image to Gray DWObject.ConvertToGrayScale(DWObject.CurrentImageIndexInBuffer); } DWObject.SaveAsJPEG(path, DWObject.CurrentImageIndexInBuffer, function() { if (FileMaker) { var fileMakerPath = getFileMakerPath(path); FileMaker.PerformScript("SetDocumentImage", fileMakerPath); } }, function(errCode, errString) { console.log(errString); } ); } ); //Show a file dialog for the user to choose where to save the image file DWObject.ShowFileDialog( true, "", 0, "jpg", "", false, false, 0 ); } } -
The helper function to join the directory and filename to a full absolute path:
function getFullPath(directory,fileName){ if (Dynamsoft.Lib.env.bMac) { return directory + "/" + fileName; }else{ return directory + "\\" + fileName; } } -
The helper function to convert the full path to FileMaker’s format:
function getFileMakerPath(path){
  if (Dynamsoft.Lib.env.bMac) {
    return "imagemac:/"+path;
  }else{
    return "imagewin:/"+path.replaceAll("\\","/");
  }
}
All right, we can now scan documents in a FileMaker app. We can use it in a document management solution.

Common Issues and Edge Cases
- Black-and-white scans fail to save as JPEG: JPEG does not support 1-bit (B&W) images. The code above handles this by converting B&W scans to grayscale with
ConvertToGrayScale()before saving. If you skip this step,SaveAsJPEGwill fail silently or produce a corrupt file. - File path format mismatch between platforms: Windows and macOS use different path separators (
\vs/) and different FileMaker image path prefixes (imagewin:/vsimagemac:/). Always use thegetFileMakerPath()helper to normalize paths before passing them toFileMaker.PerformScript(). - Web viewer does not load the scanning page: Ensure your HTTP server is running and the web viewer URL points to
http://127.0.0.1:<port>/scanner.html. FileMaker’s web viewer may blockfile://URLs for security reasons.
Frequently Asked Questions
How do I integrate TWAIN document scanning into FileMaker Pro?
Use FileMaker Pro 19’s web viewer to load a web page powered by Dynamic Web TWAIN. The JavaScript SDK connects to any TWAIN-compatible scanner and provides a scan UI inside FileMaker. After scanning, call FileMaker.PerformScript() to pass the saved image path back to a FileMaker script.
Does this approach work on both Windows and macOS?
Yes. Dynamic Web TWAIN supports both platforms. The code includes platform detection via Dynamsoft.Lib.env.bMac to handle path separator differences and FileMaker’s platform-specific image path prefixes (imagewin:/ vs imagemac:/).
Can I scan multi-page documents into FileMaker?
Yes. Dynamic Web TWAIN buffers all scanned pages. You can iterate through DWObject.HowManyImagesInBuffer to save and insert each page as a separate record, or save all pages as a multi-page PDF using SaveAllAsPDF().
Source Code
Get the complete sample project source code on GitHub