


How to Build a Document Scanner in a Flutter Windows Desktop App with Dynamic Web TWAIN
Previously, I created a flutter_web_twain to assist developers in building web-based document scanning applications with Flutter and Dynamic Web TWAIN. In this article, I will demonstrate how to integrate Dynamic Web TWAIN into a Flutter Windows desktop application using Flutter Windows webview plugin.
What you’ll build: A Flutter Windows desktop application that connects to physical TWAIN/eSCL scanners, displays scanned pages in-app, and exports them as a PDF — powered by Dynamic Web TWAIN running inside an embedded webview.
Key Takeaways
- Flutter Windows desktop apps can integrate TWAIN-based document scanning by embedding Dynamic Web TWAIN inside a webview via the
webview_windowsplugin. - The
window.chrome.webview.postMessage()API bridges JavaScript scanner logic and the Dart/Flutter UI, enabling bidirectional communication. - Dynamic Web TWAIN Service must be installed separately on Windows before the SDK can communicate with physical scanners.
- This approach supports scanner selection, image viewing, selective removal, and batch PDF export in a native desktop window.
Common Developer Questions
How do I scan documents from a physical scanner in a Flutter Windows desktop app?
Load index.html into webview_windows, initialize Dynamic Web TWAIN in JavaScript, and call GetDevicesAsync() to populate scanner names. In Flutter, send an acquire message with the selected source index, then run SelectDeviceAsync(), OpenSourceAsync(), and AcquireImageAsync() in the page script.
Can Dynamic Web TWAIN run inside a Flutter webview on Windows?
Yes. The article hosts Dynamic Web TWAIN inside the embedded webview and uses it just like a browser page, while the Flutter shell provides the desktop UI and state management around it.
How do I send messages between JavaScript and Flutter in a webview_windows plugin?
Send data to Flutter with window.chrome.webview.postMessage() and listen in Dart with controller.webMessage.listen. Send commands back with postWebMessage using event names like acquire, load, removeSelected, removeAll, and download.
Prerequisites
Before starting, make sure you have:
- Flutter SDK installed with Windows desktop support enabled (
flutter config --enable-windows-desktop) - Node.js and npm installed (for downloading the Dynamic Web TWAIN SDK)
- A 30-day free trial license for Dynamic Web TWAIN
Step 1: Set Up the Flutter Project
- Create a new Flutter desktop application project
flutter create web_twain_desktop - Install the Flutter
webview_windowsplugin.cd web_twain_desktop flutter pub add webview_windows - Create an
assetsfolder under thelibfolder and download Dynamic Web TWAIN SDK to theassetsfolder via npm.cd lib/assets npm install dwt node_modules: ├── dwt │ ├── dist - Configure the assets in
pubspec.yamlfile.assets: - lib/assets/ - lib/assets/node_modules/ - lib/assets/node_modules/dwt/ - lib/assets/node_modules/dwt/dist/ - lib/assets/node_modules/dwt/dist/addon/ - lib/assets/node_modules/dwt/dist/dist/ - lib/assets/node_modules/dwt/dist/src/ - lib/assets/node_modules/dwt/dist/types/Note: Since only files directly located in the directory are included, we must add all subdirectories under the dwt folder to the assets list to ensure that all resource files are packaged. If some resource files are missing, Dynamic Web TWAIN may not function properly.
Step 2: Configure Dynamic Web TWAIN
- Dynamic Web TWAIN consists of Dynamic Web TWAIN Service and JavaScript libraries. The Dynamic Web TWAIN Service is responsible for managing the communication between the JavaScript SDK and the scanner. Thus, the first step is to install
node_modules/dwt/dist/dist/DynamsoftServiceSetup.msion Windows. - Create an
index.htmlfile under the assets folder. - Include the
dynamsoft.webtwain.min.jsfile in theindex.htmlfile.<script src="node_modules/dwt/dist/dynamsoft.webtwain.min.js"></script> - Apply for a license key to enable the SDK.
Dynamsoft.DWT.ProductKey = "LICENSE-KEY"; - Specify the resource path for the SDK.
Dynamsoft.DWT.ResourcesPath = "node_modules/dwt/dist/"; -
Initialize the SDK with an HTML div element:
 <style>
     .container {
         position: absolute;
         top: 10%;
         left: 10;
     }
 </style>
 <div id="document-container" class="container"></div>
 <script>
 var dwtObject = null;
     Dynamsoft.DWT.CreateDWTObjectEx({ "WebTwainId": "container" }, (obj) => {
         dwtObject = obj;

         dwtObject.Viewer.bind(document.getElementById("document-container"));
         dwtObject.Viewer.width = 640;
         dwtObject.Viewer.height = 640;
         dwtObject.Viewer.show();
         onReady();
     }, (errorString) => {
         console.log(errorString);
     });

     function onReady() {
         if (dwtObject != null) {

             dwtObject.IfShowUI = false;

             dwtObject.GetDevicesAsync(Dynamsoft.DWT.EnumDWT_DeviceType.TWAINSCANNER | Dynamsoft.DWT.EnumDWT_DeviceType.ESCLSCANNER).then((sources) => {
                 sourceList = sources;

                 for (let i = 0; i < sources.length; i++) {
                     sourceNames.push(sources[i].displayName);
                 }

                 if (sources.length > 0) {
                     if (window.chrome.webview != "undefined") {
                         var param = {
                             "event": "sourceNames",
                             "data": sourceNames
                         }
                         window.chrome.webview.postMessage(param);
                     }
                 }
             });
         }
     }
 </script>
The
window.chrome.webview.postMessage()method is used to send messages from JavaScript to Flutter. We will use this method to send the list of available scanners to Flutter. - Add event listener to handle method calls from Flutter.
if (window.chrome.webview != "undefined") { window.chrome.webview.addEventListener('message', function (event) { let data = JSON.parse(JSON.stringify(event.data)); if (data.event === "acquire") { acquireImage(data.index); } else if (data.event === "load") { openImage(); } else if (data.event === "removeAll") { removeAll(); } else if (data.event === "removeSelected") { removeSelected(); } else if (data.event === "download") { downloadDocument(); } }); } -
Implement the methods in JavaScript:
 function removeAll() {
     if (!dwtObject || dwtObject.HowManyImagesInBuffer == 0)
         return;

     dwtObject.RemoveAllImages();
 }

 function removeSelected() {
     if (!dwtObject || dwtObject.HowManyImagesInBuffer == 0)
         return;

     dwtObject.RemoveImage(dwtObject.CurrentImageIndexInBuffer);
 }

 function openImage() {
     if (!dwtObject)
         return;
     dwtObject.Addon.PDF.SetConvertMode(Dynamsoft.DWT.EnumDWT_ConvertMode.CM_RENDERALL);
     let ret = dwtObject.LoadImageEx("", Dynamsoft.DWT.EnumDWT_ImageType.IT_ALL);
 }

 function acquireImage(index) {
     if (!dwtObject)
         return;

     if (sourceList.length > 0) {
         dwtObject.SelectDeviceAsync(sourceList[index]).then(() => {
             return dwtObject.OpenSourceAsync()
         }).then(() => {
             return dwtObject.AcquireImageAsync({
             })
         }).then(() => {
             if (dwtObject) {
                 dwtObject.CloseSource();
             }
         }).catch(
             (e) => {
                 console.error(e)
             }
         )
     }
 }

 function downloadDocument() {
     if (dwtObject) {
         dwtObject.SaveAllAsPDF("DynamicWebTWAIN.pdf");
     }
 }
Step 3: Build the Flutter UI for Document Scanning
Let’s go to lib/main.dart to implement the Flutter logic.
- Initialize the
WebviewController:final List<String> _sourceNames = []; String _selectedItem = ''; final _controller = WebviewController(); @override void initState() { super.initState(); initPlatformState(); } Future<void> initPlatformState() async { await _controller.initialize(); } - Find the path of the
index.htmlfile and load it into theWebviewController:final assetsDirectory = join(dirname(Platform.resolvedExecutable), 'data', 'flutter_assets', "lib/assets/index.html"); await _controller.loadUrl(Uri.file(assetsDirectory).toString()); - Add event listener to handle messages from JavaScript:
 _controller.webMessage.listen((event) {
     if (event['event'] == null) return;

     if (event['event'] == 'sourceNames') {
     _sourceNames.clear();
     for (var item in event['data']) {
         _sourceNames.add(item.toString());
     }

     if (_sourceNames.isNotEmpty) {
         setState(() {
         _selectedItem = _sourceNames[0];
         });
     }
     }
 });
Here we get the physical scanner names from JavaScript and store them in the
_sourceNameslist. We also set the first item in the list as the default selected item. -
Use
Stacklayout to show the web view:Stack( children: [ Webview( _controller, ), Positioned( top: 10, left: 10, child: Row())] ) - Add a
DropdownButtonto select the physical scanner inRow:DropdownButton<String>( value: _selectedItem, items: _sourceNames .map<DropdownMenuItem<String>>((String value) { return DropdownMenuItem<String>( value: value, child: Text(value), ); }).toList(), onChanged: (String? newValue) { if (newValue == null || newValue == '') return; setState(() { _selectedItem = newValue; }); }, ), -
Add five
ElevatedButtons for scanning a document, loading images, removing a selected image, removing all images, and saving all acquired images to a PDF file.ElevatedButton( onPressed: () async { await _controller.postWebMessage(json.encode({ "event": "acquire", "index": _sourceNames.indexOf(_selectedItem) })); }, child: const Text("Scan Documents")), const SizedBox( width: 10, height: 10, ), ElevatedButton( onPressed: () async { await _controller .postWebMessage(json.encode({"event": "load"})); }, child: const Text("Load Documents")), const SizedBox( width: 10, height: 10, ), ElevatedButton( onPressed: () async { await _controller.postWebMessage( json.encode({"event": "removeSelected"})); }, child: const Text("Remove Selected")), const SizedBox( height: 10, width: 10, ), ElevatedButton( onPressed: () async { await _controller.postWebMessage( json.encode({"event": "removeAll"})); }, child: const Text("Remove All")), const SizedBox( width: 10, height: 10, ), ElevatedButton( onPressed: () async { await _controller .postWebMessage(json.encode({"event": "download"})); }, child: const Text("Download Documents")) - Run the Flutter Windows desktop app to scan documents from a physical scanner:
flutter run -d windows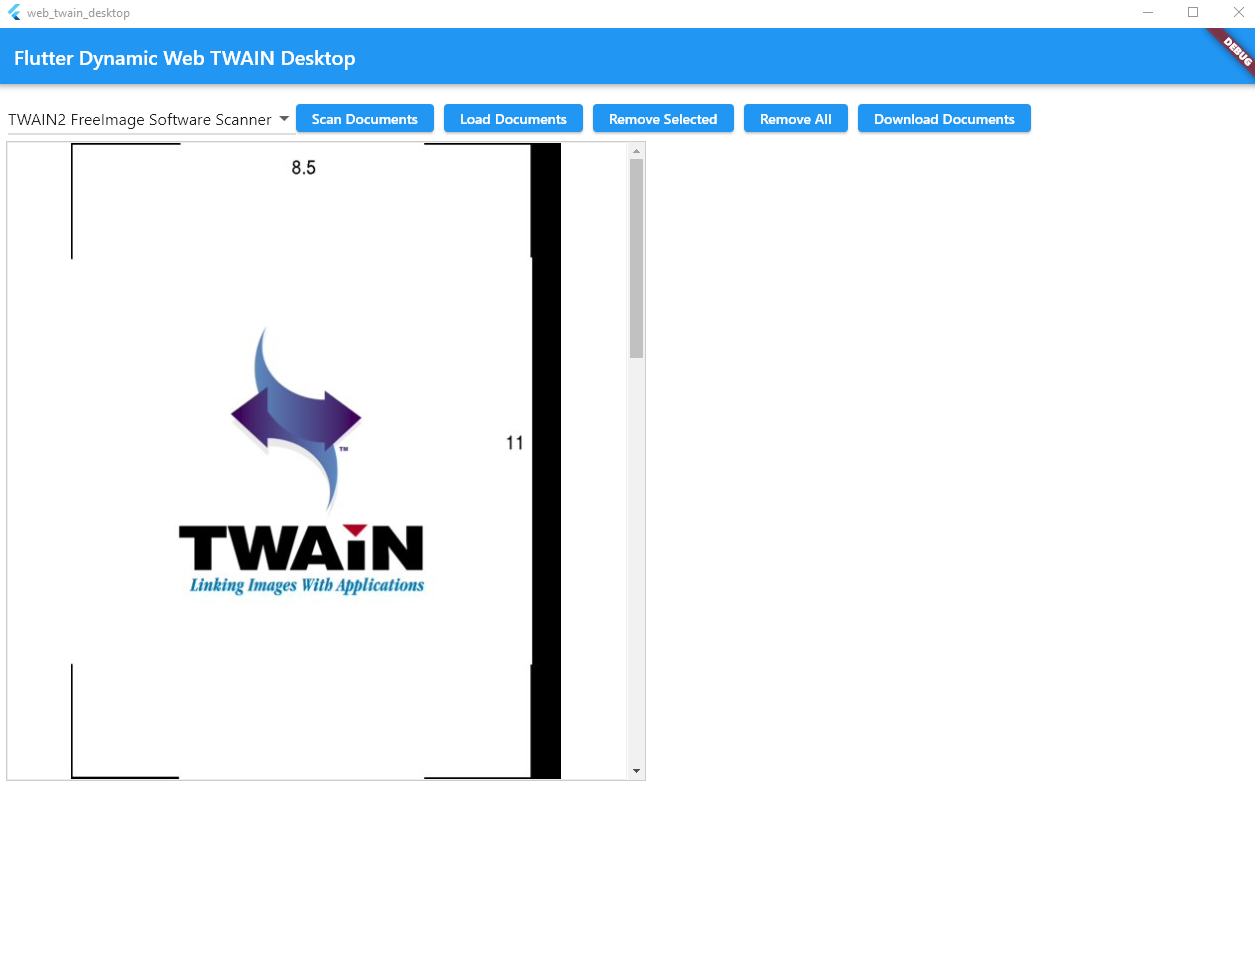
Common Issues and Edge Cases
- Dynamic Web TWAIN Service not detected: If the SDK cannot find any scanners, verify that
DynamsoftServiceSetup.msihas been installed and the Dynamsoft Service is running in the Windows system tray. Restart the service if needed. - Assets not loading in the webview: Flutter only bundles files directly inside declared asset directories. If you add new subdirectories under
dwt/dist/, you must list every subdirectory explicitly inpubspec.yaml— otherwise the webview will fail to load the SDK resources. postMessagenot received by Flutter: Ensure you are checking forwindow.chrome.webviewavailability before callingpostMessage. If the webview is not fully initialized when your JavaScript runs, messages will be silently dropped. Wrap the call in a readiness check or a short delay.