How to Build a Web Document Scanner using the ImageCapture API
The MediaStream ImageCapture API is an API for capturing images or videos from a photographic device. We can use it to enable the capabilities of the native device like turning on the torch and taking a high-resolution photo. It is supported on Chrome Android. You can check the compatibility here.
Using the ImageCapture API is easy, we can create a new ImageCapture object from the video track we get using getUserMedia. Then, we can use it to control the native camera features and take a high-resolution photo.
let imageCapture;
navigator.mediaDevices.getUserMedia(constraints).then(function(stream) {
        if ("ImageCapture" in window) {
          console.log("ImageCapture supported");
          const track = stream.getVideoTracks()[0];
          imageCapture = new ImageCapture(track);
          let blob = await imageCapture.takePhoto();
        }else{
          console.log("ImageCapture not supported");
        }
      }).catch(function(err) {
        console.error('getUserMediaError', err, err.stack);
      });
Dynamsoft Document Normalizer is an SDK to detect the borders of a document and get a normalized image.
In this article, we are going to use getUserMedia along with the ImageCapture API to build a web document scanner with Dynamsoft Document Normalizer.
Demo video of the final result:
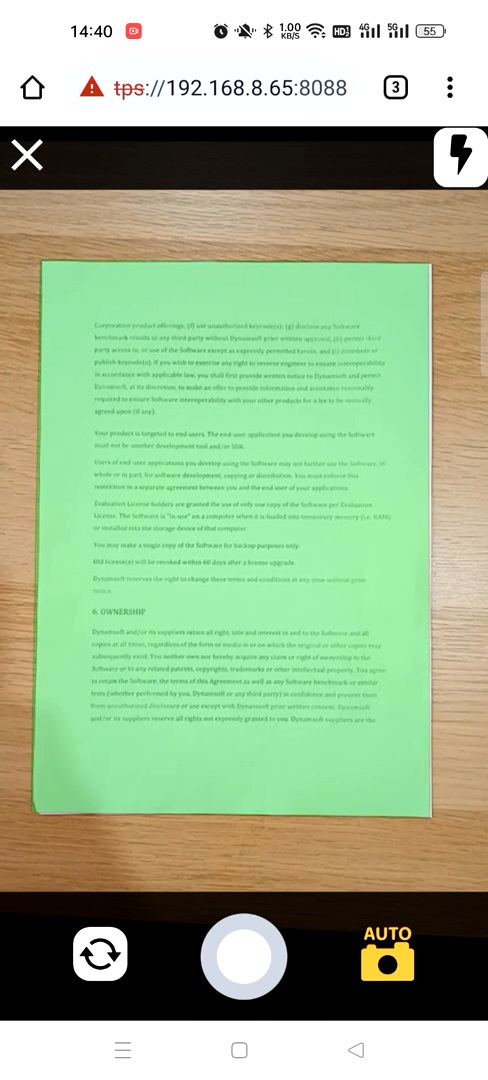
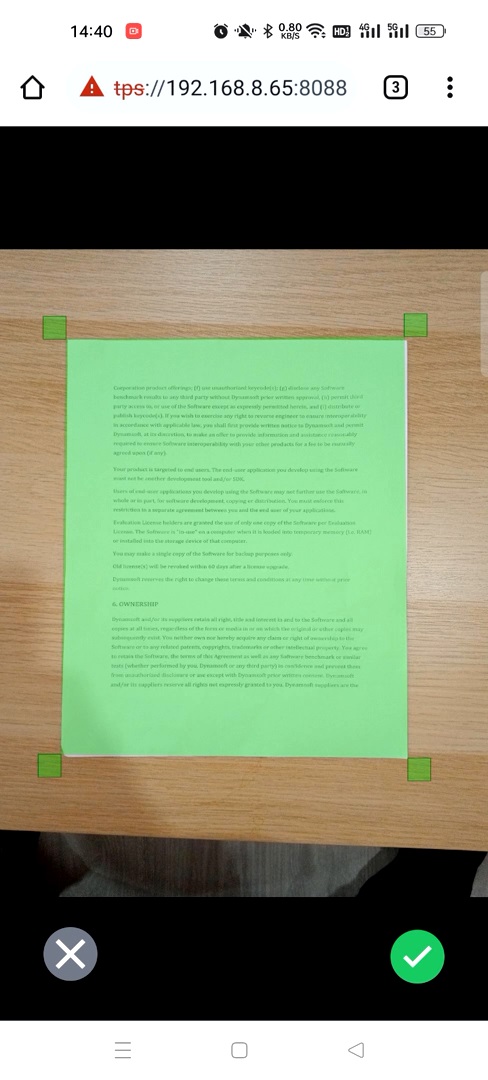
We are going to create a single-page application to scan documents. The app will have 4 pages as shown in the video: the home page, the scanner page, the cropper page and the result viewer page.
Build a Web Document Scanner using ImageCapture
Create a new HTML file with the following basic content:
<!DOCTYPE html>
<html lang="en">
<head>
  <meta charset="UTF-8">
  <meta name="viewport" content="width=device-width, initial-scale=1.0">
  <title>Document Scanner</title>
</head>
<body>
  <div class="home"></div>
  <div class="scanner"  style="display:none;"></div>
  <div class="cropper"  style="display:none;"></div>
  <div class="resultViewer"  style="display:none;"></div>
</body>
</html>
Then, we are going to implement the pages in steps.
Home Page
On the home page, we create a camera selection item, a resolution selection item and a button to start the scanner page for scanning.
HTML:
<div class="home">
  <h2>Document Scanner Demo</h2>
  Camera:
  <select class="cameraSelect"></select>
  <br/>
  Desired Resolution:
  <select class="resolutionSelect">
    <option value="1280x720">1280x720</option>
    <option value="1920x1080">1920x1080</option>
    <option value="3840x2160">3840x2160</option>
  </select>
  <br/>
  <button class="startCameraBtn">Start Camera</button>
  <div class="results"></div>
</div>
JavaScript:
-
Load the camera list using the getUserMedia API after the page is loaded.
let cameraDevices = []; window.onload = async function() { await loadCameraDevices(); loadCameraDevicesToSelect(); } async function loadCameraDevices(){ const constraints = {video: true, audio: false}; const stream = await navigator.mediaDevices.getUserMedia(constraints); const devices = await navigator.mediaDevices.enumerateDevices(); for (let i=0;i<devices.length;i++){ let device = devices[i]; if (device.kind == 'videoinput'){ // filter out audio devices cameraDevices.push(device); } } const tracks = stream.getTracks(); // stop the camera to avoid the NotReadableError for (let i=0;i<tracks.length;i++) { const track = tracks[i]; track.stop(); } } function loadCameraDevicesToSelect(){ for (let i=0;i<cameraDevices.length;i++){ let device = cameraDevices[i]; cameraSelect.appendChild(new Option(device.label,device.deviceId)) } } -
Switch to the scanner page and start the camera if the
start camerabutton is pressed.document.getElementsByClassName("startCameraBtn")[0].addEventListener('click', (event) => { console.log("start camera"); switchPage(1); startSelectedCamera(); }); function switchPage(index) { currentPageIndex = index; let home = document.getElementsByClassName("home")[0]; let scanner = document.getElementsByClassName("scanner")[0]; let cropper = document.getElementsByClassName("cropper")[0]; let resultviewer = document.getElementsByClassName("resultViewer")[0]; let pages = [home, scanner, cropper, resultviewer]; console.log(pages); for (let i = 0; i < pages.length; i++) { console.log(i); const page = pages[i]; if (i === index) { page.style.display = ""; } else { page.style.display = "none"; } } } function startSelectedCamera(){ let options = {}; if (cameraSelect.selectedIndex != -1) { options.deviceId = cameraSelect.selectedOptions[0].value; } if (resolutionSelect.selectedIndex != -1) { let width = parseInt(resolutionSelect.selectedOptions[0].value.split("x")[0]); let height = parseInt(resolutionSelect.selectedOptions[0].value.split("x")[1]); let res = {width:width,height:height}; options.desiredResolution = res; } play(options); //start the camera. The implementation is in the scanner page's part. }
Scanner Page
On the scanner page, we open the camera and use Dynamsoft Document Normalizer to detect documents.

HTML:
<div class="scanner full" style="display:none;">
  <div class="scannerContent">
    <video class="camera full" muted autoplay="autoplay" playsinline="playsinline" webkit-playsinline></video>
    <canvas class="hiddenCVSForFrame" style="display:none"></canvas>
    <canvas class="hiddenCVS" style="display:none"></canvas>
    <svg class="overlay full" version="1.1" xmlns="http://www.w3.org/2000/svg">
    </svg>
  </div>
  <div class="scannerHeader toolbar" style="justify-content: space-between;">
    <div class="closeButton">
      <img class="icon" src="assets/cross.svg" alt="close"/>
    </div>
    <div class="flashButton">
      <img class="icon" src="assets/flash.svg" alt="flash"/>
    </div>
  </div>
  <div class="scannerFooter">
    <div class="switchButton">
      <img class="icon" src="assets/switch.svg" alt="switch"/>
    </div>
    <div class="shutter">
      <div class="shutterButton"></div>
    </div>
    <div class="autoCaptureButton">
      <img class="icon" src="assets/auto-photo.svg" alt="auto"/>
    </div>
  </div>
</div>
We’ll talk about the JavaScript code in detail.
Start the Camera using getUserMedia
Start the camera with the desired camera and the desired resolution using getUserMedia. Meanwhile, check if torch control and ImageCapture are supported.
let imageCapture;
let localStream;
function play(options) {
  return new Promise(function (resolve, reject) {
    stop(); // stop before play
    let constraints = {};

    if (options.deviceId){
      constraints = {
        video: {deviceId: options.deviceId},
        audio: false
      }
    }else{
      constraints = {
        video: {width:1280, height:720,facingMode: { exact: "environment" }},
        audio: false
      }
    }

    if (options.desiredResolution) {
      constraints["video"]["width"] = options.desiredResolution.width;
      constraints["video"]["height"] = options.desiredResolution.height;
    }
    navigator.mediaDevices.getUserMedia(constraints).then(function(stream) {
      localStream = stream;
      // Attach local stream to video element

      video.srcObject = stream;

      if (localStream.getVideoTracks()[0].getCapabilities().torch === true) {
        console.log("torch supported");
        document.getElementsByClassName("flashButton")[0].style.display = "";
      }else{
        document.getElementsByClassName("flashButton")[0].style.display = "none";
      }

      if ("ImageCapture" in window) {
        console.log("ImageCapture supported");
        const track = localStream.getVideoTracks()[0];
        imageCapture = new ImageCapture(track);
      }else{
        console.log("ImageCapture not supported");
      }
      resolve(true);
    }).catch(function(err) {
      console.error('getUserMediaError', err, err.stack);
      reject(err);
    });
  });

}

function stop() {
  try{
    if (localStream){
      const tracks = localStream.getTracks();
      for (let i=0;i<tracks.length;i++) {
        const track = tracks[i];
        track.stop();
      }
    }
  } catch (e){
    alert(e.message);
  }
};
Use Dynamsoft Document Normalizer to Detect Documents
-
Add Dynamsoft Document Normalizer to the page by adding the following to the
head.<script src="https://cdn.jsdelivr.net/npm/dynamsoft-document-normalizer@1.0.11/dist/ddn.js"></script> -
Initialize Dynamsoft Document Normalizer (DDN) after the page is loaded. You can apply for a 30-day license here.
let ddn; window.onload = function() { initDDN(); } async function initDDN(){ Dynamsoft.DDN.DocumentNormalizer.license = "LICENSE-KEY"; // one-day public trial ddn = await Dynamsoft.DDN.DocumentNormalizer.createInstance(); } -
Add a
loadeddataevent listener for the video element which is triggered every time the camera is opened. In the listener, callstartDetecting. Here, we use an interval to keep capturing the frame from the video using a canvas and then passing the canvas to Dynamsoft Document Normalizer to detect documents. The frame will be scaled down if it is too large (like 3840x2160) to improve performance.let detecting; const video = document.querySelector('video'); video.addEventListener('loadeddata', (event) => { console.log("video started"); startDetecting(); }); function startDetecting(){ detecting = false; previousResults = []; interval = setInterval(detect,300); } function stopDetecting(){ previousResults = []; clearInterval(interval); } async function detect() { if (detecting === true) { return; } detecting = true; let cvs = document.getElementsByClassName("hiddenCVSForFrame")[0]; let scaleDownRatio = captureFrame(cvs,true); const quads = await ddn.detectQuad(cvs); detecting = false; console.log(quads); } function captureFrame(canvas,enableScale){ let w = video.videoWidth; let h = video.videoHeight; let scaleDownRatio = 1; if (enableScale === true) { if (w > 2000 || h > 2000) { w = 1080; h = w * (video.videoHeight/video.videoWidth); scaleDownRatio = w / video.videoWidth; } } canvas.width = w; canvas.height = h; let ctx = canvas.getContext('2d'); ctx.drawImage(video, 0, 0, w, h); return scaleDownRatio; }
Draw the Overlay using SVG
We can draw the overlay for the detected document using SVG.
-
Define the SVG element in HTML.
<video class="camera full" muted autoplay="autoplay" playsinline="playsinline" webkit-playsinline></video> <svg class="overlay full" version="1.1" xmlns="http://www.w3.org/2000/svg"> </svg> -
Update the
viewBoxattribute in theloadeddataevent.const video = document.querySelector('video'); video.addEventListener('loadeddata', (event) => { console.log("video started"); document.getElementsByClassName("overlay")[0].setAttribute("viewBox","0 0 "+video.videoWidth+" "+video.videoHeight); startDetecting(); }); -
Append the detected document as a polygon element to the SVG element.
async function detect() {
  //...
  let overlay = document.getElementsByClassName("overlay")[0];
  if (quads.length>0) {
    let quad = quads[0];
    if (scaleDownRatio != 1) {
      scaleQuad(quad,scaleDownRatio);
    }
    drawOverlay(quad,overlay);
  }else{
    overlay.innerHTML = "";
  }
}


function drawOverlay(quad,svg){
  let points = quad.location.points;
  let polygon;
  if (svg.getElementsByTagName("polygon").length === 1) {
    polygon = svg.getElementsByTagName("polygon")[0];
  }else{
    polygon = document.createElementNS("http://www.w3.org/2000/svg","polygon");
    polygon.setAttribute("class","detectedPolygon");
    svg.appendChild(polygon);
  }
  polygon.setAttribute("points",getPointsData(points));
}

function getPointsData(points){
  let pointsData = points[0].x + "," + points[0].y + " ";
  pointsData = pointsData + points[1].x + "," + points[1].y +" ";
  pointsData = pointsData + points[2].x + "," + points[2].y +" ";
  pointsData = pointsData + points[3].x + "," + points[3].y;
  return pointsData;
}

function scaleQuad(quad,scaleDownRatio){
  let points = quad.location.points;
  for (let index = 0; index < points.length; index++) {
    const point = points[index];
    point.x = point.x / scaleDownRatio;
    point.y = point.y / scaleDownRatio;
  }
}
Turn on the Torch
Add an event listener for the torch button to control the torch. The button will not be displayed if the combination of the browser and the selected camera does not support torch.
document.getElementsByClassName("flashButton")[0].addEventListener('click', async (event) => {
  let flashButton = document.getElementsByClassName("flashButton")[0];
  if (flashButton.classList.contains("invert")) {
    flashButton.classList.remove("invert");
    try {
      await localStream.getVideoTracks()[0].applyConstraints({advanced:[{torch:false}]})
    } catch (error) {
      console.log(error);
    }
  } else {
    flashButton.classList.add("invert");
    try {
      await localStream.getVideoTracks()[0].applyConstraints({advanced:[{torch:true}]})
    } catch (error) {
      console.log(error);
    }
  }
});
Take a Photo
Take a photo and go to the result viewer page when the user presses the shutter. Since it will take a while, a mask is used to show the current status.
If ImageCapture is supported, it will use the takePhoto function of ImageCapture, otherwise, it will take a snapshot of the video frame.
document.getElementsByClassName("shutterButton")[0].addEventListener('click', (event) => {
  capture();
});

async function capture() {
  stopDetecting();
  toggleStatusMask("Taking a photo...");
  let imageCaptured = document.getElementsByClassName("imageCaptured")[0];

  imageCaptured.onload = function(){
    loadPhotoToSVG(imageCaptured);
  }

  if (imageCapture) {
    try {
      console.log("take photo");
      await takePhoto(imageCaptured);
    } catch (error) {
      console.log(error);
      captureFullFrame(imageCaptured);
    }
  }else{
    captureFullFrame(imageCaptured);
  }

  toggleStatusMask("");
  resetPreviousStatus();
  stop();
  switchPage(2);
}

function takePhoto(img){
  return new Promise(async function (resolve, reject) {
    try {
      let blob = await imageCapture.takePhoto();
      img.src = URL.createObjectURL(blob);
      resolve(true);
    } catch (error) {
      reject(error); //it may not work with virtual cameras
    }
  });
}

function captureFullFrame(img){
  let cvs = document.getElementsByClassName("hiddenCVS")[0];
  captureFrame(cvs);
  img.src = cvs.toDataURL();
}
We can automatically take a photo when the detected document is steady by checking the IoUs of three consecutive detection results.
Put the following functions to a file named utils.js and include it in the HTML file.
function intersectionOverUnion(pts1, pts2) {
  let rect1 = getRectFromPoints(pts1);
  let rect2 = getRectFromPoints(pts2);
  return rectIntersectionOverUnion(rect1, rect2);
}

function rectIntersectionOverUnion(rect1, rect2) {
  let leftColumnMax = Math.max(rect1.left, rect2.left);
  let rightColumnMin = Math.min(rect1.right,rect2.right);
  let upRowMax = Math.max(rect1.top, rect2.top);
  let downRowMin = Math.min(rect1.bottom,rect2.bottom);

  if (leftColumnMax>=rightColumnMin || downRowMin<=upRowMax){
    return 0;
  }

  let s1 = rect1.width*rect1.height;
  let s2 = rect2.width*rect2.height;
  let sCross = (downRowMin-upRowMax)*(rightColumnMin-leftColumnMax);
  return sCross/(s1+s2-sCross);
}

function getRectFromPoints(points) {
  if (points[0]) {
    let left;
    let top;
    let right;
    let bottom;

    left = points[0].x;
    top = points[0].y;
    right = 0;
    bottom = 0;

    points.forEach(point => {
      left = Math.min(point.x,left);
      top = Math.min(point.y,top);
      right = Math.max(point.x,right);
      bottom = Math.max(point.y,bottom);
    });

    let r = {
      left: left,
      top: top,
      right: right,
      bottom: bottom,
      width: right - left,
      height: bottom - top
    };

    return r;
  }else{
    throw new Error("Invalid number of points");
  }
}
Then, check the IoUs to see whether to take a photo if the auto capture feature is enabled.
let previousResults[];

async function detect(){
  //...
  if (document.getElementsByClassName("autoCaptureButton")[0].classList.contains("enabled")) {
    autoCapture(quad);
  }
  //...
}

async function autoCapture(quad){
  if (previousResults.length >= 2) {
    previousResults.push(quad)
    if (steady() == true) {
      console.log("steady");
      await capture();
    }else{
      console.log("shift result");
      previousResults.shift();
    }
  }else{
    console.log("add result");
    previousResults.push(quad);
  }
}

function steady() {
  let iou1 = intersectionOverUnion(previousResults[0].location.points,previousResults[1].location.points);
  let iou2 = intersectionOverUnion(previousResults[1].location.points,previousResults[2].location.points);
  let iou3 = intersectionOverUnion(previousResults[0].location.points,previousResults[2].location.points);
  console.log(iou1);
  console.log(iou2);
  console.log(iou3);
  if (iou1>0.9 && iou2>0.9 && iou3>0.9) {
    return true;
  }else{
    return false;
  }
}
Cropper Page
On the cropper page, display the photo taken in an SVG element and let the user adjust the detected polygon.

HTML:
<div class="cropper full" style="display:none;">
  <svg class="cropperSVG full" version="1.1" xmlns="http://www.w3.org/2000/svg">
  </svg>
  <div class="okayCancelFooter">
    <div class="cropperCancelButton cancel">
      <img class="icon" src="assets/cancel.svg" alt="cancel"/>
    </div>
    <div class="cropperOkayButton okay icon">
      <img class="icon" src="assets/okay.svg" alt="okay"/>
    </div>
  </div>
</div>
-
Display the photo in an SVG image element.
async function loadPhotoToSVG(img){ let svgElement = document.getElementsByClassName("cropperSVG")[0]; svgElement.innerHTML = ""; let svgImage = document.createElementNS("http://www.w3.org/2000/svg", "image"); svgImage.setAttribute("href",img.src); svgElement.setAttribute("viewBox","0 0 "+img.width+" "+img.height); svgElement.appendChild(svgImage); } -
Detect the document and draw the overlay.
This is similar to the live detection part. It’s just we are processing the photo taken which may have a higher resolution and apart from the polygon, we are also drawing four rectangles in the corner for the user to adjust the polygon.
async function loadPhotoToSVG(img){ //... rectSize = 30/(640/img.width); toggleStatusMask("Detecting..."); let quads = await ddn.detectQuad(img); toggleStatusMask(""); console.log(quads); if (quads.length>0) { detectedQuad = quads[0]; let svg = document.getElementsByClassName("cropperSVG")[0]; drawOverlay(quads[0],svg); drawRects(quads[0],svg); } } function drawRects(quad,svg){ let points = quad.location.points; let rects = []; if (svg.getElementsByTagName("rect").length === 4) { rects = svg.getElementsByTagName("rect"); }else{ for (let index = 0; index < 4; index++) { let rect = document.createElementNS("http://www.w3.org/2000/svg","rect"); svg.appendChild(rect); rect.setAttribute("class","vertice") rect.setAttribute("index",index); rect.setAttribute("width",rectSize); rect.setAttribute("height",rectSize); addEventsForRect(rect) rects.push(rect); } } for (let index = 0; index < 4; index++) { let rect = rects[index]; rect.setAttribute("x",points[index].x+getOffsetX(index)); rect.setAttribute("y",points[index].y+getOffsetY(index)); } } function getOffsetX(index){ if (index == 0 || index == 3) { return - rectSize; } return 0; } function getOffsetY(index){ if (index == 0 || index == 1) { return - rectSize; } return 0; } -
Add events for adjusting the polygon.
function addEventsForRect(rect) { rect.addEventListener("touchstart", function(event){ console.log(event); selectedRect = rect; }); rect.addEventListener("touchend", function(event){ console.log(event); selectedRect = undefined; }); rect.addEventListener("mouseup", function(event){ console.log(event); selectedRect = undefined; }); rect.addEventListener("mousedown", function(event){ console.log(event); selectedRect = rect; }); rect.addEventListener("mouseleave", function(event){ console.log(event); selectedRect = undefined; }); } //https://www.petercollingridge.co.uk/tutorials/svg/interactive/dragging/ function addEventsForSVG() { let svg = document.getElementsByClassName("cropperSVG")[0]; svg.addEventListener('mousedown', startDrag); svg.addEventListener('mousemove', drag); svg.addEventListener('mouseup', endDrag); svg.addEventListener('mouseleave', endDrag); svg.addEventListener('touchstart', startDrag); svg.addEventListener('touchmove', drag); svg.addEventListener('touchend', endDrag); function startDrag(evt) { console.log(evt); if (selectedRect) { offset = getMousePosition(evt,svg); offset.x -= parseFloat(selectedRect.getAttribute("x")); offset.y -= parseFloat(selectedRect.getAttribute("y")); } } function drag(evt) { console.log(evt); if (selectedRect) { evt.preventDefault(); let coord = getMousePosition(evt,svg); let selectedIndex = selectedRect.getAttribute("index"); let points = detectedQuad.location.points; let point = points[selectedIndex]; point.x = (coord.x - offset.x) - getOffsetX(selectedIndex); point.y = (coord.y - offset.y) - getOffsetY(selectedIndex); drawOverlay(detectedQuad, svg); drawRects(detectedQuad, svg); } } function endDrag(evt) { //console.log(evt); } } function getMousePosition(evt,svg) { var CTM = svg.getScreenCTM(); if (evt.targetTouches) { x = evt.targetTouches[0].clientX; y = evt.targetTouches[0].clientY; return { x: (x - CTM.e) / CTM.a, y: (y - CTM.f) / CTM.d }; }else{ return { x: (evt.clientX - CTM.e) / CTM.a, y: (evt.clientY - CTM.f) / CTM.d }; } } -
Go to the result viewer page if the user presses the okay button.
document.getElementsByClassName("cropperOkayButton")[0].addEventListener('click', async (event) => {
  switchPage(3);
});
Result Viewer Page
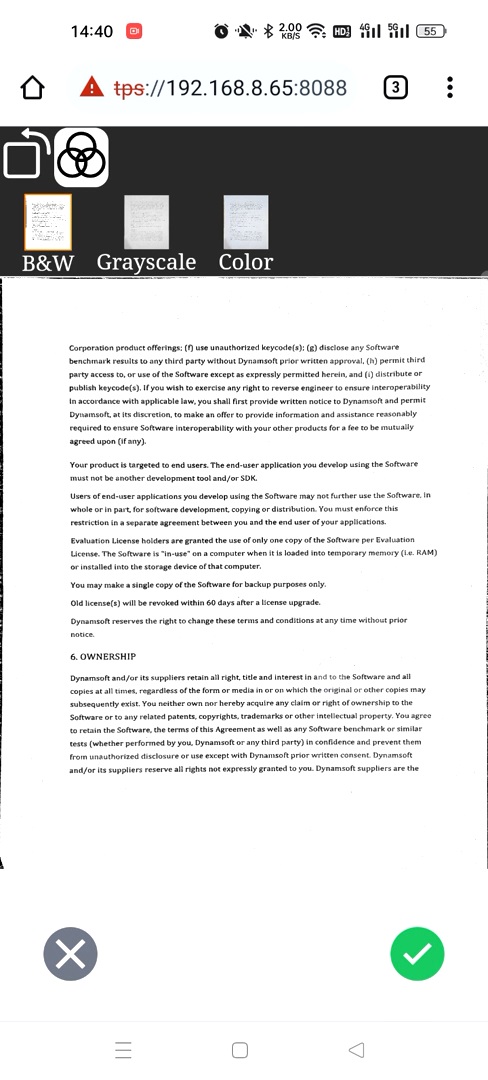
On the result viewer page, we can check out the normalized document image. We can also rotate the image and choose which filter to use.

HTML:
<div class="resultViewer full" style="display:none;">
  <div class="imageContainer">
    <img id="normalized" alt="normalized">
  </div>
  <div class="toolbar">
    <div class="rotateButton">
      <img class="icon" src="assets/rotate-counter-clockwise.svg" alt="rotate"/>
    </div>
    <div class="filterButton">
      <img class="icon" src="assets/color-filter.svg" alt="color-filter"/>
    </div>
  </div>
  <div class="filterList" style="display:none;">
    <div class="blackWhite filterItem">
      <img class="filterImg" alt="blackwhite"/>
      <div class="filterLabel">B&W</div>
    </div>
    <div class="grayscale filterItem">
      <img class="filterImg" alt="grayscale"/>
      <div class="filterLabel">Grayscale</div>
    </div>
    <div class="color filterItem">
      <img class="filterImg" alt="color"/>
      <div class="filterLabel">Color</div>
    </div>
  </div>
  <div class="okayCancelFooter">
    <div class="resultViewerCancelButton cancel">
      <img class="icon" src="assets/cancel.svg" alt="cancel"/>
    </div>
    <div class="resultViewerOkayButton okay">
      <img class="icon" src="assets/okay.svg" alt="okay"/>
    </div>
  </div>
</div>
-
Normalize the detected document image using Dynamsoft Document Normalizer. We have three filter modes: black & white, grayscale and color. By default, the color mode is used. Users can select which mode to use by selecting the thumbnails.
async function loadNormalizedAndFilterImages(){
  let modes = ["blackWhite","grayscale","color"];
  let img = document.getElementsByClassName("imageCaptured")[0];
  let cvs = document.getElementsByClassName("hiddenCVS")[0];
  let ratio = drawResizedThumbnailImageToCanvas(img,cvs);
  let scaledQuad = replicatedScaledQuad(detectedQuad,ratio);
  for (let index = 0; index < modes.length; index++) {
    const mode = modes[index];
    let filterImg = document.querySelector("."+mode+" .filterImg");
    await updateTemplate(mode);
    let imageData = await ddn.normalize(cvs, {quad: scaledQuad.location});
    filterImg.src = imageData.image.toCanvas().toDataURL();
    if (mode === "color" ) {
      imageData = await ddn.normalize(img, {quad: detectedQuad.location})
      filterImg.normalizedImage = imageData.image.toCanvas().toDataURL();
    }
  }
}

function replicatedScaledQuad(quad,scaleDownRatio){
  let newQuad = JSON.parse(JSON.stringify(quad));
  let points = newQuad.location.points;
  for (let index = 0; index < points.length; index++) {
    const point = points[index];
    point.x = parseInt(point.x * scaleDownRatio);
    point.y = parseInt(point.y * scaleDownRatio);
  }
  return newQuad;
}

function drawResizedThumbnailImageToCanvas(img,cvs){
  let w = 128;
  let h = w * (img.naturalHeight/img.naturalWidth);
  let scaleDownRatio = w / img.naturalWidth;
  cvs.width  = w;
  cvs.height = h;
  let ctx = cvs.getContext('2d');
  ctx.drawImage(img, 0, 0, w, h);
  return scaleDownRatio;
}

async function updateTemplate(mode){
  let template;
  if (mode === "blackWhite") {
    template = "{\"GlobalParameter\":{\"Name\":\"GP\",\"MaxTotalImageDimension\":0},\"ImageParameterArray\":[{\"Name\":\"IP-1\",\"NormalizerParameterName\":\"NP-1\",\"BaseImageParameterName\":\"\"}],\"NormalizerParameterArray\":[{\"Name\":\"NP-1\",\"ContentType\":\"CT_DOCUMENT\",\"ColourMode\":\"ICM_BINARY\"}]}";
  } else if (mode === "grayscale") {
    template = "{\"GlobalParameter\":{\"Name\":\"GP\",\"MaxTotalImageDimension\":0},\"ImageParameterArray\":[{\"Name\":\"IP-1\",\"NormalizerParameterName\":\"NP-1\",\"BaseImageParameterName\":\"\"}],\"NormalizerParameterArray\":[{\"Name\":\"NP-1\",\"ContentType\":\"CT_DOCUMENT\",\"ColourMode\":\"ICM_GRAYSCALE\"}]}";
  } else {
    template = "{\"GlobalParameter\":{\"Name\":\"GP\",\"MaxTotalImageDimension\":0},\"ImageParameterArray\":[{\"Name\":\"IP-1\",\"NormalizerParameterName\":\"NP-1\",\"BaseImageParameterName\":\"\"}],\"NormalizerParameterArray\":[{\"Name\":\"NP-1\",\"ContentType\":\"CT_DOCUMENT\",\"ColourMode\":\"ICM_COLOUR\"}]}";
  }
  console.log(template);
  await ddn.setRuntimeSettings(template);
}
The filter thumbnails list:
document.getElementsByClassName("filterButton")[0].addEventListener('click', (event) => { toggleFilterList(); }); function toggleFilterList(hide){ let filterButton = document.getElementsByClassName("filterButton")[0]; let filterList = document.getElementsByClassName("filterList")[0]; if (filterButton.classList.contains("invert") || hide === true) { filterButton.classList.remove("invert"); filterList.style.display = "none"; }else{ filterButton.classList.add("invert"); filterList.style.display = ""; } } function addEventsForFilterImages() { let modes = ["blackWhite","grayscale","color"]; let images = document.getElementsByClassName("filterImg"); for (let i = 0; i < images.length; i++) { const imgElement = images[i]; imgElement.addEventListener('click', async (event) => { for (let j = 0; j < images.length; j++) { images[j].classList.remove("selected"); } imgElement.classList.add("selected"); if (!imgElement.normalizedImage) { toggleStatusMask("Normalizing..."); const mode = modes[i]; await updateTemplate(mode); let img = document.getElementsByClassName("imageCaptured")[0]; let imageData = await ddn.normalize(img, {quad: detectedQuad.location}); imgElement.normalizedImage = imageData.image.toCanvas().toDataURL(); toggleStatusMask(""); } document.getElementById("normalized").src = imgElement.normalizedImage; }); } } -
Rotate the image.
Rotate the image clockwise by 90 degrees using CSS if the user presses the rotate button.
let rotationDegree = 0; document.getElementsByClassName("rotateButton")[0].addEventListener('click', (event) => { rotationDegree = rotationDegree - 90; if (rotationDegree === -360) { rotationDegree = 0; } document.getElementById("normalized").style.transform = "rotate("+rotationDegree+"deg)"; }); -
Display the normalized in the home page.
When the user presses the okay button, append the normalized image to the results container in the home page and switch to the home page. If the rotation degree is not 0, rotate the image data using a canvas.
document.getElementsByClassName("resultViewerOkayButton")[0].addEventListener('click', (event) => {
  let results = document.getElementsByClassName("results")[0];
  let container = document.createElement("div");
  let imgElement = document.createElement("img");

  imgElement.src = document.getElementById("normalized").src;

  if (rotationDegree != 0) {
    rotateImage(imgElement);
  }
  container.appendChild(imgElement);
  results.appendChild(container);
  switchPage(0);
});

function rotateImage(imgElement){
  let canvas = document.getElementsByClassName("hiddenCVS")[0];
  let ctx = canvas.getContext("2d");
  // Assign width and height.
  if (rotationDegree === -180) {
    canvas.width = imgElement.width;
    canvas.height = imgElement.height;
  }else{
    canvas.width = imgElement.height;
    canvas.height = imgElement.width;
  }

  ctx.translate(canvas.width / 2,canvas.height / 2);
  // Rotate the image and draw it on the canvas.
      // (I am not showing the canvas on the webpage.
  ctx.rotate(rotationDegree * Math.PI / 180);
  ctx.drawImage(imgElement, -imgElement.width / 2, -imgElement.height / 2);
  imgElement.src = canvas.toDataURL();
  console.log("rotate");
  console.log(imgElement);
}
All right, we’ve now finished writing the document scanner demo.
Source Code
Get the source code and have a try!


