How to Build an Ionic Document Scanner in Angular
In the previous article, we built a Capacitor document scanning plugin based on the Dynamsoft Document Normalizer SDK. In this article, we are going to build a document scanner in Angular using the Ionic framework.
Demo video of the final result:
The app can take a photo or load an existing image, and run document detection and perspective transformation to get a normalized document image.
Build an Ionic Document Scanner
New Project
Create a new Ionic project with the following command.
ionic start
We can then run the following to test in the browser:
ionic serve
Add Dependencies
-
Install the Capacitor camera plugin for accessing the camera and the photo library.
npm install @capacitor/camera npm install @ionic/pwa-elements #to make it work for the web platform -
Install
capacitor-plugin-dynamsoft-document-normalizerto provide the document detection and perspective correction functions.npm install capacitor-plugin-dynamsoft-document-normalizer -
Install
@capacitor/shareto share normalized images.npm install @capacitor/share npm install @capacitor/filesystem #write images to local files for sharing
Create Pages
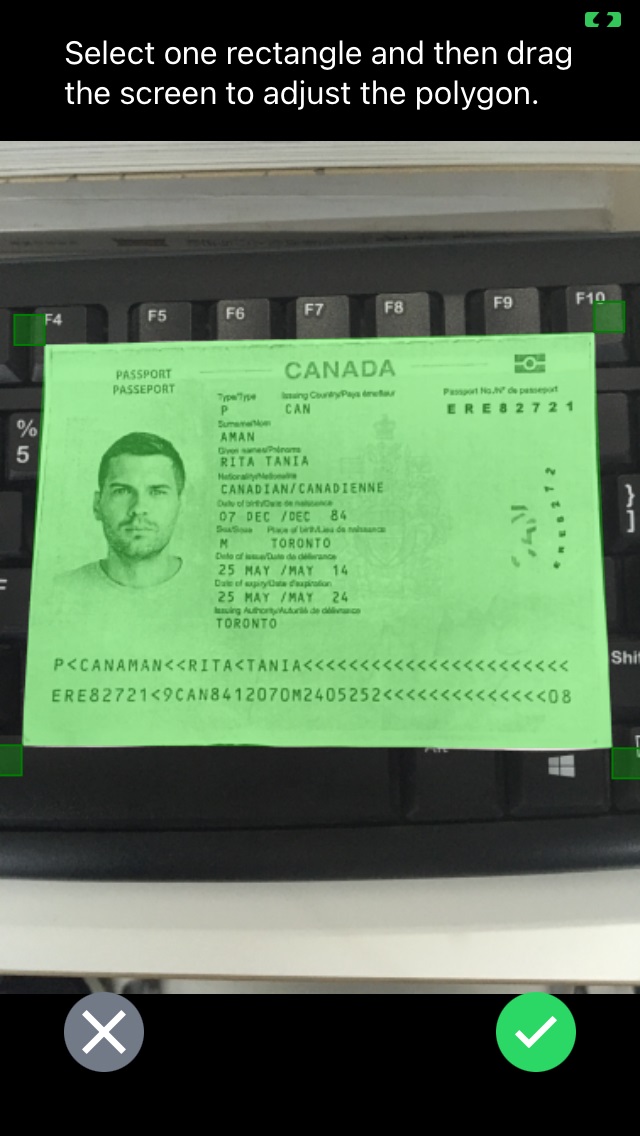
The app will have three pages: home, cropper and result viewer. The users press the scan document button on the home page to take a photo and then navigate to the cropper page to adjust the detected document polygon. The normalized image can be viewed on the result viewer page.
Here, we use the following commands to create the page components.
ionic generate page home
ionic generate page cropper
ionic generate page resultviewer
Next, we are going to implement the three pages.
Home Page Implementation
-
Initialize Dynamsoft Document Normalizer in the constructor of the home page.
constructor(private router: Router) { let license = "LICENSE-KEY"; //public trial DocumentNormalizer.initLicense({license:license}); DocumentNormalizer.initialize(); } -
Add a
Scan Documentbutton to take a photo and then navigate to the cropper page.Template:
<ion-button expand="full" (click)="scan()">Scan Document</ion-button>JavaScript:
import { Camera, CameraResultType } from '@capacitor/camera';
import { DocumentNormalizer } from 'capacitor-plugin-dynamsoft-document-normalizer';

async scan(){
  const image = await Camera.getPhoto({
    quality: 90,
    allowEditing: false,
    resultType: CameraResultType.DataUrl
  });

  if (image) {
    this.router.navigate(['/cropper'],{
      state: {
        image: image
      }
    });
  }
}
Cropper Page Implementation
We are going to use SVG to display the image and detected polygons. The detection results can also be fine-tuned by adjusting the polygon elements.
Add an SVG Element
-
In the template, create a
croppercontainer which has a height of 100%, a black background and displays items in the center.Template:
<div class="cropper">
</div>
CSS:
.cropper { display: flex; justify-content: center; height: 100vh; background: black; } -
Add an SVG element in the cropper.
Template:
<div class="cropper">
  <svg
    #svgElement
    version="1.1"
    xmlns="http://www.w3.org/2000/svg"
  >
  </svg>
</div>
Display the Image
-
Add an
imageelement in the SVG element to display the image taken. We can update the SVG element’sviewBoxandwidthbased on the image’s info.<div class="cropper"> <svg #svgElement [style.width]="getSVGWidth(svgElement)" [attr.viewBox]="viewBox" version="1.1" xmlns="http://www.w3.org/2000/svg" > <image [attr.href]="dataURL"></image> </svg> </div> -
In
ngOnInit, read the image’s dataURL from the state, load the image and get its info.private imgWidth:number = 0; private imgHeight:number = 0; dataURL:string = ""; viewBox:string = "0 0 1280 720"; ngOnInit() { const navigation = this.router.getCurrentNavigation(); if (navigation) { const routeState = navigation.extras.state; if (routeState) { const image:Photo = routeState['image']; if (image.dataUrl) { const pThis = this; let img = new Image(); img.onload = function(){ if (image.dataUrl) { pThis.viewBox = "0 0 "+img.naturalWidth+" "+img.naturalHeight; pThis.imgWidth = img.naturalWidth; pThis.imgHeight = img.naturalHeight; pThis.dataURL = image.dataUrl; } } img.src = image.dataUrl; } } } } //The width of the SVG element is adjusted so that its ratio matches the image's ratio. getSVGWidth(svgElement:any){ let imgRatio = this.imgWidth/this.imgHeight; let width = svgElement.clientHeight * imgRatio; return width; }
Detect the Document from the Image Taken
After the image is loaded, we can detect the document from it using Dynamsoft Document Normalizer.
const pThis = this;
img.onload = function(){
  //......
  pThis.detect();
}
img.src = image.dataUrl;
The detect function:
import { DocumentNormalizer } from 'capacitor-plugin-dynamsoft-document-normalizer';
import { DetectedQuadResult } from 'dynamsoft-document-normalizer';
import { Point } from "dynamsoft-document-normalizer/dist/types/interface/point";

detectedQuadResult:DetectedQuadResult|undefined;
async detect(){
  let results = (await DocumentNormalizer.detect({source:this.dataURL})).results;
  if (results.length>0) {
    this.detectedQuadResult = results[0]; // Here, we only use the first detection result
    this.points = this.detectedQuadResult.location.points;
  }else {
    this.presentToast(); // Make a toast if there are no documents detected
  }
}

async presentToast(){
  const toast = await this.toastController.create({
    message: 'No documents detected.',
    duration: 1500,
    position: 'top'
  });
  await toast.present();
}
Overlay the Detected Document Polygon
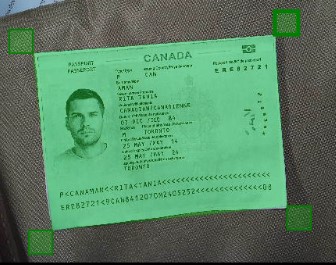
We can overlay a polygon SVG element above the image to check out how the document is detected.
In the template, add the following below the image element:
<image [attr.href]="dataURL"></image>
<a *ngIf="detectedQuadResult">
  <polygon
    [attr.points]="getPointsData()"
    stroke="green"
    stroke-width="1"
    fill="lime"
    opacity="0.3"
  >
  </polygon>
</a>
The points attribute is calculated based on the detection result.
getPointsData(){
  if (this.detectedQuadResult) {
    let location = this.detectedQuadResult.location;
    let pointsData = location.points[0].x + "," + location.points[0].y + " ";
    pointsData = pointsData + location.points[1].x + "," + location.points[1].y +" ";
    pointsData = pointsData + location.points[2].x + "," + location.points[2].y +" ";
    pointsData = pointsData + location.points[3].x + "," + location.points[3].y;
    return pointsData;
  }
  return "";
}
Make the Polygon Adjustable
We can take a step further to make the polygon adjustable so that the user can finetune the detection result.
-
Add four rectangles near the corners of the polygon.
<rect *ngFor="let point of points; let i=index;" stroke="green" [attr.stroke-width]="getRectStrokeWidth(i)" fill="rgba(0,255,0,.2)" [attr.x]="getRectX(i, point.x)" [attr.y]="getRectY(i, point.y)" [attr.width]="getRectSize()" [attr.height]="getRectSize()" (mousedown)="onRectMouseDown(i, $event)" (mouseup)="onRectMouseUp($event)" (touchstart)="onRectTouchStart(i, $event)" > -
The position of the rectangles is a bit away from the vertices as the following.

Code:
getRectX(index:number,x:number) { return this.getOffsetX(index) + x; } getOffsetX(index:number) { let width = this.getRectSize(); if (index === 0 || index === 3) { return - width; } return 0; } getRectY(index:number,y:number) { return this.getOffsetY(index) + y; } getOffsetY(index:number) { let height = this.getRectSize(); if (index === 0 || index === 1) { return - height; } return 0; } -
The size of the rectangles is updated based on the image’s width since we are using the
viewBoxattribute.getRectSize(){ let percent = 640/this.imgWidth; return 30/percent; //30 works fine when the width is 640. Scale it if the image has a different width } -
Make the rectangle as selected if the mouse is down or it is touched. The selected one will have a larger stroke width.
selectedIndex: number = -1; usingTouchEvent:boolean = false; getRectStrokeWidthgetRectStrokeWidth(i:number){ let percent = 640/this.imgWidth; if (i === this.selectedIndex) { return 5/percent; }else{ return 2/percent; } } onRectMouseDown(index:number,event:any) { if (!this.usingTouchEvent) { console.log(event); this.selectedIndex = index; } } onRectMouseUp(event:any) { if (!this.usingTouchEvent) { console.log(event); this.selectedIndex = -1; } } onRectTouchStart(index:number,event:any) { this.usingTouchEvent = true; //Touch events are triggered before mouse events. We can use this to prevent executing mouse events. console.log(event); this.selectedIndex = index; } -
Add mouse events and touch events to the SVG element so that we can drag to adjust the polygon.
Template:
<svg
  #svgElement
  [style.width]="getSVGWidth(svgElement)"
  [attr.viewBox]="viewBox"
  version="1.1"
  xmlns="http://www.w3.org/2000/svg"
  (mousedown)="startDrag($event,svgElement)"
  (mousemove)="drag($event,svgElement)"
  (touchstart)="startDrag($event,svgElement)"
  (touchmove)="drag($event,svgElement)"
>
The offset of the starting position and the selected point is recorded in the
startDragfunction. We need this info so that whether we start dragging the rectangle in the center or in the corner will have the same behavior.offset:{x:number,y:number}|undefined; startDrag(event:any,svgElement:any){ if (this.usingTouchEvent && !event.targetTouches) { //if touch events are supported, do not execute mouse events. return; } if (this.points && this.selectedIndex != -1) { this.offset = this.getMousePosition(event,svgElement); let x = this.points[this.selectedIndex].x; let y = this.points[this.selectedIndex].y; this.offset.x -= x; this.offset.y -= y; } } //Convert the screen coordinates to the SVG's coordinates from https://www.petercollingridge.co.uk/tutorials/svg/interactive/dragging/ getMousePosition(event:any,svg:any) { let CTM = svg.getScreenCTM(); if (event.targetTouches) { //if it is a touch event let x = event.targetTouches[0].clientX; let y = event.targetTouches[0].clientY; return { x: (x - CTM.e) / CTM.a, y: (y - CTM.f) / CTM.d }; }else{ return { x: (event.clientX - CTM.e) / CTM.a, y: (event.clientY - CTM.f) / CTM.d }; } }Update the point corresponding to the selected index to redraw the polygon and the rectangle in the
dragfunction.drag(event:any,svgElement:any){ if (this.usingTouchEvent && !event.targetTouches) { //if touch events are supported, do not execute mouse events. return; } if (this.points && this.selectedIndex != -1 && this.offset) { event.preventDefault(); let coord = this.getMousePosition(event,svgElement); let point = this.points[this.selectedIndex]; point.x = coord.x - this.offset.x; point.y = coord.y - this.offset.y; //update detectedQuadResult for use in the result viewer page if (this.detectedQuadResult) { this.detectedQuadResult.location.points[this.selectedIndex].x = point.x; this.detectedQuadResult.location.points[this.selectedIndex].y = point.y; if (this.detectedQuadResult.location.points[this.selectedIndex].coordinate) { this.detectedQuadResult.location.points[this.selectedIndex].coordinate = [point.x,point.y]; } } } } -
Add a
cancelbutton and ausebutton. If the user touches thecancelbutton, navigate to the home page. If the user touches theusebutton, navigate to the result viewer to check out the normalized image.Template:
<div class="footer">
  <section class="items">
    <div class="item accept-cancel" (click)="cancel()">
      <img src="data:image/svg+xml,%3Csvg version='1.1' id='Layer_1' xmlns='http://www.w3.org/2000/svg' xmlns:xlink='http://www.w3.org/1999/xlink' x='0px' y='0px' viewBox='0 0 512 512' enable-background='new 0 0 512 512' xml:space='preserve'%3E%3Ccircle fill='%23727A87' cx='256' cy='256' r='256'/%3E%3Cg id='Icon_5_'%3E%3Cg%3E%3Cpath fill='%23FFFFFF' d='M394.2,142L370,117.8c-1.6-1.6-4.1-1.6-5.7,0L258.8,223.4c-1.6,1.6-4.1,1.6-5.7,0L147.6,117.8 c-1.6-1.6-4.1-1.6-5.7,0L117.8,142c-1.6,1.6-1.6,4.1,0,5.7l105.5,105.5c1.6,1.6,1.6,4.1,0,5.7L117.8,364.4c-1.6,1.6-1.6,4.1,0,5.7 l24.1,24.1c1.6,1.6,4.1,1.6,5.7,0l105.5-105.5c1.6-1.6,4.1-1.6,5.7,0l105.5,105.5c1.6,1.6,4.1,1.6,5.7,0l24.1-24.1 c1.6-1.6,1.6-4.1,0-5.7L288.6,258.8c-1.6-1.6-1.6-4.1,0-5.7l105.5-105.5C395.7,146.1,395.7,143.5,394.2,142z'/%3E%3C/g%3E%3C/g%3E%3C/svg%3E">
    </div>
    <div class="item accept-use" (click)="use()">
      <img src="data:image/svg+xml,%3Csvg version='1.1' id='Layer_1' xmlns='http://www.w3.org/2000/svg' xmlns:xlink='http://www.w3.org/1999/xlink' x='0px' y='0px' viewBox='0 0 512 512' enable-background='new 0 0 512 512' xml:space='preserve'%3E%3Ccircle fill='%232CD865' cx='256' cy='256' r='256'/%3E%3Cg id='Icon_1_'%3E%3Cg%3E%3Cg%3E%3Cpath fill='%23FFFFFF' d='M208,301.4l-55.4-55.5c-1.5-1.5-4-1.6-5.6-0.1l-23.4,22.3c-1.6,1.6-1.7,4.1-0.1,5.7l81.6,81.4 c3.1,3.1,8.2,3.1,11.3,0l171.8-171.7c1.6-1.6,1.6-4.2-0.1-5.7l-23.4-22.3c-1.6-1.5-4.1-1.5-5.6,0.1L213.7,301.4 C212.1,303,209.6,303,208,301.4z'/%3E%3C/g%3E%3C/g%3E%3C/g%3E%3C/svg%3E">
    </div>
  </section>
</div>
CSS:
.footer {
  position: absolute;
  left: 0;
  bottom: 0;
  height: 100px;
  width: 100%;
  pointer-events: none;
}

.items {
  box-sizing: border-box;
  display: flex;
  width: 100%;
  height: 100%;
  align-items: center;
  justify-content: center;
  padding: 2.0em;
}

.items .item {
  flex: 1;
  text-align: center;
}
.items .item:first-child {
  text-align: left;
}
.items .item:last-child {
  text-align: right;
}

.camera-footer .items {
  padding: 2.0em;
}

.accept-use img {
  width: 2.5em;
  height: 2.5em;
  pointer-events: all;
  cursor:pointer;
}

.accept-cancel img {
  width: 2.5em;
  height: 2.5em;
  pointer-events: all;
  cursor:pointer;
}
JavaScript:
use(){
  if (this.detectedQuadResult) {
    this.router.navigate(['/resultviewer'],{
      state: {
        detectedQuadResult: this.detectedQuadResult,
        dataURL: this.dataURL
      }
    });
  }else{
    this.presentToast();
  }
}

cancel(){
  this.router.navigate(['/home']);
}
Here is a screenshot of the cropper page.

Result Viewer Page Implementation
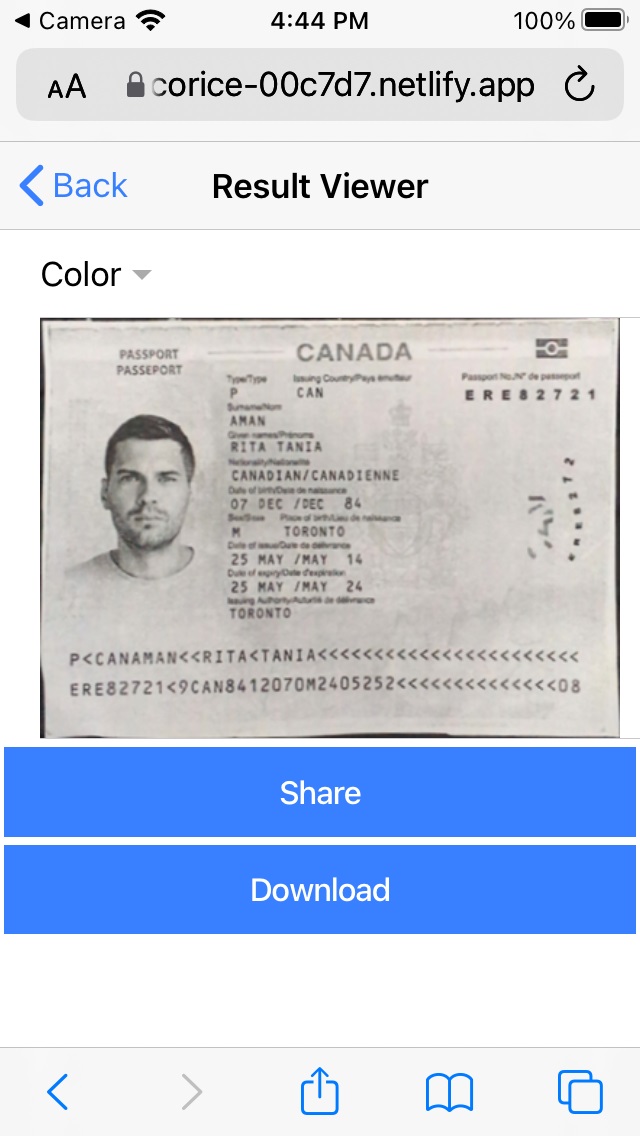
On the result viewer page, we can see the normalized image and make relevant actions.
-
Normalize the image when we enter the page or a different color mode is selected.
Template:
<ion-header>
  <ion-toolbar>
    <ion-buttons slot="start">
      <ion-back-button default-href="#"></ion-back-button>
    </ion-buttons>
    <ion-title>Result Viewer</ion-title>
  </ion-toolbar>
</ion-header>

<ion-content>
  <ion-list>
    <ion-item>
      <ion-select (ionChange)="colorModeChanged($event)" placeholder="Select color mode:">
        <ion-select-option value="binary">Binary</ion-select-option>
        <ion-select-option value="gray">Gray</ion-select-option>
        <ion-select-option value="color">Color</ion-select-option>
      </ion-select>
    </ion-item>
    <ion-item>
      <img class="normalizedImage" alt="normalizedImage" [src]="normalizedImageDataURL" />
    </ion-item>
  </ion-list>
</ion-content>
JavaScript:
import { DetectedQuadResult } from 'dynamsoft-document-normalizer'; import { DocumentNormalizer } from 'capacitor-plugin-dynamsoft-document-normalizer'; dataURL:string = ""; normalizedImageDataURL:string = ""; private detectedQuadResult:DetectedQuadResult|undefined; ngOnInit() { const navigation = this.router.getCurrentNavigation(); if (navigation) { const routeState = navigation.extras.state; console.log(routeState); if (routeState) { this.dataURL = routeState["dataURL"]; this.detectedQuadResult = routeState["detectedQuadResult"]; this.normalize(); } } } async normalize() { if (this.detectedQuadResult) { let normalizedImageResult = await DocumentNormalizer.normalize({source:this.dataURL,quad:this.detectedQuadResult.location}); let data = normalizedImageResult.result.data; if (!data.startsWith("data")) { data = "data:image/jpeg;base64," + data; } this.normalizedImageDataURL = data; } } //update the runtime settings of Document Normalizer and normalize the document image async colorModeChanged(event:any){ console.log(event); let template; if (event.target.value === "binary") { template = "{\"GlobalParameter\":{\"Name\":\"GP\",\"MaxTotalImageDimension\":0},\"ImageParameterArray\":[{\"Name\":\"IP-1\",\"NormalizerParameterName\":\"NP-1\",\"BaseImageParameterName\":\"\"}],\"NormalizerParameterArray\":[{\"Name\":\"NP-1\",\"ContentType\":\"CT_DOCUMENT\",\"ColourMode\":\"ICM_BINARY\"}]}"; } else if (event.target.value === "gray") { template = "{\"GlobalParameter\":{\"Name\":\"GP\",\"MaxTotalImageDimension\":0},\"ImageParameterArray\":[{\"Name\":\"IP-1\",\"NormalizerParameterName\":\"NP-1\",\"BaseImageParameterName\":\"\"}],\"NormalizerParameterArray\":[{\"Name\":\"NP-1\",\"ContentType\":\"CT_DOCUMENT\",\"ColourMode\":\"ICM_GRAYSCALE\"}]}"; } else { template = "{\"GlobalParameter\":{\"Name\":\"GP\",\"MaxTotalImageDimension\":0},\"ImageParameterArray\":[{\"Name\":\"IP-1\",\"NormalizerParameterName\":\"NP-1\",\"BaseImageParameterName\":\"\"}],\"NormalizerParameterArray\":[{\"Name\":\"NP-1\",\"ContentType\":\"CT_DOCUMENT\",\"ColourMode\":\"ICM_COLOUR\"}]}"; } await DocumentNormalizer.initRuntimeSettingsFromString({template:template}); await this.normalize(); } -
Display a
sharebutton to share the normalized image if supported.Template:
<ion-button expand="full" *ngIf="shareSupported" (click)="share()" >Share</ion-button>JavaScript:
shareSupported:boolean = true; ngOnInit() { this.isNative = Capacitor.isNativePlatform(); if (!this.isNative) { // Sharing is supported on the native platforms with the plugin. We only need to check if it is supported on the web. if (!("share" in navigator)) { this.shareSupported = false; } } } async share(){ if (this.isNative) { let fileName = "normalized.jpg"; let writingResult = await Filesystem.writeFile({ path: fileName, data: this.normalizedImageDataURL, directory: Directory.Cache }); Share.share({ title: fileName, text: fileName, url: writingResult.uri, }); } else { const blob = await (await fetch(this.normalizedImageDataURL)).blob(); const file = new File([blob], 'normalized.png', { type: blob.type }); navigator.share({ title: 'Hello', text: 'Check out this image!', files: [file], }) } } -
Display a
downloadbutton to download the normalized image for the web platform.Template:
<ion-button expand="full" *ngIf="!isNative" (click)="download()" >Download</ion-button>JavaScript:
async download(){
  const blob = await (await fetch(this.normalizedImageDataURL)).blob();
  const imageURL = URL.createObjectURL(blob)
  const link = document.createElement('a')
  link.href = imageURL;
  link.download = 'normalized.png';
  document.body.appendChild(link);
  link.click();
  document.body.removeChild(link);
}
Here is a screenshot of the result viewer page on iOS Safari.

Add Native Platforms
We’ve now finished writing the app. We can make it run as Android and iOS apps.
Run as an Android App
-
Add the Android project.
ionic cap add android -
Run the app on an Android device.
ionic cap run android
Run as an iOS App
-
Add the iOS project.
ionic cap add ios -
Add the following to
Info.plistfor permissions.<key>NSPhotoLibraryUsageDescription</key> <string>For photo usage</string> <key>NSPhotoLibraryAddUsageDescription</key> <string>For photo add usage</string> <key>NSCameraUsageDescription</key> <string>For camera usage</string> -
Run the app on an iOS device.
ionic cap run ios
Source Code
You can find the code of the demo in the following link:
https://github.com/tony-xlh/Ionic-Angular-Document-Scanner
Disclaimer:
The wrappers and sample code on Dynamsoft Codepool are community editions, shared as-is and not fully tested. Dynamsoft is happy to provide technical support for users exploring these solutions but makes no guarantees.


