


iOS Barcode SDK Benchmark: Dynamsoft vs ML Kit, Apple Vision, and ZXing-CPP in SwiftUI
Developers integrating barcode scanning into iOS apps have several viable options — Dynamsoft Barcode Reader (commercial), Google ML Kit (free), Apple Vision (native), and ZXing-CPP (open source) — each with different accuracy, speed, and format coverage characteristics. This article walks through building a SwiftUI benchmark app that runs all four SDKs side-by-side against identical image and video inputs. The results show Dynamsoft Barcode Reader as the clear leader: it achieved the highest detection count on a real-world test set while remaining the only SDK to combine that accuracy with hardware-accelerated, production-viable speed.
What you’ll build: An iOS 16+ SwiftUI app that benchmarks four barcode scanning SDKs (Dynamsoft, ML Kit, Apple Vision, ZXing-CPP) across image, video, and live camera modes with colored bounding-box overlays and an HTML report exportable from a built-in HTTP server.
Demo Video: iOS Barcode Scanner Benchmark in Action
Key Takeaways
- This tutorial demonstrates how to integrate Dynamsoft Barcode Reader, Google ML Kit, Apple Vision, and ZXing-CPP into a single SwiftUI app behind a shared
BarcodeDetectorprotocol, enabling like-for-like performance comparisons. - Dynamsoft Barcode Reader (v11.4.1200, SPM), ML Kit (v8.0.0, CocoaPods), Apple Vision (native framework), and ZXing-CPP (v2.3.0, SPM) are all supported and independently replaceable.
- Tested against 83 barcode images from the Dynamsoft Barcode Test Sheet: Dynamsoft detected 354 barcodes, ZXing-CPP 346, Apple Vision 150, and ML Kit 120 — Dynamsoft is the only SDK to achieve both the highest accuracy and hardware-accelerated speed suitable for real-time use.
- The app includes a built-in HTTP server so benchmark files can be uploaded from a desktop browser and results downloaded as an HTML report — no USB cable required.
Common Developer Questions
How do I integrate Google ML Kit barcode scanning into a SwiftUI iOS app via CocoaPods?
Install ML Kit through CocoaPods, open the generated workspace, and wrap the ML Kit scanner behind the same BarcodeDetector protocol used by the other SDKs in the benchmark app. That keeps the SwiftUI benchmark flow identical even though ML Kit is brought in through a different package manager.
How do I use Apple Vision’s VNDetectBarcodesRequest for barcode detection without any third-party dependency?
Create a VNDetectBarcodesRequest, run it through VNImageRequestHandler, and normalize the returned boundingBox coordinates before drawing overlays in SwiftUI. This gives the benchmark a no-third-party baseline because Apple Vision is already part of the iOS SDK.
How do I add ZXing-CPP barcode scanning to an iOS app via Swift Package Manager?
Add the zxing-cpp package with Swift Package Manager, use its iOS wrapper in a detector implementation, and adapt the decode results into the benchmark app’s shared BarcodeInfo model. That lets ZXing-CPP participate in the same image, video, and live-camera comparison flow.
Why does Dynamsoft detect significantly more barcodes than ML Kit and Apple Vision on the same test set?
On the benchmark set used here, Dynamsoft handled more of the difficult real-world barcode cases while still remaining fast enough for real-time use. The important design choice is that all four SDKs are tested through the same SwiftUI harness and identical inputs, so the comparison is not based on different app logic.
Prerequisites
- Xcode 15.0+ with Swift 5.0 support
- iOS 16.0+ device or simulator
- CocoaPods installed (
sudo gem install cocoapods) — required for Google ML Kit - A Dynamsoft Barcode Reader trial license key (the other three SDKs are free)
Get a 30-day free trial license at dynamsoft.com/customer/license/trialLicense
Step 1: Install and Configure the SDKs
ML Kit is not available through Swift Package Manager, so it is installed via CocoaPods. From the project root:
cd BarcodeBenchmarkiOS
pod install
After installation, always open BarcodeBenchmark.xcworkspace, not the .xcodeproj file. DynamsoftCaptureVisionBundle (v11.4.1200) and zxing-cpp (v2.3.0) are declared in project.pbxproj and resolved automatically by Xcode on first build. Apple Vision requires no additional setup — it is part of the iOS SDK.
The Podfile targets iOS 16 and links ML Kit 8.0.0:
platform :ios, '16.0'

target 'BarcodeBenchmark' do
  use_frameworks!

  # Google ML Kit Barcode Scanning
  pod 'GoogleMLKit/BarcodeScanning', '8.0.0'
end
Step 2: Define a Shared BarcodeDetector Protocol
All four detectors implement the same two-method protocol. This keeps the benchmark logic SDK-agnostic and makes it straightforward to add or remove a backend in the future:
protocol BarcodeDetector {
    func detectBarcodes(in image: UIImage) async throws -> [BarcodeInfo]
    func detectBarcodes(in pixelBuffer: CVPixelBuffer) async throws -> [BarcodeInfo]
}
The UIImage overload is used for image and video-frame benchmarks; the CVPixelBuffer overload is called directly from the camera sample buffer delegate for live scanning.
Step 3: Implement the Dynamsoft Barcode Reader Detector
Dynamsoft uses CaptureVisionRouter from DynamsoftCaptureVisionBundle. License verification happens asynchronously on init; decoding is a single synchronous call to captureFromImage:
import DynamsoftCaptureVisionBundle
import DynamsoftBarcodeReaderBundle

class DynamsoftBarcodeDetector: NSObject, BarcodeDetector, LicenseVerificationListener {

    private let cvr: CaptureVisionRouter

    override init() {
        cvr = CaptureVisionRouter()
        super.init()
        LicenseManager.initLicense("YOUR_LICENSE_KEY_HERE", verificationDelegate: self)
    }

    func onLicenseVerified(_ isSuccess: Bool, error: Error?) {
        if !isSuccess {
            print("Dynamsoft license error: \(error?.localizedDescription ?? "Unknown error")")
        }
    }

    func detectBarcodes(in image: UIImage) async throws -> [BarcodeInfo] {
        let result = cvr.captureFromImage(image, templateName: "ReadBarcodes_Default")
        guard let items = result.decodedBarcodesResult?.items else { return [] }
        return items.map { item in
            let bounds: CGRect? = {
                guard image.size.width > 0, image.size.height > 0 else { return nil }
                let br = item.location.boundingRect
                return CGRect(
                    x: br.minX / image.size.width,
                    y: br.minY / image.size.height,
                    width: br.width / image.size.width,
                    height: br.height / image.size.height)
            }()
            return BarcodeInfo(format: item.formatString ?? "", text: item.text ?? "", decodeTimeMs: 0, normalizedBounds: bounds)
        }
    }

    func detectBarcodes(in pixelBuffer: CVPixelBuffer) async throws -> [BarcodeInfo] {
        let ciImage = CIImage(cvPixelBuffer: pixelBuffer)
        guard let cgImage = CIContext().createCGImage(ciImage, from: ciImage.extent) else {
            throw DetectionError.invalidImage
        }
        return try await detectBarcodes(in: UIImage(cgImage: cgImage))
    }
}
Step 4: Implement the ML Kit Barcode Detector
ML Kit uses an async-callback BarcodeScanner. The detector wraps the callback in withCheckedThrowingContinuation to fit the async throws protocol signature. Passing .all to BarcodeScannerOptions enables every supported format:
import MLKitBarcodeScanning
import MLKitVision

class MLKitBarcodeDetector: BarcodeDetector {

    private let scanner: MLKitBarcodeScanning.BarcodeScanner

    init() {
        let options = BarcodeScannerOptions(formats: .all)
        scanner = MLKitBarcodeScanning.BarcodeScanner.barcodeScanner(options: options)
    }

    func detectBarcodes(in image: UIImage) async throws -> [BarcodeInfo] {
        let visionImage = VisionImage(image: image)
        visionImage.orientation = image.imageOrientation
        let imgW = image.size.width
        let imgH = image.size.height
        return try await withCheckedThrowingContinuation { continuation in
            scanner.process(visionImage) { barcodes, error in
                if let error = error {
                    continuation.resume(throwing: DetectionError.detectionFailed(error.localizedDescription))
                    return
                }
                let results = (barcodes ?? []).map { barcode -> BarcodeInfo in
                    var bounds: CGRect?
                    if imgW > 0 && imgH > 0 {
                        let f = barcode.frame
                        bounds = CGRect(x: f.minX / imgW, y: f.minY / imgH,
                                        width: f.width / imgW, height: f.height / imgH)
                    }
                    return BarcodeInfo(format: barcode.format.description,
                                       text: barcode.rawValue ?? barcode.displayValue ?? "",
                                       decodeTimeMs: 0, normalizedBounds: bounds)
                }
                continuation.resume(returning: results)
            }
        }
    }

    func detectBarcodes(in pixelBuffer: CVPixelBuffer) async throws -> [BarcodeInfo] {
        let ciImage = CIImage(cvPixelBuffer: pixelBuffer)
        guard let cgImage = CIContext().createCGImage(ciImage, from: ciImage.extent) else {
            throw DetectionError.invalidImage
        }
        return try await detectBarcodes(in: UIImage(cgImage: cgImage))
    }
}
Step 5: Implement the Apple Vision Barcode Detector
Apple Vision requires no SDK installation. VNDetectBarcodesRequest is created per call and submitted via VNImageRequestHandler. Note that Vision’s boundingBox origin is bottom-left, so the Y coordinate must be flipped before drawing overlays:
import Vision

class VisionBarcodeDetector: BarcodeDetector {

    func detectBarcodes(in image: UIImage) async throws -> [BarcodeInfo] {
        guard let cgImage = image.cgImage else {
            throw DetectionError.invalidImage
        }
        return try await withCheckedThrowingContinuation { continuation in
            let request = VNDetectBarcodesRequest { request, error in
                if let error = error {
                    continuation.resume(throwing: DetectionError.detectionFailed(error.localizedDescription))
                    return
                }
                guard let results = request.results as? [VNBarcodeObservation] else {
                    continuation.resume(returning: [])
                    return
                }
                let barcodes = results.map { observation -> BarcodeInfo in
                    let bb = observation.boundingBox
                    // boundingBox origin is bottom-left; flip Y for top-left screen coords
                    let bounds = CGRect(x: bb.minX, y: 1.0 - bb.maxY,
                                       width: bb.width, height: bb.height)
                    return BarcodeInfo(format: self.mapSymbology(observation.symbology),
                                       text: observation.payloadStringValue ?? "",
                                       decodeTimeMs: 0, normalizedBounds: bounds)
                }
                continuation.resume(returning: barcodes)
            }
            request.symbologies = [.qr, .code128, .code39, .code93, .ean8, .ean13,
                                    .upce, .pdf417, .aztec, .dataMatrix, .codabar, .itf14]
            let handler = VNImageRequestHandler(cgImage: cgImage, options: [:])
            do {
                try handler.perform([request])
            } catch {
                continuation.resume(throwing: DetectionError.detectionFailed(error.localizedDescription))
            }
        }
    }

    func detectBarcodes(in pixelBuffer: CVPixelBuffer) async throws -> [BarcodeInfo] {
        return try await withCheckedThrowingContinuation { continuation in
            let request = VNDetectBarcodesRequest { request, error in
                if let error = error {
                    continuation.resume(throwing: DetectionError.detectionFailed(error.localizedDescription))
                    return
                }
                guard let results = request.results as? [VNBarcodeObservation] else {
                    continuation.resume(returning: [])
                    return
                }
                let barcodes = results.map { observation -> BarcodeInfo in
                    let bb = observation.boundingBox
                    let bounds = CGRect(x: bb.minX, y: 1.0 - bb.maxY,
                                       width: bb.width, height: bb.height)
                    return BarcodeInfo(format: self.mapSymbology(observation.symbology),
                                       text: observation.payloadStringValue ?? "",
                                       decodeTimeMs: 0, normalizedBounds: bounds)
                }
                continuation.resume(returning: barcodes)
            }
            request.symbologies = [.qr, .code128, .code39, .code93, .ean8, .ean13,
                                    .upce, .pdf417, .aztec, .dataMatrix, .codabar, .itf14]
            let handler = VNImageRequestHandler(cvPixelBuffer: pixelBuffer, options: [:])
            do {
                try handler.perform([request])
            } catch {
                continuation.resume(throwing: DetectionError.detectionFailed(error.localizedDescription))
            }
        }
    }
}
Step 6: Implement the ZXing-CPP Barcode Detector
ZXing-CPP is integrated via SPM using the zxing-cpp package and its iOS ZXingCpp wrapper. The ZXIBarcodeReader class handles both CGImage and CVPixelBuffer directly, and bounding coordinates are extracted from the result’s position quad:
import ZXingCpp

class ZXingCppBarcodeDetector: BarcodeDetector {

    private let reader: ZXIBarcodeReader

    init() {
        reader = ZXIBarcodeReader()
    }

    func detectBarcodes(in image: UIImage) async throws -> [BarcodeInfo] {
        guard let cgImage = image.cgImage else {
            throw DetectionError.invalidImage
        }
        let results = try reader.read(cgImage)
        let imgW = Int(image.size.width)
        let imgH = Int(image.size.height)
        return results.map { r in
            var bounds: CGRect?
            if imgW > 0 && imgH > 0 {
                let pos = r.position
                let xs = [pos.topLeft.x, pos.topRight.x, pos.bottomRight.x, pos.bottomLeft.x]
                let ys = [pos.topLeft.y, pos.topRight.y, pos.bottomRight.y, pos.bottomLeft.y]
                if let minX = xs.min(), let maxX = xs.max(),
                   let minY = ys.min(), let maxY = ys.max() {
                    bounds = CGRect(x: CGFloat(minX) / CGFloat(imgW),
                                    y: CGFloat(minY) / CGFloat(imgH),
                                    width: CGFloat(maxX - minX) / CGFloat(imgW),
                                    height: CGFloat(maxY - minY) / CGFloat(imgH))
                }
            }
            return BarcodeInfo(format: mapFormat(r.format), text: r.text,
                                decodeTimeMs: 0, normalizedBounds: bounds)
        }
    }

    func detectBarcodes(in pixelBuffer: CVPixelBuffer) async throws -> [BarcodeInfo] {
        let results = try reader.read(pixelBuffer)
        let bufW = CVPixelBufferGetWidth(pixelBuffer)
        let bufH = CVPixelBufferGetHeight(pixelBuffer)
        return results.map { r in
            var bounds: CGRect?
            if bufW > 0 && bufH > 0 {
                let pos = r.position
                let xs = [pos.topLeft.x, pos.topRight.x, pos.bottomRight.x, pos.bottomLeft.x]
                let ys = [pos.topLeft.y, pos.topRight.y, pos.bottomRight.y, pos.bottomLeft.y]
                if let minX = xs.min(), let maxX = xs.max(),
                   let minY = ys.min(), let maxY = ys.max() {
                    bounds = CGRect(x: CGFloat(minX) / CGFloat(bufW),
                                    y: CGFloat(minY) / CGFloat(bufH),
                                    width: CGFloat(maxX - minX) / CGFloat(bufW),
                                    height: CGFloat(maxY - minY) / CGFloat(bufH))
                }
            }
            return BarcodeInfo(format: mapFormat(r.format), text: r.text,
                                decodeTimeMs: 0, normalizedBounds: bounds)
        }
    }
}
Step 7: Extract and Benchmark Barcode Detection Over Video Frames
For video benchmarks, VideoFrameExtractor uses AVAssetImageGenerator to sample frames at a fixed interval (default 0.5 s). Each frame is decoded as a CGImage and wrapped into a UIImage before being passed to the detector chain. The tolerance is set to zero to ensure exact frame positions are decoded:
class VideoFrameExtractor {
    static func extractFrames(from videoURL: URL, interval: Double) async throws -> [UIImage] {
        let asset = AVAsset(url: videoURL)
        let duration = try await asset.load(.duration)
        let durationSeconds = CMTimeGetSeconds(duration)

        let imageGenerator = AVAssetImageGenerator(asset: asset)
        imageGenerator.appliesPreferredTrackTransform = true
        imageGenerator.requestedTimeToleranceBefore = .zero
        imageGenerator.requestedTimeToleranceAfter = .zero

        var frames: [UIImage] = []
        var currentTime: Double = 0

        while currentTime < durationSeconds {
            let cmTime = CMTime(seconds: currentTime, preferredTimescale: 600)
            if let cgImage = try? imageGenerator.copyCGImage(at: cmTime, actualTime: nil) {
                frames.append(UIImage(cgImage: cgImage))
            }
            currentTime += interval
        }
        return frames
    }
}
Once frames are extracted, each SDK runs sequentially. The benchmark records total processing time and accumulates unique barcode results (format:text as a deduplication key) across frames — so a barcode visible in five consecutive frames counts as one detection:
private func runDetectorBenchmark(
    detector: BarcodeDetector,
    engineName: String,
    frames: [UIImage],
    totalFrames: Int,
    startProgress: Double,
    endProgress: Double
) async {
    var allBarcodes: [BarcodeInfo] = []
    var uniqueBarcodes = Set<String>()
    var totalTimeMs: Int64 = 0

    for (index, frame) in frames.enumerated() {
        let startTime = Date()
        let barcodes = (try? await detector.detectBarcodes(in: frame)) ?? []
        totalTimeMs += Int64(Date().timeIntervalSince(startTime) * 1000)

        for barcode in barcodes {
            let key = "\(barcode.format):\(barcode.text)"
            if uniqueBarcodes.insert(key).inserted {
                allBarcodes.append(barcode)
            }
        }

        let frameProgress = Double(index + 1) / Double(totalFrames)
        let overallProgress = startProgress + (frameProgress * (endProgress - startProgress))
        await MainActor.run {
            progress = overallProgress
            statusMessage = "\(engineName): Frame \(index + 1)/\(totalFrames)"
        }
    }

    await MainActor.run {
        var result = BenchmarkResult(engineName: engineName)
        result.framesProcessed = totalFrames
        result.totalTimeMs = totalTimeMs
        result.barcodes = allBarcodes
        // assign to the appropriate viewModel property
    }
}
Step 8: Configure the Live Camera Feed with AVFoundation
CameraManager wraps AVCaptureSession, selects the rear wide-angle camera, and configures AVCaptureVideoDataOutput to push sample buffers to a per-SDK delegate. Resolution is selectable between 720p and 1080p from the home screen before starting any scanner:
func setupCamera(resolution: CameraResolution, delegate: AVCaptureVideoDataOutputSampleBufferDelegate) throws {
    let session = AVCaptureSession()

    switch resolution {
    case .hd720:
        session.sessionPreset = .hd1280x720
    case .hd1080:
        session.sessionPreset = .hd1920x1080
    }

    guard let videoDevice = AVCaptureDevice.default(.builtInWideAngleCamera, for: .video, position: .back) else {
        throw CameraError.noCameraAvailable
    }

    let videoDeviceInput = try AVCaptureDeviceInput(device: videoDevice)
    if session.canAddInput(videoDeviceInput) {
        session.addInput(videoDeviceInput)
    }

    videoOutput.setSampleBufferDelegate(delegate, queue: DispatchQueue(label: "videoQueue"))
    videoOutput.alwaysDiscardsLateVideoFrames = true
    if session.canAddOutput(videoOutput) {
        session.addOutput(videoOutput)
    }

    if let connection = videoOutput.connection(with: .video) {
        connection.videoOrientation = .portrait
    }

    self.session = session
}
Each live scanner view (DynamsoftScannerView, MLKitScannerView, VisionScannerView, ZXingCppScannerView) draws color-coded bounding-box overlays — blue, green, purple, and orange respectively — using normalized CGRect coordinates returned by the detectors.
Step 9: Run Remote Benchmarks via the Built-In HTTP Server
Why Remote Benchmarking Is Valuable for Mobile SDK Evaluation
Evaluating a barcode SDK properly requires a large, diverse image corpus — often dozens to hundreds of files. Transferring this dataset to a mobile device and triggering each test manually is slow and error-prone. The built-in HTTP server solves this: open the device’s IP in a desktop browser, drag-and-drop files in batch, and let the device run detection autonomously using its real CPU, GPU, and Neural Engine. The advantage over emulators or simulator tests is that results reflect the actual hardware pipeline — including ML accelerator scheduling and thermal throttling — which matters when comparing SDKs with different compute backends.
A secondary benefit is reproducibility: the server processes files in a consistent order, runs each SDK on the exact same decoded image bytes, and returns a structured JSON response per file that the browser accumulates into a downloadable HTML report. This workflow was used to produce the benchmark data in this article.
The server starts with a single call and makes the device’s local IP available as a URL:
func startWebServer() {
    guard webServer == nil else { return }
    do {
        let server = try BenchmarkWebServer(port: BenchmarkConfig.serverPort, viewModel: self)
        try server.start()
        webServer = server
        isWebServerRunning = true
        if let ip = getLocalIPAddress() {
            serverURL = "http://\(ip):\(BenchmarkConfig.serverPort)"
        }
    } catch {
        print("Failed to start web server: \(error)")
    }
}
For each uploaded file the server determines whether it is an image or video (via MIME type or byte sniffing), runs all four detectors in series, and returns a JSON object with per-SDK barcode counts and timing. Video files are sampled at up to 30 evenly-spaced frames. A real-time progress endpoint (GET /api/video-progress) lets the browser poll SDK-level progress during video processing.
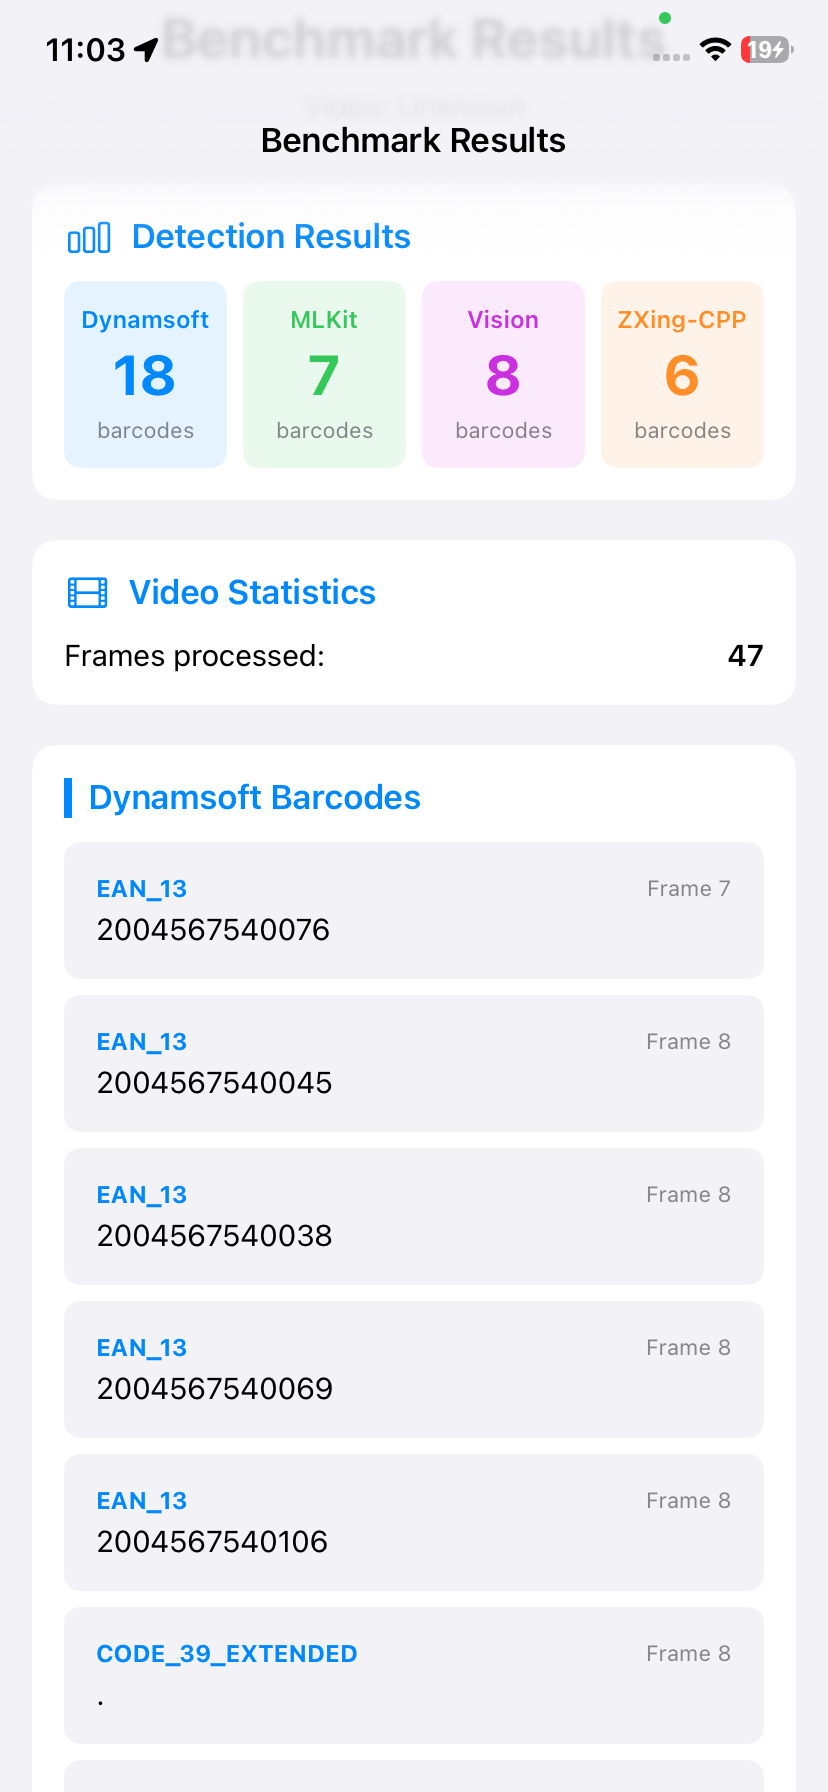
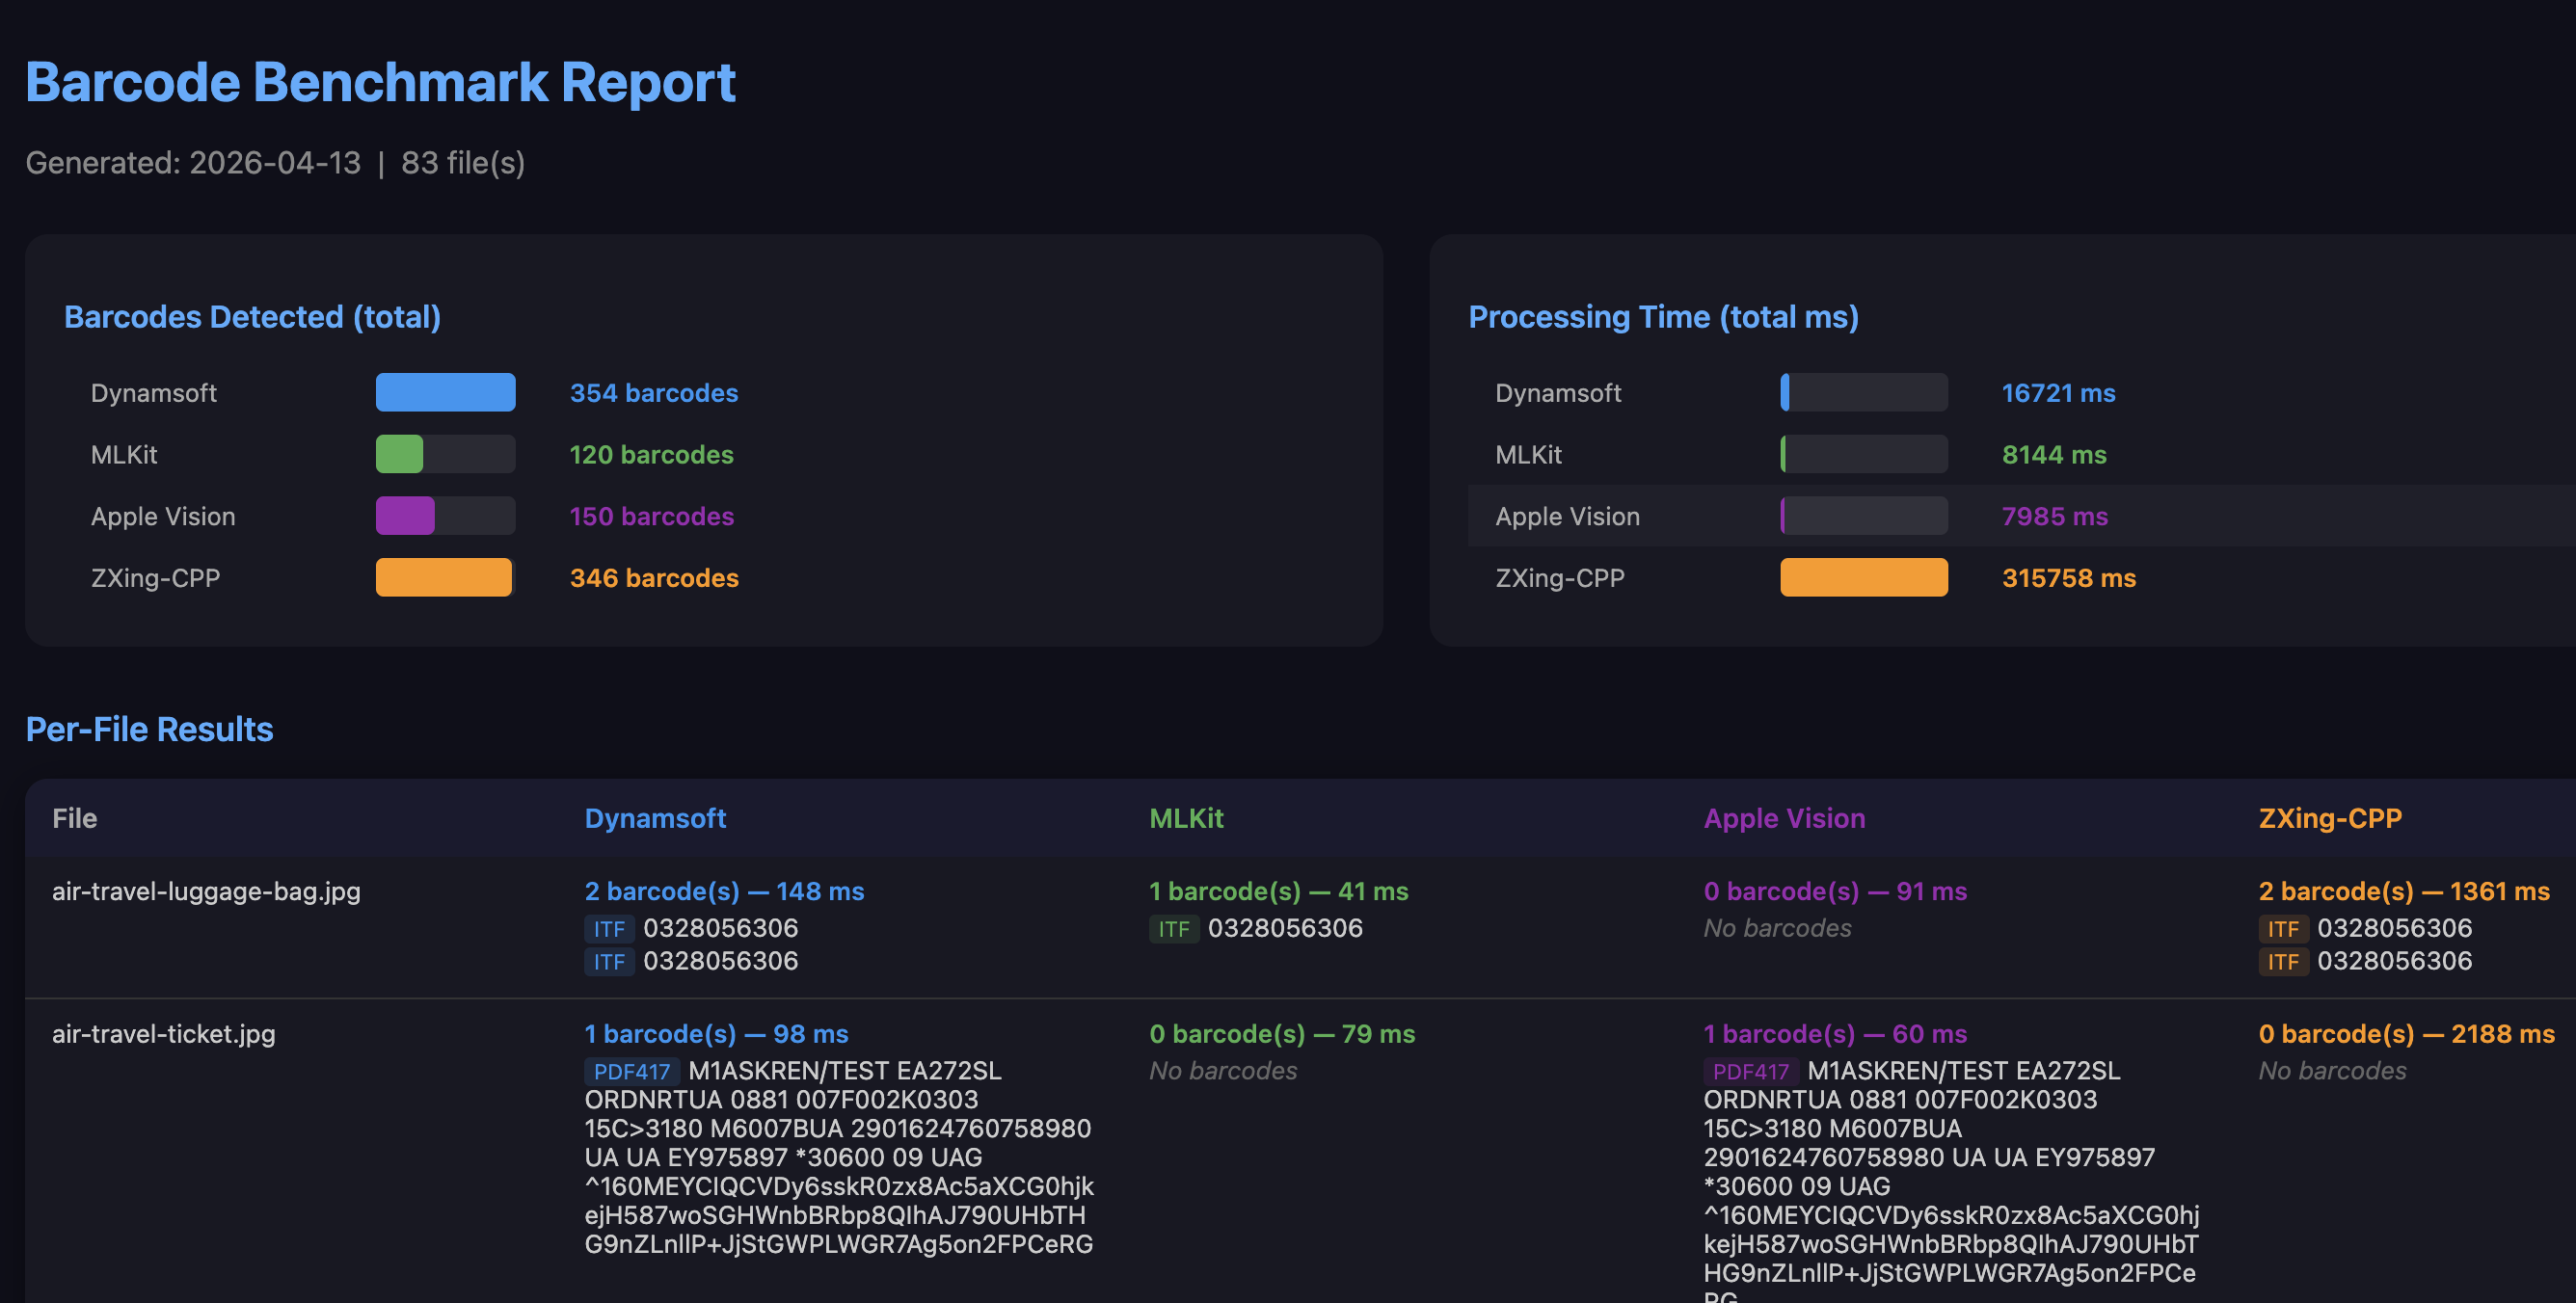
Benchmark Results
All benchmark data was collected via the remote HTTP server using 83 images from the Dynamsoft Barcode Test Sheet — a publicly available set covering QR codes, Data Matrix, PDF417, Aztec, EAN/UPC, Code 128/39/93, Codabar, ITF, and other common linear and 2D symbologies at various image qualities and orientations.
Summary Table
| SDK | Barcodes Detected | Relative to Dynamsoft | Total Time | Avg Time / Image |
|---|---|---|---|---|
| Dynamsoft | 354 | 100% | 16,721 ms | ~201 ms |
| ZXing-CPP | 346 | 97.7% | 315,758 ms | ~3,804 ms |
| Apple Vision | 150 | 42.4% | 7,985 ms | ~96 ms |
| ML Kit | 120 | 33.9% | 8,144 ms | ~98 ms |
Accuracy Analysis
Dynamsoft achieved the highest detection count at 354 barcodes — 8 more than ZXing-CPP (346), and more than twice the count of Apple Vision (150) or ML Kit (120). This lead holds across the full range of formats in the test set, including the more challenging ones:
- Dense 1D barcodes (Code 128, ITF): Apple Vision and ML Kit struggle with closely spaced bars at lower resolutions; Dynamsoft and ZXing-CPP decode them reliably.
- Small or distorted codes: Vision and ML Kit require a larger minimum barcode size relative to image dimensions; Dynamsoft is more tolerant of scale and perspective distortion.
- Multi-barcode images: on images containing multiple barcodes, Vision and ML Kit often returned only the largest or clearest one, while Dynamsoft consistently located all visible codes.
The ~2.5× gap over Apple Vision and ~3× gap over ML Kit is large enough to be a disqualifying factor in any production workflow that processes real-world images — document scans, retail shelves, logistics labels — rather than clean, well-lit single QR codes.
Speed Analysis
Apple Vision and ML Kit are the fastest per image: ~96–98 ms on average. Both offload inference to Apple’s Neural Engine, which explains their similar throughput. However, their high per-image speed is offset by the low number of barcodes they actually find — making the metric somewhat misleading in isolation.
Dynamsoft averages ~201 ms per image — roughly 2× slower than Vision/ML Kit in wall-clock time, but it returns nearly 3× more detections. The per-detection cost (total time ÷ barcodes found) is approximately 47 ms for Dynamsoft vs 53 ms for Vision and 68 ms for ML Kit. Dynamsoft extracts more value per millisecond spent, and at ~201 ms/frame it remains entirely viable for real-time camera use on current iPhone hardware. It is the only SDK in this benchmark that is both the accuracy leader and real-time capable — a combination ZXing-CPP, Vision, and ML Kit each fail to achieve for different reasons.
ZXing-CPP averages ~3,804 ms per image — roughly 19× slower than Dynamsoft — because its decoding runs entirely on the CPU in C++ without hardware acceleration. At this latency, frame-by-frame live camera scanning is not practical. It is best suited for offline or batch processing where accuracy matters more than throughput.
Practical SDK Selection Guide
| Use Case | Recommended SDK | Reason |
|---|---|---|
| QR codes only, clean lighting | Apple Vision or ML Kit | Free, fast, zero setup |
| Mixed formats, real-world images | Dynamsoft | Highest accuracy across all formats |
| Offline batch processing, free | ZXing-CPP | Near-Dynamsoft accuracy; no license needed |
| Real-time live camera, broad format support | Dynamsoft | Only SDK combining top accuracy with ~201 ms/frame speed |
| Budget-constrained, QR/EAN only | Apple Vision | Free, hardware-accelerated, adequate for simple codes |
If your app only needs to scan a single well-printed QR code from a mobile camera, Apple Vision or ML Kit are sufficient and free. For anything beyond that — mixed symbologies, challenging lighting, multi-barcode images, or document scanning — Dynamsoft is the only SDK in this benchmark that delivers both the accuracy and the speed required for a production-quality experience.
Common Issues & Edge Cases
- “Wrong file opened” build error: Opening
BarcodeBenchmark.xcodeprojinstead ofBarcodeBenchmark.xcworkspaceafterpod installwill cause the ML Kit CocoaPods target to be missing. Always use the.xcworkspace. - Dynamsoft license not verified:
onLicenseVerifiedis called asynchronously; decoding attempted before the callback fires will be silently rejected. Confirm the bundle identifier matches the one registered at the Dynamsoft customer portal. - Vision bounding box coordinates flipped:
VNBarcodeObservation.boundingBoxuses a bottom-left origin (CoreGraphics convention). SubtractmaxYfrom 1.0 when converting to UIKit/SwiftUI top-left coordinates, as done inVisionBarcodeDetector. - Low frame rate at 1080p:
videoOutput.alwaysDiscardsLateVideoFrames = truekeeps the preview responsive; computationally heavy SDKs (especially ZXing-CPP) will simply process fewer frames rather than stalling the camera pipeline.
Conclusion
This SwiftUI app provides a reproducible, on-device comparison of four barcode scanning SDKs under identical conditions. Based on 83 real-world barcode images, Dynamsoft Barcode Reader is the strongest all-around performer: it detected the most barcodes (354), achieved the best per-detection efficiency (~47 ms per barcode found), and remains fast enough for real-time camera use. The three free alternatives each cover a narrower niche — ZXing-CPP approaches Dynamsoft’s accuracy but is 19× slower, making it suitable only for offline processing; Apple Vision and ML Kit are fast but miss more than half the barcodes Dynamsoft finds on challenging inputs. For production apps that need reliable scanning across diverse barcode types and real-world image conditions, Dynamsoft Barcode Reader is the well-supported choice.