


How to Measure Barcode Scanning Distance on iOS with ARKit and Swift
When evaluating barcode scanning SDKs, you’ll often encounter bold marketing claims: “Scans barcodes from 5 meters away!” or “Industry-leading long-distance scanning!” But here’s the truth that vendors don’t want you to know: distance alone is a meaningless metric.
In this article, I’ll show you how to build an iOS app using ARKit and Dynamsoft Barcode Reader SDK to measure the real performance indicator: module size. You’ll learn why a barcode SDK that claims to scan from 10 meters away might perform worse than one that “only” scans from 2 meters, and how to objectively evaluate barcode scanning performance.
What you’ll build: An iOS app using ARKit and Dynamsoft Barcode Reader SDK that overlays real-time distance and module size measurements on detected barcodes — giving you a repeatable, objective benchmark tool for comparing any barcode scanning SDK.
Key Takeaways
- Distance alone is a misleading barcode SDK benchmark — module size (the pixel width of the smallest barcode element) is the only objective performance metric.
- ARKit’s hit testing provides accurate depth measurement (±1cm on LiDAR-equipped devices) that can be combined with barcode detection results in real time.
- Dynamsoft Barcode Reader SDK exposes
moduleSizedirectly on eachBarcodeResultItem, eliminating manual pixel calculation. - This measurement tool enables reproducible side-by-side SDK comparisons under identical physical test conditions.
Common Developer Questions
How do I measure barcode scanning distance on iOS using ARKit in Swift?
Use ARKit to obtain the camera frame and depth information, detect the barcode in that frame, and then place a measurement overlay that combines the hit-tested distance with the decode result. That produces a live iOS benchmark tool rather than a hand-measured estimate.
What is module size in barcode scanning and why does it matter more than distance?
Module size is the pixel width of the smallest barcode element, such as the narrowest bar or the smallest QR square. It matters more than raw distance because two barcodes at different physical distances can present the same module size to the camera and therefore the same decoding difficulty.
How do I decode barcodes from an ARKit ARFrame camera buffer using the NV12 pixel format in Swift?
Treat the ARFrame image as an NV12 pixel buffer, lock it before reading, and initialize the barcode SDK input with the matching NV12 image format instead of an RGB format. Using the wrong pixel format is a common reason for silent decode failures when integrating ARKit frames.
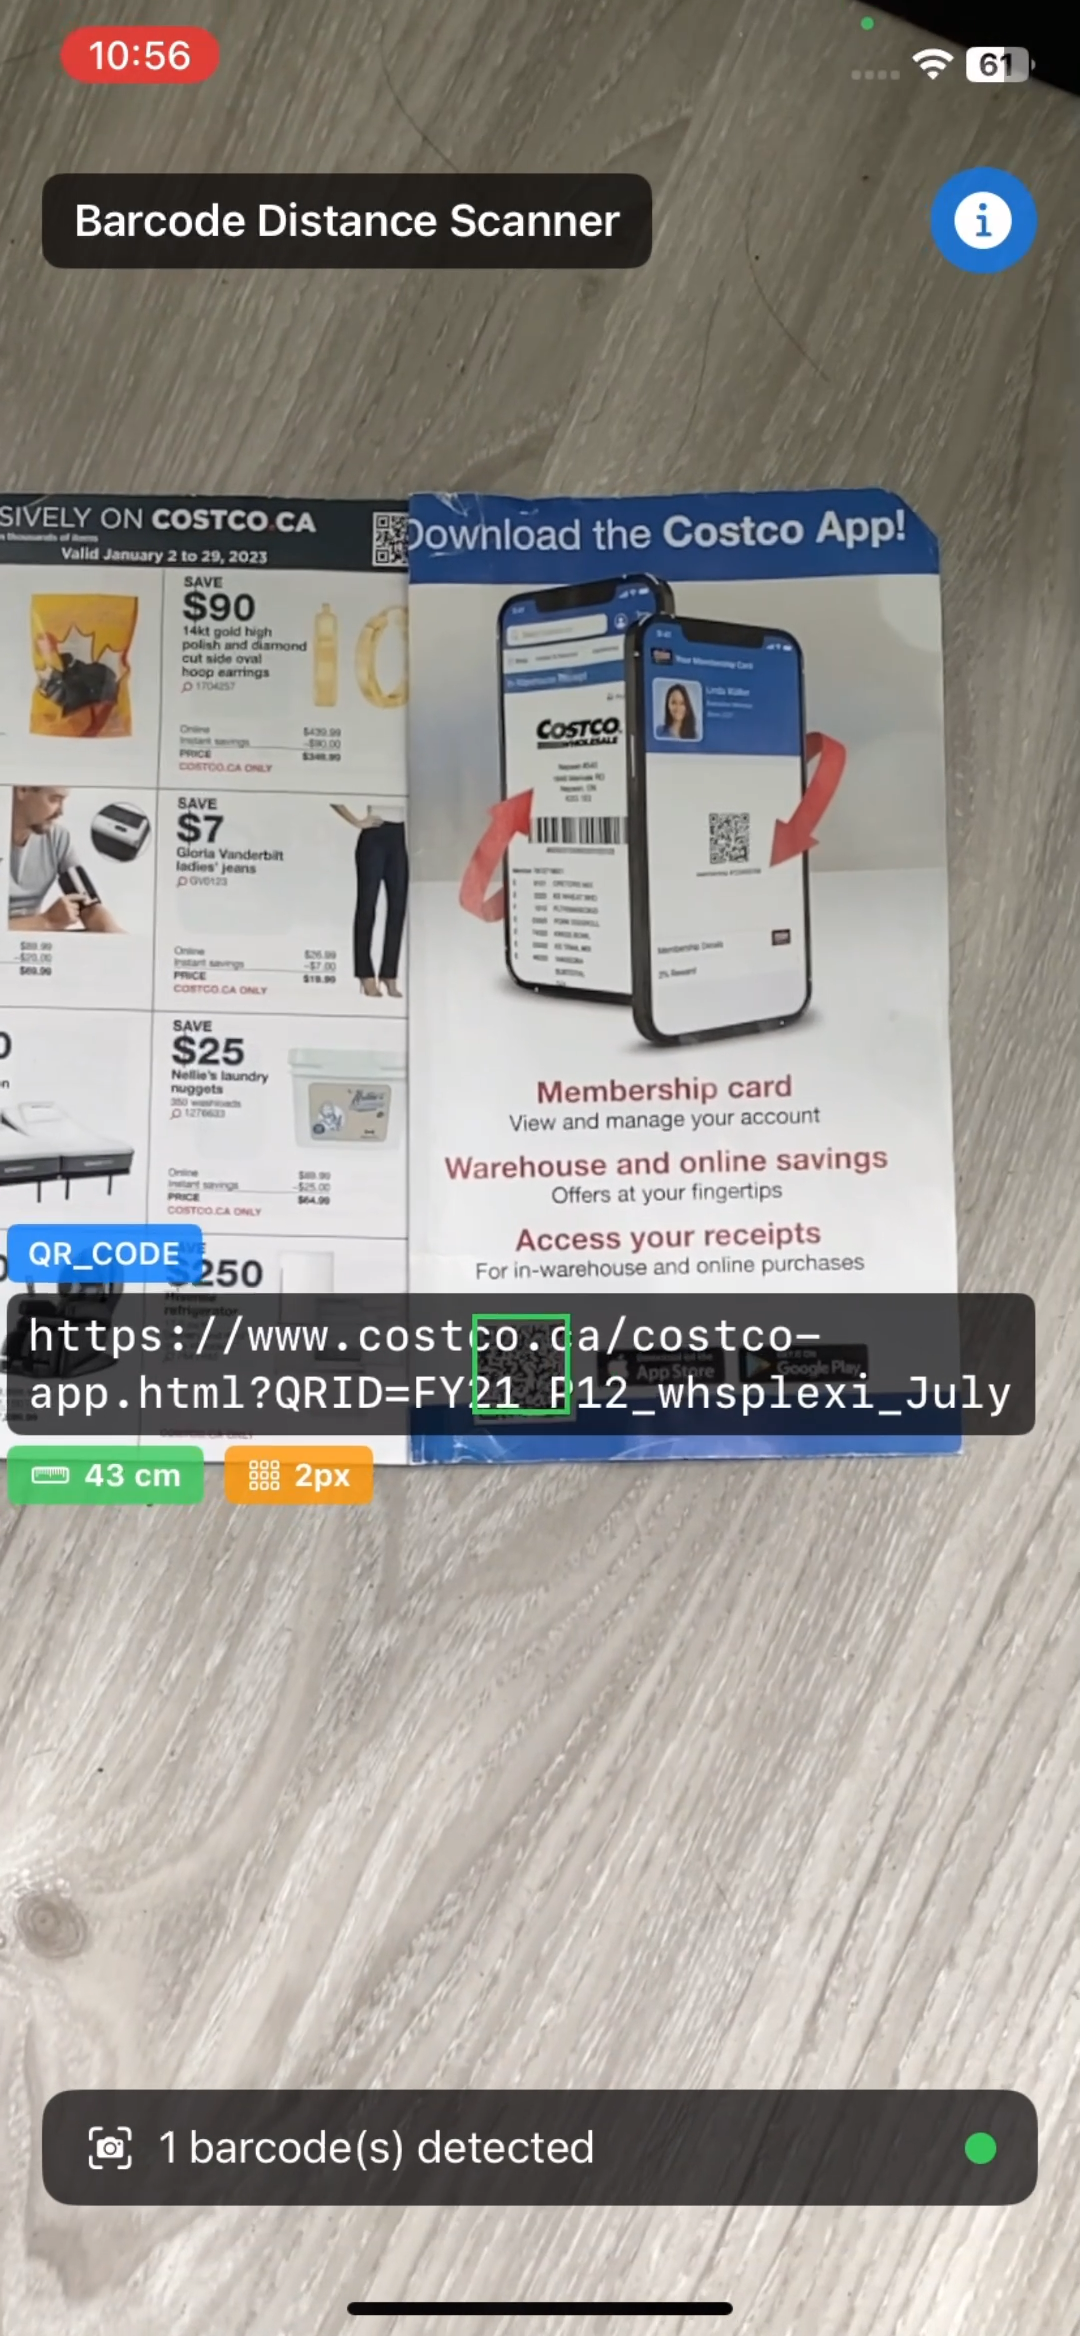
Demo Video: Display Barcode Module Size and Distance in Real-Time
The video below shows a demo app that runs on an iPhone 11, using ARKit to measure distance and Dynamsoft Barcode Reader to detect barcodes. The overlay displays both the distance to the barcode and its module size in pixels.
Prerequisites
- Get a 30-day free trial license for Dynamsoft Barcode Reader
Why Distance Claims Are Misleading: Module Size Is the Real Metric
Why Distance-Based Claims Miss the Point
Many companies market their barcode SDKs with impressive distance claims:
- “Read barcodes up to 10 meters away!”
- “5x farther than competitors!”
- “Long-distance scanning capability!”
Here’s why these claims are deceptive:
If a barcode is physically large, any decent SDK can scan it from far away. The real question isn’t “how far?” but rather “how small of a module size can your SDK reliably decode?”
What Is Module Size and Why It Determines Scanning Difficulty
Module size is the width (in pixels) of the smallest element in a barcode:
- For QR codes: the size of one black or white square
- For 1D barcodes: the width of the narrowest bar
This is the metric that truly determines scanning difficulty:
- Large module size (e.g., 20+ pixels): Easy to scan, even from distance
- Small module size (e.g., 5-10 pixels): Challenging, requires good algorithm
- Very small module size (< 5 pixels): Often at the limit of SDK capability
How Distance and Physical Size Together Determine Module Size
Consider these scenarios:
| Physical Barcode Size | Distance | Module Size in Camera | Difficulty |
|---|---|---|---|
| 10cm × 10cm QR code | 3 meters | 15 pixels | Easy |
| 2cm × 2cm QR code | 50cm | 15 pixels | Easy (same!) |
| 10cm × 10cm QR code | 8 meters | 5 pixels | Hard |
| 1cm × 1cm QR code | 40cm | 5 pixels | Hard (same!) |
The scanning difficulty is identical when module size is the same, regardless of the actual physical distance. A vendor claiming “10-meter scanning” might just be testing with poster-sized barcodes!
Build a Real-Time Barcode Performance Measurement Tool with ARKit
To objectively evaluate barcode SDK performance, we need to measure module size alongside distance. This iOS app demonstrates how to do exactly that using:
- ARKit - Apple’s augmented reality framework for accurate distance measurement
- Dynamsoft Barcode Reader - A commercial SDK we’ll evaluate (you can substitute any SDK)
- Real-time overlay - Display both distance AND module size simultaneously
What the Demo App Measures
- Real-time barcode detection with Dynamsoft iOS Barcode Reader SDK
- Accurate distance measurement using ARKit hit testing and LiDAR (when available)
- Module size reporting directly from SDK
- Visual overlay showing all metrics simultaneously
- Support for all major barcode formats (QR, Code 128, EAN, etc.)
Understand the App Architecture
┌─────────────────────────────────────┐
│         ContentView.swift           │
│    (Main UI with ZStack layout)    │
└──────────┬──────────────────────────┘
           │
           ├─► ARBarcodeScanner.swift
           │   ├─ ARSCNView (Camera + AR session)
           │   ├─ ARKit distance calculation
           │   └─ Dynamsoft barcode detection
           │
           └─► BarcodeOverlayView.swift
               └─ Visual annotations (distance + module size)
The app uses SwiftUI’s ZStack to layer:
- Bottom layer: AR camera view with barcode detection
- Top layer: Overlay annotations showing results
Step-by-Step: Build the iOS Barcode Distance Scanner in Swift
Step 1: Define the BarcodeDetection Data Model
First, we define a data structure to hold all the information we need about each detected barcode:
struct BarcodeDetection: Identifiable {
    let id = UUID()
    let value: String           // Barcode content
    let type: String            // Format (QR, Code128, etc.)
    let distance: Float         // Distance from camera (meters)
    let position: CGPoint       // Screen position for overlay
    let bounds: CGRect          // Bounding box for drawing
    let moduleSize: Int         // THE KEY METRIC: module size in pixels
}
The moduleSize property is what makes this tool valuable - it’s the objective performance metric we’re after.
Step 2: Set Up ARKit and the AR Session
We use ARSCNView to get camera access and AR tracking capabilities:
struct ARBarcodeScanner: UIViewRepresentable {
    @Binding var detectedBarcodes: [BarcodeDetection]

    func makeUIView(context: Context) -> ARSCNView {
        let arView = ARSCNView()
        arView.delegate = context.coordinator
        arView.session.delegate = context.coordinator

        let configuration = ARWorldTrackingConfiguration()

        configuration.planeDetection = []
        configuration.environmentTexturing = .none

        if ARWorldTrackingConfiguration.supportsFrameSemantics(.sceneDepth) {
            configuration.frameSemantics = .sceneDepth
        }

        arView.session.run(configuration)
        return arView
    }

    func makeCoordinator() -> ARBarcodeScannerCoordinator {
        ARBarcodeScannerCoordinator(parent: self)
    }
}
Key points:
ARWorldTrackingConfigurationenables 6DOF tracking and distance measurementsceneDepthactivates LiDAR sensor for precise depth data (if hardware supports it)- We disable plane detection and environment texturing to conserve battery/performance
Step 3: Process Camera Frames with Throttling
Processing every single camera frame would drain battery and CPU. We implement throttling:
func session(_ session: ARSession, didUpdate frame: ARFrame) {
    let currentTime = Date().timeIntervalSince1970
    guard !isProcessing && (currentTime - lastProcessTime) >= processingInterval else { return }

    isProcessing = true
    lastProcessTime = currentTime

    let currentOrientation: UIInterfaceOrientation
    if Thread.isMainThread {
        currentOrientation = UIApplication.shared.connectedScenes
            .compactMap { $0 as? UIWindowScene }
            .first?.interfaceOrientation ?? .portrait
    } else {
        currentOrientation = .portrait
    }

    DispatchQueue.global(qos: .userInitiated).async { [weak self] in
        self?.detectBarcodes(in: frame, orientation: currentOrientation)
        self?.isProcessing = false
    }
}
Key points:
- Process every 100ms (10 FPS) instead of 60 FPS - enough for smooth UX
- Capture UI orientation on main thread (UIKit requirement)
- Perform heavy work on background queue
- Use
[weak self]to prevent retain cycles
Step 4: Integrate Dynamsoft Barcode Reader SDK
Now the core barcode detection using Dynamsoft Barcode Reader SDK:
private func detectBarcodes(in frame: ARFrame, orientation: UIInterfaceOrientation) {
    let pixelBuffer = frame.capturedImage

    CVPixelBufferLockBaseAddress(pixelBuffer, .readOnly)
    defer { CVPixelBufferUnlockBaseAddress(pixelBuffer, .readOnly) }

    guard let baseAddress = CVPixelBufferGetBaseAddress(pixelBuffer) else { return }

    let width = CVPixelBufferGetWidth(pixelBuffer)
    let height = CVPixelBufferGetHeight(pixelBuffer)
    let bufferSize = CVPixelBufferGetDataSize(pixelBuffer)

    let buffer = Data(bytes: baseAddress, count: bufferSize)
    let imageData = ImageData(
        bytes: buffer,
        width: UInt(width),
        height: UInt(height),
        stride: UInt(width),
        format: .NV12,
        orientation: getDynamsoftOrientation(for: orientation),
        tag: nil
    )

    let result = cvr.captureFromBuffer(imageData, templateName: PresetTemplate.readBarcodes.rawValue)

    if let items = result.items {
        for item in items {
            if item.type == .barcode, let barcodeItem = item as? BarcodeResultItem {
                let format = barcodeItem.formatString
                let text = barcodeItem.text
                let points = barcodeItem.location.points
                let moduleSize = barcodeItem.moduleSize

                ...
            }
        }
    }
}
Key points:
- ARKit provides YUV (NV12) pixel buffers, not RGB
- Must handle device orientation for correct image interpretation
moduleSizeis provided directly by Dynamsoft SDK - this is the gold standard metric- Always unlock pixel buffers when done
Step 5: Map Barcode Coordinates from Camera to Screen
Camera resolution (e.g., 1920×1080) differs from screen size (e.g., 414×896 points). We must map barcode coordinates correctly:
let viewInfo = getARViewSize()
let arViewPointSize = viewInfo.pointSize
let arViewPixelSize = viewInfo.pixelSize
let screenScale = viewInfo.scale

let (cameraWidth, cameraHeight) = getOrientedCameraDimensions(
    bufferWidth: width,
    bufferHeight: height,
    orientation: orientation
)

let scaleX = arViewPixelSize.width / CGFloat(cameraWidth)
let scaleY = arViewPixelSize.height / CGFloat(cameraHeight)
let scale = max(scaleX, scaleY)

let scaledImageWidth = CGFloat(cameraWidth) * scale
let scaledImageHeight = CGFloat(cameraHeight) * scale
let cropOffsetX = (scaledImageWidth - arViewPixelSize.width) / 2
let cropOffsetY = (scaledImageHeight - arViewPixelSize.height) / 2

let scaledPixelPoints = points.map { point in
    CGPoint(
        x: point.x * scale - cropOffsetX,
        y: point.y * scale - cropOffsetY
    )
}

let scaledPoints = scaledPixelPoints.map { pixelPoint in
    CGPoint(
        x: pixelPoint.x / screenScale,
        y: pixelPoint.y / screenScale
    )
}
Key challenges:
- Points vs Pixels: iOS uses “points” for UI, but camera uses pixels. On retina displays (2× or 3×), 1 point = multiple pixels
- Aspect Fill: Camera feed is cropped to fill screen
- Orientation: Camera buffer is fixed landscape orientation
Step 6: Calculate Distance with ARKit Hit Testing
ARKit provides hit testing to determine 3D world coordinates:
private func calculateDistance(at point: CGPoint, frame: ARFrame) -> Float? {
    var results = frame.hitTest(point, types: .featurePoint)

    if results.isEmpty {
        results = frame.hitTest(point, types: .existingPlane)
    }

    if results.isEmpty {
        results = frame.hitTest(point, types: .estimatedHorizontalPlane)
    }

    guard let result = results.first else { return nil }

    let distance = simd_distance(
        result.worldTransform.columns.3,
        frame.camera.transform.columns.3
    )

    guard distance > 0.1 && distance < 10.0 else { return nil }

    return distance
}
Key points:
- Try multiple hit test strategies: feature points (LiDAR/visual), existing planes, estimated planes
simd_distancecomputes 3D Euclidean distance between world positions- Filter out unrealistic values (too close or too far)
- Returns
nilif no reliable depth information available
On LiDAR devices (iPhone 12 Pro and newer Pro models), this is extremely accurate (±1cm). On non-LiDAR devices, it uses visual SLAM which is less precise but still usable.
Step 7: Display Distance and Module Size in the Overlay
Finally, we display both distance AND module size together:
struct BarcodeAnnotationView: View {
    let barcode: BarcodeDetection

    var body: some View {
        VStack(alignment: .leading, spacing: 4) {

            Text(barcode.type)
                .font(.caption)
                .padding(.horizontal, 8)
                .padding(.vertical, 4)
                .background(Color.blue.opacity(0.8))
                .foregroundColor(.white)
                .cornerRadius(4)

            Text(barcode.value)
                .font(.system(.body, design: .monospaced))
                .padding(.horizontal, 8)
                .padding(.vertical, 6)
                .background(Color.black.opacity(0.7))
                .foregroundColor(.white)
                .cornerRadius(6)

            HStack(spacing: 8) {
                HStack(spacing: 4) {
                    Image(systemName: "ruler")
                    Text(formatDistance(barcode.distance))
                        .fontWeight(.bold)
                }
                .font(.caption)
                .padding(.horizontal, 8)
                .padding(.vertical, 4)
                .background(Color.green.opacity(0.8))
                .foregroundColor(.white)
                .cornerRadius(4)

                HStack(spacing: 4) {
                    Image(systemName: "square.grid.3x3")
                    Text("\(barcode.moduleSize)px")
                        .fontWeight(.bold)
                }
                .font(.caption)
                .padding(.horizontal, 8)
                .padding(.vertical, 4)
                .background(Color.orange.opacity(0.8))
                .foregroundColor(.white)
                .cornerRadius(4)
            }
        }
        .position(x: barcode.position.x, y: barcode.position.y)
        .overlay(
            Rectangle()
                .stroke(Color.green, lineWidth: 2)
                .frame(width: barcode.bounds.width, height: barcode.bounds.height)
                .position(x: barcode.bounds.midX, y: barcode.bounds.midY)
        )
    }
}
How to Use This Tool to Compare Barcode SDKs Objectively
Now that you have the app running, here’s how to objectively test barcode SDK performance:
Run the Side-by-Side SDK Comparison Test
- Print test barcodes of various physical sizes:
- Small: 2cm × 2cm QR codes
- Medium: 5cm × 5cm QR codes
- Large: 10cm × 10cm QR codes
- For each barcode size, gradually move away until detection fails:
- Record the module size at the maximum working distance
- The distance itself doesn’t matter!
- Compare SDKs by the minimum module size they can reliably decode:
- SDK A: Works down to 8px module size
- SDK B: Works down to 5px module size
- SDK B is objectively better, regardless of physical distance
Interpret Your Module Size Performance Results
| Module Size Range | Performance Level | Notes |
|---|---|---|
| 20+ pixels | Excellent | Should be 100% reliable for any decent SDK |
| 10-20 pixels | Good | Normal scanning conditions |
| 5-10 pixels | Challenging | Separates good SDKs from mediocre ones |
| 3-5 pixels | Difficult | Premium SDKs only; may require good lighting |
| < 3 pixels | Extreme | At or beyond most SDK capabilities |
Common Issues and Edge Cases
- ARKit hit test returns no results: This happens in low-texture environments (blank walls, featureless floors). The fallback chain in Step 6 — trying
.featurePoint→.existingPlane→.estimatedHorizontalPlanein sequence — handles most cases. If all three fail,nilis returned and the overlay simply omits the distance value rather than crashing. - Barcode overlay appears offset from the actual barcode: The most common cause is an incorrect aspect-fill scale calculation. Verify you are using
max(scaleX, scaleY)(notmin) and thatcropOffsetX/Yaccounts for the full pixel-to-point conversion including the screen’snativeScale. Different iPhone screen densities (2× vs 3×) require theUIScreen.main.nativeScalevalue, notUIScreen.main.scale. - NV12 pixel buffer causes missed detections or garbled results: ARKit captures frames in YUV NV12 format, not RGB. Passing the wrong
EnumImagePixelFormatto Dynamsoft’sImageDatainitializer (e.g.,.ARGB_8888) will silently decode garbage. Always useformat: .NV12as shown in Step 4 and lock/unlock the pixel buffer withCVPixelBufferLockBaseAddress/CVPixelBufferUnlockBaseAddressaround every read.