


Swift iOS MRZ Scanner: Build an ID Card Reader with Face Detection, OCR, and Document Scanning
Apple’s vision framework provides APIs for performing computer vision tasks such as face detection, document boundary detection, and text extraction. In this tutorial, we’ll explore how to leverage these APIs and Dynamsoft MRZ SDK to build a robust iOS ID scanner app.
What you’ll build: A SwiftUI iOS app that uses Apple Vision for real-time face and document boundary detection, native OCR for text extraction, and Dynamsoft MRZ Scanner to reliably parse machine-readable fields from passports and ID cards.
Key Takeaways
- Apple’s
VNDetectFaceRectanglesRequestandVNDetectRectanglesRequestenable real-time face and document detection on iOS 14+ without third-party libraries. VNRecognizeTextRequestcan extract general text from ID images, but a dedicated SDK like Dynamsoft MRZ Scanner is needed for accurate Machine Readable Zone parsing from passports and national IDs.- Perspective correction using
CIFilter(name: "CIPerspectiveCorrection")removes scan distortion before running OCR or MRZ recognition, significantly improving accuracy. - This tutorial produces a production-ready Swift ID card scanner combining free Apple frameworks with a commercial MRZ SDK suitable for iOS 14+ deployment.
Common Developer Questions
- How do I build an iOS MRZ scanner in Swift for passports and ID cards?
- What is the difference between Apple Vision OCR and Dynamsoft MRZ Scanner for reading travel document MRZ fields?
- How do I use
VNDetectRectanglesRequestto detect and crop document boundaries in SwiftUI?
Demo Video: iOS ID Scanner
Prerequisites
- A 30-day FREE trial license for Dynamsoft MRZ Scanner SDK
- Xcode 15.0 or later
- iOS 14.0+ deployment target
- A physical iOS device (camera features don’t work in simulator)
Set Up the Xcode Project
- Create a new SwiftUI project in Xcode.
- Add the Dynamsoft MRZ Scanner via Swift Package Manager:
- In Xcode: File > Add Package Dependency
- Enter URL:
https://github.com/Dynamsoft/mrz-scanner-spm - Select version:
3.0.5200 - Add both products:
DynamsoftCaptureVisionBundleDynamsoftMRZScannerBundle
-
Navigate to your project settings, select your app target, and go to the Info tab. Add the following keys to request camera access:
 <key>NSCameraUsageDescription</key>
 <string>Camera access is required for document scanning and face detection.</string>
Step 1: Request Camera Permissions in iOS
First, let’s create a permissions manager to handle camera access:
import AVFoundation
import Photos
import SwiftUI

class PermissionsManager: ObservableObject {
    @Published var cameraPermissionStatus: AVAuthorizationStatus = .notDetermined

    init() {
        checkPermissions()
        startMonitoringPermissions()
    }

    func checkPermissions() {
        cameraPermissionStatus = AVCaptureDevice.authorizationStatus(for: .video)
        photoLibraryPermissionStatus = PHPhotoLibrary.authorizationStatus(for: .addOnly)
    }

    private func startMonitoringPermissions() {
        NotificationCenter.default.addObserver(
            forName: UIApplication.didBecomeActiveNotification,
            object: nil,
            queue: .main
        ) { [weak self] _ in
            self?.checkPermissions()
        }
    }

    func requestCameraPermission() {
        AVCaptureDevice.requestAccess(for: .video) { [weak self] granted in
            DispatchQueue.main.async {
                self?.checkPermissions()
            }
        }
    }

    var isCameraAuthorized: Bool {
        cameraPermissionStatus == .authorized
    }

    deinit {
        NotificationCenter.default.removeObserver(self)
    }
}

struct PermissionsView: View {
    @ObservedObject var permissionsManager: PermissionsManager
    @Binding var isPresented: Bool

    var body: some View {
        VStack(spacing: 30) {
            VStack(spacing: 16) {
                Image(systemName: "camera.viewfinder")
                    .font(.system(size: 60))
                    .foregroundColor(.blue)

                Text("Camera Access Required")
                    .font(.title2)
                    .fontWeight(.semibold)

                Text("ID Scanner needs camera access to scan documents and detect faces for verification.")
                    .font(.body)
                    .multilineTextAlignment(.center)
                    .foregroundColor(.secondary)
                    .padding(.horizontal)
            }

            VStack(spacing: 16) {
                PermissionRow(
                    icon: "camera",
                    title: "Camera",
                    description: "Required for document scanning",
                    status: permissionsManager.cameraPermissionStatus,
                    action: permissionsManager.requestCameraPermission
                )

            }
            .padding(.horizontal)

            if permissionsManager.isCameraAuthorized {
                Button("Continue") {
                    isPresented = false
                }
                .buttonStyle(.borderedProminent)
                .controlSize(.large)
            }

            Spacer()
        }
        .padding()
        .onAppear {
            permissionsManager.checkPermissions()
        }
    }
}
Then create a user-friendly permission view:
struct PermissionRow: View {
    let icon: String
    let title: String
    let description: String
    let status: Any
    let action: () -> Void

    private var statusText: String {
        if let cameraStatus = status as? AVAuthorizationStatus {
            switch cameraStatus {
            case .authorized:
                return "Granted"
            case .denied, .restricted:
                return "Denied"
            case .notDetermined:
                return "Not Requested"
            @unknown default:
                return "Unknown"
            }
        } else if let photoStatus = status as? PHAuthorizationStatus {
            switch photoStatus {
            case .authorized, .limited:
                return "Granted"
            case .denied, .restricted:
                return "Denied"
            case .notDetermined:
                return "Not Requested"
            @unknown default:
                return "Unknown"
            }
        }
        return "Unknown"
    }

    private var isGranted: Bool {
        if let cameraStatus = status as? AVAuthorizationStatus {
            return cameraStatus == .authorized
        } else if let photoStatus = status as? PHAuthorizationStatus {
            return photoStatus == .authorized || photoStatus == .limited
        }
        return false
    }

    var body: some View {
        HStack(spacing: 16) {
            Image(systemName: icon)
                .font(.title2)
                .foregroundColor(.blue)
                .frame(width: 30)

            VStack(alignment: .leading, spacing: 2) {
                Text(title)
                    .font(.headline)

                Text(description)
                    .font(.caption)
                    .foregroundColor(.secondary)
            }

            Spacer()

            if isGranted {
                Image(systemName: "checkmark.circle.fill")
                    .foregroundColor(.green)
            } else {
                Button("Allow") {
                    action()
                }
                .buttonStyle(.bordered)
                .controlSize(.small)
            }
        }
        .padding()
        .background(Color(UIColor.secondarySystemBackground))
        .cornerRadius(12)
    }
}
Step 2: Configure the AVFoundation Camera Stream
Create a camera manager class:
import AVFoundation
import UIKit
import Vision
import DynamsoftMRZScannerBundle

final class CameraManager: NSObject, ObservableObject {
    @Published var captureSession = AVCaptureSession()
    @Published var previewLayer: AVCaptureVideoPreviewLayer?
    @Published var detectedFaces: [VNFaceObservation] = []
    @Published var detectedRectangles: [VNRectangleObservation] = []
    @Published var isSessionRunning = false

    @Published var imageWidth: Int = 0
    @Published var imageHeight: Int = 0

    enum CameraQuality {
        case maximum    // .photo preset (~12MP, best for OCR/MRZ)
        case high4K     // .hd4K3840x2160
        case fullHD     // .hd1920x1080 (good balance)
        case hd         // .hd1280x720 (faster processing)
        case balanced   // .high (system optimized)

        var preset: AVCaptureSession.Preset {
            switch self {
            case .maximum: return .photo
            case .high4K: return .hd4K3840x2160
            case .fullHD: return .hd1920x1080
            case .hd: return .hd1280x720
            case .balanced: return .high
            }
        }

        var description: String {
            switch self {
            case .maximum: return "Maximum Quality (~12MP, best for OCR/MRZ)"
            case .high4K: return "4K Quality (3840×2160)"
            case .fullHD: return "Full HD (1920×1080, good balance)"
            case .hd: return "HD (1280×720, faster processing)"
            case .balanced: return "Balanced (system optimized)"
            }
        }
    }

    private var currentQuality: CameraQuality = .maximum
    private let videoOutput = AVCaptureVideoDataOutput()
    private let sessionQueue = DispatchQueue(label: "camera.session.queue")

    private let faceRequest = VNDetectFaceRectanglesRequest()
    private let rectangleRequest: VNDetectRectanglesRequest = {
        let request = VNDetectRectanglesRequest()
        request.minimumConfidence = 0.80
        request.maximumObservations = 5
        request.minimumAspectRatio = 0.2
        request.maximumAspectRatio = 5.0
        request.minimumSize = 0.05
        return request
    }()

    private let cvr = CaptureVisionRouter()
    private let model = ParsedItemModel()

    override init() {
        super.init()
        setupCamera()
        setLicense()
    }

    deinit {
        cleanup()
    }
}
Configure Camera Quality and Optimization Settings
Add camera setup and quality management:
extension CameraManager {
    private func setupCamera() {
        sessionQueue.async { [weak self] in
            self?.configureSession()
        }
    }

    private func configureSession() {
        captureSession.beginConfiguration()

        let preferredPreset = currentQuality.preset
        if captureSession.canSetSessionPreset(preferredPreset) {
            captureSession.sessionPreset = preferredPreset
            print("Using camera quality: \(currentQuality.description)")
        } else {
            captureSession.sessionPreset = .photo
        }

        guard let camera = AVCaptureDevice.default(.builtInWideAngleCamera,
                                                  for: .video,
                                                  position: .back),
              let videoInput = try? AVCaptureDeviceInput(device: camera) else {
            captureSession.commitConfiguration()
            return
        }

        configureCameraOptimization(camera: camera)

        if captureSession.canAddInput(videoInput) {
            captureSession.addInput(videoInput)
        }

        setupVideoOutput()

        captureSession.commitConfiguration()

        DispatchQueue.main.async { [weak self] in
            self?.createPreviewLayer()
        }
    }

    private func configureCameraOptimization(camera: AVCaptureDevice) {
        do {
            try camera.lockForConfiguration()

            if camera.isFocusModeSupported(.continuousAutoFocus) {
                camera.focusMode = .continuousAutoFocus
            }

            if camera.isExposureModeSupported(.continuousAutoExposure) {
                camera.exposureMode = .continuousAutoExposure
            }

            if camera.isWhiteBalanceModeSupported(.continuousAutoWhiteBalance) {
                camera.whiteBalanceMode = .continuousAutoWhiteBalance
            }

            camera.unlockForConfiguration()
        } catch {
            print("Failed to configure camera settings: \(error)")
        }
    }

    private func setupVideoOutput() {
        videoOutput.videoSettings = [
            kCVPixelBufferPixelFormatTypeKey as String: kCVPixelFormatType_32BGRA
        ]
        videoOutput.alwaysDiscardsLateVideoFrames = true
        videoOutput.setSampleBufferDelegate(self, queue: sessionQueue)

        if captureSession.canAddOutput(videoOutput) {
            captureSession.addOutput(videoOutput)
        }

        if let connection = videoOutput.connection(with: .video) {
            if connection.isVideoOrientationSupported {
                connection.videoOrientation = .portrait
            }
            if connection.isVideoStabilizationSupported {
                connection.preferredVideoStabilizationMode = .auto
            }
        }
    }

    private func createPreviewLayer() {
        let layer = AVCaptureVideoPreviewLayer(session: captureSession)
        layer.videoGravity = .resizeAspectFill
        if let connection = layer.connection,
           connection.isVideoOrientationSupported {
            connection.videoOrientation = .portrait
        }
        previewLayer = layer
    }
}
Step 3: Detect Faces and Document Boundaries in Real Time
Implement the video processing delegate for detecting faces and document edges:
extension CameraManager: AVCaptureVideoDataOutputSampleBufferDelegate {
    func captureOutput(_ output: AVCaptureOutput,
                      didOutput sampleBuffer: CMSampleBuffer,
                      from connection: AVCaptureConnection) {

        guard let pixelBuffer = CMSampleBufferGetImageBuffer(sampleBuffer) else {
            return
        }

        let handler = VNImageRequestHandler(cvPixelBuffer: pixelBuffer,
                                          orientation: .right,
                                          options: [:])

        do {
            try handler.perform([faceRequest, rectangleRequest])

            let faces = (faceRequest.results as? [VNFaceObservation]) ?? []
            let rectangles = (rectangleRequest.results as? [VNRectangleObservation]) ?? []

            let processedRectangles = processRectangles(rectangles)

            updateDetectionResults(faces: faces, rectangles: processedRectangles)

        } catch {
            print("Vision detection failed: \(error)")
        }
    }

    private func processRectangles(_ rectangles: [VNRectangleObservation]) -> [VNRectangleObservation] {
        return rectangles
            .filter { $0.confidence > 0.70 }
            .sorted {
                ($0.boundingBox.width * $0.boundingBox.height) >
                ($1.boundingBox.width * $1.boundingBox.height)
            }
            .prefix(1)
            .map { $0 }
    }

    private var lastUpdateTime: CFTimeInterval = 0
    private let updateInterval: CFTimeInterval = 1.0 / 15.0

    private func updateDetectionResults(faces: [VNFaceObservation],
                                      rectangles: [VNRectangleObservation]) {
        let currentTime = CACurrentMediaTime()
        guard currentTime - lastUpdateTime >= updateInterval else { return }

        lastUpdateTime = currentTime

        DispatchQueue.main.async { [weak self] in
            self?.detectedFaces = faces
            self?.detectedRectangles = rectangles
        }
    }
}
Step 4: Remove Document Perspective Distortion with CIFilter
Implement perspective correction for captured documents:
import CoreImage
import UIKit
import Vision

struct ImageRectifier {
    static func rectifyImage(_ image: UIImage,
                           with rectangle: VNRectangleObservation) -> UIImage? {

        guard let cgImage = image.cgImage else { return nil }

        let imageSize = CGSize(width: cgImage.width, height: cgImage.height)

        let topLeft = convertPoint(rectangle.topLeft, imageSize: imageSize)
        let topRight = convertPoint(rectangle.topRight, imageSize: imageSize)
        let bottomLeft = convertPoint(rectangle.bottomLeft, imageSize: imageSize)
        let bottomRight = convertPoint(rectangle.bottomRight, imageSize: imageSize)

        let ciImage = CIImage(cgImage: cgImage)

        let correctedImage = applyPerspectiveCorrection(
            to: ciImage,
            topLeft: topLeft,
            topRight: topRight,
            bottomLeft: bottomLeft,
            bottomRight: bottomRight
        )

        return correctedImage
    }

    private static func convertPoint(_ point: CGPoint,
                                   imageSize: CGSize) -> CGPoint {
        return CGPoint(
            x: point.x * imageSize.width,
            y: (1 - point.y) * imageSize.height
        )
    }

    private static func applyPerspectiveCorrection(to image: CIImage,
                                                 topLeft: CGPoint,
                                                 topRight: CGPoint,
                                                 bottomLeft: CGPoint,
                                                 bottomRight: CGPoint) -> UIImage? {

        let width = max(
            distance(topLeft, topRight),
            distance(bottomLeft, bottomRight)
        )
        let height = max(
            distance(topLeft, bottomLeft),
            distance(topRight, bottomRight)
        )

        let targetSize = CGSize(width: width, height: height)
        let targetTopLeft = CGPoint(x: 0, y: targetSize.height)
        let targetTopRight = CGPoint(x: targetSize.width, y: targetSize.height)
        let targetBottomLeft = CGPoint(x: 0, y: 0)
        let targetBottomRight = CGPoint(x: targetSize.width, y: 0)

        guard let perspectiveFilter = CIFilter(name: "CIPerspectiveCorrection") else {
            return nil
        }

        perspectiveFilter.setValue(image, forKey: kCIInputImageKey)
        perspectiveFilter.setValue(CIVector(cgPoint: topLeft), forKey: "inputTopLeft")
        perspectiveFilter.setValue(CIVector(cgPoint: topRight), forKey: "inputTopRight")
        perspectiveFilter.setValue(CIVector(cgPoint: bottomLeft), forKey: "inputBottomLeft")
        perspectiveFilter.setValue(CIVector(cgPoint: bottomRight), forKey: "inputBottomRight")

        guard let outputImage = perspectiveFilter.outputImage else { return nil }

        let context = CIContext()
        guard let cgImage = context.createCGImage(outputImage,
                                                from: outputImage.extent) else {
            return nil
        }

        return UIImage(cgImage: cgImage)
    }

    private static func distance(_ point1: CGPoint, _ point2: CGPoint) -> CGFloat {
        let dx = point1.x - point2.x
        let dy = point1.y - point2.y
        return sqrt(dx * dx + dy * dy)
    }
}
The normalized image will be used for OCR and MRZ recognition.
Step 5: Extract Text from Documents Using Apple Vision OCR
Create an OCR service:
import Vision
import UIKit

class OCRService {
    static let shared = OCRService()

    private init() {}

    func extractText(from image: UIImage, completion: @escaping ([String]) -> Void) {
        guard let cgImage = image.cgImage else {
            completion([])
            return
        }

        DispatchQueue.global(qos: .userInitiated).async {
            let request = VNRecognizeTextRequest { request, error in
                if let error = error {
                    print("OCR Error: \(error)")
                    DispatchQueue.main.async {
                        completion([])
                    }
                    return
                }

                let observations = request.results as? [VNRecognizedTextObservation] ?? []
                let extractedText = observations.compactMap { observation in
                    return observation.topCandidates(1).first?.string
                }.filter { !$0.trimmingCharacters(in: .whitespacesAndNewlines).isEmpty }

                DispatchQueue.main.async {
                    completion(extractedText)
                }
            }

            request.recognitionLevel = .accurate
            request.usesLanguageCorrection = true

            let handler = VNImageRequestHandler(cgImage: cgImage, options: [:])

            do {
                try handler.perform([request])
            } catch {
                print("OCR processing failed: \(error)")
                DispatchQueue.main.async {
                    completion([])
                }
            }
        }
    }
}
The OCR service uses Apple’s Vision framework to extract text from images. However, it is not well-suited for MRZ recognition.
To accurately extract MRZ data from a passport or ID card, a professional MRZ SDK such as Dynamsoft MRZ Scanner should be used.
Step 6: Parse MRZ Fields Using Dynamsoft MRZ Scanner
Configure the MRZ scanner in the CameraManager class:
extension CameraManager: LicenseVerificationListener {
    func setLicense() {
        LicenseManager.initLicense(
            "YOUR_DYNAMSOFT_LICENSE_KEY",
            verificationDelegate: self
        )
    }

    func onLicenseVerified(_ isSuccess: Bool, error: Error?) {
        if !isSuccess {
            if let error = error {
                print("License verification failed: \(error.localizedDescription)")
            }
        } else {
            print("License verified successfully")
        }
    }

    func processMRZOnImage(_ image: UIImage, completion: @escaping ([String: String]) -> Void) {
        DispatchQueue.global(qos: .userInitiated).async { [weak self] in
            guard let self = self else {
                completion([:])
                return
            }

            autoreleasepool {
                let result = self.cvr.captureFromImage(image, templateName: "ReadPassportAndId")

                var mrzData: [String: String] = [:]
                if let item = result.parsedResult?.items?.first, self.model.isLegalMRZ(item) {
                    mrzData = [
                        "Document Type": self.model.documentType,
                        "Document Number": self.model.documentNumber,
                        "Name": self.model.name,
                        "Gender": self.model.gender,
                        "Age": self.model.age != -1 ? String(self.model.age) : "Unknown",
                        "Issuing State": self.model.issuingState,
                        "Nationality": self.model.nationality,
                        "Date of Birth": self.model.dateOfBirth,
                        "Date of Expiry": self.model.dateOfExpiry,
                    ]
                }

                DispatchQueue.main.async {
                    completion(mrzData)
                }
            }
        }
    }
}
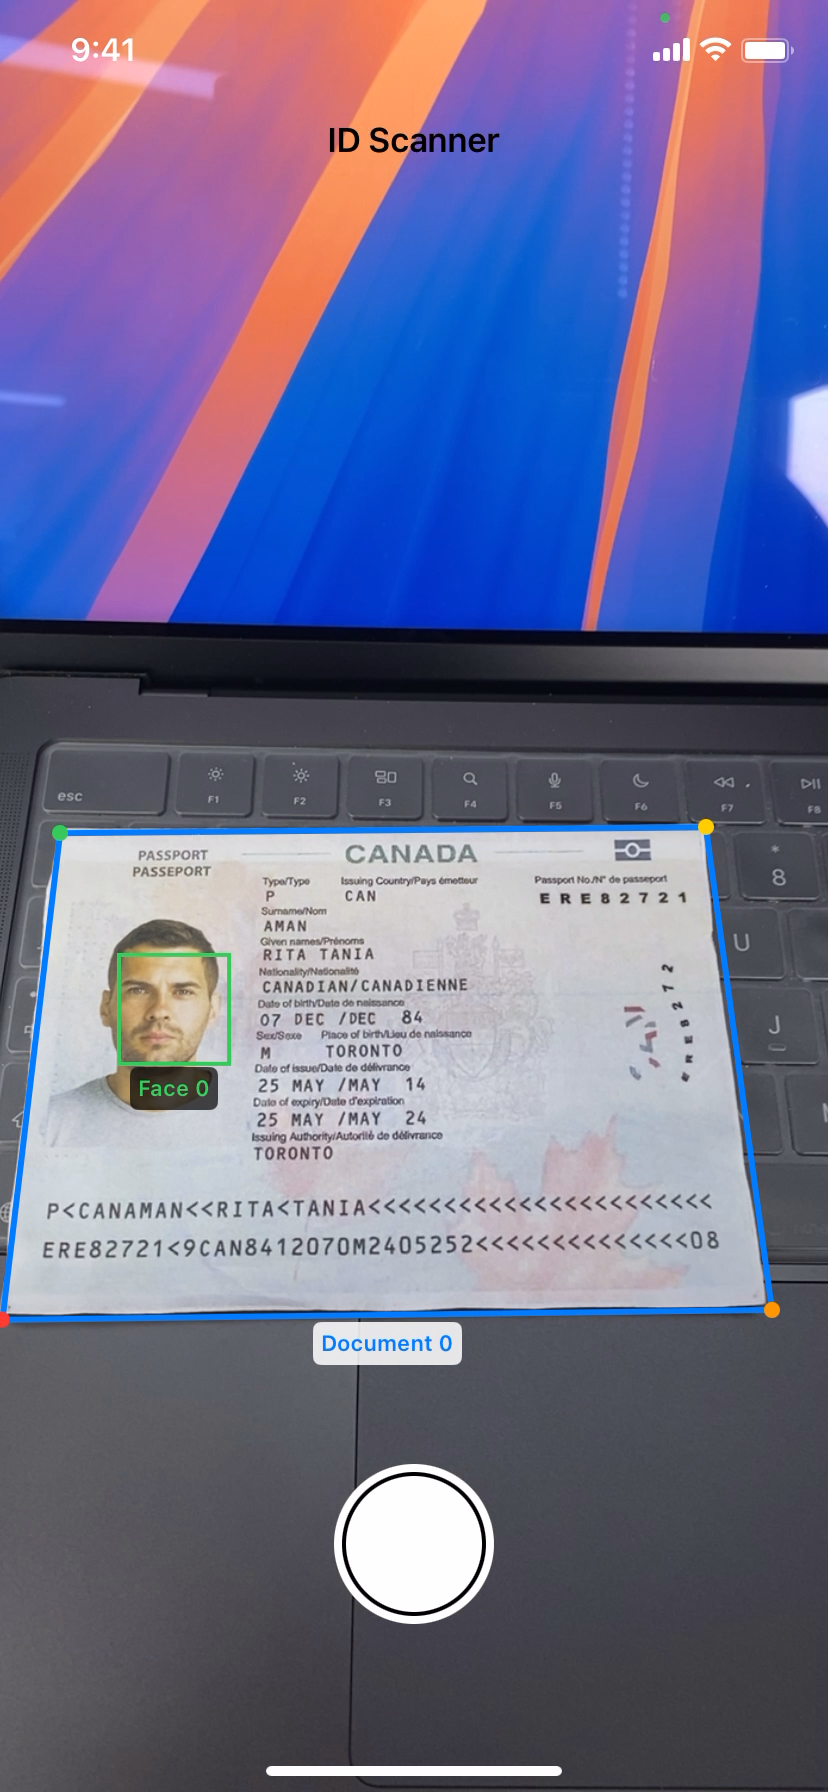
Step 7: Build the SwiftUI Camera Interface with Live Overlays
Create the main camera view with real-time overlays:
import SwiftUI

struct CameraView: View {
    @StateObject private var cameraManager = CameraManager()
    @State private var isProcessing = false
    @State private var processingStage = ""
    @State private var capturedImage: UIImage?
    @State private var ocrResults: [String] = []
    @State private var mrzResults: [String: String] = [:]
    @Binding var navigationPath: NavigationPath

    var body: some View {
        ZStack {
            CameraPreviewView(cameraManager: cameraManager)
                .ignoresSafeArea()

            OverlayView(
                faces: cameraManager.detectedFaces,
                rectangles: cameraManager.detectedRectangles,
                imageWidth: cameraManager.imageWidth,
                imageHeight: cameraManager.imageHeight
            )

            if isProcessing {
                ProcessingOverlay(stage: processingStage)
            }

            VStack {
                Spacer()

                HStack {
                    Spacer()

                    Button(action: captureImage) {
                        Circle()
                            .fill(Color.white)
                            .frame(width: 80, height: 80)
                            .overlay(
                                Circle()
                                    .stroke(Color.black, lineWidth: 2)
                                    .frame(width: 60, height: 60)
                            )
                    }
                    .disabled(isProcessing)
                    .scaleEffect(isProcessing ? 0.8 : 1.0)
                    .animation(.easeInOut(duration: 0.1), value: isProcessing)

                    Spacer()
                }
                .padding(.bottom, 50)
            }
        }
        .onAppear {
            cameraManager.startSession()
        }
        .onDisappear {
            cameraManager.stopSession()
        }
    }

    private func captureImage() {
        guard !isProcessing else { return }

        withAnimation(.easeInOut(duration: 0.3)) {
            isProcessing = true
            processingStage = "Capturing..."
        }

        cameraManager.capturePhoto { image in
            guard let capturedImage = image else {
                finishProcessing()
                return
            }

            self.capturedImage = capturedImage
            processImage(capturedImage)
        }
    }

    private func processImage(_ image: UIImage) {
        updateProcessingStage("Rectifying document...")

        let finalImage: UIImage
        if let rectangle = cameraManager.detectedRectangles.first {
            finalImage = ImageRectifier.rectifyImage(image, with: rectangle) ?? image
        } else {
            finalImage = image
        }

        updateProcessingStage("Extracting text...")

        OCRService.shared.extractText(from: finalImage) { [self] ocrResults in
            self.ocrResults = ocrResults

            updateProcessingStage("Processing MRZ...")

            cameraManager.processMRZOnImage(finalImage) { [self] mrzResults in
                self.mrzResults = mrzResults

                updateProcessingStage("Complete!")

                DispatchQueue.main.asyncAfter(deadline: .now() + 0.5) {
                    finishProcessing()
                    navigateToResults(image: finalImage)
                }
            }
        }
    }

    private func updateProcessingStage(_ stage: String) {
        DispatchQueue.main.async {
            withAnimation(.easeInOut(duration: 0.2)) {
                processingStage = stage
            }
        }
    }

    private func finishProcessing() {
        withAnimation(.easeInOut(duration: 0.3)) {
            isProcessing = false
            processingStage = ""
        }
    }

    private func navigateToResults(image: UIImage) {
        let imageData = CapturedImageData(
            image: image,
            ocrResults: ocrResults,
            mrzResults: mrzResults
        )
        navigationPath.append(imageData)
    }
}
The OverlayView class converts the coordinates from Vision framework to SwiftUI coordinates and draws bounding boxes around detected faces and documents:
import SwiftUI
import Vision

struct OverlayView: View {
    let faces: [VNFaceObservation]
    let rectangles: [VNRectangleObservation]
    let imageWidth: Int
    let imageHeight: Int

    var body: some View {
        GeometryReader { geometry in
            ZStack {
                ForEach(faces.indices, id: \.self) { index in
                    let face = faces[index]
                    let boundingBox = convertBoundingBox(
                        face.boundingBox,
                        to: geometry.size
                    )

                    RoundedRectangle(cornerRadius: 8)
                        .stroke(Color.blue, lineWidth: 2)
                        .frame(width: boundingBox.width, height: boundingBox.height)
                        .position(x: boundingBox.midX, y: boundingBox.midY)
                        .overlay(
                            Text("👤")
                                .font(.caption)
                                .foregroundColor(.blue)
                                .position(x: boundingBox.minX + 15, y: boundingBox.minY + 15)
                        )
                }

                ForEach(rectangles.indices, id: \.self) { index in
                    let rectangle = rectangles[index]

                    DocumentOutline(
                        rectangle: rectangle,
                        viewSize: geometry.size
                    )
                }
            }
        }
    }

    private func convertBoundingBox(_ boundingBox: CGRect,
                                  to viewSize: CGSize) -> CGRect {
        let flippedY = 1 - boundingBox.origin.y - boundingBox.height

        return CGRect(
            x: boundingBox.origin.x * viewSize.width,
            y: flippedY * viewSize.height,
            width: boundingBox.width * viewSize.width,
            height: boundingBox.height * viewSize.height
        )
    }
}

struct DocumentOutline: View {
    let rectangle: VNRectangleObservation
    let viewSize: CGSize

    @State private var animationPhase: CGFloat = 0

    var body: some View {
        let corners = [
            convertPoint(rectangle.topLeft),
            convertPoint(rectangle.topRight),
            convertPoint(rectangle.bottomRight),
            convertPoint(rectangle.bottomLeft)
        ]

        ZStack {
            Path { path in
                path.move(to: corners[0])
                for corner in corners.dropFirst() {
                    path.addLine(to: corner)
                }
                path.closeSubpath()
            }
            .stroke(
                LinearGradient(
                    colors: [.green, .green.opacity(0.6)],
                    startPoint: .topLeading,
                    endPoint: .bottomTrailing
                ),
                style: StrokeStyle(lineWidth: 3, dash: [10, 5])
            )

            ForEach(corners.indices, id: \.self) { index in
                Circle()
                    .fill(Color.green)
                    .frame(width: 12, height: 12)
                    .position(corners[index])
                    .scaleEffect(1.0 + sin(animationPhase + Double(index) * 0.5) * 0.2)
            }

            Text(String(format: "%.0f%%", rectangle.confidence * 100))
                .font(.caption)
                .fontWeight(.bold)
                .foregroundColor(.green)
                .padding(.horizontal, 8)
                .padding(.vertical, 4)
                .background(Color.black.opacity(0.7))
                .cornerRadius(8)
                .position(
                    x: (corners[0].x + corners[1].x) / 2,
                    y: min(corners[0].y, corners[1].y) - 20
                )
        }
        .onAppear {
            withAnimation(.easeInOut(duration: 2).repeatForever()) {
                animationPhase = .pi * 2
            }
        }
    }

    private func convertPoint(_ point: CGPoint) -> CGPoint {
        return CGPoint(
            x: point.x * viewSize.width,
            y: (1 - point.y) * viewSize.height
        )
    }
}
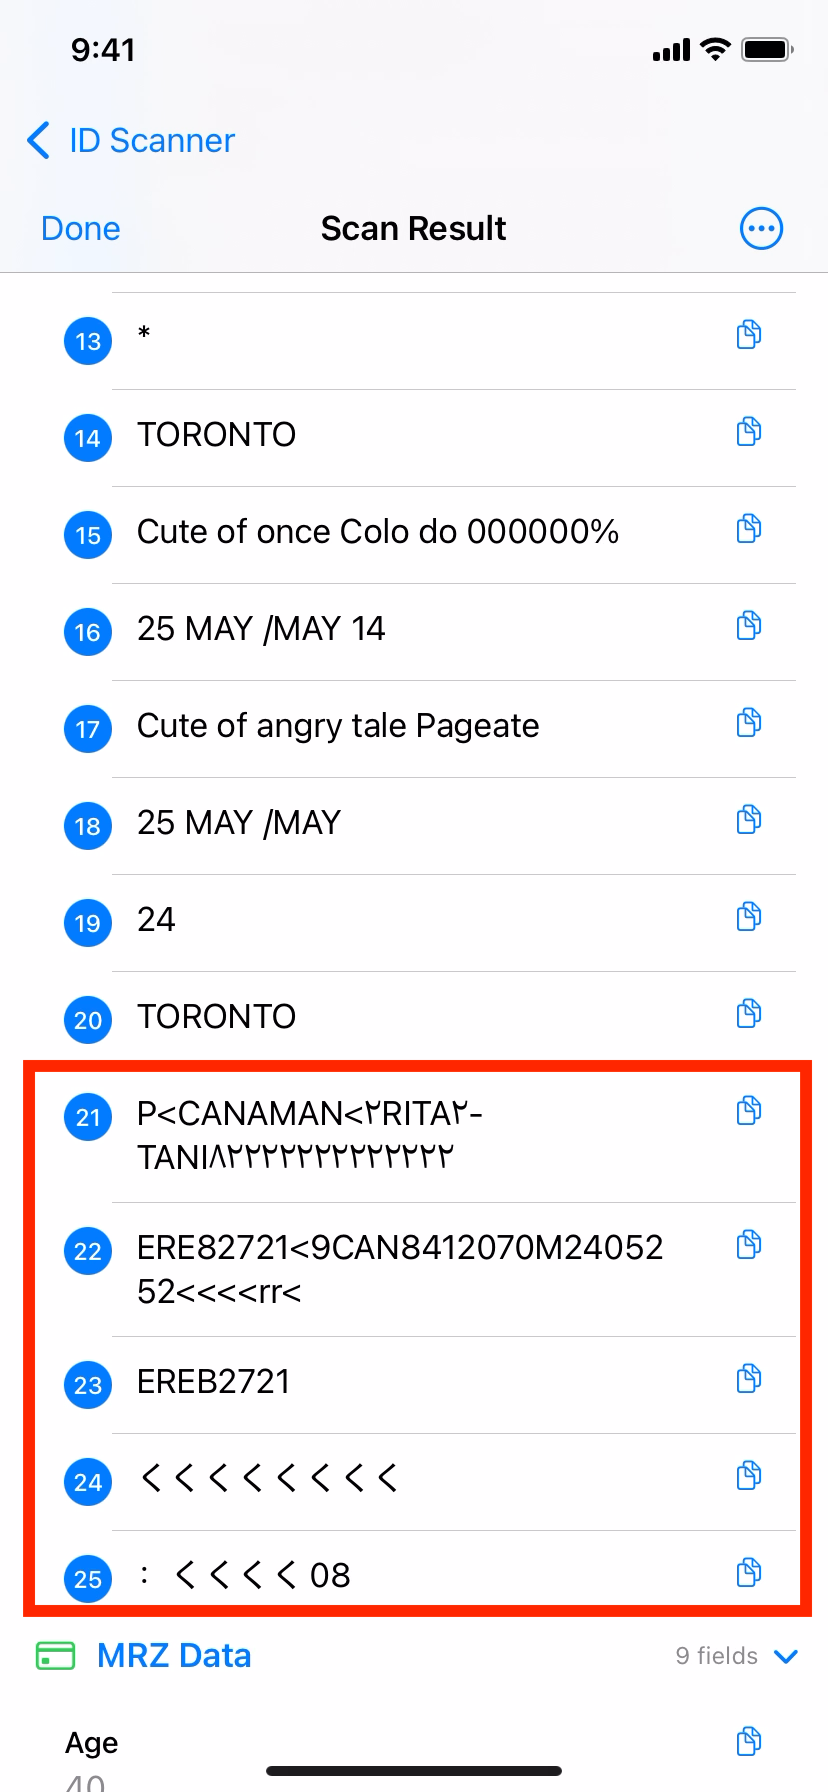
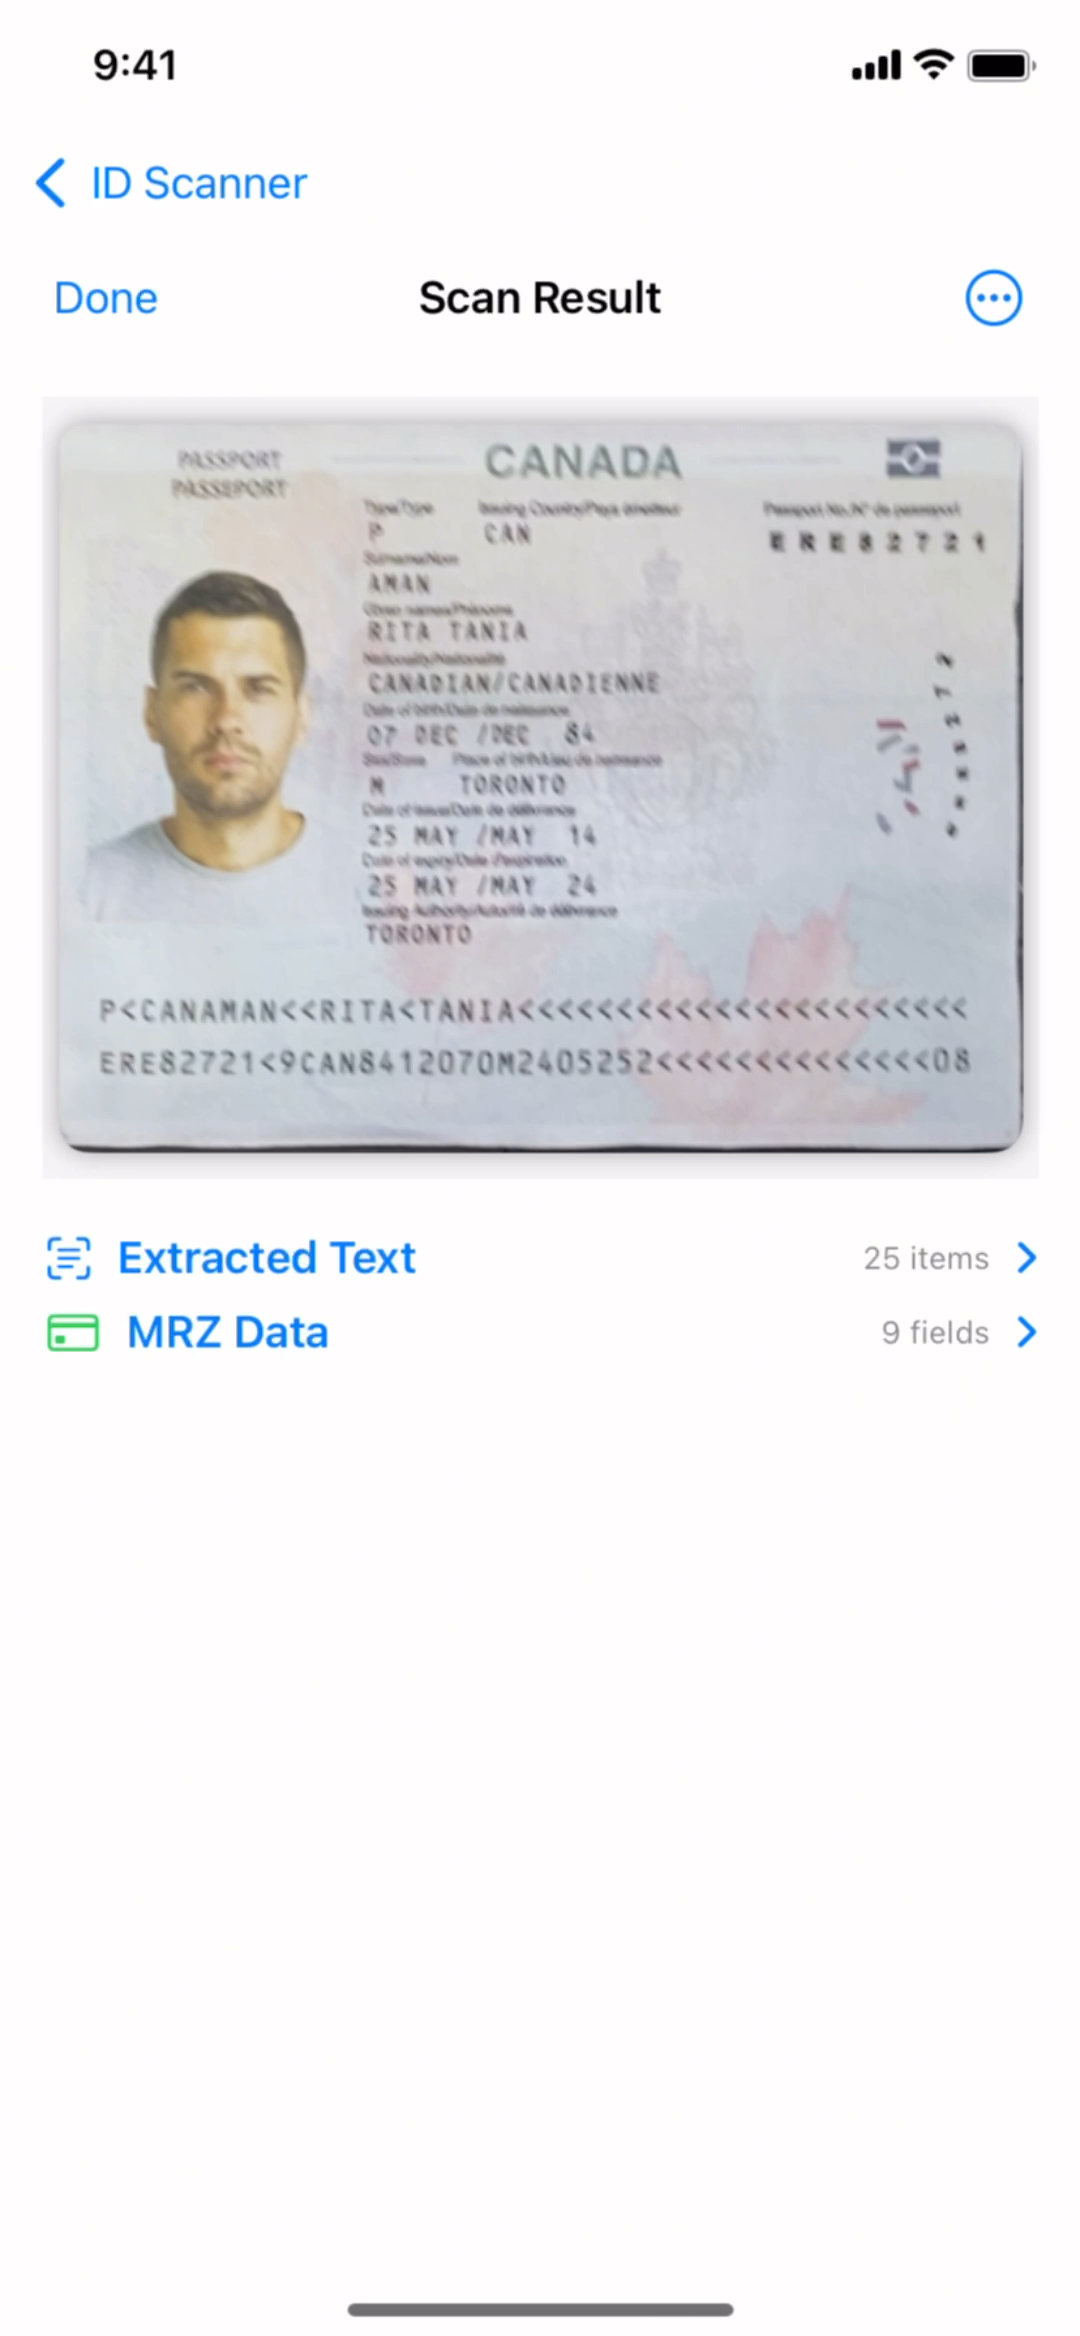
Step 8: Display Scanned OCR and MRZ Results
Create a new SwiftUI view to display the normalized image, OCR results, and MRZ results:
struct ResultView: View {
    let image: UIImage
    let ocrResults: [String]
    let mrzResults: [String: String]

    @State private var selectedTab = 0

    var body: some View {
        NavigationView {
            VStack {
                Image(uiImage: image)
                    .resizable()
                    .aspectRatio(contentMode: .fit)
                    .frame(maxHeight: 300)
                    .cornerRadius(12)
                    .shadow(radius: 8)
                    .padding()

                Picker("Results", selection: $selectedTab) {
                    Text("OCR Text").tag(0)
                    Text("MRZ Data").tag(1)
                }
                .pickerStyle(.segmented)
                .padding(.horizontal)

                TabView(selection: $selectedTab) {
                    OCRResultsView(results: ocrResults)
                        .tag(0)

                    MRZResultsView(results: mrzResults)
                        .tag(1)
                }
                .tabViewStyle(.page(indexDisplayMode: .never))
            }
            .navigationTitle("Scan Results")
            .navigationBarTitleDisplayMode(.inline)
            .toolbar {
                ToolbarItem(placement: .navigationBarTrailing) {
                    shareButton
                }
            }
        }
    }

    private var shareButton: some View {
        Button(action: shareResults) {
            Image(systemName: "square.and.arrow.up")
        }
    }

    private func shareResults() {
        let text = """
        OCR Results:
        \(ocrResults.joined(separator: "\n"))

        MRZ Results:
        \(mrzResults.map { "\($0.key): \($0.value)" }.joined(separator: "\n"))
        """

        let activityViewController = UIActivityViewController(
            activityItems: [image, text],
            applicationActivities: nil
        )

        if let windowScene = UIApplication.shared.connectedScenes.first as? UIWindowScene,
           let window = windowScene.windows.first {
            window.rootViewController?.present(activityViewController, animated: true)
        }
    }
}

struct OCRResultsView: View {
    let results: [String]

    var body: some View {
        ScrollView {
            LazyVStack(alignment: .leading, spacing: 8) {
                if results.isEmpty {
                    Text("No text detected")
                        .foregroundColor(.secondary)
                        .frame(maxWidth: .infinity, alignment: .center)
                        .padding()
                } else {
                    ForEach(results.indices, id: \.self) { index in
                        Text(results[index])
                            .padding(.horizontal)
                            .padding(.vertical, 4)
                            .background(Color.gray.opacity(0.1))
                            .cornerRadius(8)
                            .textSelection(.enabled)
                    }
                }
            }
            .padding()
        }
    }
}

struct MRZResultsView: View {
    let results: [String: String]

    var body: some View {
        ScrollView {
            LazyVStack(spacing: 12) {
                if results.isEmpty {
                    VStack(spacing: 8) {
                        Image(systemName: "doc.text.magnifyingglass")
                            .font(.system(size: 48))
                            .foregroundColor(.secondary)

                        Text("No MRZ data detected")
                            .foregroundColor(.secondary)

                        Text("MRZ processing requires a valid license")
                            .font(.caption)
                            .foregroundColor(.secondary)
                    }
                    .frame(maxWidth: .infinity, alignment: .center)
                    .padding()
                } else {
                    ForEach(Array(results.keys.sorted()), id: \.self) { key in
                        MRZDataRow(key: key, value: results[key] ?? "")
                    }
                }
            }
            .padding()
        }
    }
}

struct MRZDataRow: View {
    let key: String
    let value: String

    var body: some View {
        VStack(alignment: .leading, spacing: 4) {
            Text(key)
                .font(.caption)
                .fontWeight(.medium)
                .foregroundColor(.secondary)

            Text(value)
                .font(.body)
                .textSelection(.enabled)
        }
        .frame(maxWidth: .infinity, alignment: .leading)
        .padding()
        .background(Color.gray.opacity(0.1))
        .cornerRadius(8)
    }
}
Common Issues & Edge Cases
- MRZ not detected on device: Ensure the camera preset is
.photoor.hd1920x1080— MRZ zone text is fine-grained and requires high resolution. IfcaptureFromImagereturns empty results, verify the Dynamsoft license key is initialized viaLicenseManager.initLicensebefore any scan calls. - Vision framework reports no document rectangles:
VNDetectRectanglesRequestfilters out documents smaller than 5% of the frame (minimumSize = 0.05). Instruct users to hold the camera 20–30 cm from the document and avoid heavy glare; poor lighting drops confidence below the 0.70 threshold and suppresses results. - Wrong orientation after perspective correction:
VNImageRequestHandlermust be initialized withorientation: .rightfor portrait-mode frames. Passing the wrong orientation causesCIPerspectiveCorrectionto output flipped or rotated images, breaking downstream OCR.
Source Code
https://github.com/yushulx/ios-swiftui-barcode-mrz-document-scanner/tree/main/examples/IdScanner