Building a Real-Time Barcode QR Code Scanner with Node.js for Desktop and Web
Many open-source JavaScript libraries for reading barcodes and QR codes exist, yet few are suited for enterprise use due to a lack of long-term updates and maintenance roadmaps. Additionally, the performance of pure JavaScript often falls short. For those prioritizing performance, WebAssembly serves as a superior alternative to pure JavaScript on the client-side. On the server-side, Node.js addons developed with C++ provide the best performance. In this article, we will explore how to leverage a Node.js addon, developed with the Dynamsoft C++ Barcode SDK, to create high-performance desktop and web applications.
Prequisites
- Dynamsoft Barcode Reader Trial License
- Node.js
-
For Windows, you must configure the following environment variables before installing the
opencv4nodejspackage:OPENCV_INCLUDE_DIR: Points to the directory containing theopencv2subfolder with header files.OPENCV_LIB_DIR: Points to the library directory containing the OpenCV.libfiles.
Installation
-
The
barcode4nodejspackage is a Node.js addon built with the Dynamsoft C++ Barcode SDK. It is used to scan barcodes and QR codes.npm install barcode4nodejsSet the license key before using the package:
const dbr = require('barcode4nodejs'); dbr.initLicense("LICENSE-KEY") -
The
opencv4nodejspackage is a Node.js addon for OpenCV. It is used to open the camera and read the video stream.npm install opencv4nodejs
Customizing Node.js API for Reading Barcodes and QR Codes
Currently, the barcode4nodejs package supports only a part of the C++ API of the Dynamsoft Barcode Reader. If the existing features do not meet your needs, you can follow these steps to customize the JavaScript API:
-
Clone the source code of
barcode4nodejs.git clone https://github.com/Dynamsoft/nodejs-barcode - Edit
src/dbr.ccandindex.jsto add custom functions. -
Build the Node.js extension:
 node-gyp configure
 node-gyp build
Building a Barcode and QR Code Scanner for Desktop and Web in 5 Minutes
Node.js Desktop Application
Create a desktop.js file. According to the basic tutorial of opencv4nodejs, we can use an infinite loop to capture webcam frames and display them in a desktop window:
const cv = require('opencv4nodejs');
const vCap = new cv.VideoCapture(0);
const delay = 10;
while (true) {
  let frame = vCap.read();
  if (frame.empty) {
    vCap.reset();
    frame = vCap.read();
  }

  cv.imshow('OpenCV Node.js', frame);
  const key = cv.waitKey(delay); // Press ESC to quit
  if (key == 27) {break;}
}
However, continuously invoking an asynchronous function to decode QR codes and barcodes within this loop can cause the result callback function to never return. The workaround is to use the setTimeout() function to ensure barcodes and QR codes are detected periodically without blocking:
const dbr = require('barcode4nodejs');
const cv = require('opencv4nodejs');
dbr.initLicense("LICENSE-KEY")
barcodeTypes = dbr.barcodeTypes
const vCap = new cv.VideoCapture(0);
const drawParams = { color: new cv.Vec(0, 255, 0), thickness: 2 }
const fontFace = cv.FONT_HERSHEY_SIMPLEX;
const fontScale = 0.5;
const textColor = new cv.Vec(255, 0, 0);
const thickness = 2;

results = null;

function getframe() {
    let img = vCap.read();
    dbr.decodeBufferAsync(img.getData(), img.cols, img.rows, img.step, barcodeTypes, function (err, msg) {
        results = msg
    }, "", 1);
    cv.imshow('Webcam', img);
    const key = cv.waitKey(10); // Press ESC to quit
    if (key != 27) {
        setTimeout(getframe, 30);
    }
}

getframe()
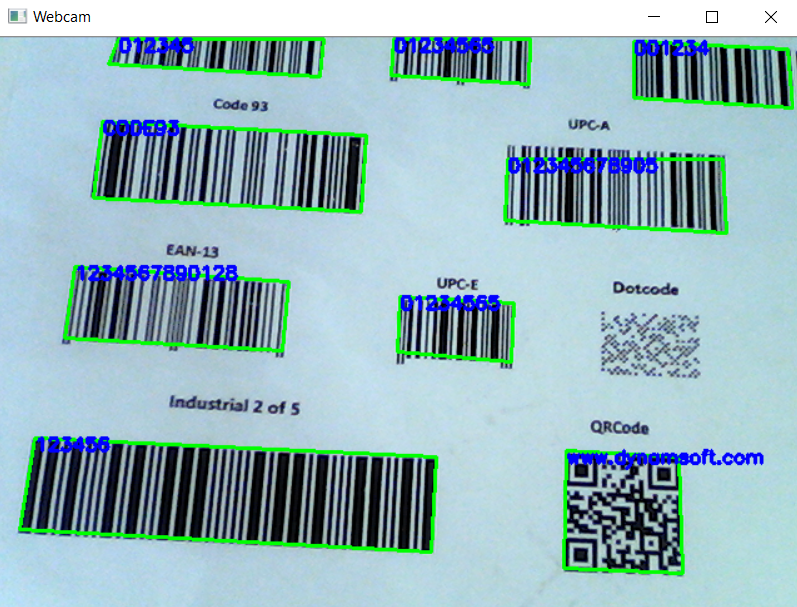
Next, we utilize the OpenCV API to draw overlays, which display the text and bounding boxes of the detected barcodes and QR codes. Given the similarity of adjacent frames, it is not necessary to synchronously draw a frame and its corresponding results. A slight delay is acceptable。
if (results != null) {
    for (index in results) {
        let result = results[index];

        let upperLeft = new cv.Point(result.x1, result.y1);
        let bottomLeft = new cv.Point(result.x2, result.y2);
        let upperRight = new cv.Point(result.x3, result.y3);
        let bottomRight = new cv.Point(result.x4, result.y4);

        img.drawLine(upperLeft, bottomLeft, drawParams);
        img.drawLine(bottomLeft, upperRight, drawParams);
        img.drawLine(upperRight, bottomRight, drawParams);
        img.drawLine(bottomRight, upperLeft, drawParams);

        img.putText(result.value, new cv.Point(result.x1, result.y1 + 10), fontFace, fontScale, textColor, thickness);
    }
}

Node.js Web Application
Create a web.js file and add the following code to launch a web server:
var fs=require("fs");
var html = fs.readFileSync("index.htm", "utf8");

var server = http.createServer(function (req, res) {
    if (req.url.startsWith("/image")) {
        res.writeHead(200, { 'Content-Type': 'image/jpeg' });
        res.write(img);
        res.end();
    }
    else {
        res.writeHead(200, { 'Content-Type': 'text/html' });
        res.write(html);
        res.end();
    }
});

server.listen(2020);

console.log('Node.js web server is running at port 2020...')
Copy the code from desktop.js to web.js. Instead of using cv.imshow() to show the webcam image in a desktop window, we use res.write() to send the image data to the web client.
Next, create an HTML page to display the webcam feed:
<!DOCTYPE html PUBLIC "-//W3C//DTD XHTML 1.0 Transitional//EN" "http://www.w3.org/TR/xhtml1/DTD/xhtml1-transitional.dtd">
<html xmlns="http://www.w3.org/1999/xhtml">
<head>
    <meta http-equiv="Content-Type" content="text/html; charset=utf-8" />
    <title>Webcam</title>
</head>

<body>
    <img id="image" width="960" />

    <script type="text/javascript">
        var image = document.getElementById('image');
        function refresh() {
            image.src = "/image?" + new Date().getTime();
            image.onload= function(){
                setTimeout(refresh, 30);
            }
        }

        refresh();
    </script>

</body>
</html>
This implementation uses a simple <img> element, ensuring 100% compatibility with any web browser without the need for advanced HTML5 APIs.
Now, you can run your server-side barcode and QR code scanning app using Node.js:
node web.js
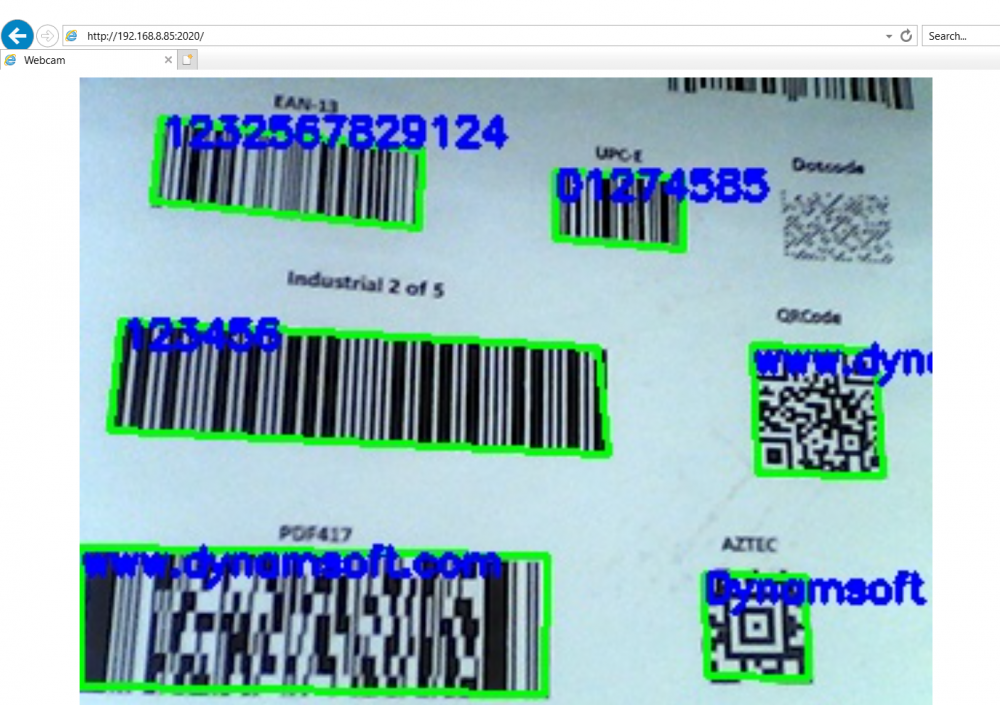
Here is a screenshot from Microsoft Internet Explorer showing the app in action.

Q&A
You may encounter the following error when running the code on Windows, even if the opencv4nodejs.node file has been successfully built:
node:internal/modules/cjs/loader:1275
  return process.dlopen(module, path.toNamespacedPath(filename));
                 ^

Error: The specified module could not be found.
\\?\D:\code\nodejs-barcode\examples\opencv\node_modules\opencv4nodejs\build\Release\opencv4nodejs.node
    at Object.Module._extensions..node (node:internal/modules/cjs/loader:1275:18)
    at Module.load (node:internal/modules/cjs/loader:1069:32)
    at Function.Module._load (node:internal/modules/cjs/loader:904:12)
    at Module.require (node:internal/modules/cjs/loader:1093:19)
    at require (node:internal/modules/cjs/helpers:108:18)
    at Object.<anonymous> (D:\code\nodejs-barcode\examples\opencv\node_modules\opencv4nodejs\lib\cv.js:58:8)
    at Module._compile (node:internal/modules/cjs/loader:1191:14)
    at Object.Module._extensions..js (node:internal/modules/cjs/loader:1245:10)
    at Module.load (node:internal/modules/cjs/loader:1069:32)
    at Function.Module._load (node:internal/modules/cjs/loader:904:12) {
  code: 'ERR_DLOPEN_FAILED'
}
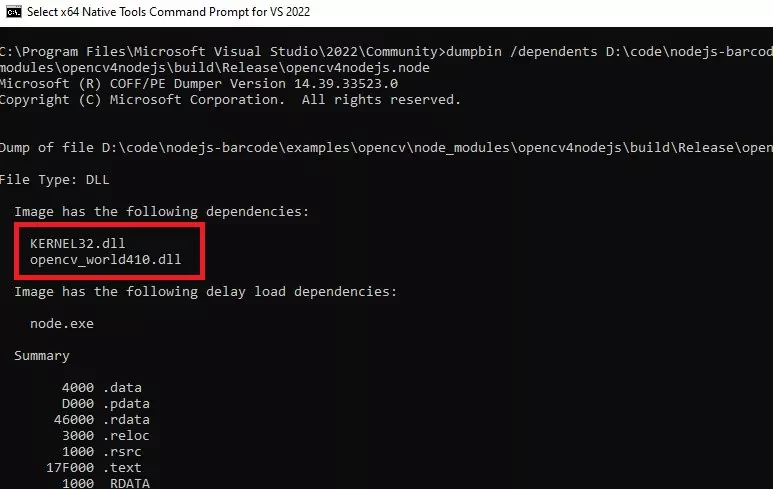
To resolve this issue, check the dependencies of opencv4nodejs.node with dumpbin:
dumpbin /dependents node_modules\opencv4nodejs\build\Release\opencv4nodejs.node

Then copy the missing DLL, opencv_world410.dll, to the directory where opencv4nodejs.node is located.
Source Code
https://github.com/yushulx/barcode4nodejs/tree/main/examples/opencv
Disclaimer:
The wrappers and sample code on Dynamsoft Codepool are community editions, shared as-is and not fully tested. Dynamsoft is happy to provide technical support for users exploring these solutions but makes no guarantees.


