How to Build a Python MRZ Scanner with Passport Portrait and Face Extraction
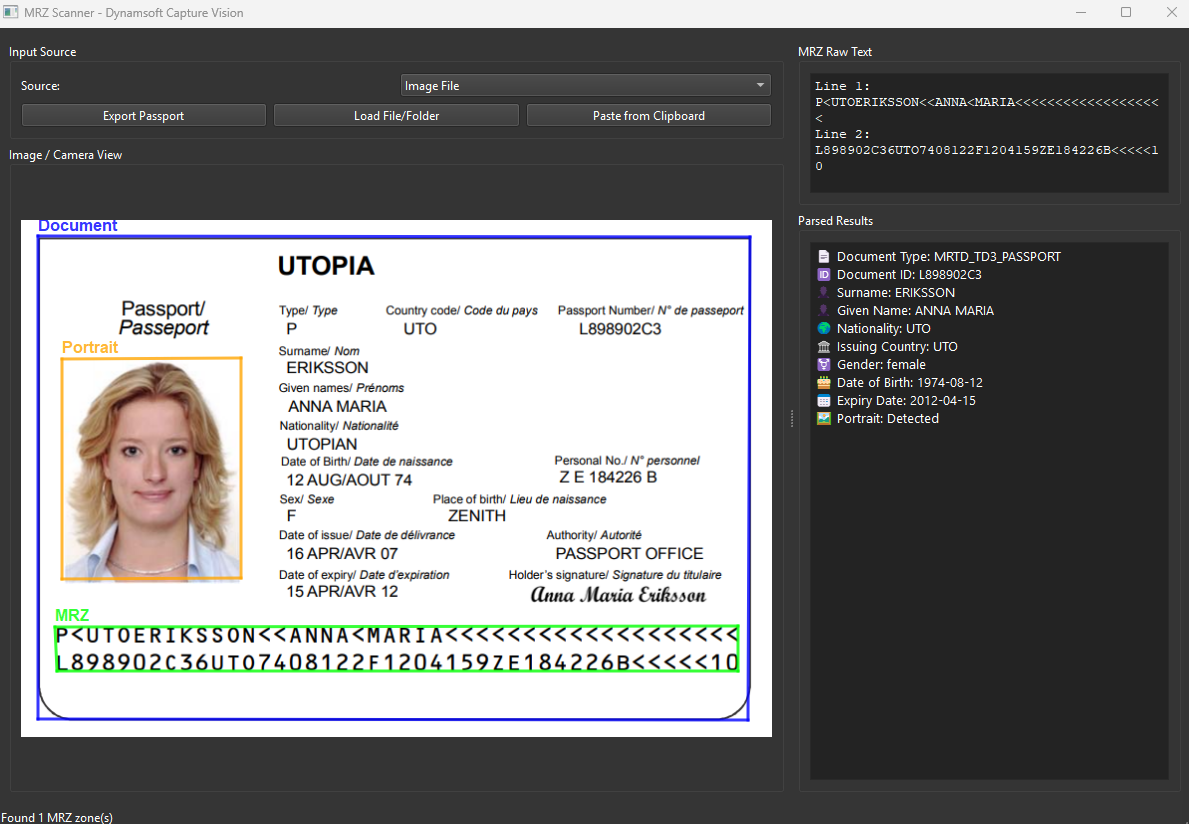
Build a professional PySide6 desktop application that reads Machine Readable Zones (MRZ) from passports and ID cards, extracts the portrait zone, and overlays document boundaries in real time using the Dynamsoft Capture Vision SDK. The SDK’s "ReadPassportAndId" template detects MRZ text, parses structured identity fields, and locates the portrait zone in a single capture call, making the app a strong fit for digital KYC (Know Your Customer) pipelines that need to capture identity data from documents quickly and accurately.
This article is Part 1 in a 4-Part Series.
- Part 1 - How to Build a Python MRZ Scanner with Passport Portrait and Face Extraction
- Part 2 - How to Extract Structured Data and Photos from Passports in JavaScript with Dynamsoft Capture Vision
- Part 3 - How to Build an Android Passport Scanner with MRZ and Portrait Detection
- Part 4 - How to Build an iOS MRZ Scanner with SwiftUI: Real-Time Passport and ID Card Recognition
What you’ll build: A PySide6 desktop application that reads MRZ text from passports and ID cards, extracts the portrait zone, and overlays document boundaries in real time — powered by Dynamsoft Capture Vision SDK.
Key Takeaways
- Dynamsoft Capture Vision SDK’s
IdentityProcessor.find_portrait_zone()locates the passport portrait region by analyzing its spatial relationship to MRZ text lines — no manual coordinate logic needed. - A single
CaptureVisionRouterinstance handles document detection, OCR-based MRZ recognition, and portrait extraction in one pass using the"ReadPassportAndId"template, making it suitable for digital KYC pipelines that require both text data and biometric photo extraction. - The intermediate result pipeline (
IntermediateResultReceiver) provides raw access to deskewed images and text line units, enabling accurate portrait zone localization for identity verification workflows. - The finished app runs cross-platform on Windows, Linux, and macOS with real-time camera support and a dark-theme PySide6 UI.
Common Developer Questions
How do I extract a portrait photo from a passport using Python?
Use the ReadPassportAndId template to get the intermediate document and text-line results, then let the identity-processing helper locate the portrait zone relative to the MRZ. Once that region is identified, the PySide6 app can crop and display the portrait directly.
How accurate is Python MRZ scanning with Dynamsoft Capture Vision compared to Tesseract?
Dynamsoft Capture Vision’s ReadPassportAndId pipeline uses a specialized MRZ model instead of general-purpose OCR, so it is better suited to structured passport and ID layouts than plain Tesseract. The SDK also returns parsed and validated identity fields rather than only raw text lines.
How do I scan a passport MRZ in real time from a webcam using Python?
Capture webcam frames in the desktop app, feed them into a persistent CaptureVisionRouter, and update the overlays and parsed results whenever a valid MRZ is found. That gives a continuous live-scanning experience instead of a file-only workflow.
Which MRZ scanning solution integrates with digital KYC systems?
The Dynamsoft ReadPassportAndId pipeline is a strong fit for KYC because it returns validated MRZ fields plus portrait localization from a single capture flow. Those outputs map directly to KYC identity verification fields, and the extracted portrait can be fed into face-matching or liveness detection pipelines.
Demo Video: Passport Scanner with Face, MRZ and Document Detection
What You Will Build
A cross-platform desktop passport scanner featuring:
- Real-time MRZ recognition from passports and ID documents (TD1, TD2, TD3 formats)
- Portrait/face detection and localization on travel documents
- Multiple input methods: image files, folders, camera streams, drag-and-drop, clipboard paste
- Visual overlays showing document boundaries, MRZ locations, and detected portraits
- Parsed data display with structured extraction of personal information
- Export functionality for normalized document images
Why Dynamsoft Capture Vision SDK Handles MRZ and Portrait in One Pass
Dynamsoft Capture Vision SDK provides a comprehensive solution for document processing with these key advantages:
- All-in-one document processing: Combines document detection, MRZ recognition, and portrait extraction in a single SDK
- High accuracy: Advanced OCR engines optimized for machine-readable zones
- Intermediate results access: Fine-grained control over the processing pipeline
- Cross-platform support: Windows, Linux, and macOS compatibility
- Production-ready: Built on the same Capture Vision SDK used across enterprise document-capture deployments
Prerequisites
Before starting, ensure you have:
- Python 3.9 or higher installed
- A webcam (optional, for camera capture functionality)
- Sample passport or ID card images for testing
Getting Your Trial License
Get a 30-day free trial license for Dynamsoft Capture Vision Suite — no credit card required, full feature access for 30 days.
Step 1: Set Up Your Project and Install Dependencies
Create your project directory and install the required packages:
mkdir mrz_scanner_gui
cd mrz_scanner_gui
python -m venv venv
source venv/bin/activate  # On Windows: venv\Scripts\activate
Install the dependencies:
pip install dynamsoft-capture-vision-bundle opencv-python PySide6
Create a requirements.txt file for dependency management:
dynamsoft-capture-vision-bundle
PySide6
opencv-python
Step 2: Understand the SDK Processing Pipeline
Dynamsoft Capture Vision SDK uses a pipeline-based architecture:
- CaptureVisionRouter: Orchestrates the image processing workflow
- IntermediateResultManager: Provides access to intermediate processing stages
- IntermediateResultReceiver: Callback interface for capturing intermediate results like deskewed images and detected text lines
- IdentityProcessor: Specialized processor for portrait zone detection on identity documents
Step 3: Define the MRZ Data Model
First, define data structures to store MRZ results:
from dataclasses import dataclass
from typing import List, Optional

@dataclass
class MRZResult:
    """Stores parsed MRZ result data."""
    raw_lines: List[str]
    doc_type: str
    doc_id: str
    surname: str
    given_name: str
    nationality: str
    issuer: str
    gender: str
    date_of_birth: str
    date_of_expiry: str
    is_passport: bool
    mrz_locations: List['Quadrilateral']
    portrait_zone: Optional['Quadrilateral'] = None
This data class captures all essential information from an MRZ: raw text lines, parsed personal data, document location, and portrait zone coordinates.
Step 4: Implement Portrait Detection Using Intermediate Results
Portrait detection requires accessing intermediate processing results. Create a receiver class:
from dynamsoft_capture_vision_bundle import *

class NeededResultUnit:
    """Container for intermediate results needed for portrait extraction."""
    def __init__(self):
        self.deskewed_image_unit = None
        self.localized_text_lines_unit = None
        self.scaled_colour_img_unit = None
        self.detected_quads_unit = None
        self.recognized_text_lines_unit = None

class MyIntermediateResultReceiver(IntermediateResultReceiver):
    """Captures intermediate processing stages for portrait detection."""

    def __init__(self, cvr: CaptureVisionRouter):
        super().__init__()
        self.cvr = cvr
        self.unit_groups: Dict[str, NeededResultUnit] = {}

    def on_deskewed_image_received(self, result, info):
        if info.is_section_level_result:
            id = result.get_original_image_hash_id()
            if self.unit_groups.get(id) is None:
                self.unit_groups[id] = NeededResultUnit()
            self.unit_groups[id].deskewed_image_unit = result

    def on_scaled_colour_image_unit_received(self, result, info):
        id = result.get_original_image_hash_id()
        if self.unit_groups.get(id) is None:
            self.unit_groups[id] = NeededResultUnit()
        self.unit_groups[id].scaled_colour_img_unit = result

    def on_localized_text_lines_received(self, result, info):
        if info.is_section_level_result:
            id = result.get_original_image_hash_id()
            if self.unit_groups.get(id) is None:
                self.unit_groups[id] = NeededResultUnit()
            self.unit_groups[id].localized_text_lines_unit = result

    def on_recognized_text_lines_received(self, result, info):
        if info.is_section_level_result:
            id = result.get_original_image_hash_id()
            if self.unit_groups.get(id) is None:
                self.unit_groups[id] = NeededResultUnit()
            self.unit_groups[id].recognized_text_lines_unit = result

    def on_detected_quads_received(self, result, info):
        if info.is_section_level_result:
            id = result.get_original_image_hash_id()
            if self.unit_groups.get(id) is None:
                self.unit_groups[id] = NeededResultUnit()
            self.unit_groups[id].detected_quads_unit = result

    def get_portrait_zone(self, hash_id: str) -> Optional['Quadrilateral']:
        """Extract portrait zone using IdentityProcessor."""
        if self.unit_groups.get(hash_id) is None:
            return None

        id_processor = IdentityProcessor()
        units = self.unit_groups[hash_id]

        ret, portrait_zone = id_processor.find_portrait_zone(
            units.scaled_colour_img_unit,
            units.localized_text_lines_unit,
            units.recognized_text_lines_unit,
            units.detected_quads_unit,
            units.deskewed_image_unit
        )

        if ret != EnumErrorCode.EC_OK:
            return None
        return portrait_zone
The IdentityProcessor.find_portrait_zone() method intelligently locates the portrait area by analyzing the spatial relationship between MRZ text lines and document boundaries—a powerful feature exclusive to Dynamsoft’s SDK.
Step 5: Parse and Structure MRZ Field Data
Create a processor to convert SDK results into your data model:
class DCPResultProcessor:
    """Converts ParsedResultItem into structured MRZ data."""

    def __init__(self, item: ParsedResultItem):
        self.doc_type = item.get_code_type()
        self.raw_text = []
        self.doc_id = None
        self.surname = None
        self.given_name = None
        self.nationality = None
        self.issuer = None
        self.gender = None
        self.date_of_birth = None
        self.date_of_expiry = None
        self.is_passport = False

        # Handle passport-specific fields
        if self.doc_type == "MRTD_TD3_PASSPORT":
            if item.get_field_value("passportNumber") is not None:
                self.doc_id = item.get_field_value("passportNumber")
            elif item.get_field_value("documentNumber") is not None:
                self.doc_id = item.get_field_value("documentNumber")
            self.is_passport = True

        # Extract raw MRZ lines
        for i in range(1, 4):
            line = item.get_field_value(f"line{i}")
            if line is not None:
                if item.get_field_validation_status(f"line{i}") == EnumValidationStatus.VS_FAILED:
                    line += " [Validation Failed]"
                self.raw_text.append(line)

        # Extract structured fields with validation checks
        if item.get_field_value("nationality") is not None:
            self.nationality = item.get_field_value("nationality")
        if item.get_field_value("issuingState") is not None:
            self.issuer = item.get_field_value("issuingState")
        if item.get_field_value("dateOfBirth") is not None:
            self.date_of_birth = item.get_field_value("dateOfBirth")
        if item.get_field_value("dateOfExpiry") is not None:
            self.date_of_expiry = item.get_field_value("dateOfExpiry")
        if item.get_field_value("sex") is not None:
            self.gender = item.get_field_value("sex")
        if item.get_field_value("primaryIdentifier") is not None:
            self.surname = item.get_field_value("primaryIdentifier")
        if item.get_field_value("secondaryIdentifier") is not None:
            self.given_name = item.get_field_value("secondaryIdentifier")
Step 6: Build the PySide6 Application Window
Create the main application window with dual-panel layout:
from PySide6.QtWidgets import (
    QApplication, QMainWindow, QWidget, QVBoxLayout, QHBoxLayout,
    QPushButton, QLabel, QFileDialog, QTextEdit, QSplitter,
    QComboBox, QGroupBox, QListWidget, QMessageBox
)
from PySide6.QtCore import Qt, QThread, Signal
from PySide6.QtGui import QImage, QPixmap, QPainter, QPen, QColor, QFont

class MRZScannerWindow(QMainWindow):
    """Main application window for MRZ scanning."""

    def __init__(self):
        super().__init__()
        self.setWindowTitle("MRZ Scanner - Dynamsoft Capture Vision")
        self.setMinimumSize(1200, 800)

        # Initialize SDK components
        self._init_sdk()

        # Setup UI
        self._setup_ui()

    def _init_sdk(self):
        """Initialize Dynamsoft Capture Vision SDK."""
        # Initialize license - replace with your license key
        error_code, error_message = LicenseManager.init_license(
            "YOUR_LICENSE_KEY_HERE"
        )

        if error_code != EnumErrorCode.EC_OK and error_code != EnumErrorCode.EC_LICENSE_WARNING:
            QMessageBox.warning(
                None,
                "License Error",
                f"License initialization failed: {error_message}"
            )

        # Create router and intermediate result manager
        self.cvr = CaptureVisionRouter()
        self.irm = self.cvr.get_intermediate_result_manager()

        # Create and register intermediate result receiver
        self.irr = MyIntermediateResultReceiver(self.cvr)
        self.irm.add_result_receiver(self.irr)

    def _setup_ui(self):
        """Setup the user interface."""
        central_widget = QWidget()
        self.setCentralWidget(central_widget)

        main_layout = QHBoxLayout(central_widget)

        # Create splitter for resizable panels
        splitter = QSplitter(Qt.Horizontal)
        main_layout.addWidget(splitter)

        # Left panel - Image display and controls
        left_panel = QWidget()
        left_layout = QVBoxLayout(left_panel)

        # Input controls
        input_group = QGroupBox("Input Source")
        input_layout = QVBoxLayout(input_group)

        self.source_combo = QComboBox()
        self.source_combo.addItems(["Image File", "Image Folder", "Camera"])
        input_layout.addWidget(self.source_combo)

        button_layout = QHBoxLayout()
        self.load_btn = QPushButton("Load File/Folder")
        self.paste_btn = QPushButton("Paste from Clipboard")
        self.export_btn = QPushButton("Export Passport")
        button_layout.addWidget(self.load_btn)
        button_layout.addWidget(self.paste_btn)
        button_layout.addWidget(self.export_btn)
        input_layout.addLayout(button_layout)

        left_layout.addWidget(input_group)

        # Image display with overlay support
        display_group = QGroupBox("Image / Camera View")
        display_layout = QVBoxLayout(display_group)

        self.image_display = ImageDisplayWidget()
        display_layout.addWidget(self.image_display)

        left_layout.addWidget(display_group, 1)

        # Right panel - Results display
        right_panel = QWidget()
        right_layout = QVBoxLayout(right_panel)

        # Raw MRZ text
        raw_group = QGroupBox("MRZ Raw Text")
        raw_layout = QVBoxLayout(raw_group)
        self.raw_text_edit = QTextEdit()
        self.raw_text_edit.setReadOnly(True)
        self.raw_text_edit.setFont(QFont("Courier New", 10))
        raw_layout.addWidget(self.raw_text_edit)
        right_layout.addWidget(raw_group)

        # Parsed results
        parsed_group = QGroupBox("Parsed Results")
        parsed_layout = QVBoxLayout(parsed_group)
        self.parsed_text_edit = QTextEdit()
        self.parsed_text_edit.setReadOnly(True)
        parsed_layout.addWidget(self.parsed_text_edit)
        right_layout.addWidget(parsed_group, 1)

        # Add panels to splitter
        splitter.addWidget(left_panel)
        splitter.addWidget(right_panel)
        splitter.setSizes([800, 400])
Step 7: Process Images and Extract MRZ Results
Implement the core image processing logic:
def _process_image_file(self, file_path: str):
    """Process a single image file."""
    try:
        # Read image for display
        image = cv2.imread(file_path)
        if image is None:
            self.statusBar().showMessage("Failed to load image")
            return

        # Process with SDK using "ReadPassportAndId" template
        result = self.cvr.capture(file_path, "ReadPassportAndId")
        self.current_captured_result = result

        if result is None:
            self.image_display.set_image(image, [])
            self._update_results_display([])
            return

        # Extract MRZ results with portrait zones
        mrz_results = self._extract_mrz_results(result)
        doc_quad = self._get_document_quad(result)

        # Update display
        self.image_display.set_image(image, mrz_results, doc_quad)
        self._update_results_display(mrz_results)

    except Exception as e:
        self.statusBar().showMessage(f"Error: {str(e)}")

def _extract_mrz_results(self, result: CapturedResult) -> List[MRZResult]:
    """Extract MRZ results from CapturedResult."""
    mrz_results = []

    parsed_result = result.get_parsed_result()
    if parsed_result is None:
        return mrz_results

    # Get MRZ text line locations
    mrz_locations = []
    line_result = result.get_recognized_text_lines_result()
    if line_result is not None:
        for item in line_result.get_items():
            mrz_locations.append(item.get_location())

    hash_id = result.get_original_image_hash_id()

    for item in parsed_result.get_items():
        processor = DCPResultProcessor(item)

        # Get portrait zone for passports
        portrait_zone = None
        if processor.is_passport and self.irr:
            portrait_zone = self.irr.get_portrait_zone(hash_id)

        mrz_result = processor.to_mrz_result(portrait_zone, mrz_locations)
        mrz_results.append(mrz_result)

    return mrz_results
Step 8: Render Visual Overlays for Document, MRZ, and Portrait Zones
Create a custom widget for displaying images with MRZ and portrait overlays:
class ImageDisplayWidget(QLabel):
    """Custom widget with visual overlays for MRZ and portrait."""

    def __init__(self, parent=None):
        super().__init__(parent)
        self.setAcceptDrops(True)
        self.current_image = None
        self.mrz_results = []
        self.doc_quad = None

    def set_image(self, image, mrz_results=None, doc_quad=None):
        self.current_image = image
        self.mrz_results = mrz_results or []
        self.doc_quad = doc_quad
        self._update_display()

    def _update_display(self):
        if self.current_image is None:
            return

        # Convert OpenCV image to QPixmap
        rgb_image = cv2.cvtColor(self.current_image, cv2.COLOR_BGR2RGB)
        h, w, ch = rgb_image.shape
        bytes_per_line = ch * w
        q_image = QImage(rgb_image.data, w, h, bytes_per_line, QImage.Format_RGB888)
        pixmap = QPixmap.fromImage(q_image)

        # Scale to fit widget
        scaled_pixmap = pixmap.scaled(self.size(), Qt.KeepAspectRatio, Qt.SmoothTransformation)

        # Calculate scale factor
        self.scale_factor = scaled_pixmap.width() / w

        # Draw overlays
        if self.mrz_results or self.doc_quad:
            painter = QPainter(scaled_pixmap)
            painter.setRenderHint(QPainter.Antialiasing)

            # Draw document boundary (blue)
            if self.doc_quad:
                self._draw_quadrilateral(painter, self.doc_quad, QColor(0, 0, 255, 200), "Document")

            for result in self.mrz_results:
                # Draw MRZ locations (green)
                for location in result.mrz_locations:
                    self._draw_quadrilateral(painter, location, QColor(0, 255, 0, 200), "MRZ")

                # Draw portrait zone (orange)
                if result.portrait_zone:
                    self._draw_quadrilateral(painter, result.portrait_zone, QColor(255, 165, 0, 200), "Portrait")

            painter.end()

        self.setPixmap(scaled_pixmap)

    def _draw_quadrilateral(self, painter: QPainter, quad, color: QColor, label: str):
        pen = QPen(color, 3)
        painter.setPen(pen)

        points = quad.points
        if len(points) >= 4:
            # Scale points to display coordinates
            scaled_points = []
            for p in points:
                x = int(p.x * self.scale_factor)
                y = int(p.y * self.scale_factor)
                scaled_points.append((x, y))

            # Draw quadrilateral
            for i in range(4):
                x1, y1 = scaled_points[i]
                x2, y2 = scaled_points[(i + 1) % 4]
                painter.drawLine(x1, y1, x2, y2)

            # Draw label
            font = QFont("Arial", 12, QFont.Bold)
            painter.setFont(font)
            painter.setPen(QPen(color, 2))
            min_y = min(p[1] for p in scaled_points)
            min_x = min(p[0] for p in scaled_points)
            painter.drawText(min_x, max(0, min_y - 5), label)
Step 9: Launch the Application with a Dark Theme
Complete the application with dark theme and entry point:
def main():
    app = QApplication(sys.argv)
    app.setStyle("Fusion")

    # Apply dark theme
    palette = QPalette()
    palette.setColor(QPalette.Window, QColor(53, 53, 53))
    palette.setColor(QPalette.WindowText, Qt.white)
    palette.setColor(QPalette.Base, QColor(35, 35, 35))
    palette.setColor(QPalette.Text, Qt.white)
    palette.setColor(QPalette.Button, QColor(53, 53, 53))
    palette.setColor(QPalette.ButtonText, Qt.white)
    app.setPalette(palette)

    window = MRZScannerWindow()
    window.show()

    sys.exit(app.exec())

if __name__ == "__main__":
    main()
Common Issues & Edge Cases
- Portrait zone returns
None:IdentityProcessor.find_portrait_zone()requires all five intermediate result units to be populated. Ifdeskewed_image_unitorlocalized_text_lines_unitisNone(e.g., the document boundary was not detected), the method returnsEC_OKwith aNonezone. Ensure the image has adequate contrast and a clearly visible document border. - MRZ validation failures: Lines flagged with
[Validation Failed]typically indicate poor image quality, motion blur, or partial occlusion of the MRZ strip. Increase camera resolution or enforce a minimum DPI of 300 for static image inputs. - PySide6 display lag on large images: Scaling high-resolution images (>8 MP) in
_update_display()on every resize event can cause UI freezes. Pre-scale the image once after loading and cache the result rather than rescaling on every paint.
Test the Completed Application
Run the application:
python mrz_scanner_gui.py