


How to Build a Web Document Scanner with Python Flask and Dynamsoft SDK
The document-scanner-sdk package provides Python bindings for the Dynamsoft C/C++ Document Scanner SDK v1.x, enabling developers to quickly create document scanner applications for Windows and Linux desktop environments. This article demonstrates how to build a web-based document scanner using Python Flask and the Python Document Scanner SDK. The application allows you to capture documents using a connected camera, process them on the server, and display the scanned results directly in a web browser.
What you’ll build: A web-based document scanner that captures camera frames via Flask, detects document edges with the Dynamsoft Document Normalizer SDK, and outputs a perspective-corrected document image in the browser.
Key Takeaways
- The
document-scanner-sdkPython package wraps the Dynamsoft C/C++ Document Normalizer and providesdetectMatandnormalizeBuffermethods for edge detection and perspective correction. - Flask’s
multipart/x-mixed-replacestreaming lets you push live camera frames to an<img>tag without WebSockets or JavaScript polling. - The same
Scannerclass works for both desktop (OpenCV window) and web (Flask route) workflows, so you can prototype locally before deploying. - This approach runs on Windows and Linux and requires only
flask,document-scanner-sdk, andopencv-python.
Common Developer Questions
How do I integrate document scanning into a Python Flask web app?
Wrap the camera and document-detection logic in a reusable Python class, expose live video and capture routes from Flask, and return the normalized document image back to the browser when the user captures a page. That is the overall structure used here for turning a desktop-style scanner flow into a web app.
How do I stream a webcam feed to a browser using Flask and OpenCV?
Use a Flask response that emits multipart/x-mixed-replace frames and keep encoding each OpenCV frame as JPEG before yielding it to the client. That pattern lets a plain browser <img> tag display a near-live webcam stream without WebSockets.
How do I detect and rectify document edges server-side in Python?
Call the SDK’s edge-detection method on each frame to get the document corners, then run the normalization step with those four points to produce a perspective-corrected page image. The sample wraps both of those operations in the same Scanner helper so the server can draw outlines and generate the final flattened document.
Prerequisites
- Get a 30-day free trial license for the Dynamsoft Document Normalizer SDK.
-
Install the required dependencies:
pip install flask document-scanner-sdk opencv-python
Step 1: Create a Scanner Class for Document Edge Detection
Start by creating a document.py file and defining a Scanner class to handle document image processing:
import cv2
import numpy as np
import docscanner

docscanner.initLicense("LICENSE-KEY")

class Scanner(object):
    def __init__(self):
        self.scanner = docscanner.createInstance()
        self.scanner.setParameters(docscanner.Templates.color)

    def __del__(self):
        pass

    def detect_edge(self, image, enabled_transform=False):
        results = self.scanner.detectMat(image)
        normalized_image = None
        for result in results:
            x1 = result.x1
            y1 = result.y1
            x2 = result.x2
            y2 = result.y2
            x3 = result.x3
            y3 = result.y3
            x4 = result.x4
            y4 = result.y4

            cv2.drawContours(
                image, [np.intp([(x1, y1), (x2, y2), (x3, y3), (x4, y4)])], 0, (0, 255, 0), 2)

            if enabled_transform:
                normalized_image = self.scanner.normalizeBuffer(
                    image, x1, y1, x2, y2, x3, y3, x4, y4)
                normalized_image = docscanner.convertNormalizedImage2Mat(
                    normalized_image)
            break

        return image, normalized_image
Explanation
initLicense: Initializes the SDK with the provided license key.createInstance: Creates an instance of the document scanner.setParameters: Configures the scanner parameters using the color template.detectMat: Detects the document edges in the input image.normalizeBuffer: Normalizes the document image based on detected edges.convertNormalizedImage2Mat: Converts the normalized image to acv2matrix.
Step 2: Implement a Desktop Document Scanner with OpenCV
-
Create a
desktop.pyfile and add the following code:import cv2 from document import Scanner cap = cv2.VideoCapture(0) scanner = Scanner() while (cap.isOpened()): ret, frame = cap.read() video_frame = None image_frame = None if cv2.waitKey(10) & 0xFF == ord('q'): break if ret: if cv2.waitKey(10) & 0xFF == ord('p'): video_frame, image_frame = scanner.detect_edge(frame, True) else: video_frame, _ = scanner.detect_edge(frame) if video_frame is not None: cv2.imshow("Edge Detection", video_frame) if image_frame is not None: cv2.imshow("Rectified Document", image_frame) cap.release() cv2.destroyAllWindows()This code captures frames from the camera using OpenCV, continuously detects document edges, and displays the rectified document when the
pkey is pressed. Pressqto exit the application. -
Run the desktop document scanner:
python desktop.py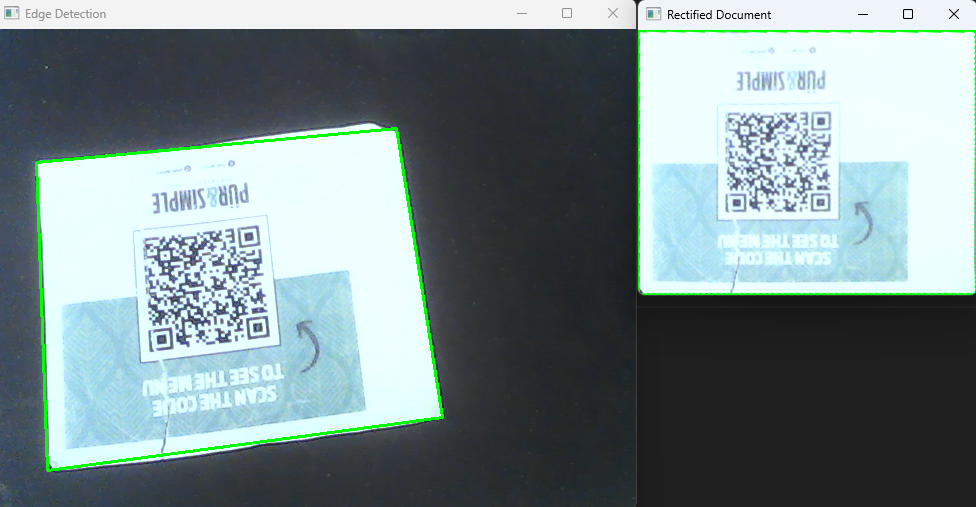
Step 3: Build a Flask Web Document Scanner
-
Create a
camera.pyfile to manage the camera, detect document edges, and rectify the document:import cv2 from document import Scanner class VideoCamera(object): def __init__(self): self.cap = cv2.VideoCapture(0) self.is_record = False self.out = None self.transformed_frame = None self.scanner = Scanner() self.cached_frame = None def __del__(self): self.cap.release() def get_video_frame(self): ret, frame = self.cap.read() if ret: frame, _ = self.scanner.detect_edge(frame) self.cached_frame = frame ret, jpeg = cv2.imencode('.jpg', frame) return jpeg.tobytes() else: return None def capture_frame(self): ret, frame = self.cap.read() if ret: _, frame = self.scanner.detect_edge(frame, True) ret, jpeg = cv2.imencode('.jpg', frame) self.transformed_frame = jpeg.tobytes() else: return None def get_cached_frame(self): return self.cached_frame def get_image_frame(self): return self.transformed_frame -
Create an HTML template with an image element to display the camera frames served by Flask:
<!DOCTYPE html> <html> <head> <title>Document Scanner</title> </head> <body> <h1>Document Edge Detection and Perspective Transformation</h1> <div id="controller"> <button id="capture">Capture</button> <script type="text/javascript" src=""></script> </div> <img id="video" src="" width="640" height="480"> <img id="image" style="max-width:640px; max-height:480px"> </body> </html> -
Encode each frame as a JPEG image and stream it to the client:
def video_frame(): global video_camera if video_camera == None: video_camera = VideoCamera() while True: frame = video_camera.get_video_frame() if frame is not None: yield (b'--frame\r\n' b'Content-Type: image/jpeg\r\n\r\n' + frame + b'\r\n\r\n') else: yield (b'--frame\r\n' b'Content-Type: image/jpeg\r\n\r\n' + video_camera.get_cached_frame() + b'\r\n\r\n') @app.route('/video_viewer') def video_viewer(): return Response(video_frame(), mimetype='multipart/x-mixed-replace; boundary=frame') -
Create a
controller.jsfile to handle the capture event:var buttonCapture = document.getElementById("capture"); buttonCapture.onclick = function() { var xhr = new XMLHttpRequest(); xhr.onreadystatechange = function() { if (xhr.readyState == 4 && xhr.status == 200) { var image = document.getElementById("image"); image.src = "/image_viewer?" + new Date().getTime(); } } xhr.open("POST", "/capture_status"); xhr.setRequestHeader("Content-Type", "application/json;charset=UTF-8"); xhr.send(JSON.stringify({ status: "true" })); }; -
Stream the transformed document image to the client:
def image_frame(): global video_camera if video_camera == None: video_camera = VideoCamera() frame = video_camera.get_image_frame() if frame is not None: yield (b'--frame\r\n' b'Content-Type: image/jpeg\r\n\r\n' + frame + b'\r\n\r\n') @app.route('/image_viewer') def image_viewer(): return Response(image_frame(), mimetype='multipart/x-mixed-replace; boundary=frame') -
Run the Flask application.
python server.py -
Visit
http://127.0.0.1:5000in your web browser to use the document scanner.
Common Issues and Edge Cases
- Camera not detected:
cv2.VideoCapture(0)may fail if no camera is connected or another application is using it. Check that the camera index is correct and no other process holds the device. - License initialization error: Calling
docscanner.initLicense()with an expired or invalid key raises a silent failure and returns empty results fromdetectMat. Verify your license key is active before debugging detection issues. - Poor edge detection on low-contrast backgrounds: The SDK may not detect document edges when the document color is similar to the surface beneath it. Place documents on a contrasting background for reliable detection.