


Build a Scanned Document Image Quality Assessment Tool with JavaScript and OpenCV
Whether we scan documents via document scanners or cameras, we may end up getting document images with bad quality. In this article, we are going to talk about how to evaluate the quality of scanned document images so that we can recapture the document to get a better image. A web app is made for automatic evaluation.
What you’ll build: A browser-based document quality assessment tool that automatically detects blur, skew, overexposure, and aspect ratio issues in scanned images using OpenCV.js, Tesseract.js, and Dynamic Web TWAIN.
Key Takeaways
- Scanned document image quality can be assessed automatically by measuring blur (Laplacian variance), skew angle, overexposure (histogram analysis), aspect ratio deviation, and OCR confidence.
- OpenCV.js enables browser-native blur detection via Laplacian kernel and overexposure detection via grayscale histogram analysis — no server-side processing required.
- Dynamic Web TWAIN handles document scanning, image loading, and built-in skew angle detection directly in the browser.
- A weighted scoring formula combining all five metrics produces a single quality score from 0 to 100.
Common Developer Questions
How do I detect if a scanned document image is blurry using JavaScript?
Use a sharpness metric such as Laplacian variance on the grayscale document image and treat low variance as a blur signal. In this tutorial, OpenCV.js performs that measurement directly in the browser so the page can warn users before they keep a bad scan.
What is the best way to automatically assess scanned document image quality in a web app?
Measure several quality signals together instead of relying on only one check: blur, skew, overexposure, expected aspect ratio, and OCR confidence all contribute useful evidence. This article combines those browser-side metrics into a single assessment workflow.
How do I calculate a document image quality score from blur, skew, and overexposure metrics?
Normalize each metric onto a comparable scale, assign weights based on how strongly each defect affects usability, and then combine them into a 0 to 100 score. The example here uses blur, skew, overexposure, aspect ratio, and OCR confidence as the five ingredients in that overall score.
Quality Metrics for Scanned Document Images
Here are some aspects we generalized for evaluating the quality.
Detect Blur from Motion or Focus Issues
Blur may be caused by motion or out of focus during capturing.
Blurred example:
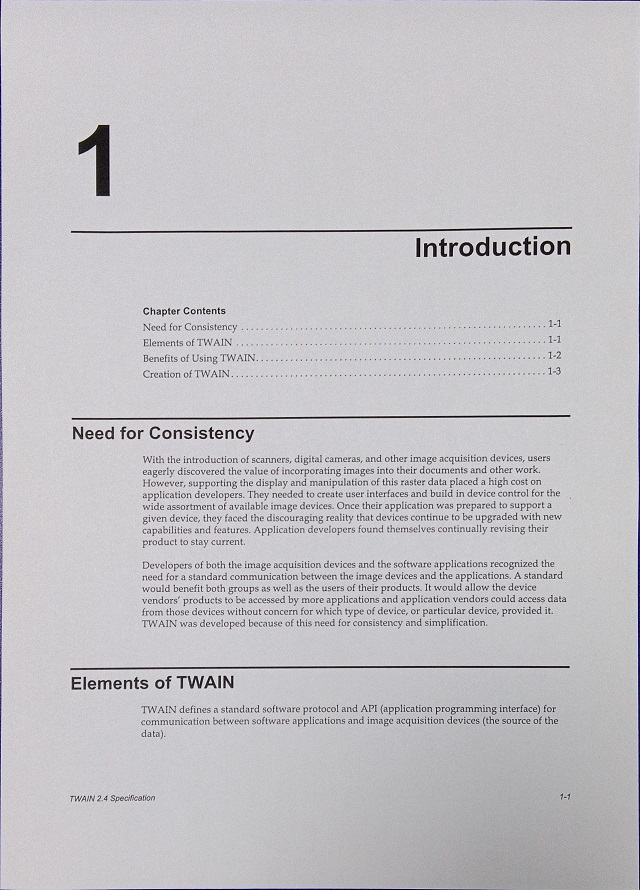
Clear example:
Identify Document Skew
If the document paper is not placed straight for a document scanner, the scanned image may be skewed.
Identify Overexposed Images
Overexposure will produce an image which is very bright and has a low contrast.
Validate Document Aspect Ratio
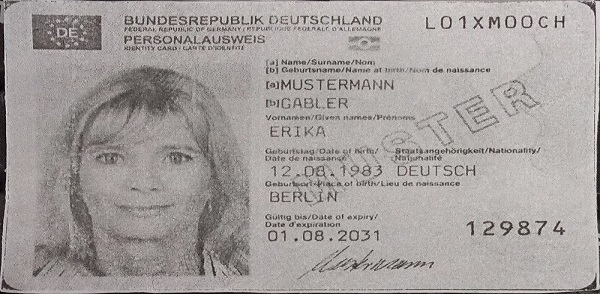
Documents usually have a fixed aspect ratio. For example, an ID Card’s physical size is 86mm × 54mm and its image should also have this aspect ratio.
ID Card demo which is stretched because of incorrect camera settings.
Use OCR Confidence as a Quality Signal
OCR software often produces confidence scores along with the text results. The score can reflect the quality of a document image.
Build an Automatic Document Quality Assessment Web App
Let’s build a web app in steps to evaluate the quality of a scanned document automatically.
Prerequisites
- A modern browser (Chrome, Firefox, or Edge)
- Get a 30-day free trial license for Dynamic Web TWAIN
Step 1: Create the HTML Page
Create a new page with the following content:
<!DOCTYPE html>
<html lang="en">
<head>
  <meta charset="UTF-8">
  <meta name="viewport" content="width=device-width, initial-scale=1.0">
  <title>Quality Evaluation of Scanned Documents</title>
  <style>
    .main {
      display: flex;
    }
  </style>
</head>
<body>
  <div class="home">
    <h2>Quality Evaluation of Scanned Documents</h2>
    <div class="main">
    </div>
  </div>
</body>
</html>
Step 2: Add Dependencies
-
Add Dynamic Web TWAIN for scanning documents and loading images or PDF files.
Add the library and an element as the container of its controls.
HTML:
<style>
  #dwtcontrolContainer {
    width: 240px;
    height: 320px;
  }
</style>
<script src="https://unpkg.com/dwt@18.4.2/dist/dynamsoft.webtwain.min.js"></script>
<div class="main">
  <div class="scanner">
    <div id="dwtcontrolContainer"></div>
  </div>
</div>
Use the following JavaScript to initialize an instance of Web TWAIN. Replace
LICENSE-KEYwith your trial license key.let DWObject; Dynamsoft.DWT.AutoLoad = false; Dynamsoft.DWT.ProductKey = "LICENSE-KEY"; Dynamsoft.DWT.ResourcesPath = "https://unpkg.com/dwt@18.4.2/dist"; window.onload = function(){ initDWT(); } function initDWT(){ return new Promise((resolve, reject) => { Dynamsoft.DWT.CreateDWTObjectEx( { WebTwainId: 'dwtcontrol' }, function(obj) { DWObject = obj; DWObject.Viewer.bind(document.getElementById('dwtcontrolContainer')); DWObject.Viewer.height = "100%"; DWObject.Viewer.width = "100%"; DWObject.Viewer.show(); resolve(); }, function(err) { console.log(err); reject(err); } ); }) } -
Add OpenCV.js for image processing.
Add the library and get its loading status.
<script> var Module = { // https://emscripten.org/docs/api_reference/module.html#Module.onRuntimeInitialized onRuntimeInitialized() { document.getElementsByClassName("OpenCVStatus")[0].innerText = 'OpenCV.js is ready.'; } }; </script> <script async src="https://docs.opencv.org/4.8.0/opencv.js" type="text/javascript"></script> -
Add Tesseract.js for OCR.
<script src='https://cdn.jsdelivr.net/npm/tesseract.js@5/dist/tesseract.min.js'></script>
<script>
let worker;
window.onload = function(){
  initTesseract();
}
async function initTesseract(){
  worker = await Tesseract.createWorker("eng", 1, {
    logger: function(m){console.log(m);}
  });
}
</script>
Step 3: Detect Blur with Laplacian Variance
As pixels in a blurred image have similar neighboring pixels, we can apply a 3 x 3 Laplacian kernel on the grayscale image and then calculate the variance to detect blur.

Here is the code to detect blur with OpenCV.js. If the variance is smaller than 200, the image is blurry.
function DetectBlur(src){
  let img = cv.imread(src);
  let gray = new cv.Mat();
  cv.cvtColor(img, gray, cv.COLOR_RGBA2GRAY);

  let laplacianMat = new cv.Mat();
  cv.Laplacian(gray, laplacianMat, cv.CV_64F);
  let mean = new cv.Mat(1, 4, cv.CV_64F);
  let standardDeviationMat = new cv.Mat(1, 4, cv.CV_64F);
  cv.meanStdDev(laplacianMat, mean, standardDeviationMat);

  let standardDeviation = standardDeviationMat.doubleAt(0, 0);
  let variance = standardDeviation * standardDeviation;

  let threshold = 200;
  let isBlurry = variance < threshold;
  img.delete();
  gray.delete();
  laplacianMat.delete();
  mean.delete();
  standardDeviationMat.delete();
  return isBlurry;
}
Step 4: Detect Overexposure with Histogram Analysis
We can use a histogram to detect overexposure. Histogram is a way to understand an image. It is a plot with pixel values (ranging from 0 to 255, not always) on the X-axis and the corresponding number of pixels in the image on the Y-axis.
A normal document image may have the following histogram:
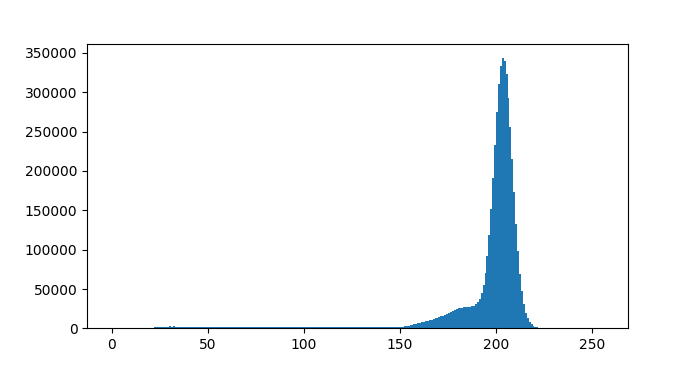
Image:
An overexposed image may have the following histogram:

Image:
We can see that the overexposed image has a more intense intensity distribution and the distribution is more to the right side of the histogram.
Here is the code to detect overexposure with OpenCV.js and histogram:
function DetectOverExposure(src){
  let img = cv.imread(src);
  cv.cvtColor(img, img, cv.COLOR_RGBA2GRAY, 0);
  let srcVec = new cv.MatVector();
  srcVec.push_back(img);
  let accumulate = false;
  let channels = [0];
  let histSize = [256];
  let ranges = [0, 255];
  let hist = new cv.Mat();
  let mask = new cv.Mat();
  let color = new cv.Scalar(255, 255, 255);
  let scale = 2;
  // You can try more different parameters
  cv.calcHist(srcVec, channels, mask, hist, histSize, ranges, accumulate);
  let result = cv.minMaxLoc(hist, mask);
  if (result.maxLoc.y > 240) {
    let data = hist.data32F
    let darkPixels = 0;
    for (let index = 0; index <= 200; index++) {
      const pixels = data[index];
      darkPixels = darkPixels + pixels;
    }
    let totalPixels = src.naturalHeight * src.naturalWidth;
    let percent = darkPixels/totalPixels;
    hist.delete();
    img.delete();
    if (percent < 0.2) {
      return true;
    } else {
      return false;
    }
  }else{
    hist.delete();
    img.delete();
    return false;
  }
}
Step 5: Detect Skew Angle
We can find the contours of text lines to detect the skew angle. We’ve talked about this in a previous article.
Here is the code to detect skew with Web TWAIN. If the detected skew angle is larger than 1, then the document image is skewed.
function DetectSkewness(){
  return new Promise((resolve, reject) => {
    DWObject.GetSkewAngle(
      DWObject.SelectedImagesIndices[0],
      function(angle) {
        console.log("skew angle: " + angle);
        if (Math.abs(angle)>1) {
          resolve(true);
        }else{
          resolve(false);
        }
      },
      function(errorCode, errorString) {
        console.log(errorString);
        reject(errorString);
      }
    );
  })
}
Step 6: Validate Aspect Ratio
We need to know the document type before examining if its aspect ratio is correct.
We can let the user select the document type.
 <label>
  Expected Document Type:
  <select id="documentType">
    <option value="">None</option>
    <option value="2480x3508">A4</option>
    <option value="1013x638">ID Card</option>
  </select>
</label>
Then examine the aspect ratio with the following code:
function DetectIfAspectRatioIncorrect(img){
  let documentSize = document.getElementById("documentType").selectedOptions[0].value;
  if (documentSize) {
    let width = documentSize.split("x")[0];
    let height = documentSize.split("x")[1];
    let ratio = width / height;
    let imgRatio = img.naturalWidth / img.naturalHeight;
    let percent = Math.max(ratio,imgRatio) / Math.min(ratio,imgRatio);
    if (percent > 1.1) {
      console.log(percent);
      return true;
    }else{
      return false;
    }
  }else{
    return false;
  }
}
Step 7: Extract OCR Confidence Score
Here, we use Tesseract.js to perform OCR and get the confidence value.
async function getOCRConfidence(img){
  const result = await worker.recognize(img);
  const data = result.data;
  let size = data.lines.length;
  let totalConfidence = 0;
  data.lines.forEach(line => {
    totalConfidence = line.confidence + totalConfidence;
  });
  let confidence = parseInt(totalConfidence/size);
  console.log(confidence);
  return confidence;
}
Step 8: Calculate an Overall Quality Score
We can calculate an overall score for assessing the quality.
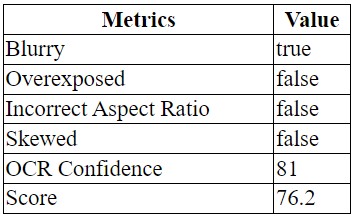
let overallScore = 0;
overallScore = overallScore + (isBlurry ? 0 : 1) * 20;
overallScore = overallScore + (isOverexposed ? 0 : 1) * 20;
overallScore = overallScore + (isAspectRatioIncorrect ? 0 : 1) * 20;
overallScore = overallScore + (isSkewed ? 0 : 1) * 20;
overallScore = overallScore + OCRConfidence * 0.2;
The result is displayed in a table.
Common Issues and Edge Cases
- Laplacian variance threshold needs tuning per DPI. The default blur threshold of 200 works well for 300 DPI scans, but low-resolution camera captures may need a lower threshold (e.g., 100). Test with representative samples from your scanner or camera.
- White-background documents may trigger false overexposure. Documents with minimal text and large white margins can skew the histogram toward high pixel values. Consider restricting the analysis to the text region only or adjusting the dark-pixel percentage threshold.
- OCR confidence varies by language and font. Tesseract.js produces the most reliable confidence scores for printed English text. Handwritten text, non-Latin scripts, or decorative fonts will return lower confidence even on clear images.