


How to Integrate Document Scanning into a Quasar Electron Desktop App
Quasar is a Vue.js-based framework, which allows web developers to quickly create responsive websites/apps. It can use Electron to build multi-platform desktop apps.
In this article, we are going to build a document scanning desktop app with Quasar and Electron. Dynamic Web TWAIN is used to provide the ability to interact with document scanners.
The final app looks like this:
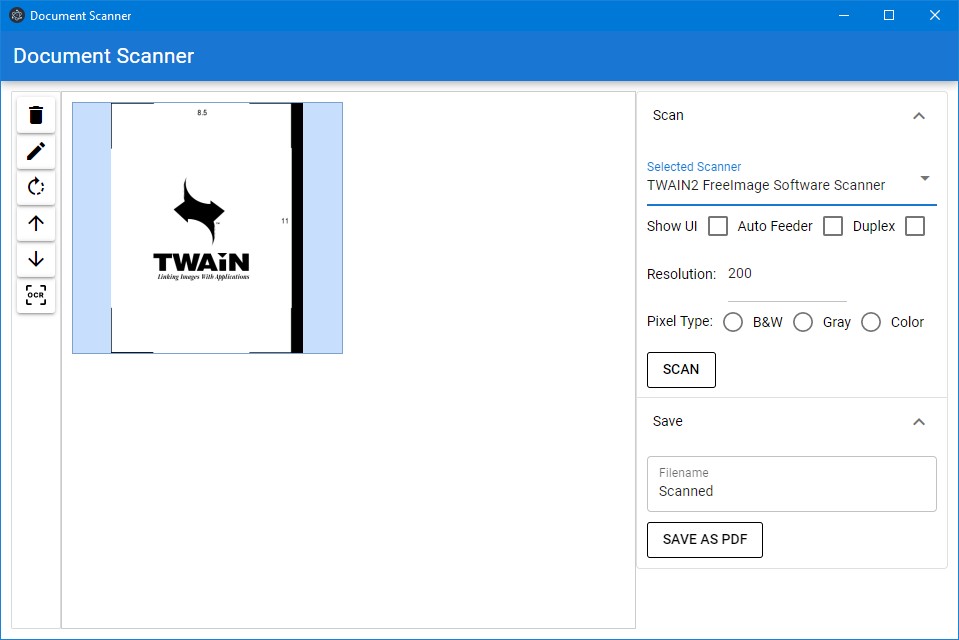
What you’ll build: A cross-platform desktop document scanning application using Quasar (Vue.js), Electron, and the Dynamic Web TWAIN SDK — capable of scanning, editing, rotating, and saving documents as PDF, with optional OCR text extraction.
Key Takeaways
- Quasar’s Electron mode lets you package a Vue.js document scanning web app as a native desktop application for Windows, macOS, and Linux with minimal configuration changes.
- Dynamic Web TWAIN provides a JavaScript API to discover connected scanners, configure scan settings (resolution, pixel type, duplex), and save results as multi-page PDF.
- Electron’s preload script bridges Node.js APIs into the renderer process, enabling native features like Tesseract OCR on scanned images.
- The Dynamic Web TWAIN Service must be installed locally for scanner communication; the tutorial includes platform-aware installer detection and a reconnect flow.
Common Developer Questions
How do I integrate a document scanner into a Quasar Electron desktop app?
Initialize Dynamic Web TWAIN in the Quasar renderer after the component mounts, then expose the WebTwain instance so Vue panels can call scan, rotate, and save actions. Electron packaging gives the same Quasar app a desktop shell without changing the scanner logic.
Can I scan documents and save them as PDF using Vue.js and Dynamic Web TWAIN?
Yes. Dynamic Web TWAIN provides the Vue-facing JavaScript APIs to discover scanners, configure scan settings such as resolution or duplex, and save the resulting image buffer as a multi-page PDF.
How do I add OCR text recognition to an Electron app with Quasar?
Use Electron’s preload bridge to expose a controlled OCR helper to the renderer, then save the selected image to a temp path and run Tesseract from the Node side. That keeps OCR out of the browser sandbox while still letting the Quasar UI trigger recognition.
Prerequisites
- Node.js 14 or later
- Quasar CLI (
npm install -g @quasar/cli) - A physical or virtual document scanner connected to your machine
- Get a 30-day free trial license for Dynamic Web TWAIN
Step 1: Create a New Quasar Project
Install quasar cli:
npm install -g @quasar/cli
Then, use it to create a new project:
npm init quasar
Here, we create a new project with TypeScript + Vite using composition API.
√ What would you like to build? » App with Quasar CLI, let's go!
√ Project folder: ... document-scanner
√ Pick Quasar version: » Quasar v2 (Vue 3 | latest and greatest)
√ Pick script type: » Typescript
√ Pick Quasar App CLI variant: » Quasar App CLI with Vite
√ Package name: ... document-scanner
√ Project product name: (must start with letter if building mobile apps) ... Document Scanner
√ Project description: ... A desktop document scanner
√ Author: ... Lihang Xu
√ Pick a Vue component style: » Composition API with <script setup>
√ Pick your CSS preprocessor: » Sass with SCSS syntax
√ Check the features needed for your project: » ESLint
√ Pick an ESLint preset: » Prettier
Step 2: Install the Dynamic Web TWAIN SDK
-
Install Dynamic Web TWAIN from npm:
npm install dwt -
We also need to copy the resources of Dynamic Web TWAIN to the public folder.
Here, we use
ncpto do this.npm install ncp --save-devThen modify
package.jsonto add the following scripts:"build": "ncp node_modules/dwt/dist public/assets/dwt-resources && quasar build", "start": "ncp node_modules/dwt/dist public/assets/dwt-resources && quasar dev",
Step 3: Configure the Default Project Files
- Remove the example components under
src/components. -
Open
src/layouts/MainLayout.vueand simplify its template with the following content:<template> <q-layout view="lHh Lpr lFf"> <q-header elevated > <q-toolbar> <q-toolbar-title> Document Scanner </q-toolbar-title> </q-toolbar> </q-header> <q-page-container> <router-view /> </q-page-container> </q-layout> </template>
Step 4: Create the Document Viewer Component
Dynamic Web TWAIN provides a document viewer control and a bunch of APIs to scan and manage documents. We are going to wrap the viewer as a Vue component and expose the object of Dynamic Web TWAIN to call different APIs.
First, create a new component named DWT.vue.
In the template, add a div as the container of the viewer of Dynamic Web TWAIN.
<template>
  <div ref='viewer' id='dwtcontrolContainer'></div>
</template>
When the component is mounted, load Dynamic Web TWAIN and register the OnWebTwainReady event. When Web TWAIN is ready, a document viewer will appear in the container. The Web TWAIN object for further actions is emitted using the onWebTWAINReady event.
<script setup lang='ts'>
import { onMounted, ref, watch } from 'vue';
import Dynamsoft from 'dwt';
import { WebTwain } from 'dwt/dist/types/WebTwain';

const emit = defineEmits(['onWebTWAINReady']);
const viewer = ref(null);
const ContainerId = 'dwtcontrolContainer';
let DWObject:WebTwain|undefined;

const initDWT = () => {
  Dynamsoft.DWT.RegisterEvent('OnWebTwainReady', () => {
    DWObject = Dynamsoft.DWT.GetWebTwain(ContainerId);
    emit('onWebTWAINReady',DWObject);
  });

  Dynamsoft.DWT.ResourcesPath = 'assets/dwt-resources';
  Dynamsoft.DWT.Containers = [{
      WebTwainId: 'dwtObject',
      ContainerId: ContainerId
  }];
  Dynamsoft.DWT.Load();
}

onMounted(async () => {
  initDWT();
});
</script>
There are some additional props we can add to the component:
-
A license to activate Dynamic Web TWAIN. We can apply for a trial license here.
const props = defineProps(['license']); const initDWT = () => { //... if (props.license) { Dynamsoft.DWT.ProductKey = props.license; } //... } -
Width and height for the viewer.
const props = defineProps(['width','height','license']); const initDWT = () => { //... Dynamsoft.DWT.RegisterEvent('OnWebTwainReady', () => { DWObject.Viewer.width = "100%"; DWObject.Viewer.height = "100%"; resizeViewer(); }); //... } const resizeViewer = () => { if (viewer.value && DWObject) { let ele = viewer.value as HTMLElement; if (props.width) { ele.style.width = props.width; } if (props.height) { ele.style.height = props.height; } } } watch(() => [props.width,props.height], ([newWidth,oldWidth], [newHeight,oldHeight]) => { resizeViewer(); }); -
View mode for the viewer.
const props = defineProps(['width','height','cols','rows','license']);
const initDWT = () => {
  //...
  Dynamsoft.DWT.RegisterEvent('OnWebTwainReady', () => {
    updateViewMode();
  });
  //...
}
const updateViewMode = () => {
  if (props.cols && props.rows && DWObject) {
    DWObject.Viewer.setViewMode(parseInt(props.cols),parseInt(props.rows));
  }
}

watch(() => [props.cols,props.rows], ([newCols,oldCols], [newRows,oldRows]) => {
  updateViewMode();
});
Step 5: Design the Three-Panel App Layout
The app can be divided into three parts from left to right: the toolbar, the document viewer and the panels for operations.
Here is the basic template following this layout:
<template>
  <q-page class="index">
    <div class="row container">
      <div class="col-8" id="left">
        <div class="toolbar">
        </div>
        <div class="dwt">
        </div>
      </div>
      <div class="col-4" id="right">
      </div>
    </div>
  </q-page>
</template>
The CSS:
.index {
  height: calc(100% - 50px);
}

.toolbar {
  width: 50px;
  height: 100%;
  overflow: auto;
  padding: 5px;
  font-size: 21px;
  border: 1px solid #d9d9d9;
  border-radius: 2px;
}

.dwt {
  width: calc(100% - 50px);
  height: 100%;
}

#left {
  display: flex;
  height: 100%;
}

#right {
  height: 100%;
  overflow: auto;
}
Step 6: Integrate the Viewer Component into the Page
In IndexPage.vue, add the DWT component in the template:
<div class="dwt">
  <DWT
    width="100%"
    height="100%"
    cols="2"
    rows="2"
    @onWebTWAINReady="onWebTWAINReady"
  >
  </DWT>
</div>
Define an onWebTWAINReady function which saves the object of Web TWAIN:
let DWObject:WebTwain|undefined;
const onWebTWAINReady = (dwt:WebTwain) => {
  DWObject = dwt;
};
Next, we are going to implement the panels for operations.
Step 7: Implement Scanning and Saving Controls
Here, we use two expansion items as panels to hold relevant controls. One is for scanning and the other is for saving.
HTML:
<div class="col-4" id="right">
  <q-list bordered class="rounded-borders">
    <q-expansion-item
      :model-value="true"
      expand-separator
      label="Scan"
    >
      <div class="inner">
      </div>
    </div>
    </q-expansion-item>
    <q-expansion-item
      :model-value="true"
      expand-separator
      label="Save"
    >
      <div class="inner">
      </div>
    </q-expansion-item>
  </q-list>
</div>
Build the Scanner Configuration Panel
-
Add a
selectcomponent to list connected scanners and let the user select which scanner to use.The scanners list is loaded when Web TWAIN is ready. The first scanner is selected by default.
HTML:
<q-expansion-item
  :model-value="true"
  expand-separator
  label="Scan"
>
  <div class="inner">
   <q-select v-model="selectedScanner" :options="scanners" label="Selected Scanner" />
  </div>
</q-expansion-item>
Script:
const scanners = ref([] as string[]); const selectedScanner = ref(""); const onWebTWAINReady = (dwt:WebTwain) => { DWObject = dwt; loadScanners(); }; const loadScanners = () => { if (DWObject) { let sourceNames = DWObject.GetSourceNames(false) as string[]; scanners.value = sourceNames; if (sourceNames.length > 0 ) { selectedScanner.value = sourceNames[0]; } } } -
Add three checkboxes for configuring the relevant scan settings: show the scanner’s setting UI, use auto document feeder and enable duplex scan.
HTML:
<q-checkbox left-label v-model="showUI" label="Show UI" />
<q-checkbox left-label v-model="feederEnabled" label="Auto Feeder" />
<q-checkbox left-label v-model="duplexEnabled" label="Duplex" />
Script:
const showUI = ref(false); const feederEnabled = ref(false); const duplexEnabled = ref(false); -
Add an input control for setting the resolution.
HTML:
<q-input
  v-model.number="resolution"
  type="number"
  style="max-width: 200px"
>
  <template v-slot:before>
    <span style="font-size: 14px;color: black;">Resolution:</span>
  </template>
</q-input>
Script:
const resolution = ref(200); -
Add radios for setting the pixel type of the scanned documents: black & white, gray or color.
HTML:
<div>
  <span>Pixel Type:</span>
  <q-radio v-model="pixelType" val="0" label="B&W" />
  <q-radio v-model="pixelType" val="1" label="Gray" />
  <q-radio v-model="pixelType" val="2" label="Color" />
</div>
Script:
const pixelType = ref("0"); -
Add a button to perform document scanning.
HTML:
<q-btn outline class="button" color="black" label="Scan" v-on:click="scan" />Script:
const scan = () => {
  if (DWObject) {
    let selectedIndex = scanners.value.indexOf(selectedScanner.value);
    let deviceConfiguration:DeviceConfiguration = {};
      deviceConfiguration.IfShowUI = showUI.value;
      deviceConfiguration.IfFeederEnabled = feederEnabled.value;
      deviceConfiguration.IfDuplexEnabled = duplexEnabled.value;
      deviceConfiguration.SelectSourceByIndex = selectedIndex;
      deviceConfiguration.Resolution = resolution.value;
      deviceConfiguration.PixelType = pixelType.value;
      DWObject.AcquireImage(deviceConfiguration);
  }
}
Build the PDF Save Panel
Add an input for setting the filename and add a button to save the scanned documents into a PDF file.
HTML:
<q-expansion-item
  :model-value="true"
  expand-separator
  label="Save"
>
  <div class="inner">
    <q-input outlined v-model="filename" label="Filename" />
    <q-btn outline class="button" color="black" label="Save as PDF" v-on:click="save" />
  </div>
</q-expansion-item>
Script:
const filename = ref("Scanned");
const save = () => {
  if (DWObject) {
    DWObject.SaveAllAsPDF(filename.value);
  }
}
Step 8: Add the Document Management Toolbar
The toolbar has five buttons. We can use them to remove, edit, rotate and move selected documents.
HTML:
<q-btn class="toolbar-btn" v-on:click="deleteSelected" icon="delete" />
<q-btn class="toolbar-btn" v-on:click="edit" icon="edit" />
<q-btn class="toolbar-btn" v-on:click="rotate" icon="rotate_right" />
<q-btn class="toolbar-btn" v-on:click="moveUp" icon="arrow_upward" />
<q-btn class="toolbar-btn" v-on:click="moveDown" icon="arrow_downward" />
Script:
const deleteSelected = () => {
  if (DWObject) {
    DWObject.RemoveAllSelectedImages();
  }
}

const edit = () => {
  if (DWObject) {
    let imageEditor = DWObject.Viewer.createImageEditor();
    imageEditor.show();
  }
}

const rotate = () => {
  if (DWObject) {
    DWObject.RotateRight(DWObject.CurrentImageIndexInBuffer);
  }
}

const moveUp = () => {
  if (DWObject) {
    DWObject.MoveImage(DWObject.CurrentImageIndexInBuffer,DWObject.CurrentImageIndexInBuffer-1);
  }
}

const moveDown = () => {
  if (DWObject) {
    DWObject.MoveImage(DWObject.CurrentImageIndexInBuffer,DWObject.CurrentImageIndexInBuffer+1);
  }
}
CSS:
.toolbar-btn {
  width: 100%;
}
All right, we’ve now finished building the document scanning app.
Step 9: Package as a Desktop App with Electron
It is easy to make a Quasar app a desktop app using Electron.
-
Add the Electron mode:
quasar mode add electron -
Start the app in development mode:
quasar dev -m electron -
Build the app for production:
quasar build -m electron
There are some extra steps we have to do to adapt the app as an Electron app and add native features.
Handle Dynamic Web TWAIN Service Installation
Dynamic Web TWAIN Service is a local service for interacting with scanners. It has to be installed beforehand. The default behavior when the service is not found works okay in browsers but not in Electron. We have to override the default behavior to prompt the user to install Dynamic Web TWAIN Service. The Dynamic Web TWAIN Service installers are located in the dist folder of Web TWAIN’s resources folder.
-
Add an
onWebTWAINNotFoundevent for theDWTcomponent.const emit = defineEmits(['onWebTWAINReady','onWebTWAINNotFound']); const initDWT = () => { //... const notfound = () => { emit('onWebTWAINNotFound'); } let DynamsoftAny:any = Dynamsoft; //override the default behavior DynamsoftAny.OnWebTwainNotFoundOnWindowsCallback = notfound; DynamsoftAny.OnWebTwainNotFoundOnMacCallback = notfound; DynamsoftAny.OnWebTwainNotFoundOnLinuxCallback = notfound; } -
Add a
reconnectfunction for theDWTcomponent and expose it so that the parent component can call the function.The
reconnectfunction can check whether the service is running. If it is running, initialize Dynamic Web TWAIN. Otherwise, trigger the not found event.const reconnect = () => { let dwtport = 18622; let DynamsoftAny:any = Dynamsoft; if (location.protocol == "https:") { dwtport = 18623; } DynamsoftAny.DWT.CheckConnectToTheService("127.0.0.1", dwtport, function () { initDWT(); }, function () { emit('onWebTWAINNotFound'); } ); } defineExpose({ reconnect }) -
Create a reference object of the
DWTcomponent and add theonWebTWAINNotFoundevent in the page.HTML:
<DWT
  ref="dwtElement"
  width="100%"
  height="100%"
  cols="2"
  rows="2"
  @onWebTWAINReady="onWebTWAINReady"
  @onWebTWAINNotFound="onWebTWAINNotFound">
</DWT>
Script:
const dwtElement = ref<any>(); const onWebTWAINNotFound = () => {}; -
In the page, when the
onWebTWAINNotFoundevent is triggered, show a dialog with the links to the installer and a reconnect button. Since Dynamic Web TWAIN Service has different installers for Windows, macOS and Linux, we also have to display the links based on the running platform.HTML:
<q-dialog v-model="confirm" persistent>
  <q-card>
    <q-card-section>
      <div>Dynamic Web TWAIN Service is not found. Please download and install it first.</div>
      <div v-for="(installer, index) in serviceInstallers" :key="index">
        <div><a :href='`assets/dwt-resources/dist/${installer}`'></a></div>
      </div>
    </q-card-section>
    <q-card-actions align="right">
      <q-btn flat label="Reconnect to the service" color="primary" v-close-popup v-on:click="reconnect" />
    </q-card-actions>
  </q-card>
</q-dialog>
Script:
import { Platform } from 'quasar';
const confirm = ref(false);
const serviceInstallers = ref([] as string[]);
const onWebTWAINNotFound = () => {
  const platform = Platform.is.platform;
  if (platform === 'win') {
    serviceInstallers.value = ['DynamsoftServiceSetup.msi'];
  }else if (platform === 'mac') {
    serviceInstallers.value = ['DynamsoftServiceSetup.pkg'];
  }else {
    serviceInstallers.value = ['DynamsoftServiceSetup.rpm','DynamsoftServiceSetup.deb','DynamsoftServiceSetup-arm64.deb'];
  }
  confirm.value = true;
}

const reconnect = () => {
  if (dwtElement.value) {
    dwtElement.value.reconnect();
  }
}
Add OCR Text Recognition via Electron’s Node.js Bridge
With Electron, we can use native APIs using node.js. Here, we can add a function to OCR the scanned document to demonstrate how to do it.
Here is some knowledge of Quasar and Electron we have to learn about:
In Electron, the process that runs package.json’s main script is called the main process. This is the script that runs in the main process and can display a GUI by initializing the renderer thread. This thread deals with your code in /src-electron/electron-main.[js|ts].
The preload script (/src-electron/electron-preload.[js|ts]) is a way for you to inject Node.js stuff into the renderer thread by using a bridge between it and the UI. You can expose APIs that you can then call from your UI.
In order to expose native features to our web app, we have to modify the preload script.
Here are the steps to add the OCR function.
-
Install
tesseractocrwhich calls tesseract via CLI to extract text.npm i tesseractocr -
In
electron-preload.ts, expose two functions. One is to get the temp folder to save the scanned document image for OCR and the other is to recognize the image using tesseract.import { contextBridge } from 'electron' const tesseract = require('tesseractocr') const os = require('os'); contextBridge.exposeInMainWorld('myAPI', { platform: () => process.platform, recognize: recognize, tmpDir: () => os.tmpdir() }) async function recognize(path:string){ return await tesseract.recognize(path); } -
In the web app, add an OCR button in the toolbar to get the text of a selected document using the exposed functions and display the text in a dialog. The button is only shown for the Electron platform.
HTML:
<div v-if="isElectron">
    <q-dialog v-model="showOCRResult">
      <q-card>
        <q-card-section>
          <div class="text-h6">Result</div>
        </q-card-section>

        <q-card-section class="q-pt-none">
          <pre>

          </pre>
        </q-card-section>

        <q-card-actions align="right">
          <q-btn flat label="OK" color="primary" v-close-popup />
        </q-card-actions>
      </q-card>
    </q-dialog>
  </div>
  <q-btn v-if="isElectron" class="toolbar-btn" v-on:click="recognizeSelected">
    <img :src="OCR"/>
  </q-btn>
</div>
Script:
const isElectron = ref(false);
const OCRResult = ref("");
const showOCRResult = ref(false);
onMounted(async () => {
  if (Platform.is.electron) {
    isElectron.value = true;
  }
});

const recognizeSelected = async () => {
  if (DWObject) {
    DWObject.IfShowFileDialog = false;
    let windowAny = window as any;
    let imgPath = windowAny.myAPI.tmpDir() + "/out.jpg";

    //If the current image is B&W
    //1 is B&W, 8 is Gray, 24 is RGB
    if (DWObject.GetImageBitDepth(DWObject.CurrentImageIndexInBuffer) == 1) {
      //If so, convert the image to Gray
      DWObject.ConvertToGrayScale(DWObject.CurrentImageIndexInBuffer);
    }
    DWObject.SaveAsJPEG(imgPath,DWObject.CurrentImageIndexInBuffer,
    function() {
      const OCR = async () => {
        let text = await windowAny.myAPI.recognize(imgPath);
        OCRResult.value = text;
        showOCRResult.value = true;
      }
      OCR();
    },
    function() {
      console.log("failed");
    });
  }
}
PS: in order to use third-party packages, we need to disable the sandbox.
Common Issues and Edge Cases
- Dynamic Web TWAIN Service not detected in Electron: The default browser-based service detection does not work inside Electron’s renderer process. Override the
OnWebTwainNotFoundOnWindowsCallback,OnWebTwainNotFoundOnMacCallback, andOnWebTwainNotFoundOnLinuxCallbackcallbacks and useCheckConnectToTheServiceto verify connectivity before initializing. - Scanned images appear black when saving as JPEG for OCR: If the scanned document has a bit depth of 1 (black and white), JPEG encoding produces a solid black image. Convert the image to grayscale using
ConvertToGrayScalebefore saving. - Electron sandbox blocks Node.js modules in the preload script: Third-party packages like
tesseractocrrequire Node.js APIs that are blocked when Electron’s sandbox is enabled. Disable the sandbox in yourBrowserWindowconfiguration or use Electron’snodeIntegrationwith appropriate security considerations.