


How to Build a React Native ID Card Scanner
Identity documents are adopted in many countries to prove a person’s identity. They usually have a card design around 8.6 cm x 5.4 cm in size with three-line MRZ, like ID cards in Germany and the Netherlands.
Dutch ID Card Specimen:
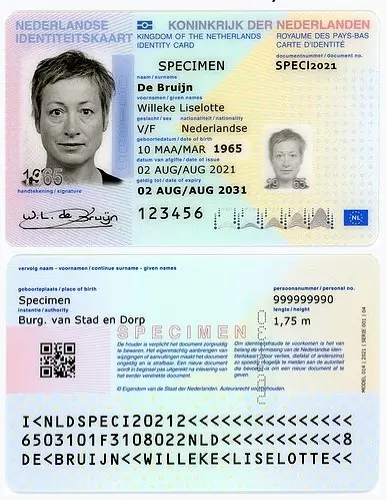
In this article, we are going to talk about how to build an ID card scanner in React Native. The scanner can capture the front and the back of the ID card and extract the card owner’s info by recognizing the MRZ using OCR. Dynamsoft Label Recognizer is used to provide the OCR functionality.
Demo video:
What you’ll build: A React Native app that scans both sides of an ID card, extracts MRZ data using Dynamsoft Label Recognizer, and displays parsed identity fields — name, date of birth, nationality, and expiry date — running fully offline on Android and iOS.
Key Takeaways
- Dynamsoft Label Recognizer provides on-device MRZ OCR in React Native via the
vision-camera-dynamsoft-label-recognizerframe processor plugin. - The app combines
react-native-vision-camerafor live camera access withvision-camera-cropperto isolate the card region before recognition. - Raw MRZ strings are decoded into structured fields using the
mrznpm package, which supports ICAO TD1, TD2, and TD3 document formats. - The full pipeline runs completely offline — no server round-trip needed for identity document reading.
Common Developer Questions
How do I read MRZ data from an ID card in React Native?
Capture the card image, run MRZ recognition through the Dynamsoft Label Recognizer frame processor, and then parse the returned MRZ text into structured identity fields with the mrz package. That is the offline identity-extraction flow used in this scanner.
How do I use react-native-vision-camera with Dynamsoft Label Recognizer on Android and iOS?
Use Vision Camera for the live camera stream and plug the Dynamsoft recognizer into that stream as a frame processor so OCR runs directly on the device. The tutorial combines those libraries to keep both capture and MRZ recognition inside one React Native app.
How do I crop a camera frame to a specific region in React Native?
Overlay a target rectangle in the camera UI and pass the frame through vision-camera-cropper so only the ID-card region is sent to the recognizer. That reduces noise and helps the MRZ OCR focus on the part of the frame that actually contains the card.
Prerequisites
Get your trial key.
New Project
Create a new React Native project:
npx react-native@latest init IDCardScanner
Add Dependencies
-
Install
react-native-vision-camerafor accessing the camera.npm install react-native-vision-camera -
Install
vision-camera-dynamsoft-label-recognizerfor recognizing the MRZ.npm install vision-camera-dynamsoft-label-recognizer -
Install
vision-camera-cropperto crop camera frames.npm install vision-camera-cropper react-native-worklets-core -
Install
react-native-svgfor drawing the rectangle for cropping.npm install react-native-svg -
Install
react-navigationfor navigation.npm install @react-navigation/native @react-navigation/native-stack react-native-safe-area-context react-native-screens -
Install
@react-native-async-storage/async-storageto store the scanned ID cards.npm install @react-native-async-storage/async-storage -
Install
mrzfor parsing MRZ.npm install mrz
Add Camera Permission
For iOS, add the following to Info.plist.
<key>NSCameraUsageDescription</key>
<string>For document scanning</string>
For Android, add the following to AndroidManifest.xml.
<uses-permission android:name="android.permission.CAMERA" />
Navigation
The app will have three screens.
-
Home Screen. We can manage scanned ID cards on this page.
-
Card Screen. We can scan a new ID card or view and modify an ID card on this page.
-
Camera Screen. We can open the camera to crop the ID card image on this page.
We use react navigation to manage the screens and navigation.
-
Create screen files under
src/screens:HomeScreen.tsx,CardScreen.tsx,CameraScreen.tsx. -
Update
App.tsxto use react navigation.import React from 'react'; import { NavigationContainer } from '@react-navigation/native'; import { createNativeStackNavigator } from '@react-navigation/native-stack'; import HomeScreen from './screens/HomeScreen'; import CameraScreen from './screens/CameraScreen'; import CardScreen from './screens/CardScreen'; import { TextButton } from './components/TextButton'; const Stack = createNativeStackNavigator(); function App(): React.JSX.Element { return ( <NavigationContainer> <Stack.Navigator> <Stack.Screen name="Home" component={HomeScreen} /> <Stack.Screen name="Camera" component={CameraScreen} /> <Stack.Screen name="Card" component={CardScreen} /> </Stack.Navigator> </NavigationContainer> ); } export default App;
How the ID Cards are Stored
A ScannedCard interface is defined to represent an ID card. It contains the base64 of its back and front images and the extracted info.
export interface ParsedResult {
  Surname:string,
  GivenName:string,
  IDNumber:string,
  DateOfBirth:string,
  DateOfExpiry:string
}

export interface ScannedIDCard {
  backImage:string,
  frontImage:string,
  info:ParsedResult,
  timestamp:number
}
An IDCardManager is used to store the ID cards using async-storage. The timestamp is used as the key.
import AsyncStorage from '@react-native-async-storage/async-storage';
export class IDCardManager {

  static async saveIDCard(card:ScannedIDCard) {
    await AsyncStorage.setItem(card.timestamp.toString(),JSON.stringify(card));
  }

  static async deleteIDCard(key:string) {
    await AsyncStorage.removeItem(key);
  }

  static async getKeys(){
    return await AsyncStorage.getAllKeys();
  }

  static async getIDCard(key:string){
    let jsonStr:string|null = await AsyncStorage.getItem(key);
    if (jsonStr) {
      let card:ScannedIDCard = JSON.parse(jsonStr);
      return card;
    }else{
      return null;
    }
  }

  static async listIDCards(){
    let cards:ScannedIDCard[] = [];
    let keys = await this.getKeys();
    for (let index = 0; index < keys.length; index++) {
      const key = keys[index];
      let card = await this.getIDCard(key);
      if (card) {
        cards.push(card);
      }
    }
    return cards;
  }
}
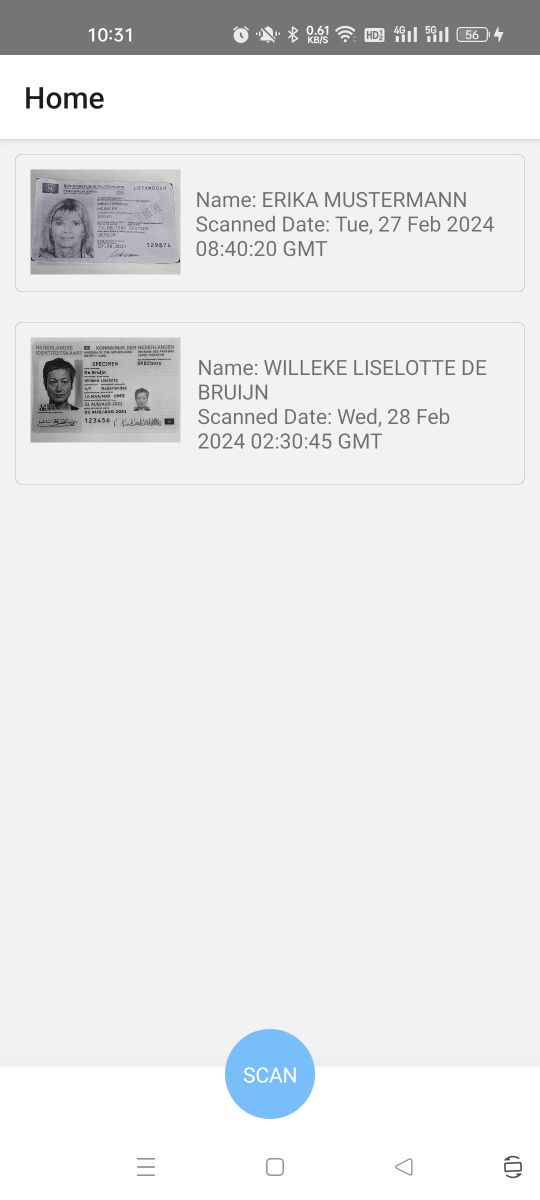
Home Screen
-
Define a
Cardcomponent undersrc/components/Card.tsx. It can be listed on the home screen.export interface CardProps{ cardKey:string; onPress?:()=>void; } export function Card(props:CardProps){ const [card,setCard] = useState<ScannedIDCard|null>(); const [pressed,setPressed] = useState(false); useEffect(() => { (async () => { console.log("mounted") const result = await IDCardManager.getIDCard(props.cardKey); setCard(result); })(); }, []); const getDate = () => { if (card) { let timestamp = card.timestamp; let date = new Date(timestamp); return date.toUTCString(); } return ""; } const getCardDetailsText = () => { let text = "Name: "+card?.info.GivenName+" "+card?.info.Surname + "\n"; text = text + "Scanned Date: " + getDate(); return text; } return ( <Pressable onPress={props.onPress} onPressIn={()=>setPressed(true)} onPressOut={()=>setPressed(false)} > <View style={[styles.card,pressed?styles.pressed:null]}> <Image style={styles.cardImage} source={{ uri: 'data:image/jpeg;base64,'+card?.frontImage, }} /> <View style={styles.cardDetails}> <Text>{getCardDetailsText()}</Text> </View> </View> </Pressable> ) } const styles = StyleSheet.create({ card:{ flex:1, display:"flex", flexDirection:"row", margin: 10, padding:10, borderColor:"gray", borderWidth:0.2, borderRadius:3 }, pressed:{ backgroundColor:"lightgray", }, cardImage:{ width: 100, height: 70, resizeMode:"cover" }, cardDetails:{ flex:1, padding:10, justifyContent:"center", flexDirection:"row" }, }); -
List the existing cards on the home screen.
interface HomeScreenProps { route:any; navigation:any; } export default function HomeScreen(props:HomeScreenProps){ const selectedCardKey = useRef(""); const [cardKeys,setCardKeys] = useState<readonly string[]>([]); useEffect(() => { const unsubscribe = props.navigation.addListener('focus', async () => { console.log("screen focused"); setCardKeys([]);//force rendering setCardKeys(await IDCardManager.getKeys()); }); return unsubscribe; }, [props.navigation]); const cardPressed = (key:string) => { selectedCardKey.current = key; } const renderCards = () => { let cards:React.ReactElement[] = []; if (cardKeys.length == 0) { return; } cardKeys.forEach(async cardKey => { let card = <Card key={cardKey} cardKey={cardKey} onPress={()=>cardPressed(cardKey)}></Card>; cards.push(card); }); if (cards.length>0) { return cards; } } return ( <View style={StyleSheet.absoluteFill}> <ScrollView style={styles.cardList}> {renderCards()} </ScrollView> </View> ) } -
When the card is pressed, display a modal for the user to choose whether to open the card or delete the card.
JSX:
<Modal
  animationType="slide"
  transparent={true}
  visible={modalVisible}
  onRequestClose={() => {
    setModalVisible(!modalVisible);
  }}>
  <View style={styles.centeredView}>
    <View style={styles.modalView}>
      <Text style={styles.modalText}>Please select an action:</Text>
      <View style={{flexDirection:"row"}}>
        <Pressable
          style={styles.button}
          onPress={() => performAction("open")}>
          <Text style={styles.textStyle}>Open</Text>
        </Pressable>
        <Pressable
          style={styles.button}
          onPress={() => performAction("delete")}>
          <Text style={styles.textStyle}>Delete</Text>
        </Pressable>
      </View>
    </View>
  </View>
</Modal>
Functions:
const [modalVisible,setModalVisible] = useState(false); const goToCardScreen = () => { console.log("goToCardScreen"); props.navigation.navigate('Card',{ cardKey: selectedCardKey.current, }); } const cardPressed = (key:string) => { selectedCardKey.current = key; setModalVisible(true); } const performAction = async (mode:"delete"|"open") => { if (mode === "delete") { await IDCardManager.deleteIDCard(selectedCardKey.current); setCardKeys(await IDCardManager.getKeys()); }else{ goToCardScreen(); } setModalVisible(!modalVisible); } -
Add a bottom bar with a “scan” button which navigates to the card screen.
JSX:
<View style={[styles.bottomBar, styles.elevation,styles.shadowProp]}>
  <Pressable onPress={()=>{selectedCardKey.current ="";goToCardScreen()}}>
    <View style={styles.circle}>
      <Text style={styles.buttonText}>SCAN</Text>
    </View>
  </Pressable>
</View>
Styles:
const styles = StyleSheet.create({
  bottomBar:{
    width: "100%",
    height: 45,
    marginTop: 5,
    flexDirection:"row",
    justifyContent:"center",
    backgroundColor:"white",
  },
  shadowProp: {
    shadowColor: '#171717',
    shadowOffset: {width: 2, height: 4},
    shadowOpacity: 0.2,
    shadowRadius: 3,
  },
  elevation: {
    elevation: 20,
    shadowColor: '#52006A',
  },
  circle: {
    width: 60,
    height: 60,
    borderRadius: 60 / 2,
    backgroundColor: "rgb(120,190,250)",
    top:-25,
    justifyContent:"center",
  },
  buttonText:{
    alignSelf:"center",
    color:"white",
  },
});
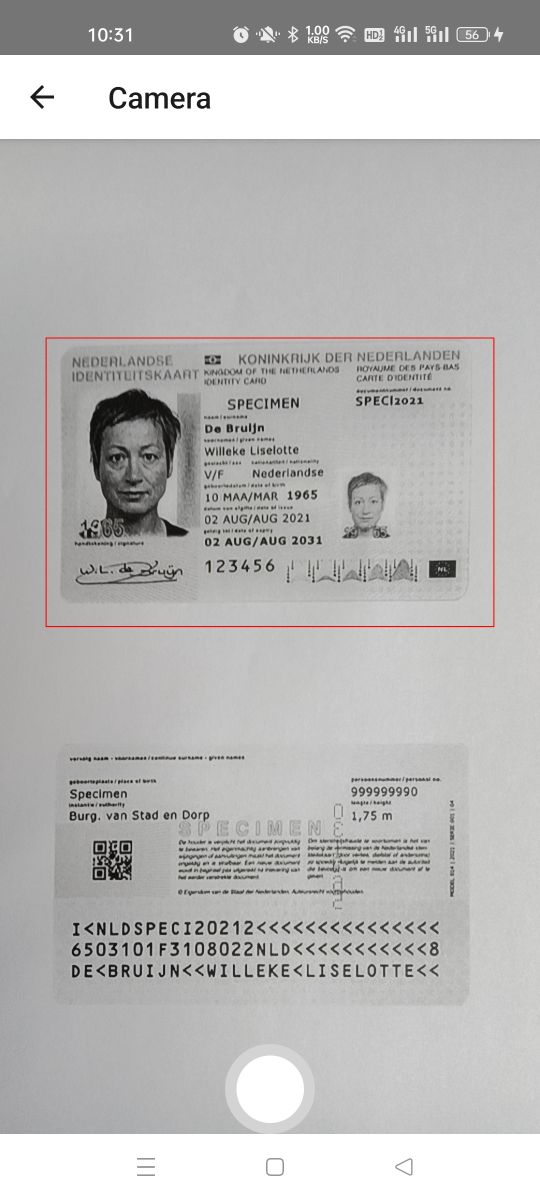
Camera Screen
-
On camera screen, use Vision Camera to open the camera, add a rectangle to indicate which region to crop and a button for capturing.
const [hasPermission, setHasPermission] = useState(false); const [isActive,setIsActive] = useState(true); const device = useCameraDevice("back"); const format = useCameraFormat(device, [ { videoResolution: { width: 1920, height: 1080 } }, { fps: 30 } ]) useEffect(() => { (async () => { const status = await Camera.requestCameraPermission(); setHasPermission(status === 'granted'); setIsActive(true); })(); }, []); return ( <View style={StyleSheet.absoluteFill}> {device != null && hasPermission && ( <> <Camera style={StyleSheet.absoluteFill} isActive={isActive} device={device} format={format} frameProcessor={frameProcessor} pixelFormat='yuv' /> <Svg preserveAspectRatio={(Platform.OS == 'ios') ? '':'xMidYMid slice'} style={StyleSheet.absoluteFill} viewBox={getViewBox()}> <Rect x={cropRegion.left/100*getFrameSize().width} y={cropRegion.top/100*getFrameSize().height} width={cropRegion.width/100*getFrameSize().width} height={cropRegion.height/100*getFrameSize().height} strokeWidth="2" stroke="red" fillOpacity={0.0} /> </Svg> </> )} <View style={[styles.bottomBar]}> <Pressable onPressIn={()=>{setPressed(true)}} onPressOut={()=>{setPressed(false)}} onPress={()=>{capture()}}> <View style={styles.outerCircle}> <View style={[styles.innerCircle, pressed ? styles.circlePressed:null]}></View> </View> </Pressable> </View> </View> ) -
The crop region is set based on the ratio of an ID card.
const [cropRegion,setCropRegion] = useState({ left: 10, top: 20, width: 80, height: 30 }); const cropRegionShared = useSharedValue<undefined|CropRegion>(undefined); const adaptCropRegionForIDCard = () => { let size = getFrameSize(); let regionWidth = 0.8*size.width; let desiredRegionHeight = regionWidth/(85.6/54); let height = Math.ceil(desiredRegionHeight/size.height*100); let region = { left:10, width:80, top:20, height:height }; setCropRegion(region); cropRegionShared.value = region; } const getFrameSize = ():{width:number,height:number} => { let size = {width:1080,height:1920}; return size; } useEffect(() => { (async () => { adaptCropRegionForIDCard(); })(); }, []); -
Define a frame processor to capture a frame when the capture button is pressed. It will return to the previous screen with the cropped frame’s base64.
const shouldTake = useSharedValue(false);
const [pressed,setPressed] = useState(false);
const capture = () => {
  shouldTake.value=true;
}

const onCaptured = (base64:string) => {
  setIsActive(false);
  if (props) {
    if (props.navigation) {
      props.navigation.navigate({
        name: 'Card',
        params: { base64: base64 },
        merge: true,
      });
    }
  }
}

const onCapturedJS = Worklets.createRunInJsFn(onCaptured);
const frameProcessor = useFrameProcessor((frame) => {
  'worklet';
  if (shouldTake.value == true && cropRegionShared.value != undefined) {
    shouldTake.value = false;
    const result = crop(frame,{cropRegion:cropRegion,includeImageBase64:true,saveAsFile:false});
    if (result.base64) {
      onCapturedJS(result.base64);
    }
  }
}, []);
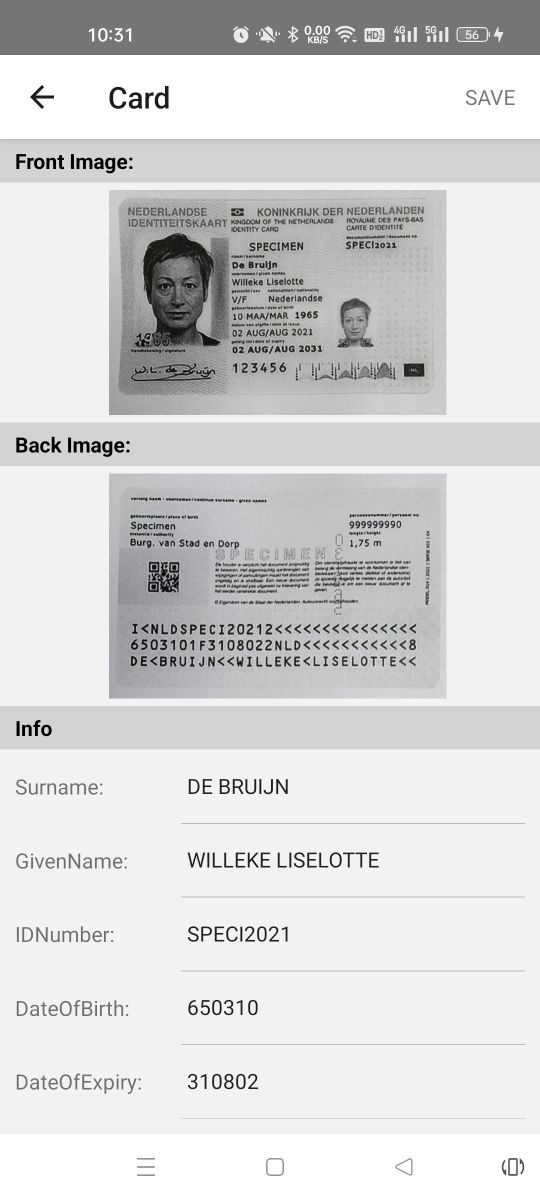
Card Screen
On the card screen, display the card’s images and info and allow editing of the card.
-
Define the JSX:
const isFrontRef = useRef(false); const goToCameraScreen = (isFront:boolean) => { isFrontRef.current = isFront; props.navigation.navigate('Camera'); } const Card = (props:{isFront:boolean}) => { let base64; if (props.isFront) { base64 = frontImageBase64; }else{ base64 = backImageBase64; } let innerControl; if (!base64) { innerControl = <View style={styles.buttonContainer}> <Button title="Add Image" onPress={()=>{goToCameraScreen(props.isFront)}} ></Button> </View> }else{ innerControl = <View style={styles.imageContainer}> <Pressable onPress={()=>{goToCameraScreen(props.isFront)}} > <Image style={styles.cardImage} source={{ uri: 'data:image/jpeg;base64,'+base64, }}></Image> </Pressable> </View> } return ( <> <Text style={styles.header}> {props.isFront?"Front":"Back"} Image: </Text> {innerControl} </> ) } const Fields = () => { const onChangeText = (key:string,text:string) => { console.log("onChangeText"); let result:any = JSON.parse(JSON.stringify(parsedResult)); result[key] = text; setParsedResult(result); } let fieldArray = []; let keys = Object.keys(parsedResult); for (let index = 0; index < keys.length; index++) { let key = keys[index]; const value = (parsedResult as any)[key]; let view = <View style={styles.infoField} key={"field-"+key}> <Text style={styles.fieldLabel}>{key+":"}</Text> <TextInput style={styles.fieldInput} onChangeText={(text)=>{onChangeText(key,text)}} value={value}/> </View> fieldArray.push(view); } return ( fieldArray ) } return ( <View style={StyleSheet.absoluteFill}> <ScrollView> {Card({isFront:true})} {Card({isFront:false})} <Text style={styles.header}> Info </Text> {Fields()} </ScrollView> </View> ) -
When the component mounted, load the card info if a key is specified.
const cardKey = useRef(""); const [frontImageBase64,setFrontImageBase64] = useState(""); const [backImageBase64,setBackImageBase64] = useState(""); const [parsedResult,setParsedResult] = useState<ParsedResult>( { Surname:"", GivenName:"", IDNumber:"", DateOfBirth:"", DateOfExpiry:"" } ); useEffect(() => { const init = async () => { console.log(props); let key = props.route.params.cardKey; if (key) { cardKey.current = key; let IDCard = await IDCardManager.getIDCard(key); if (IDCard) { setFrontImageBase64(IDCard.frontImage); setBackImageBase64(IDCard.backImage); setParsedResult(IDCard.info); } } } init() }, []); -
When the back image is captured, try to recognize the MRZ lines of the ID card and extract the info.
useEffect(() => { if (props.route.params?.base64) { let base64 = props.route.params?.base64; if (isFrontRef.current === true) { setFrontImageBase64(base64); }else{ setBackImageBase64(base64); recognizeIDCard(base64); } } }, [props.route.params?.base64]); const recognizeIDCard = async (base64:string) => { const OCRResult = await decodeBase64(base64) if (OCRResult.results.length>0) { let lineResults = OCRResult.results[0].lineResults; let MRZLines:string[] = []; for (let index = 0; index < lineResults.length; index++) { const lineResult = lineResults[index]; MRZLines = MRZLines.concat(lineResult.text.split("\n")); } console.log(MRZLines); let parsed = parse(MRZLines); let result = { Surname:parsed.fields.lastName ?? "", GivenName:parsed.fields.firstName ?? "", IDNumber:parsed.fields.documentNumber ?? "", DateOfBirth:parsed.fields.birthDate ?? "", DateOfExpiry:parsed.fields.expirationDate ?? "" } console.log("set parsed result"); console.log(result); setParsedResult(result); return; } Alert.alert("","Failed to recognize the card."); } -
Save the scanned card when the “save” button on the header is pressed.
useEffect(() => {
  // Use `setOptions` to update the button that we previously specified
  // Now the button includes an `onPress` handler to update the count
  props.navigation.setOptions({
    headerRight: () => (
      <TextButton title="Save" onPress={()=>saveCard()}></TextButton>
    ),
  });
}, [props.navigation,parsedResult,frontImageBase64,backImageBase64]);

const saveCard = async () => {
  let complete = isInfoComplete();
  if (complete) {
    let key;
    if (cardKey.current) {
      key = parseInt(cardKey.current);
    }else{
      key = new Date().getTime();
      cardKey.current = key.toString();
    }
    let card:ScannedIDCard = {
      frontImage:frontImageBase64,
      backImage:backImageBase64,
      info:parsedResult,
      timestamp:key
    }
    await IDCardManager.saveIDCard(card);
    Alert.alert("","Saved");
  }else{
    Alert.alert("","Card info not complete");
  }
}
Please note that we need to initialize Dynamsoft Label Recognizer with a license. You can apply for a license here.
   useEffect(() => {
     (async () => {
       let success = await initLicense("LICENSE-KEY");
       if (!success) {
         Alert.alert("","License for the MRZ Reader is invalid.");
       }
     })();
   }, []);
Source Code
Get the complete sample project source code on GitHub
Disclaimer:
The wrappers and sample code on Dynamsoft Codepool are community editions, shared as-is and not fully tested. Dynamsoft is happy to provide technical support for users exploring these solutions but makes no guarantees.