


Build an HTML5 JavaScript Document Scanner: Detect, Crop, and Save to PDF
Capturing and saving documents, such as receipts, invoices, and contracts, as PDF files is a common requirement for many businesses. In this article, we enhance our web document editor project built with Dynamsoft Document Viewer by adding the capability to detect and save documents as PDFs. The document detection feature is powered by Dynamsoft Capture Vision.
This article is Part 4 in a 5-Part Series.
- Part 1 - How to Add Barcodes to a PDF Using JavaScript on the Client Side
- Part 2 - How to Read DataMatrix Barcodes from PDF Files Using JavaScript
- Part 3 - How to Add Electronic Signatures to PDF Documents Using JavaScript and HTML5
- Part 4 - Build an HTML5 JavaScript Document Scanner: Detect, Crop, and Save to PDF
- Part 5 - How to Integrate Document Scan and Annotation JavaScript APIs into Your Angular Application
What you’ll build: A browser-based document scanner that detects document edges, lets you adjust corner points, rectifies the perspective, and saves the result as a PDF — all with HTML5, JavaScript, Dynamsoft Document Viewer, and Dynamsoft Capture Vision.
Key Takeaways
- Dynamsoft Capture Vision’s
DetectDocumentBoundaries_Defaultpreset locates four corner points of a document in a JPEG image captured from the browser. - Corner points are rendered as an editable polygon annotation in Dynamsoft Document Viewer, so users can fine-tune the crop region before normalization.
- The
NormalizeDocument_Defaultpreset rectifies perspective distortion and returns a clean, cropped image that can be saved to PDF via the Document Viewer’s built-in export. - This approach works entirely client-side in modern browsers — no server-side processing required.
Common Developer Questions
- How do I detect and crop a document from an image in the browser using JavaScript?
- How can I rectify perspective distortion of a scanned document with HTML5?
- How do I save a detected and cropped document as a PDF using a JavaScript SDK?
Demo Video: Detect, Crop, and Save Documents to PDF
Try the Online Demo
https://yushulx.me/web-document-annotation/
Prerequisites
-
Dynamsoft Capture Vision Trial License: Get a 30-day free trial license to unlock the full capabilities of Dynamsoft Products.
-
Dynamsoft Document Viewer: This JavaScript SDK enables seamless viewing of PDF, JPEG, PNG, TIFF, and BMP files. It also features PDF annotation rendering and saving. Download it here: https://www.npmjs.com/package/dynamsoft-document-viewer.
-
Dynamsoft Capture Vision Bundle: This JavaScript SDK provides document detection, cropping, and image enhancement functionalities. Download it here: https://www.npmjs.com/package/dynamsoft-capture-vision-bundle.
Implement Document Detection and Rectification with HTML5 and JavaScript
The following sections guide you through implementing document detection and rectification functionalities using HTML5 and JavaScript. If you have already downloaded the source code, you can skip to Step 2.
Step 1: Clone the Source Code
-
Clone the source code from the GitHub repository:
git clone https://github.com/yushulx/web-twain-document-scan-management.git -
Navigate to the
document_annotationdirectory:cd web-twain-document-scan-management/examples/document_annotation -
Open the project in Visual Studio Code.
Step 2: Add a Document Detection Button to the Toolbar
-
In
main.css, add a material icon for the document detection button:.icon-document_scanner::before { content: "crop_free"; } .icon-document_scanner { display: flex; font-size: 1.5em; }
-
Define the document detection button and add it to the toolbar in
main.js:const documentButton = { type: Dynamsoft.DDV.Elements.Button, className: "material-icons icon-document_scanner", tooltip: "Detect document", events: { click: "detectDocument", } } const pcEditViewerUiConfig = { type: Dynamsoft.DDV.Elements.Layout, flexDirection: "column", className: "ddv-edit-viewer-desktop", children: [ { type: Dynamsoft.DDV.Elements.Layout, className: "ddv-edit-viewer-header-desktop", children: [ { type: Dynamsoft.DDV.Elements.Layout, children: [ Dynamsoft.DDV.Elements.ThumbnailSwitch, Dynamsoft.DDV.Elements.Zoom, Dynamsoft.DDV.Elements.FitMode, Dynamsoft.DDV.Elements.Crop, Dynamsoft.DDV.Elements.Filter, Dynamsoft.DDV.Elements.Undo, Dynamsoft.DDV.Elements.Redo, Dynamsoft.DDV.Elements.DeleteCurrent, Dynamsoft.DDV.Elements.DeleteAll, Dynamsoft.DDV.Elements.Pan, Dynamsoft.DDV.Elements.AnnotationSet, qrButton, checkButton, scanButton, clearButton, signatureButton, documentButton, ], }, { type: Dynamsoft.DDV.Elements.Layout, children: [ { type: Dynamsoft.DDV.Elements.Pagination, className: "ddv-edit-viewer-pagination-desktop", }, loadButton, downloadButton, ], }, ], }, Dynamsoft.DDV.Elements.MainView, ], }; -
Add the click event handler for the document detection button:
 editViewer.on("detectDocument", detectDocument);

 async function detectDocument() {
     ...
 }
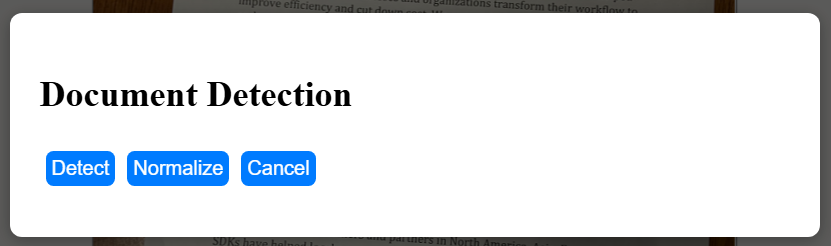
Step 3: Build a Pop-up Dialog for Detection and Normalization
The pop-up dialog for document detection and normalization includes three buttons: Detect, Normalize, and Cancel.
- Detect: Detect the document boundary.
- Normalize: Normalize the document.
- Cancel: Close the dialog.
HTML Code
<div id="document-detection" class="overlay">
        <div class="document-container">
            <h2>Document Detection</h2>

            <div class="form-group">
                <button id="detectDocument">Detect</button>
                <button id="normalizeDocument">Normalize</button>
                <button id="cancelDocument">Cancel</button>
            </div>
        </div>
    </div>
JavaScript code
let detectDocumentButton = document.getElementById("detectDocument");
let cancelDocumentButton = document.getElementById("cancelDocument");
let normalizeDocumentButton = document.getElementById("normalizeDocument");

cancelDocumentButton.addEventListener('click', () => {
    document.getElementById("document-detection").style.display = "none";
});

normalizeDocumentButton.addEventListener('click', async () => {
    document.getElementById("document-detection").style.display = "none";

    ...
});

detectDocumentButton.addEventListener('click', async () => {
    document.getElementById("document-detection").style.display = "none";

    ...
});
Step 4: Detect Corner Points and Rectify the Document Image
-
Detect the document and draw the contours based on the four corner points in the edit viewer:
detectDocumentButton.addEventListener('click', async () => { document.getElementById("document-detection").style.display = "none"; const settings = { quality: 100, saveAnnotation: false, }; const image = await editViewer.currentDocument.saveToJpeg(editViewer.getCurrentPageIndex(), settings); const result = await cvRouter.capture(image, "DetectDocumentBoundaries_Default"); for (let item of result.items) { if (item.type !== Dynamsoft.Core.EnumCapturedResultItemType.CRIT_DETECTED_QUAD) { continue; } let points = item.location.points; let currentPageId = currentDoc.pages[editViewer.getCurrentPageIndex()]; let pageData = await currentDoc.getPageData(currentPageId); documentPoints = points; const polygonOptions = { points: points.map(p => { return { x: p.x / pageData.display.width * pageData.mediaBox.width, y: p.y / pageData.display.height * pageData.mediaBox.height } }), borderColor: "rgb(0,0,255)", flags: { print: false, noView: false, readOnly: false, } } let polygon = Dynamsoft.DDV.annotationManager.createAnnotation(currentPageId, "polygon", polygonOptions); polygon['name'] = 'document'; break; } }); -
Normalize the document image:
 normalizeDocumentButton.addEventListener('click', async () => {
     document.getElementById("document-detection").style.display = "none";

     let currentPageId = currentDoc.pages[editViewer.getCurrentPageIndex()];
     let blob = await normalizeImage();

     if (blob) {
         await currentDoc.updatePage(currentPageId, blob);
         documentPoints = null;
     }
 });

 async function normalizeImage() {

     if (!documentPoints) {
         return null;
     }

     let params = await cvRouter.getSimplifiedSettings("NormalizeDocument_Default");
     params.roi.points = documentPoints;
     params.roiMeasuredInPercentage = 0;
     await cvRouter.updateSettings("NormalizeDocument_Default", params);

     const settings = {
         quality: 100,
         saveAnnotation: false,
     };

     const image = await editViewer.currentDocument.saveToJpeg(editViewer.getCurrentPageIndex(), settings);
     cvRouter.maxCvsSideLength = 9999;
     const result = await cvRouter.capture(image, "NormalizeDocument_Default");

     for (let item of result.items) {
         if (item.type !== Dynamsoft.Core.EnumCapturedResultItemType.CRIT_ENHANCED_IMAGE) {
             continue;
         }


         let blob = await item.toBlob();
         return blob;
     }
 }
Common Issues and Edge Cases
- Detection fails on low-contrast backgrounds: If the document sits on a white desk with minimal shadow,
DetectDocumentBoundaries_Defaultmay not find four distinct corners. Place the document on a darker, contrasting surface or manually specify corner points via the polygon annotation. - Normalized image appears stretched or skewed: This usually happens when a corner point is misplaced (e.g., snapping to a shadow edge instead of the paper edge). Drag the polygon handles in the edit viewer to correct them before clicking Normalize.
- Large images cause slow processing:
cvRouter.maxCvsSideLengthdefaults to a conservative value. The tutorial sets it to9999for full-resolution output. On older devices, reduce this value or downscale the source JPEG quality to balance speed and output quality.
Source Code
https://github.com/yushulx/web-twain-document-scan-management/tree/main/examples/document_annotation