How to Extract Text from Scanned Documents in C# .NET with Windows OCR API
In today’s digital workplace, document scanning and text recognition are vital capabilities for many business applications. In this tutorial, you’ll learn how to build a Windows document scanner application with Optical Character Recognition (OCR) using:
- .NET 8
- C#
- Dynamic Web TWAIN REST API
- Windows.Media.Ocr API (Windows built-in OCR engine)
By the end, you’ll have a fully functional desktop app that can scan documents, manage images, and recognize text in multiple languages.
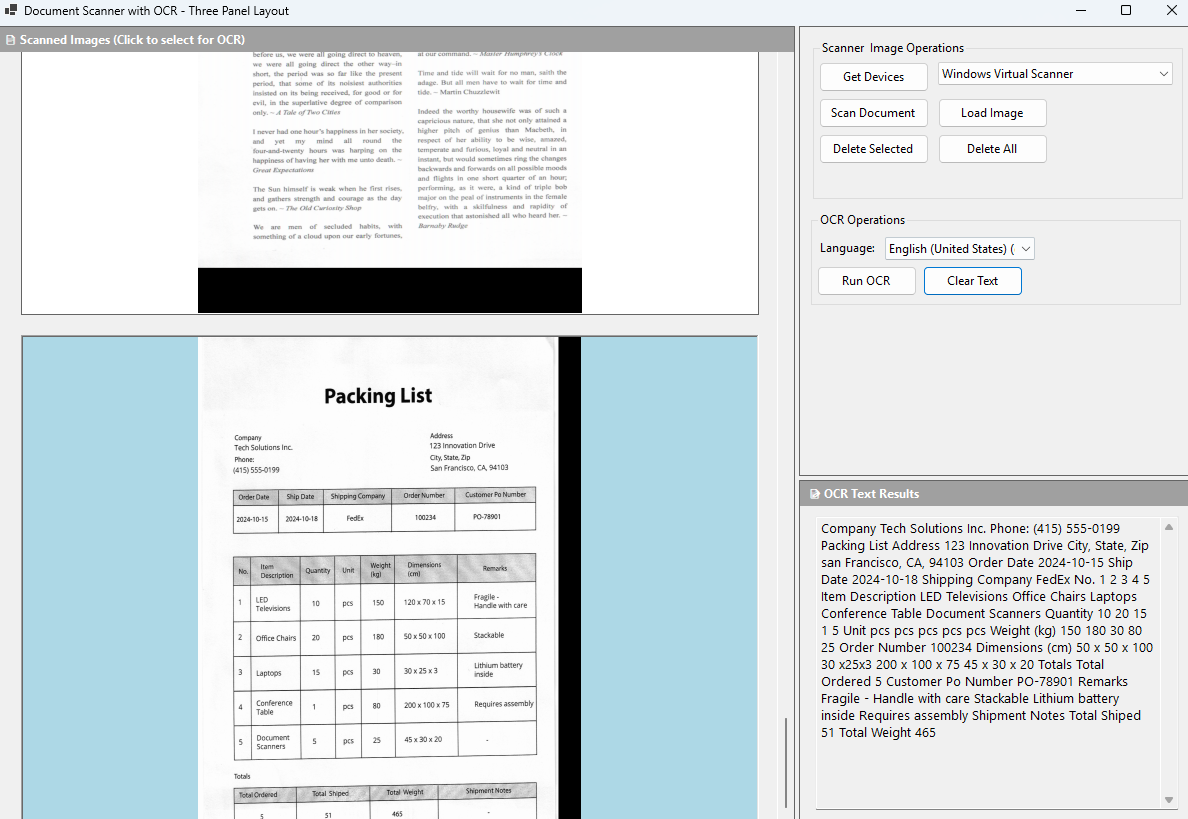
What you’ll build: A WinForms desktop application in C# that controls a TWAIN scanner via Dynamic Web TWAIN REST API, displays scanned pages in a scrollable gallery, and extracts text in multiple languages using the free, on-device Windows.Media.Ocr engine.
Key Takeaways
- Dynamic Web TWAIN REST API lets you control TWAIN scanners from .NET 8 without writing native driver code — the Dynamsoft service handles all scanner communication over HTTP.
Windows.Media.Ocr(Windows 10 1803+) provides free, on-device multi-language OCR with no cloud calls; languages are installed via Windows Optional Features.- Targeting
net8.0-windows10.0.17763.0and setting<UseWinRT>true</UseWinRT>in the.csprojis required to access WinRT OCR APIs from a .NET 8 WinForms project. - This scan-and-recognize pipeline fits real-world scenarios such as invoice digitization, medical record capture, and legal document archiving.
Common Developer Questions
How do I extract text from scanned documents in C# .NET using Windows built-in OCR?
Scan or load the page image, convert it into the SoftwareBitmap format expected by Windows.Media.Ocr, and then run the selected OcrEngine to read the text. This keeps OCR fully local and uses the Windows language packs already installed on the machine.
How do I connect to a TWAIN scanner from a .NET 8 WinForms application using Dynamic Web TWAIN REST API?
Reference the Twain.Wia.Sane.Scanner package, configure the local Dynamic Web TWAIN service host, and call its C# methods to enumerate devices and create scan jobs. The WinForms app never needs direct native TWAIN code because the service handles the driver layer over HTTP.
Why does OcrEngine.TryCreateFromLanguage return null in my C# app?
It usually means the target OCR language pack is not installed in Windows. Install that language’s OCR optional feature, then recreate the engine so TryCreateFromLanguage can return a usable recognizer instead of null.
Demo: .NET Document Scanner with OCR in Action
Prerequisites
- Install Dynamic Web TWAIN Service for Windows
- Get a free trial license for Dynamic Web TWAIN
Application Features at a Glance
Your application will include:
- TWAIN Scanner Integration for professional document scanning
- Image Management with gallery view and delete operations
- Multi-language OCR powered by Windows built-in OCR engine
- File Operations for loading existing images
Step 1: Set Up the Project
Step 1: Create the WinForms Project
dotnet new winforms -n DocumentScannerOCR
cd DocumentScannerOCR
Step 2: Add NuGet Dependencies
Edit your .csproj file:
<Project Sdk="Microsoft.NET.Sdk">
  <PropertyGroup>
    <OutputType>WinExe</OutputType>
    <TargetFramework>net8.0-windows10.0.17763.0</TargetFramework>
    <Nullable>enable</Nullable>
    <UseWindowsForms>true</UseWindowsForms>
    <ImplicitUsings>enable</ImplicitUsings>
    <UseWinRT>true</UseWinRT>
    <TargetPlatformMinVersion>10.0.17763.0</TargetPlatformMinVersion>
  </PropertyGroup>

  <ItemGroup>
    <PackageReference Include="Twain.Wia.Sane.Scanner" Version="2.0.1" />
    <PackageReference Include="Newtonsoft.Json" Version="13.0.3" />
  </ItemGroup>
</Project>
Why these packages?
- Twain.Wia.Sane.Scanner: Wrapper for the Dynamic Web TWAIN REST API
- Newtonsoft.Json: High-performance JSON serialization/deserialization
Step 3: Import WinRT and Scanner Namespaces
In Form1.cs:
using Newtonsoft.Json;
using System.Collections.ObjectModel;
using Twain.Wia.Sane.Scanner;
using Windows.Media.Ocr;
using Windows.Graphics.Imaging;
using System.Runtime.InteropServices.WindowsRuntime;
using Windows.Storage.Streams;
using System.Diagnostics;
Step 2: Implement Core Application Logic
Step 1: Define Form Fields and Constructor
public partial class Form1 : Form
{
    private static string licenseKey = "YOUR_DYNAMSOFT_LICENSE_KEY";
    private static ScannerController scannerController = new ScannerController();
    private static List<Dictionary<string, object>> devices = new List<Dictionary<string, object>>();
    private static string host = "http://127.0.0.1:18622";

    private List<Image> scannedImages = new List<Image>();
    private Image? selectedImage = null;
    private int selectedImageIndex = -1;

    public ObservableCollection<string> Items { get; set; }
    public ObservableCollection<string> OcrLanguages { get; set; }

    public Form1()
    {
        InitializeComponent();
        SetupUI();
        InitializeOcrLanguages();
    }
}
Step 2: Populate the OCR Language List at Startup
The Windows.Media.Ocr API provides access to system-installed OCR (C:\Windows\OCR) languages:
private void InitializeOcrLanguages()
{
    try
    {
        var supportedLanguages = OcrEngine.AvailableRecognizerLanguages;
        foreach (var language in supportedLanguages)
        {
            OcrLanguages.Add($"{language.DisplayName} ({language.LanguageTag})");
        }

        languageComboBox.DataSource = OcrLanguages;
        if (OcrLanguages.Count > 0)
        {
            // Try to select English as default
            var englishIndex = OcrLanguages.ToList().FindIndex(lang => lang.Contains("English"));
            languageComboBox.SelectedIndex = englishIndex >= 0 ? englishIndex : 0;
        }
    }
    catch (Exception ex)
    {
        MessageBox.Show($"Error initializing OCR languages: {ex.Message}",
                       "OCR Error", MessageBoxButtons.OK, MessageBoxIcon.Warning);
    }
}
Step 3: Detect Connected TWAIN Scanners
Use the Dynamic Web TWAIN REST API to discover available scanners:
private async void GetDevicesButton_Click(object sender, EventArgs e)
{
    var scannerInfo = await scannerController.GetDevices(host,
        ScannerType.TWAINSCANNER | ScannerType.TWAINX64SCANNER);

    devices.Clear();
    Items.Clear();

    var scanners = new List<Dictionary<string, object>>();
    try
    {
        scanners = JsonConvert.DeserializeObject<List<Dictionary<string, object>>>(scannerInfo)
                   ?? new List<Dictionary<string, object>>();
    }
    catch (Exception ex)
    {
        Debug.WriteLine($"Error parsing scanner data: {ex.Message}");
        MessageBox.Show("Error detecting scanners. Please ensure TWAIN service is running.");
        return;
    }

    if (scanners.Count == 0)
    {
        MessageBox.Show("No scanners found. Please check your scanner connection.");
        return;
    }

    foreach (var scanner in scanners)
    {
        devices.Add(scanner);
        if (scanner.ContainsKey("name"))
        {
            Items.Add(scanner["name"].ToString() ?? "Unknown Scanner");
        }
    }

    comboBox1.DataSource = Items;
}
Step 4: Trigger the Scan and Retrieve Images
Add a button click event handler for triggering the scan and inserting the scanned image into the UI:
private async void ScanButton_Click(object sender, EventArgs e)
{
    if (comboBox1.SelectedIndex < 0)
    {
        MessageBox.Show("Please select a scanner first.");
        return;
    }

    try
    {
        var device = devices[comboBox1.SelectedIndex];
        var parameters = new
        {
            license = licenseKey,
            device = device,
            config = new
            {
                IfShowUI = false,
                PixelType = 2,
                Resolution = 300,
                IfFeederEnabled = false,
                IfDuplexEnabled = false
            }
        };

        string jobId = await scannerController.ScanDocument(host, parameters);

        if (!string.IsNullOrEmpty(jobId))
        {
            await ProcessScanResults(jobId);
        }
    }
    catch (Exception ex)
    {
        MessageBox.Show($"Scanning failed: {ex.Message}", "Scan Error",
                       MessageBoxButtons.OK, MessageBoxIcon.Error);
    }
}

private async Task ProcessScanResults(string jobId)
{
    while (true)
    {
        byte[] imageBytes = await scannerController.GetImageStream(host, jobId);

        if (imageBytes.Length == 0)
            break;

        using var stream = new MemoryStream(imageBytes);
        var image = Image.FromStream(stream);

        scannedImages.Add(image);
        var pictureBox = CreateImagePictureBox(image, scannedImages.Count - 1);

        flowLayoutPanel1.Controls.Add(pictureBox);
        flowLayoutPanel1.Controls.SetChildIndex(pictureBox, 0);
    }

    await scannerController.DeleteJob(host, jobId);
}
Step 5: Display Scanned Images in a Scrollable Gallery
Create picture boxes optimized for document viewing:
private PictureBox CreateImagePictureBox(Image image, int index)
{
    int panelWidth = Math.Max(flowLayoutPanel1.Width, 400);
    int pictureBoxWidth = Math.Max(280, panelWidth - 60);

    double aspectRatio = (double)image.Width / image.Height;
    int pictureBoxHeight;

    if (aspectRatio > 1.0)
    {
        pictureBoxHeight = Math.Min(350, (int)(pictureBoxWidth / aspectRatio));
    }
    else
    {
        pictureBoxHeight = Math.Min(500, (int)(pictureBoxWidth / aspectRatio));
    }

    pictureBoxHeight = Math.Max(300, pictureBoxHeight);

    var pictureBox = new PictureBox
    {
        Image = image,
        SizeMode = PictureBoxSizeMode.Zoom,
        Size = new Size(pictureBoxWidth, pictureBoxHeight),
        Margin = new Padding(10),
        BorderStyle = BorderStyle.FixedSingle,
        Cursor = Cursors.Hand,
        Tag = index
    };

    pictureBox.Click += (s, e) => SelectImage(index);

    return pictureBox;
}
Step 6: Run OCR on the Selected Image
Implement text recognition using the Windows built-in OCR engine:
private async void OcrButton_Click(object sender, EventArgs e)
{
    if (selectedImage == null)
    {
        MessageBox.Show("Please select an image first by clicking on it.",
                       "No Image Selected", MessageBoxButtons.OK, MessageBoxIcon.Information);
        return;
    }

    if (languageComboBox.SelectedIndex < 0)
    {
        MessageBox.Show("Please select an OCR language.",
                       "No Language Selected", MessageBoxButtons.OK, MessageBoxIcon.Information);
        return;
    }

    try
    {
        ocrButton.Enabled = false;
        ocrButton.Text = "Processing...";

        var selectedLanguageText = languageComboBox.SelectedItem?.ToString() ?? "";
        var languageTag = ExtractLanguageTag(selectedLanguageText);

        var language = new Windows.Globalization.Language(languageTag);
        var ocrEngine = OcrEngine.TryCreateFromLanguage(language);

        if (ocrEngine == null)
        {
            MessageBox.Show($"OCR engine could not be created for language: {languageTag}",
                           "OCR Error", MessageBoxButtons.OK, MessageBoxIcon.Error);
            return;
        }

        var softwareBitmap = await ConvertImageToSoftwareBitmap(selectedImage);

        var ocrResult = await ocrEngine.RecognizeAsync(softwareBitmap);

        if (string.IsNullOrWhiteSpace(ocrResult.Text))
        {
            ocrTextBox.Text = "No text was recognized in the selected image.";
        }
        else
        {
            ocrTextBox.Text = ocrResult.Text;
        }
    }
    catch (Exception ex)
    {
        MessageBox.Show($"OCR processing failed: {ex.Message}",
                       "OCR Error", MessageBoxButtons.OK, MessageBoxIcon.Error);
    }
    finally
    {
        ocrButton.Enabled = true;
        ocrButton.Text = "Run OCR";
    }
}
Step 3: Build the Three-Panel UI Layout
Step 1: Configure the Split Container Layout
Create a responsive layout optimized for document workflows:
private void SetupUI()
{
    mainSplitContainer.Dock = DockStyle.Fill;
    mainSplitContainer.Orientation = Orientation.Vertical;
    mainSplitContainer.FixedPanel = FixedPanel.Panel2;
    mainSplitContainer.SplitterDistance = 800;

    rightSplitContainer.Dock = DockStyle.Fill;
    rightSplitContainer.Orientation = Orientation.Horizontal;
    rightSplitContainer.FixedPanel = FixedPanel.Panel1;
    rightSplitContainer.SplitterDistance = 450;

    flowLayoutPanel1.FlowDirection = FlowDirection.TopDown;
    flowLayoutPanel1.AutoScroll = true;
    flowLayoutPanel1.WrapContents = false;
    flowLayoutPanel1.Padding = new Padding(15, 20, 15, 15);

    ocrButton.Enabled = false;

    imagePanel.SizeChanged += ImagePanel_SizeChanged;
    flowLayoutPanel1.SizeChanged += FlowLayoutPanel1_SizeChanged;
}
Step 2: Add Image Load and Delete Controls
Add and delete image files:
private void LoadImageButton_Click(object sender, EventArgs e)
{
    using var openFileDialog = new OpenFileDialog
    {
        Filter = "Image Files|*.jpg;*.jpeg;*.png;*.bmp;*.tiff;*.tif;*.gif",
        Multiselect = true,
        Title = "Select Image Files"
    };

    if (openFileDialog.ShowDialog() == DialogResult.OK)
    {
        foreach (string fileName in openFileDialog.FileNames)
        {
            try
            {
                var image = Image.FromFile(fileName);
                scannedImages.Add(image);

                var pictureBox = CreateImagePictureBox(image, scannedImages.Count - 1);
                flowLayoutPanel1.Controls.Add(pictureBox);
                flowLayoutPanel1.Controls.SetChildIndex(pictureBox, 0);
            }
            catch (Exception ex)
            {
                MessageBox.Show($"Error loading {fileName}: {ex.Message}",
                               "Load Error", MessageBoxButtons.OK, MessageBoxIcon.Warning);
            }
        }

        UpdateDeleteButtonStates();
    }
}

private void DeleteSelectedButton_Click(object sender, EventArgs e)
{
    if (selectedImageIndex < 0) return;

    var result = MessageBox.Show("Are you sure you want to delete the selected image?",
                                "Confirm Delete", MessageBoxButtons.YesNo, MessageBoxIcon.Question);

    if (result == DialogResult.Yes)
    {
        scannedImages[selectedImageIndex]?.Dispose();
        scannedImages.RemoveAt(selectedImageIndex);

        RefreshImageDisplay();
        ClearSelection();
    }
}

private void DeleteAllButton_Click(object sender, EventArgs e)
{
    if (scannedImages.Count == 0) return;

    var result = MessageBox.Show($"Are you sure you want to delete all {scannedImages.Count} images?",
                                "Confirm Delete All", MessageBoxButtons.YesNo, MessageBoxIcon.Question);

    if (result == DialogResult.Yes)
    {
        foreach (var image in scannedImages)
        {
            image?.Dispose();
        }

        scannedImages.Clear();
        flowLayoutPanel1.Controls.Clear();
        ClearSelection();
        ocrTextBox.Clear();
    }
}
Common Issues & Edge Cases
TryCreateFromLanguagereturnsnull: The required language pack is not installed. Open Settings → Time & Language → Language, select the target language, then install its Optional Features (OCR Pack) fromC:\Windows\OCR.- Scan returns zero images: The Dynamic Web TWAIN Service may not be running. Confirm
DynamsoftServiceis active in Windows Services and that port 18622 is not blocked by a firewall or VPN. ConvertImageToSoftwareBitmapfails withE_INVALIDARG:Windows.Media.Ocrrequires the inputSoftwareBitmapto useBgra8orGray8pixel format. Convert or decode the bitmap into one of those formats before callingRecognizeAsync.
Step 4: Build and Run the Application
-
Set the license key in
Form1.cs:private static string licenseKey = "LICENSE-KEY"; -
Run the application:
dotnet run