


Build a Desktop Document Scanner with Tauri, React, and Dynamic Web TWAIN
Tauri is a framework for building desktop apps for all major platforms. Developers can integrate any front-end framework that compiles to HTML, JS and CSS for building their user interface. The backend of the application is a Rust-sourced binary with an API that the front-end can interact with.
Different from Electron which bundles a complete Chrome, Tauri uses the system’s built-in webview. The installer’s size can be very small.
In this article, we are going to build a document scanning desktop app using Tauri. Dynamic Web TWAIN is used to provide the ability to interact with document scanners.
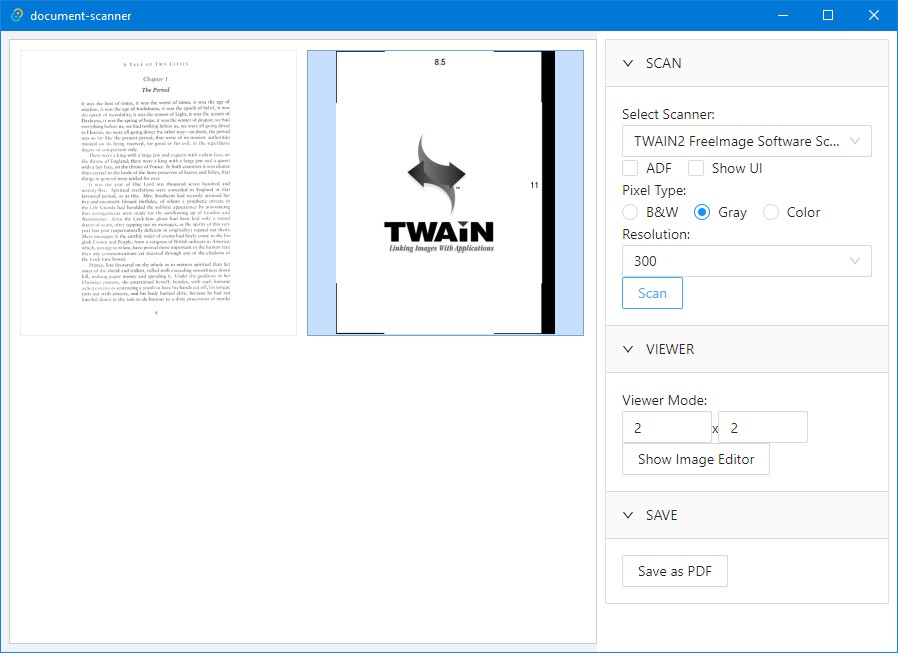
The final app looks like this:

What you’ll build: A cross-platform desktop document scanning application using Tauri with React and TypeScript, integrated with Dynamic Web TWAIN SDK for scanner communication, document viewing, and PDF export.
Key Takeaways
- Tauri apps use the system’s built-in webview instead of bundling Chromium, producing installers as small as a few megabytes compared to Electron’s 100 MB+ bundles.
- Dynamic Web TWAIN communicates with TWAIN/WIA/SANE-compatible scanners through a local service, enabling features like auto document feeder (ADF) support, pixel type selection, and resolution control.
- The React-based DocumentViewer component wraps the Dynamic Web TWAIN viewer and exposes the WebTwain API object for scanning, editing, and saving operations.
- Scanned documents can be saved as multi-page PDF files directly from the Tauri desktop app using
DWObject.SaveAllAsPDF().
Common Developer Questions
How do I build a desktop document scanner app with Tauri and JavaScript?
Start from a Tauri React TypeScript template, load Dynamic Web TWAIN in the webview layer, and wrap the viewer in a React component that exposes the WebTwain object to the rest of the app. Tauri handles packaging and the native shell, while the scanning workflow stays in JavaScript.
Can Tauri apps communicate with hardware scanners using Dynamic Web TWAIN?
Yes. Dynamic Web TWAIN talks to TWAIN, WIA, and SANE-compatible scanners through its local service, so the Tauri app can still control ADF, resolution, and pixel type from the front end. If scanning fails, the first thing to verify is that the bundled Dynamic Web TWAIN Service is installed and running.
How do I save scanned documents as PDF in a Tauri React application?
Call SaveAllAsPDF() on the active DWObject after pages are scanned or loaded into the viewer buffer. The same React-side object used for acquisition also handles export, so no Rust-side PDF assembly is required.
Build a Desktop Document Scanner with Tauri Step by Step
Prerequisites
- Node.js (v16 or later)
- Rust toolchain for Tauri backend compilation
- A TWAIN-compatible document scanner connected to your machine
- Get a 30-day free trial license for Dynamic Web TWAIN
Step 1: Create a New Tauri Project
npm create tauri-app
✔ Project name · Document Scanner
✔ Package name · document-scanner
✔ Choose your package manager · npm
✔ Choose your UI template · react-ts
Here we choose React with TypeScript as the template.
Step 2: Install Dynamic Web TWAIN and Dependencies
-
Install Dynamic Web TWAIN from npm:
npm install dwt -
We also need to copy the resources of Dynamic Web TWAIN to the public folder.
Add the following
scripttopackage.json:"copy:resources": "npx ncp node_modules/dwt/dist public/dwt-resources && npx ncp public/dwt-resources/dist src-tauri/dist && npx del-cli public/dwt-resources/dist -f"Install used command line packages:
npm install --save-dev ncp del-cliThen run the command:
npm run copy:resources
Step 3: Create a Document Viewer React Component
Dynamic Web TWAIN provides a document viewer control and a bunch of APIs to scan and manage documents. We are going to wrap the viewer as a React component and expose the object of Dynamic Web TWAIN to call different APIs.
Here is the basic content of the component:
interface props {
  onWebTWAINReady?: (dwt:WebTwain) => void;
}

const DocumentViewer: React.FC<props> = (props: props)  => {
  const containerID = "dwtcontrolContainer";
  const container = useRef<HTMLDivElement>(null);
  useEffect(()=>{
    Dynamsoft.DWT.RegisterEvent('OnWebTwainReady', () => {
      const DWObject = Dynamsoft.DWT.GetWebTwain(containerID);
      if (props.onWebTWAINReady) {
        props.onWebTWAINReady(DWObject); // expose the object of Dynamic Web TWAIN
      }
    });
    Dynamsoft.DWT.ResourcesPath = "/dwt-resources";
    Dynamsoft.DWT.Containers = [{
        WebTwainId: 'dwtObject',
        ContainerId: containerID
    }];
    Dynamsoft.DWT.Load();
  },[]);

  return (
    <div ref={container} id={containerID}></div>
  );
}

export default DocumentViewer;
There are some additional props we can add to the component:
-
A license to activate Dynamic Web TWAIN. We can apply for a trial license here.
interface props { license?:string; } useEffect(()=>{ if (props.license) { Dynamsoft.DWT.ProductKey = props.license; } },[]); -
Width and height for the viewer.
interface props { width?: string; height?: string; } useEffect(()=>{ Dynamsoft.DWT.RegisterEvent('OnWebTwainReady', () => { const DWObject = Dynamsoft.DWT.GetWebTwain(containerID); DWObject.Viewer.width = "100%"; DWObject.Viewer.height = "100%"; if (props.width) { if (container.current) { container.current.style.width = props.width; } } if (props.height) { if (container.current) { container.current.style.height = props.height; } } }); },[]); -
View mode for the viewer:
interface props { viewMode?: {cols:number,rows:number}; } useEffect(()=>{ Dynamsoft.DWT.RegisterEvent('OnWebTwainReady', () => { const DWObject = Dynamsoft.DWT.GetWebTwain(containerID); if (props.viewMode) { DWObject.Viewer.setViewMode(props.viewMode.cols,props.viewMode.rows); } }); },[]); -
An
onWebTWAINNotFoundevent when the Dynamic Web TWAIN Service has not been installed.interface props { license?:string; } useEffect(()=>{ if (props.onWebTWAINNotFound){ const notfound = () => { if (props.onWebTWAINNotFound){ props.onWebTWAINNotFound(); } } let DynamsoftAny:any = Dynamsoft; // use any here since the followings are not defined in TypeScript DynamsoftAny.OnWebTwainNotFoundOnWindowsCallback = notfound; DynamsoftAny.OnWebTwainNotFoundOnMacCallback = notfound; DynamsoftAny.OnWebTwainNotFoundOnLinuxCallback = notfound; } },[]);PS: Dynamic Web TWAIN Service is a local service for interacting with scanners.
Step 4: Integrate the Viewer into the App Layout
Next, we are going to use the component in the app.
Here, we use Ant Design’s UI components.
The viewer is placed in the left and a sider with panels is placed in the right for operations.
import "./App.css";
import { Button, Layout, Collapse, Checkbox, Radio, RadioChangeEvent, InputNumber  } from 'antd';
const { Panel } = Collapse;
const { Content, Sider } = Layout;
function App() {
  const dwt = React.useRef<WebTwain>();
  const [viewMode, setViewMode] = React.useState({cols:2,rows:2});
  const onWebTWAINReady = (instance:WebTwain) => {
    dwt.current = instance;
  }
  const onWebTWAINNotFound = async () => {
    console.log("Dynamic Web TWAIN Service not installed");
  }
  return (
    <Layout hasSider>
      <Layout style={{ marginRight: 300 }}>
        <Content className="content">
            <DocumentViewer
              width="100%"
              height="100%"
              onWebTWAINReady={onWebTWAINReady}
              onWebTWAINNotFound={onWebTWAINNotFound}
              viewMode={viewMode}
            ></DocumentViewer>
        </Content>
      </Layout>
      <Sider
        width='300px'
        theme='light'
        style={{
          overflow: 'auto',
          height: '100vh',
          position: 'fixed',
          right: 0,
          top: 0,
          bottom: 0,
        }}
      >
        <Collapse className="controls" defaultActiveKey={['1']} onChange={onChange}>
          <Panel header="SCAN" key="1">
          </Panel>
          <Panel header="VIEWER" key="2">
          </Panel>
          <Panel header="SAVE" key="3">
          </Panel>
        </Collapse>
      </Sider>
  </Layout>
  );
}

export default App;
The CSS:
@import 'antd/dist/antd.css';

.content {
  height: calc(100vh - 16px);
  margin-left: 8px;
  margin-top: 8px;
  margin-bottom: 8px;
  width: "100%";
}

.controls {
  margin: 8px;
}
Next, we are going implement the panels for different operations.
Step 5: Implement the Scanner Selection and Scan Panel
-
Add a
selectcomponent to select which scanner to use.const [scanners,setScanners] = React.useState([] as string[]); const [selectedScanner,setSelectedScanner] = React.useState(""); const onSelectedScannerChange = (value:string) => { setSelectedScanner(value); } //... <Panel header="SCAN" key="1"> Select Scanner: <Select onChange={onSelectedScannerChange} value={selectedScanner} style={{width:"100%"}}> {scanners.map(scanner => <Option key={scanner} value={scanner} >{scanner}</Option> )} </Select> </Panel>The scanners list is loaded when Web TWAIN is ready.
const onWebTWAINReady = (instance:WebTwain) => { dwt.current = instance; loadScannersList(); } const loadScannersList = () => { const DWObject = dwt.current; if (DWObject) { const names = DWObject.GetSourceNames(false) as string[]; setScanners(names); if (names.length>0) { setSelectedScanner(names[0]); } } } -
Add an auto feeder (ADF) checkbox.
const [ADF,setADF] = React.useState(false); //... <Checkbox checked={ADF} onChange={()=>{setADF(!ADF)}}>ADF</Checkbox> -
Add a show UI checkbox. If it is enabled, a scanning configuration window will appear when we start scanning.
const [showUI,setShowUI] = React.useState(false); //... <Checkbox checked={showUI} onChange={()=>{setShowUI(!showUI)}}>Show UI</Checkbox> -
Add three radios for pixel type selection. We can use this to set whether the scanned document’s pixel type is black & white, gray or color.
const [selectedPixelType, setSelectedPixelType] = React.useState(0); //... Pixel Type: <Radio.Group onChange={(e:RadioChangeEvent)=>{setSelectedPixelType(e.target.value)}} value={selectedPixelType}> <Radio value={0}>B&W</Radio> <Radio value={1}>Gray</Radio> <Radio value={2}>Color</Radio> </Radio.Group> -
Add a resolution select.
const [selectedResolution, setSelectedResolution] = React.useState(100); //... Resolution: <Select style={{width:"100%"}} onChange={(value)=>{setSelectedResolution(value)}} value={selectedResolution}> <Option value="100">100</Option> <Option value="200">200</Option> <Option value="300">300</Option> </Select> -
Add a
scanbutton to start scanning.const scan = () => { const DWObject = dwt.current; if (DWObject) { let deviceConfiguration:DeviceConfiguration = {}; deviceConfiguration.IfShowUI = showUI; deviceConfiguration.IfFeederEnabled = ADF; deviceConfiguration.SelectSourceByIndex = scanners.indexOf(selectedScanner); deviceConfiguration.PixelType = selectedPixelType; deviceConfiguration.Resolution = selectedResolution; DWObject.AcquireImage(deviceConfiguration); } } //... <Button onClick={scan}>Scan</Button>
Step 6: Save Scanned Documents as PDF
In the save panel, add a button to save all the documents as a PDF file.
<Panel header="SAVE" key="3">
  <Button onClick={save}>Save as PDF</Button>
</Panel>
The save function:
const save = () => {
  const DWObject = dwt.current;
  if (DWObject) {
    const onSuccess = () => {
      alert("success");
    }
    const onFailure = () => {
      alert("failed");
    }
    DWObject.SaveAllAsPDF("Documents.pdf",onSuccess,onFailure);
  }
}
Step 7: Configure the Viewer Mode and Image Editor
-
Add two number input to set up the view mode of the viewer.
Viewer Mode: <div> <InputNumber min={-1} max={5} value={viewMode.cols} onChange={(value)=>{setViewMode({cols:value,rows:viewMode.rows})}} /> x <InputNumber min={-1} max={5} value={viewMode.rows} onChange={(value)=>{setViewMode({cols:viewMode.cols,rows:value})}} /> </div> -
Add a button to display the image editor.
const showImageEditor = () => {
  const DWObject = dwt.current;
  if (DWObject) {
    let imageEditor = DWObject.Viewer.createImageEditor();
    imageEditor.show();
  }
}
//...
<Button onClick={showImageEditor}>Show Image Editor</Button>
All right, we’ve now finished building the document scanning app.
Step 8: Bundle and Prompt for Dynamic Web TWAIN Service Installation
Dynamic Web TWAIN Service is required for the app to work. In the installing dependencies step, we’ve put the installers under src-tauri/dist.
We are going to set that folder as resources in tauri.conf.json so that the app will bundle them as resources.
- "resources": [],
+ "resources": ["dist"],
Meanwhile, in the onWebTWAINNotFound event, display a dialog and open the folder of the installers to let the user install the service.
import { resourceDir, join } from '@tauri-apps/api/path';
import { open } from '@tauri-apps/api/shell';
import { message } from '@tauri-apps/api/dialog';
const onWebTWAINNotFound = async () => {
  await message('Dynamic Web TWAIN Service has not been installed. Please install it and then restart the program.', { title: 'Document Scanner', type: 'warning' });
  const resourceDirPath = await resourceDir();
  const distPath = await join(resourceDirPath, 'dist');
  await open(distPath);
}
Several @tauri-apps/api packages are used for native functionalities.
Common Issues and Edge Cases
- Dynamic Web TWAIN Service not detected: If the app fails to connect to scanners, ensure the Dynamic Web TWAIN Service is installed and running. The service installer is bundled under
src-tauri/dist— check your system tray or services panel to verify it is active. Restart the app after installation. - Scanner not listed in the dropdown: Some scanners require manufacturer-specific TWAIN drivers. Verify the driver is installed and that the scanner appears in your operating system’s scanner list before launching the Tauri app.
- Blank or black scanned images: This typically occurs when the selected pixel type or resolution is incompatible with the scanner’s capabilities. Try switching to Color mode and 200 DPI resolution as a baseline.