


How to Build a Vue.js Camera-to-PDF Document Scanner with Dynamsoft
Modern browsers can now access the camera and run image processing to do various computer vision tasks. In this article, we are going to build a Vue.js app to scan document images from a camera and save them into a PDF file.
Dynamsoft Mobile Web Capture is used to provide the UI and image processing ability.
What you’ll build: A Vue.js web application that opens the device camera, auto-detects document borders, lets you adjust the crop region, and exports scanned pages as a multi-page PDF — powered by Dynamsoft Mobile Web Capture.
Key Takeaways
- Vue.js can access a device camera and perform real-time document border detection entirely in the browser using Dynamsoft Mobile Web Capture and Dynamsoft Document Normalizer.
- The scanning workflow has three stages: live camera capture with auto-detect, perspective polygon editing, and an image editor for rotation, filtering, and PDF export.
- Camera frames are compressed before border detection to maintain smooth performance on mobile devices.
- The complete solution runs client-side with no server upload required; the final PDF is generated and downloaded in-browser.
Common Developer Questions
How do I scan documents to PDF from a camera in a Vue.js web app?
Initialize Dynamsoft’s browser capture stack in the Vue app, open the device camera, let the user capture and adjust document pages, and then hand the processed images to the PDF export flow in the editor stage. This tutorial keeps the whole scan-to-PDF pipeline inside one Vue component hierarchy.
How do I detect document borders in real time using JavaScript and a webcam?
Use the live capture viewer to analyze incoming camera frames and run document-boundary detection before the user confirms the shot. The article also notes that frames are compressed before detection so the border-finding loop stays responsive on mobile hardware.
How do I export captured camera images as a multi-page PDF in the browser?
Keep the captured pages in the viewer’s editing pipeline, let users rotate or enhance them if needed, and then invoke the built-in PDF export from the final editor stage. That multi-stage workflow is what makes browser-only multi-page PDF output practical in this Vue implementation.
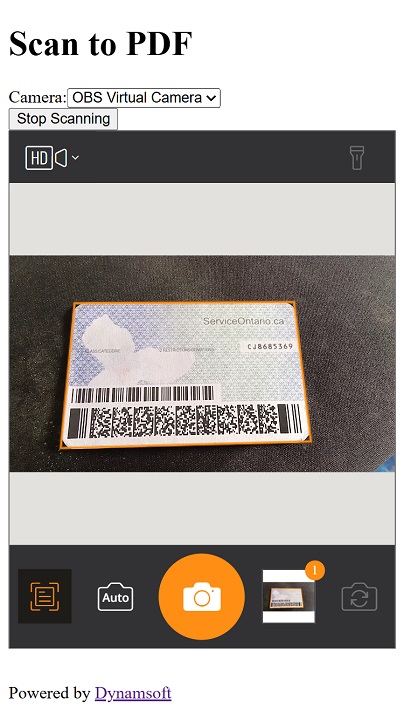
What the Vue Document Scanner App Looks Like
The app contains one page with a document scanner component in the center.
The document scanner component have three pages for the document capturing:
-
Camera page with border detection and auto capture features:
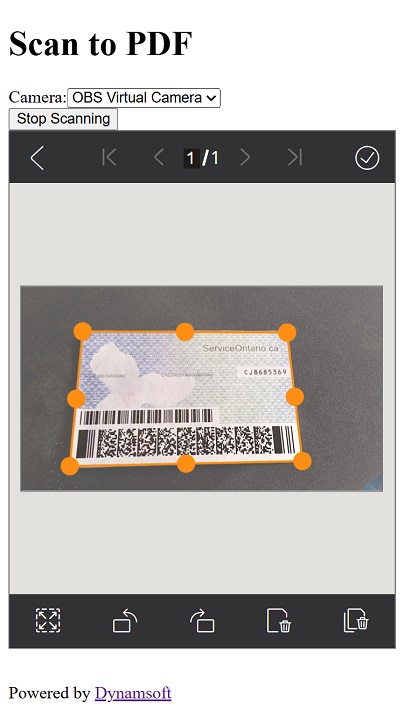
-
Polygon editing page:
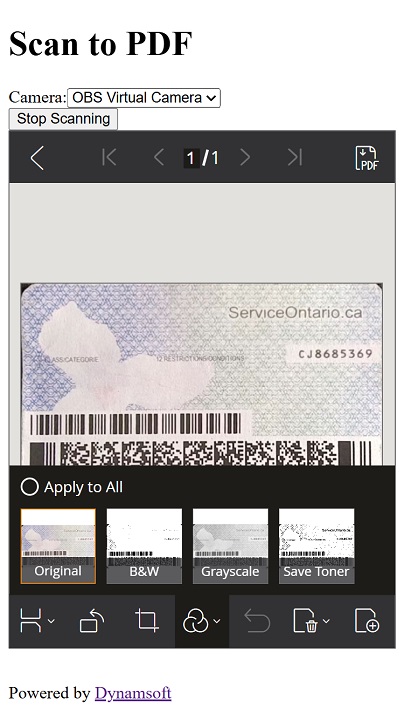
-
Image editing page (for tasks like rotating, image filtering, saving as PDF, etc):
Prerequisites
- Node.js 16 or later
- A modern browser with camera access (Chrome, Edge, Safari, or Firefox)
- A Dynamsoft license key. Get a 30-day free trial license for Dynamsoft Capture Vision.
Step 1: Create a New Vue TypeScript Project
Create a new Vue TypeScript project using Vite:
npm create vite@latest document-scanner -- --template vue-ts
Step 2: Install the Dynamsoft SDK Dependencies
Install the Dynamsoft SDKs:
npm install dynamsoft-document-viewer dynamsoft-capture-vision-bundle
In addition, copy the resources of Dynamsoft Document Viewer to public/assets/ddv-resources
-
Install
ncpas a dev dependency.npm install ncp --save-dev -
Update
package.jsonto use ncp to copy the resources."scripts": { - "dev": "vite", - "build": "tsc && vite build", + "dev": "ncp node_modules/dynamsoft-document-viewer/dist public/assets/ddv-resources && vite", + "build": "ncp node_modules/dynamsoft-document-viewer/dist public/assets/ddv-resources && vue-tsc -b && vite build", }
Step 3: Configure the Dynamsoft License and WASM Resources
Create a file named dynamsoft.config.ts with the following content to initialize the license and resources. Replace "LICENSE-KEY" with the trial key you obtained in the Prerequisites.
/* eslint-disable @typescript-eslint/no-explicit-any */
/* eslint-disable @typescript-eslint/no-unused-vars */
import "dynamsoft-license";

import "dynamsoft-document-normalizer";
import "dynamsoft-capture-vision-router";

import { CoreModule, DSImageData } from "dynamsoft-core";
import { LicenseManager } from "dynamsoft-license";
import { DDV, DetectResult, DocumentDetectConfig, VImageData } from "dynamsoft-document-viewer";
import { CaptureVisionRouter } from "dynamsoft-capture-vision-bundle";

let initiazlied = false;

export async function init(){
  if (initiazlied === false) {
    CoreModule.engineResourcePaths.rootDirectory = "https://cdn.jsdelivr.net/npm/";
    //set the license for Dynamsoft Document Viewer and Dynamsoft Document Normalizer. Use one-day trial by default.
    await LicenseManager.initLicense("LICENSE-KEY",{executeNow:true});
    await CoreModule.loadWasm(["DDN"]).catch((ex: Error) => {
      const errMsg = ex.message || ex;
      console.error(errMsg);
      alert(errMsg);
    });
    DDV.Core.engineResourcePath = "assets/ddv-resources/engine";// Lead to a folder containing the distributed WASM files
    await DDV.Core.loadWasm();
    await DDV.Core.init();
    DDV.setProcessingHandler("imageFilter", new DDV.ImageFilter());
  }
  initiazlied = true;
  return true;
}
Then use it in App.vue:
import {init as initDynamsoft} from './dynamsoft.config'
const initializing = ref(false);
const initialized = ref(false);
onMounted(()=>{
  if (!initializing.value && !initialized.value) {
    initializing.value = true;
    initialize();
  }
})

const initialize = async () => {
  await initDynamsoft();
  initialized.value = true;
}
Step 4: Build the Document Scanner Component
Next, create a document scanner component under src/components/Scanner.vue.
-
Add the template content to it:
<script setup lang="ts"> </script> <template> <div id="container"></div> </template> <style scoped> #container { position: absolute; top: 0; left: 0; width: 100%; height: 100%; } </style> -
Import the CSS of Dynamsoft Document Viewer.
import "dynamsoft-document-viewer/dist/ddv.css"; -
Create an instance of capture viewer.
const initializing = ref(false); const initialized = ref(false); let captureViewer:CaptureViewer|undefined; onMounted(() => { if (initializing.value === false) { initializing.value = true; init(); } }) const init = async () => { initCaptureViewer(); } const initCaptureViewer = () => { const captureViewerUiConfig:UiConfig = { type: DDV.Elements.Layout, flexDirection: "column", children: [ { type: DDV.Elements.Layout, className: "ddv-capture-viewer-header-mobile", children: [ { type: "CameraResolution", className: "ddv-capture-viewer-resolution", }, DDV.Elements.Flashlight, ], }, DDV.Elements.MainView, { type: DDV.Elements.Layout, className: "ddv-capture-viewer-footer-mobile", children: [ DDV.Elements.AutoDetect, DDV.Elements.AutoCapture, { type: "Capture", className: "ddv-capture-viewer-captureButton", }, { // Bind click event to "ImagePreview" element // The event will be registered later. type: DDV.Elements.ImagePreview, events:{ click: "showPerspectiveViewer" } }, DDV.Elements.CameraConvert, ], }, ], }; // Create a capture viewer captureViewer = new DDV.CaptureViewer({ container: "container", uiConfig: captureViewerUiConfig, viewerConfig: { acceptedPolygonConfidence: 60, enableAutoDetect: false, } }); } -
Create an instance of perspective viewer to edit the detected document polygon.
let perspectiveViewer:PerspectiveViewer|undefined; const initPerspectiveViewer = () => { const perspectiveUiConfig:UiConfig = { type: DDV.Elements.Layout, flexDirection: "column", children: [ { type: DDV.Elements.Layout, className: "ddv-perspective-viewer-header-mobile", children: [ { // Add a "Back" button in perspective viewer's header and bind the event to go back to capture viewer. // The event will be registered later. type: DDV.Elements.Button, className: "ddv-button-back", events:{ click: "backToCaptureViewer" } }, DDV.Elements.Pagination, { // Bind event for "PerspectiveAll" button to show the edit viewer // The event will be registered later. type: DDV.Elements.PerspectiveAll, events:{ click: "showEditViewer" } }, ], }, DDV.Elements.MainView, { type: DDV.Elements.Layout, className: "ddv-perspective-viewer-footer-mobile", children: [ DDV.Elements.FullQuad, DDV.Elements.RotateLeft, DDV.Elements.RotateRight, DDV.Elements.DeleteCurrent, DDV.Elements.DeleteAll, ], }, ], }; // Create a perspective viewer perspectiveViewer = new DDV.PerspectiveViewer({ container: "container", groupUid: captureViewer!.groupUid, uiConfig: perspectiveUiConfig, viewerConfig: { scrollToLatest: true, } }); perspectiveViewer.hide(); } -
Create an instance of edit viewer.
let editViewer:EditViewer|undefined; const initEditViewer = () => { const editViewerUiConfig:UiConfig = { type: DDV.Elements.Layout, flexDirection: "column", className: "ddv-edit-viewer-mobile", children: [ { type: DDV.Elements.Layout, className: "ddv-edit-viewer-header-mobile", children: [ { // Add a "Back" buttom to header and bind click event to go back to the perspective viewer // The event will be registered later. type: DDV.Elements.Button, className: "ddv-button-back", events:{ click: "backToPerspectiveViewer" } }, DDV.Elements.Pagination, DDV.Elements.Download, ], }, DDV.Elements.MainView, { type: DDV.Elements.Layout, className: "ddv-edit-viewer-footer-mobile", children: [ DDV.Elements.DisplayMode, DDV.Elements.RotateLeft, DDV.Elements.Crop, DDV.Elements.Filter, DDV.Elements.Undo, DDV.Elements.Delete, DDV.Elements.Load, ], }, ], }; // Create an edit viewer editViewer = new DDV.EditViewer({ container: "container", groupUid: captureViewer!.groupUid, uiConfig: editViewerUiConfig }); editViewer.hide(); } -
Register events so that the viewers can work together.
const registerEvenets = () => {
  // Register an event in `captureViewer` to show the perspective viewer
  captureViewer!.on("showPerspectiveViewer" as any,() => {
    switchViewer(0,1,0);
  });

  // Register an event in `perspectiveViewer` to go back the capture viewer
  perspectiveViewer!.on("backToCaptureViewer" as any,() => {
    switchViewer(1,0,0);
    captureViewer!.play().catch(err => {alert(err.message)});
  });

  // Register an event in `perspectiveViewer` to show the edit viewer
  perspectiveViewer!.on("showEditViewer" as any,() => {
    switchViewer(0,0,1)
  });

  // Register an event in `editViewer` to go back the perspective viewer
  editViewer!.on("backToPerspectiveViewer" as any,() => {
    switchViewer(0,1,0);
  });

  // Define a function to control the viewers' visibility
  const switchViewer = (c:number,p:number,e:number) => {
    captureViewer!.hide();
    perspectiveViewer!.hide();
    editViewer!.hide();

    if(c) {
      captureViewer!.show();
    } else {
      captureViewer!.stop();
    }

    if(p) perspectiveViewer!.show();
    if(e) editViewer!.show();
  };
}
Step 5: Set Up Document Boundary Detection
Next, we need to use Dynamsoft Document Normalizer to provide the document boundary detection ability by defining a document detection handler for Dynamsoft Document Viewer.
export async function initDocDetectModule() {
  const router = await CaptureVisionRouter.createInstance();
  await router.initSettings("{\"CaptureVisionTemplates\": [{\"Name\": \"Default\"},{\"Name\": \"DetectDocumentBoundaries_Default\",\"ImageROIProcessingNameArray\": [\"roi-detect-document-boundaries\"]},{\"Name\": \"DetectAndNormalizeDocument_Default\",\"ImageROIProcessingNameArray\": [\"roi-detect-and-normalize-document\"]},{\"Name\": \"NormalizeDocument_Binary\",\"ImageROIProcessingNameArray\": [\"roi-normalize-document-binary\"]},  {\"Name\": \"NormalizeDocument_Gray\",\"ImageROIProcessingNameArray\": [\"roi-normalize-document-gray\"]},  {\"Name\": \"NormalizeDocument_Color\",\"ImageROIProcessingNameArray\": [\"roi-normalize-document-color\"]}],\"TargetROIDefOptions\": [{\"Name\": \"roi-detect-document-boundaries\",\"TaskSettingNameArray\": [\"task-detect-document-boundaries\"]},{\"Name\": \"roi-detect-and-normalize-document\",\"TaskSettingNameArray\": [\"task-detect-and-normalize-document\"]},{\"Name\": \"roi-normalize-document-binary\",\"TaskSettingNameArray\": [\"task-normalize-document-binary\"]},  {\"Name\": \"roi-normalize-document-gray\",\"TaskSettingNameArray\": [\"task-normalize-document-gray\"]},  {\"Name\": \"roi-normalize-document-color\",\"TaskSettingNameArray\": [\"task-normalize-document-color\"]}],\"DocumentNormalizerTaskSettingOptions\": [{\"Name\": \"task-detect-and-normalize-document\",\"SectionImageParameterArray\": [{\"Section\": \"ST_REGION_PREDETECTION\",\"ImageParameterName\": \"ip-detect-and-normalize\"},{\"Section\": \"ST_DOCUMENT_DETECTION\",\"ImageParameterName\": \"ip-detect-and-normalize\"},{\"Section\": \"ST_DOCUMENT_NORMALIZATION\",\"ImageParameterName\": \"ip-detect-and-normalize\"}]},{\"Name\": \"task-detect-document-boundaries\",\"TerminateSetting\": {\"Section\": \"ST_DOCUMENT_DETECTION\"},\"SectionImageParameterArray\": [{\"Section\": \"ST_REGION_PREDETECTION\",\"ImageParameterName\": \"ip-detect\"},{\"Section\": \"ST_DOCUMENT_DETECTION\",\"ImageParameterName\": \"ip-detect\"},{\"Section\": \"ST_DOCUMENT_NORMALIZATION\",\"ImageParameterName\": \"ip-detect\"}]},{\"Name\": \"task-normalize-document-binary\",\"StartSection\": \"ST_DOCUMENT_NORMALIZATION\",   \"ColourMode\": \"ICM_BINARY\",\"SectionImageParameterArray\": [{\"Section\": \"ST_REGION_PREDETECTION\",\"ImageParameterName\": \"ip-normalize\"},{\"Section\": \"ST_DOCUMENT_DETECTION\",\"ImageParameterName\": \"ip-normalize\"},{\"Section\": \"ST_DOCUMENT_NORMALIZATION\",\"ImageParameterName\": \"ip-normalize\"}]},  {\"Name\": \"task-normalize-document-gray\",   \"ColourMode\": \"ICM_GRAYSCALE\",\"StartSection\": \"ST_DOCUMENT_NORMALIZATION\",\"SectionImageParameterArray\": [{\"Section\": \"ST_REGION_PREDETECTION\",\"ImageParameterName\": \"ip-normalize\"},{\"Section\": \"ST_DOCUMENT_DETECTION\",\"ImageParameterName\": \"ip-normalize\"},{\"Section\": \"ST_DOCUMENT_NORMALIZATION\",\"ImageParameterName\": \"ip-normalize\"}]},  {\"Name\": \"task-normalize-document-color\",   \"ColourMode\": \"ICM_COLOUR\",\"StartSection\": \"ST_DOCUMENT_NORMALIZATION\",\"SectionImageParameterArray\": [{\"Section\": \"ST_REGION_PREDETECTION\",\"ImageParameterName\": \"ip-normalize\"},{\"Section\": \"ST_DOCUMENT_DETECTION\",\"ImageParameterName\": \"ip-normalize\"},{\"Section\": \"ST_DOCUMENT_NORMALIZATION\",\"ImageParameterName\": \"ip-normalize\"}]}],\"ImageParameterOptions\": [{\"Name\": \"ip-detect-and-normalize\",\"BinarizationModes\": [{\"Mode\": \"BM_LOCAL_BLOCK\",\"BlockSizeX\": 0,\"BlockSizeY\": 0,\"EnableFillBinaryVacancy\": 0}],\"TextDetectionMode\": {\"Mode\": \"TTDM_WORD\",\"Direction\": \"HORIZONTAL\",\"Sensitivity\": 7}},{\"Name\": \"ip-detect\",\"BinarizationModes\": [{\"Mode\": \"BM_LOCAL_BLOCK\",\"BlockSizeX\": 0,\"BlockSizeY\": 0,\"EnableFillBinaryVacancy\": 0,\"ThresholdCompensation\" : 7}],\"TextDetectionMode\": {\"Mode\": \"TTDM_WORD\",\"Direction\": \"HORIZONTAL\",\"Sensitivity\": 7},\"ScaleDownThreshold\" : 512},{\"Name\": \"ip-normalize\",\"BinarizationModes\": [{\"Mode\": \"BM_LOCAL_BLOCK\",\"BlockSizeX\": 0,\"BlockSizeY\": 0,\"EnableFillBinaryVacancy\": 0}],\"TextDetectionMode\": {\"Mode\": \"TTDM_WORD\",\"Direction\": \"HORIZONTAL\",\"Sensitivity\": 7}}]}");
  class DDNNormalizeHandler extends DDV.DocumentDetect {
    async detect(image:VImageData, config:DocumentDetectConfig) {
      if (!router) {
        return Promise.resolve({
          success: false
        });
      };

      if (!image.width || !image.height) {
        return Promise.resolve({
          success: false
        });
      };

      let width = image.width;
      let height = image.height;
      let ratio = 1;
      let data:ArrayBuffer;

      if (height > 720) {
        ratio = height / 720;
        height = 720;
        width = Math.floor(width / ratio);
        data = compress(image.data as ArrayBuffer, image.width, image.height, width, height);
      } else {
        data = image.data.slice(0) as ArrayBuffer;
      }


      // Define DSImage according to the usage of DDN
      const DSImage:DSImageData = {
        bytes: new Uint8Array(data),
        width,
        height,
        stride: width * 4, //RGBA
        format: 10 // IPF_ABGR_8888
      } as DSImageData;

      // Use DDN normalized module
      const results = await router.capture(DSImage, 'DetectDocumentBoundaries_Default');
      const detectedQuadResultItems = results.detectedQuadResultItems;
      // Filter the results and generate corresponding return values
      if (!detectedQuadResultItems || detectedQuadResultItems.length <= 0) {
        return Promise.resolve({
          success: false
        });
      };

      const quad:any[] = [];

      detectedQuadResultItems[0].location.points.forEach((p) => {
        quad.push([p.x * ratio, p.y * ratio]);
      });

      const detectResult = this.processDetectResult({
        location: quad,
        width: image.width,
        height: image.height,
        config
      } as DetectResult);

      return Promise.resolve(detectResult);
    }
  }
  DDV.setProcessingHandler('documentBoundariesDetect', new DDNNormalizeHandler())
}
The camera frames are compressed to improve the efficiency with the following function:
function compress(
    imageData:ArrayBuffer,
    imageWidth:number,
    imageHeight:number,
    newWidth:number,
    newHeight:number,
) {
  let source = null;
  try {
      source = new Uint8ClampedArray(imageData);
  } catch (error) {
      source = new Uint8Array(imageData);
  }

  const scaleW = newWidth / imageWidth;
  const scaleH = newHeight / imageHeight;
  const targetSize = newWidth * newHeight * 4;
  const targetMemory = new ArrayBuffer(targetSize);
  let distData = null;

  try {
      distData = new Uint8ClampedArray(targetMemory, 0, targetSize);
  } catch (error) {
      distData = new Uint8Array(targetMemory, 0, targetSize);
  }

  const filter = (distCol:number, distRow:number) => {
      const srcCol = Math.min(imageWidth - 1, distCol / scaleW);
      const srcRow = Math.min(imageHeight - 1, distRow / scaleH);
      const intCol = Math.floor(srcCol);
      const intRow = Math.floor(srcRow);

      let distI = (distRow * newWidth) + distCol;
      let srcI = (intRow * imageWidth) + intCol;

      distI *= 4;
      srcI *= 4;

      for (let j = 0; j <= 3; j += 1) {
          distData[distI + j] = source[srcI + j];
      }
  };

  for (let col = 0; col < newWidth; col += 1) {
      for (let row = 0; row < newHeight; row += 1) {
          filter(col, row);
      }
  }

  return distData;
}
Step 6: Integrate the Scanner into Your Vue App
Next, in App.vue, use the document scanner with the following code:
<script setup lang="ts">
import { onMounted, ref } from 'vue';
import {init as initDynamsoft, initDocDetectModule} from './dynamsoft.config';
import Scanner from './components/Scanner.vue';

const initializing = ref(false);
const initialized = ref(false);
const isScanning = ref(false);

const toggleScanning = () => {
  isScanning.value = !isScanning.value;
}

onMounted(()=>{
  if (!initializing.value && !initialized.value) {
    initializing.value = true;
    initialize();
  }
})

const initialize = async () => {
  await initDynamsoft();
  await initDocDetectModule();
  initialized.value = true;
}

</script>

<template>
  <h1>Scan to PDF</h1>
  <button v-on:click="toggleScanning" v-if="initialized">
    {{isScanning ? "Stop Scanning" : "Start Scanning"}}
  </button>
  <div v-if="!initialized">Initializing...</div>
  <div id="scanner" v-if="isScanning">
    <Scanner></Scanner>
  </div>
  <div style="margin-top:2em">
    Powered by <a href='https://www.dynamsoft.com' target='_blank'>Dynamsoft</a>
  </div>
</template>

<style scoped>
#scanner {
  position: relative;
  width: 100%;
  height: 480px;
}
</style>
All right, we’ve now completed the demo.
Common Issues and Edge Cases
- Camera permission denied or black preview: Ensure the page is served over HTTPS (or
localhost). Browsers block camera access on insecure origins. Also check that no other application is holding the camera. - WASM files fail to load (404 errors): Verify the
ncpcopy step ran beforevite dev. Thepublic/assets/ddv-resources/enginefolder must exist and contain the.wasmfiles fromdynamsoft-document-viewer. - Border detection is slow on low-end phones: The
compress()function scales frames down to 720 px height before detection. If you still see lag, lower the threshold (e.g., 480 px) or disableenableAutoDetectand rely on manual capture.