


How to Build an Android MRZ Scanner with Dynamsoft MRZ SDK
Machine Readable Zone (MRZ) recognition is a critical feature in applications that require scanning and processing identity documents, such as passports and visas. On Android devices, implementing accurate MRZ recognition can significantly enhance the efficiency and user experience of such apps. In this article, we will explore how to build a comprehensive MRZ scanner using the Dynamsoft MRZ Scanner SDK combined with Google ML Kit. This powerful combination provides dual scanning modes (live camera and document capture), automatic face extraction, and robust MRZ parsing capabilities, making your app enterprise-ready.
This article is Part 3 in a 3-Part Series.
Demo Video: Android MRZ Scanner
Key Features
This MRZ Scanner app demonstrates a production-ready implementation with:
- Dual Scanning Modes:
- Live Camera Scanning: Real-time MRZ detection and parsing from video feed
- Document Scanner: High-resolution capture using Google ML Kit Document Scanner API
- Automatic Face Extraction: Uses Google ML Kit Face Detection to crop passport photos
- Comprehensive MRZ Parsing: Extracts all key fields including name, document number, dates, nationality, and more
- Multiple Document Support: Handles TD1, TD2, and TD3 (passport) MRZ formats
- Modern UI: Material Design components with CardView layouts for professional presentation
Technology Stack
- Dynamsoft MRZ Scanner SDK 3.2.5000: Core MRZ recognition engine
- Google ML Kit Document Scanner: High-quality document capture
- Google ML Kit Face Detection: Automatic face cropping
- Google ML Kit Text Recognition v2: OCR fallback and text extraction
- AndroidX & Material Design: Modern UI components
Prerequisites
Implementing MRZ Recognition on Android
Step 1: Configure Your Android Project Dependencies
-
In your project’s root
build.gradlefile, add the Dynamsoft Maven repository:allprojects { repositories { google() mavenCentral() maven { url "https://download2.dynamsoft.com/maven/aar" } } } -
In the module’s
build.gradlefile, include all necessary dependencies:dependencies { // Dynamsoft MRZ Scanner SDK implementation 'com.dynamsoft:mrzscannerbundle:3.2.5000' // Google ML Kit - Document Scanner implementation 'com.google.android.gms:play-services-mlkit-document-scanner:16.0.0-beta1' // Google ML Kit - Face Detection implementation 'com.google.mlkit:face-detection:16.1.6' // Google ML Kit - Text Recognition v2 implementation 'com.google.mlkit:text-recognition:16.0.0' // AndroidX & Material Design implementation 'androidx.appcompat:appcompat:1.6.1' implementation 'com.google.android.material:material:1.11.0' implementation 'androidx.constraintlayout:constraintlayout:2.1.4' implementation 'androidx.cardview:cardview:1.0.0' // Image loading implementation 'com.github.bumptech.glide:glide:4.16.0' }
Step 2: Initialize Dynamsoft License and MRZ Parser
Create a MrzParser utility class to centralize license initialization:
public class MrzParser {
    private static final String LICENSE_KEY = "YOUR_DYNAMSOFT_LICENSE_KEY";

    public static void initLicense() {
        LicenseManager.initLicense(LICENSE_KEY, (isSuccess, error) -> {
            if (!isSuccess) {
                Log.e("MrzParser", "License initialization failed: " + error.getMessage());
            }
        });
    }

    // Methods for parsing MRZ data from Dynamsoft ParsedResultItem
    public static Map<String, String> parse(ParsedResultItem item) {
        // Extract and format MRZ fields
        HashMap<String, String> properties = new HashMap<>();
        // ... parsing logic
        return properties;
    }
}
Step 3: Create the Home Activity with Dual Scanning Options

Create a HomeActivity that provides users with two scanning options:
public class HomeActivity extends AppCompatActivity {
    private LinearLayout btnDocumentScan;
    private LinearLayout btnLiveScan;
    private GmsDocumentScanner documentScanner;
    private ActivityResultLauncher<IntentSenderRequest> scannerLauncher;

    @Override
    protected void onCreate(Bundle savedInstanceState) {
        super.onCreate(savedInstanceState);
        setContentView(R.layout.activity_home);

        initViews();
        initDocumentScanner();
        setupClickListeners();
    }

    private void initDocumentScanner() {
        GmsDocumentScannerOptions options = new GmsDocumentScannerOptions.Builder()
                .setGalleryImportAllowed(true)
                .setPageLimit(1)
                .setResultFormats(GmsDocumentScannerOptions.RESULT_FORMAT_JPEG)
                .setScannerMode(GmsDocumentScannerOptions.SCANNER_MODE_BASE)
                .build();

        documentScanner = GmsDocumentScanning.getClient(options);

        scannerLauncher = registerForActivityResult(
                new ActivityResultContracts.StartIntentSenderForResult(),
                result -> {
                    if (result.getResultCode() == Activity.RESULT_OK) {
                        GmsDocumentScanningResult scanResult =
                            GmsDocumentScanningResult.fromActivityResultIntent(result.getData());

                        if (scanResult != null && !scanResult.getPages().isEmpty()) {
                            Uri imageUri = scanResult.getPages().get(0).getImageUri();
                            navigateToResult(imageUri);
                        }
                    }
                });
    }

    private void setupClickListeners() {
        btnDocumentScan.setOnClickListener(v -> startDocumentScanner());
        btnLiveScan.setOnClickListener(v -> navigateToLiveScan());
    }
}
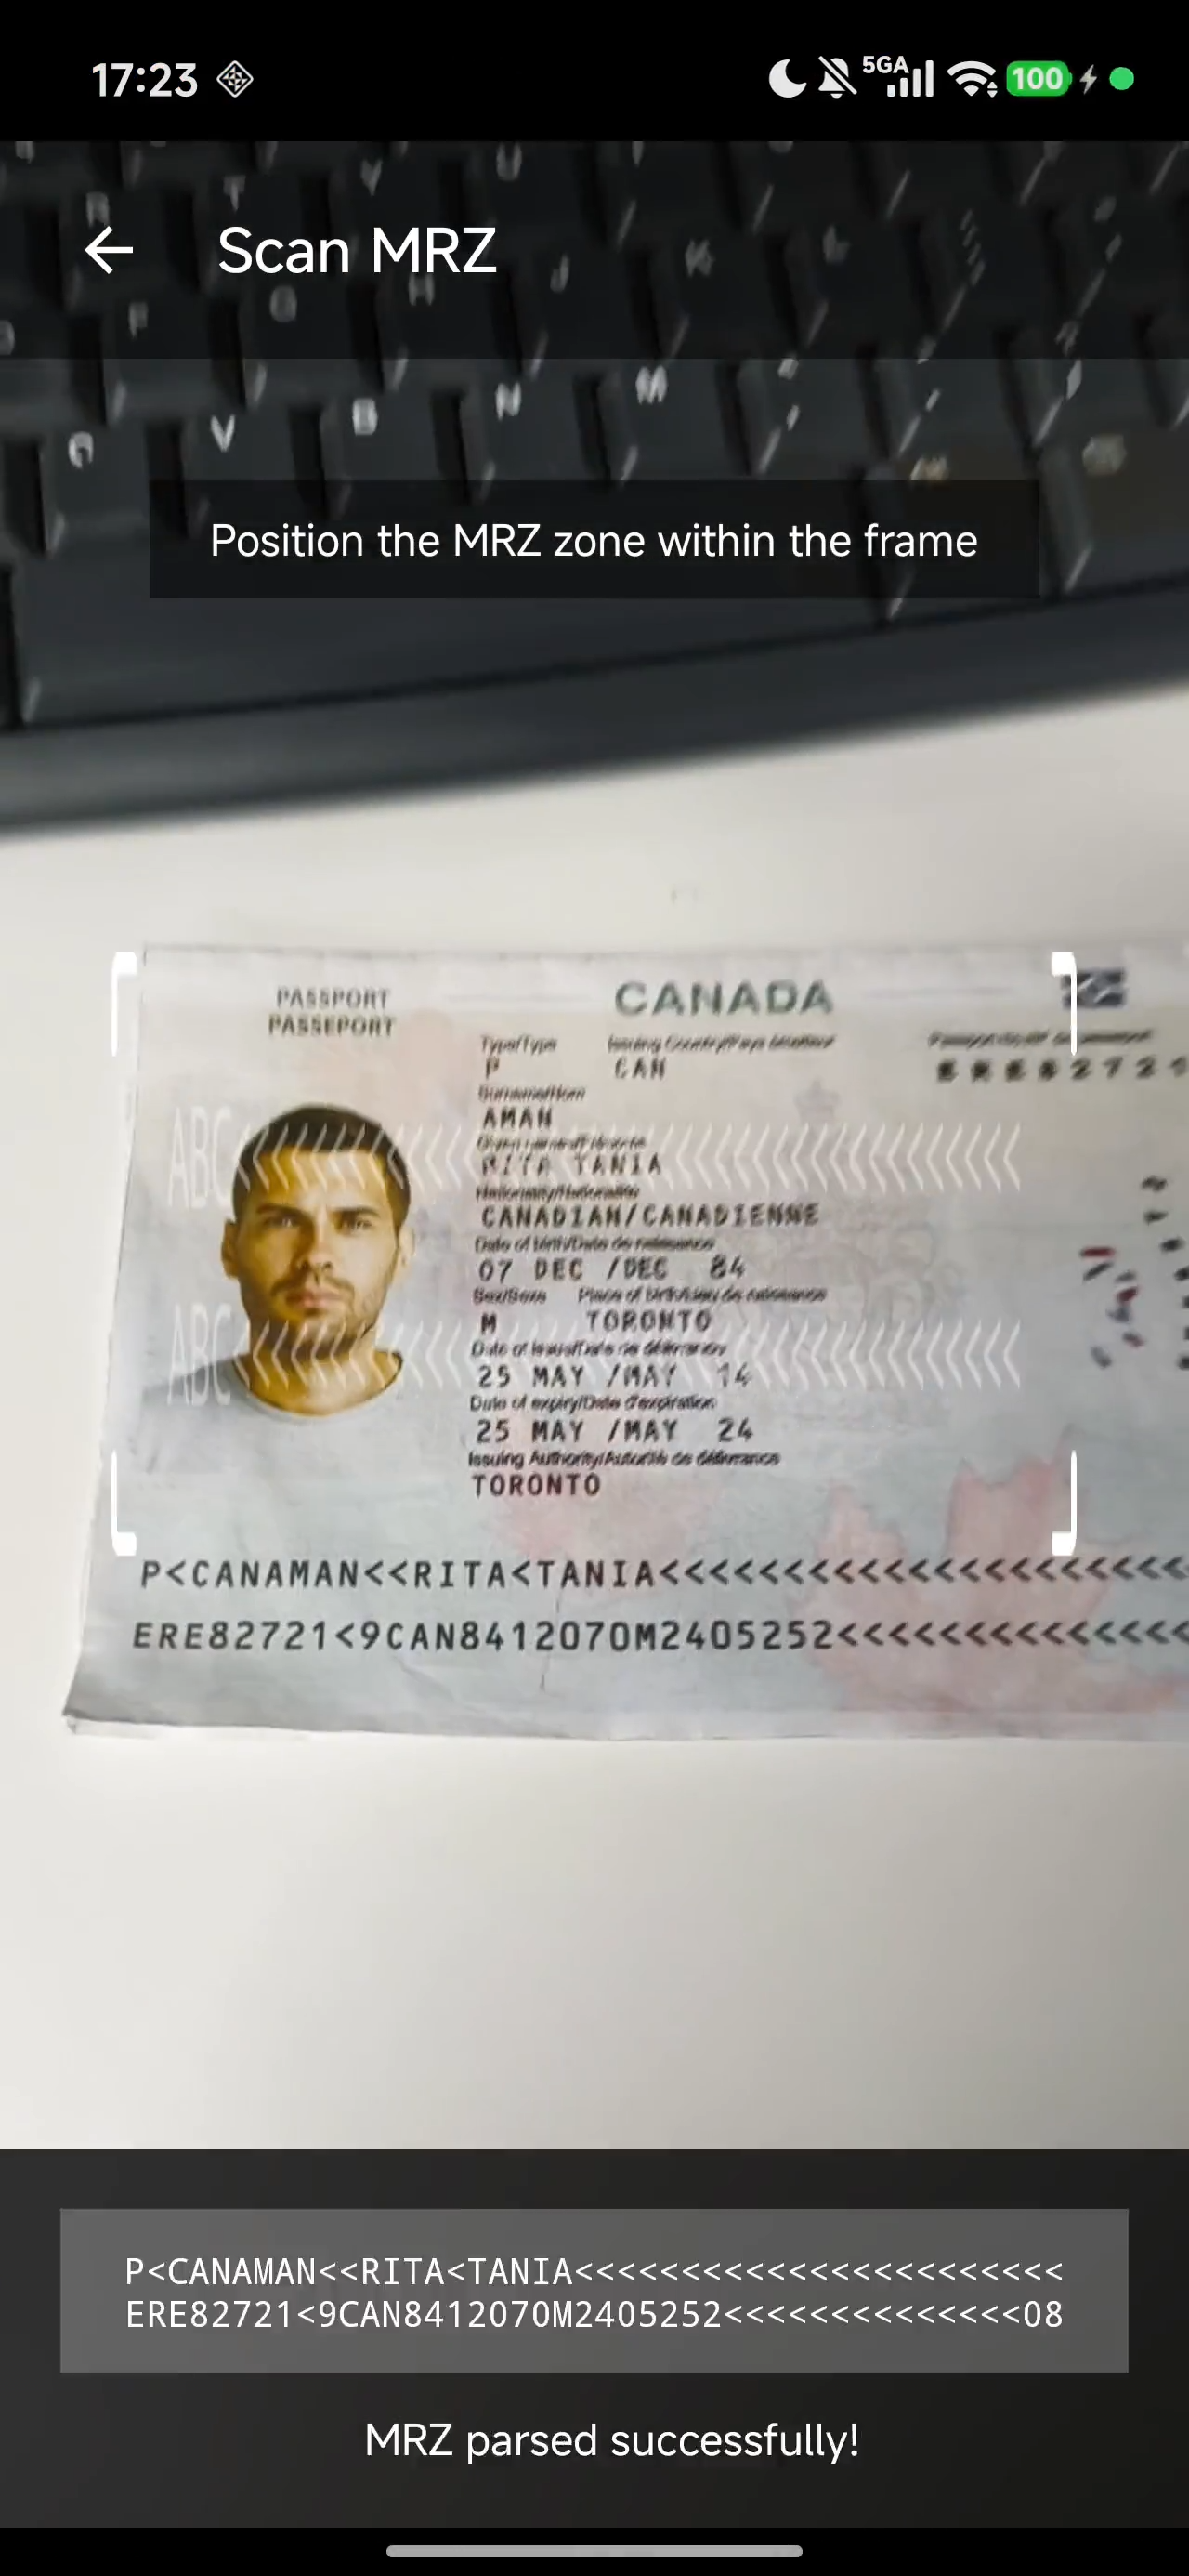
Step 4: Implement Live Camera Scanning
-
Add a new layout file named
activity_scan.xmlin thelayoutfolder:<?xml version="1.0" encoding="utf-8"?> <RelativeLayout xmlns:android="http://schemas.android.com/apk/res/android" android:layout_width="match_parent" android:layout_height="match_parent"> <com.dynamsoft.dce.CameraView android:id="@+id/dce_camera_view" android:layout_width="match_parent" android:layout_height="match_parent" /> <TextView android:layout_above="@+id/tv_result" android:id="@+id/tv_message" android:layout_marginHorizontal="24dp" android:layout_centerHorizontal="true" android:layout_marginBottom="80dp" android:textColor="@color/red00" android:textSize="16sp" android:layout_width="wrap_content" android:layout_height="wrap_content"/> <TextView android:layout_alignParentBottom="true" android:layout_centerHorizontal="true" android:layout_marginBottom="70dp" android:id="@+id/tv_result" android:layout_width="wrap_content" android:layout_height="wrap_content" /> </RelativeLayout>Key Components:
CameraView: Dynamsoft’s camera preview for real-time MRZ scanningTextViews: Display scan status, instructions, and detected MRZ textCircularProgressIndicator: Shows processing state
-
Configure the live camera scanning in
MainActivity.java:public class MainActivity extends AppCompatActivity { private CameraEnhancer mCamera; private CameraView mCameraView; private final CaptureVisionRouter mRouter = new CaptureVisionRouter(); @Override protected void onCreate(Bundle savedInstanceState) { super.onCreate(savedInstanceState); setContentView(R.layout.activity_scan); PermissionUtil.requestCameraPermission(this); // Initialize Dynamsoft License MrzParser.initLicense(); // Setup camera mCameraView = findViewById(R.id.dce_camera_view); mCamera = new CameraEnhancer(mCameraView, this); try { mRouter.setInput(mCamera); } catch (CaptureVisionRouterException e) { throw new RuntimeException(e); } // Register result receivers mRouter.addResultReceiver(new CapturedResultReceiver() { @Override public void onRecognizedTextLinesReceived(@NonNull RecognizedTextLinesResult result) { onLabelTextReceived(result); } @Override public void onParsedResultsReceived(@NonNull ParsedResult result) { if (!succeed) { onParsedResultReceived(result); } } }); } @Override protected void onResume() { super.onResume(); succeed = false; mCamera.open(); mRouter.startCapturing("ReadPassportAndId", new CompletionListener() { @Override public void onSuccess() { runOnUiThread(() -> updateStatus("Ready - Position MRZ in frame")); } @Override public void onFailure(int errorCode, String errorString) { runOnUiThread(() -> showError(errorString)); } }); } @Override protected void onPause() { super.onPause(); mCamera.close(); mRouter.stopCapturing(); } } -
Handle the parsed MRZ results and navigate to the result screen:
 private void onParsedResultReceived(ParsedResult result) {
     if (result.getItems() == null || result.getItems().length == 0) {
         return;
     }

     HashMap<String, String> labelMap = MrzParser.parse(result.getItems()[0]);

     if (!labelMap.isEmpty()) {
         succeed = true;
         runOnUiThread(() -> {
             updateStatus("MRZ parsed successfully!");
         });

         // Navigate to result screen
         Intent intent = new Intent(this, ScanResultActivity.class);
         intent.putExtra(ScanResultActivity.EXTRA_LABEL_MAP, labelMap);
         startActivity(intent);
     }
 }
The
ParsedResultis processed by theMrzParserutility which extracts all relevant fields.
Step 5: Implement Document Scanning with Google ML Kit
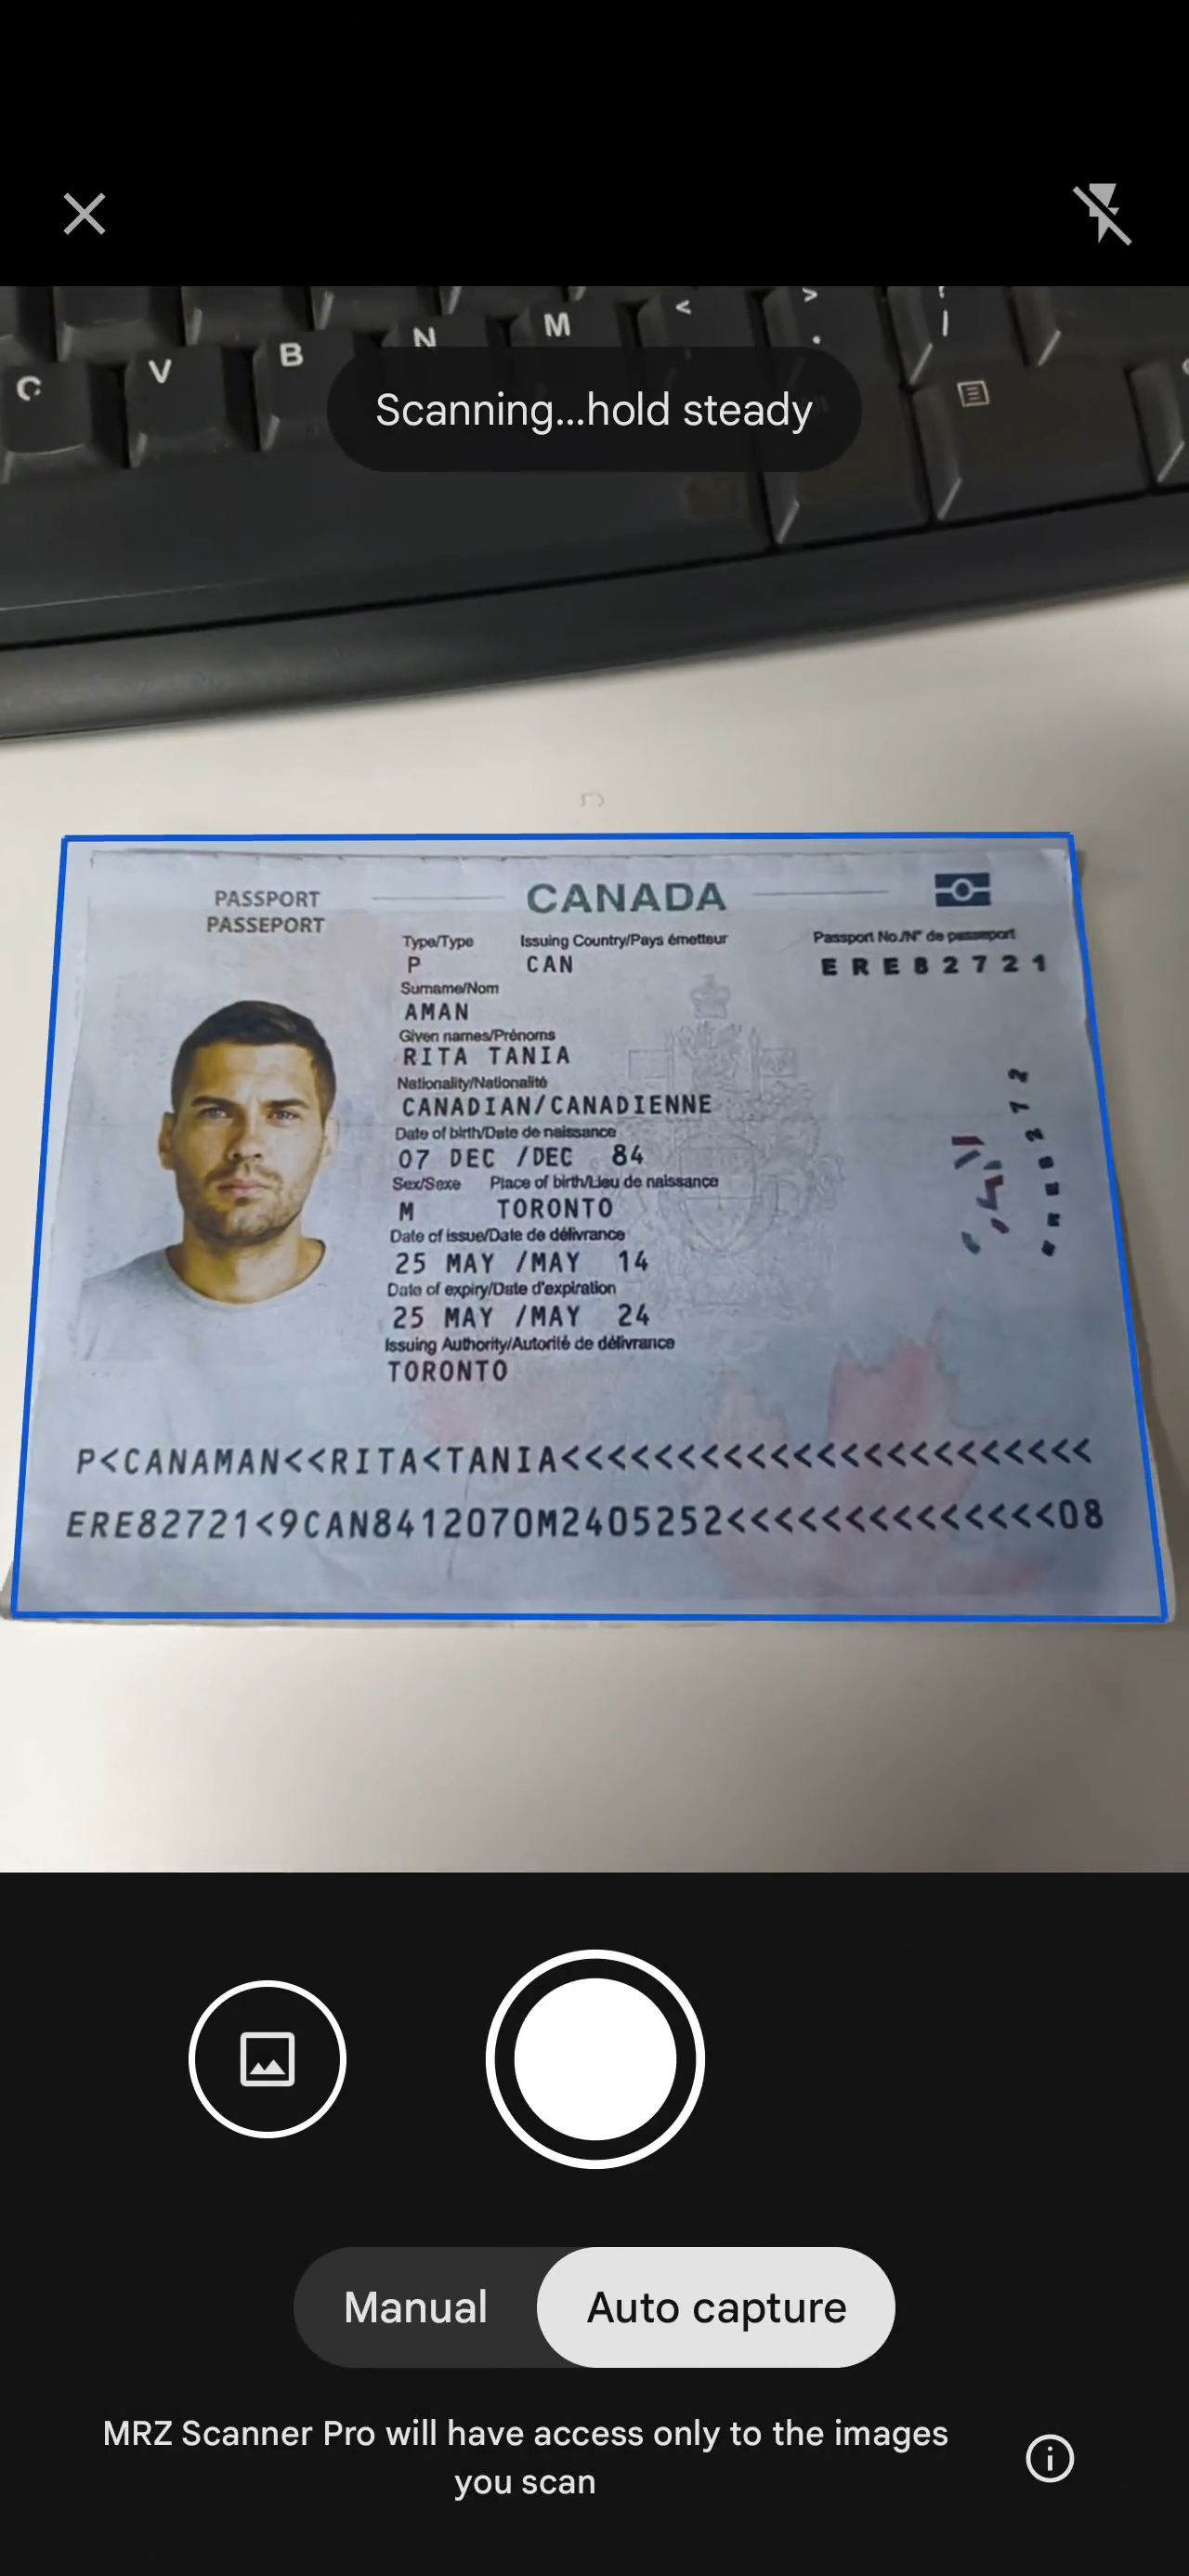
For the document scanning mode, implement image processing with face detection:
public class ScanResultActivity extends AppCompatActivity {
    private FaceDetector faceDetector;
    private TextRecognizer textRecognizer;
    private CaptureVisionRouter mRouter;

    private void initMLKit() {
        // Initialize Face Detector
        FaceDetectorOptions faceOptions = new FaceDetectorOptions.Builder()
                .setPerformanceMode(FaceDetectorOptions.PERFORMANCE_MODE_ACCURATE)
                .setLandmarkMode(FaceDetectorOptions.LANDMARK_MODE_ALL)
                .setMinFaceSize(0.1f)
                .build();
        faceDetector = FaceDetection.getClient(faceOptions);

        // Initialize Text Recognizer
        textRecognizer = TextRecognition.getClient(TextRecognizerOptions.DEFAULT_OPTIONS);
    }

    private void processImage() {
        InputImage inputImage = InputImage.fromBitmap(documentBitmap, 0);

        // Detect faces
        faceDetector.process(inputImage)
                .addOnSuccessListener(faces -> {
                    if (!faces.isEmpty()) {
                        extractFace(faces.get(0));
                    }
                    recognizeText(inputImage);
                })
                .addOnFailureListener(e -> {
                    Log.e(TAG, "Face detection failed", e);
                    recognizeText(inputImage);
                });

        // Process with Dynamsoft for MRZ parsing
        processwithDynamsoft();
    }

    private void extractFace(Face face) {
        Rect bounds = face.getBoundingBox();
        // Add padding and crop face from document
        int padding = (int) (bounds.width() * 0.3);
        // ... crop logic
        faceBitmap = Bitmap.createBitmap(documentBitmap, left, top, width, height);
        ivAvatar.setImageBitmap(faceBitmap);
    }
}
Step 6: Display the MRZ Data with Face Photo

The result screen displays comprehensive information extracted from the document:
-
Create a modern layout file named
activity_scan_result.xmlwith Material Design components:<?xml version="1.0" encoding="utf-8"?> <RelativeLayout xmlns:android="http://schemas.android.com/apk/res/android" xmlns:app="http://schemas.android.com/apk/res-auto" xmlns:tools="http://schemas.android.com/tools" android:layout_width="match_parent" android:layout_height="match_parent" android:background="@color/dy_black_3B" tools:context=".ResultActivity"> <RelativeLayout android:id="@+id/rl_title" android:layout_width="match_parent" android:layout_height="48dp" android:background="@color/dy_black_2B"> <ImageView android:id="@+id/iv_back" android:layout_width="wrap_content" android:layout_height="wrap_content" android:layout_centerVertical="true" android:layout_marginStart="16dp" android:background="@color/transparent" android:src="@drawable/ic_arrow_left" /> <TextView android:layout_width="wrap_content" android:layout_height="wrap_content" android:layout_centerVertical="true" android:layout_toEndOf="@id/iv_back" android:text="Back" android:textColor="@color/white" android:textSize="17sp" /> <TextView android:layout_width="wrap_content" android:layout_height="wrap_content" android:layout_centerInParent="true" android:layout_gravity="center_horizontal" android:text="Result" android:textColor="@color/white" android:textSize="20sp" android:textStyle="bold" /> </RelativeLayout> <ScrollView android:layout_below="@id/rl_title" android:layout_width="match_parent" android:layout_height="wrap_content"> <LinearLayout android:id="@+id/ll_content" android:layout_width="match_parent" android:layout_height="wrap_content" android:orientation="vertical" android:padding="20dp"> </LinearLayout> </ScrollView> </RelativeLayout> -
Inflate the layout and display the MRZ data in the
ResultActivity.javafile:package com.dynamsoft.mrzscanner; import androidx.annotation.NonNull; import androidx.appcompat.app.AppCompatActivity; import androidx.core.content.ContextCompat; import android.graphics.Color; import android.os.Bundle; import android.view.View; import android.view.ViewGroup; import android.widget.LinearLayout; import android.widget.TextView; import java.util.HashMap; public class ResultActivity extends AppCompatActivity { private LinearLayout content; @Override protected void onCreate(Bundle savedInstanceState) { super.onCreate(savedInstanceState); setContentView(R.layout.activity_result); findViewById(R.id.iv_back).setOnClickListener((v) -> { finish(); }); content = findViewById(R.id.ll_content); HashMap<String, String> properties = (HashMap<String, String>) getIntent(). getSerializableExtra("labelMap"); if (properties != null) { fillViews(properties); } } @NonNull private View childView(String label, String labelText) { LinearLayout layout = new LinearLayout(this); LinearLayout.LayoutParams params = new LinearLayout.LayoutParams(ViewGroup.LayoutParams.MATCH_PARENT, ViewGroup.LayoutParams.WRAP_CONTENT); params.setMargins(0, 30, 0, 0); layout.setLayoutParams(params); layout.setOrientation(LinearLayout.VERTICAL); TextView labelView = new TextView(this); labelView.setPadding(0, 30, 0, 0); labelView.setTextColor(ContextCompat.getColor(this, R.color.dy_grey_AA)); labelView.setTextSize(16); labelView.setText(label); TextView textView = new TextView(this); textView.setTextSize(16); textView.setTextColor(Color.WHITE); textView.setText(labelText); layout.addView(labelView); layout.addView(textView); return layout; } private void fillViews(HashMap<String, String> properties) { content.addView(childView("Document Type:", properties.get("Document Type"))); content.addView(childView("Document Number:", properties.get("Document Number"))); content.addView(childView("Name:", properties.get("Name"))); content.addView(childView("Issuing State:", properties.get("Issuing State"))); content.addView(childView("Nationality:", properties.get("Nationality"))); content.addView(childView("Date of Birth(YYYY-MM-DD):", properties.get("Date of Birth(YYYY-MM-DD)"))); content.addView(childView("Sex:", Character.toUpperCase(properties.get("Sex").charAt(0)) + properties.get("Sex").substring(1))); content.addView(childView("Date of Expiry(YYYY-MM-DD):", properties.get("Date of Expiry(YYYY-MM-DD)"))); } }
Complete Feature Set
The final application includes:
- Home Screen - Choose between Document Scan or Live Scan
- Live Camera Scanner - Real-time MRZ detection with visual feedback
- Document Scanner - High-resolution capture using Google ML Kit
- Result Screen - Displays:
- Extracted face photo (automatically cropped)
- Document type (Passport/ID/Visa)
- Full name, nationality, sex, age
- Document number and issuing state
- Birth date and expiry date
- Raw MRZ text for verification
- Scanned document image
Supported MRZ Formats
- TD1 (ID cards): 3 lines × 30 characters
- TD2 (Travel documents): 2 lines × 36 characters
- TD3/MRP (Passports): 2 lines × 44 characters
Source Code
https://github.com/yushulx/android-camera-barcode-mrz-document-scanner/tree/main/examples/MrzScanner