Using Visual SourceSafe - Branch
This article is a part of SourceSafe / VSS Tutorial
As we talked about in our last post Share, share is only a small function in version control. It should be combined with Branch to play a greater role. This article will talk about the following topics: Introduction to Branch, Why Branch, How to Branch and How to Track Different Branches.
Introduction to Branch
After a file is shared in several projects, modifications to the file in one project are automatically propagated to all sharing projects. This feature has great advantages in some cases. However, sometimes we may want the file and its counterparts to be independent. That is when Branch comes to handy.
VSS allows us to branch a shared file with the Branch command. After branching, the file and its counterparts will be independent, and changes made to the file will not be reflected elsewhere. We can use Merge Branches to merge the branches back.
Why Branch
The Visual SourceSafe Branch command breaks the shared link between copies of the file, making the file versions independent and able to be part of separate projects. Here are two common scenarios in which we need Branch:
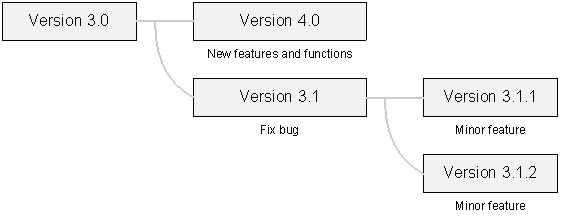
- Suppose that after we released a new Version 3.0, the R&D team starts working toward the next major release, the 4.0 version with new features and functions. We can implement it by branching all files into a new project $/Project4. If our users find bugs or need minor features in Version 3.0, we may need to work out a maintenance version, say, Version 3.1. In this case, we can create a new project named $/PATCH to represent the 3.1 version, and branch all the files from Version 3.0. Then some specific developers can fix bugs in the PATCH project while the other team members stay on the 4.0 version development.
 (Branch scenario 1)
- Suppose that we are working on two projects which are virtually identical for two clients. We need to tailor program behavior in one or two files. First, we share the project $/CLIENT1 to a new project $/CLIENT2 recursively. Next, we select the few files we want to tailor in $/CLIENT2 and branch them. Now, when we modify these specific files in $/CLIENT2, the changes do not propagate to $/CLIENT1. All the other files, however, are still shared between the two projects. So, if we modify any of the shared files, the changes will be propagated.
How to Branch
How to Branch Shared Files
Visual SourceSafe allows us to branch a shared file using the Branch command:
- Select the shared file(s) to branch in Visual SourceSafe Explorer.
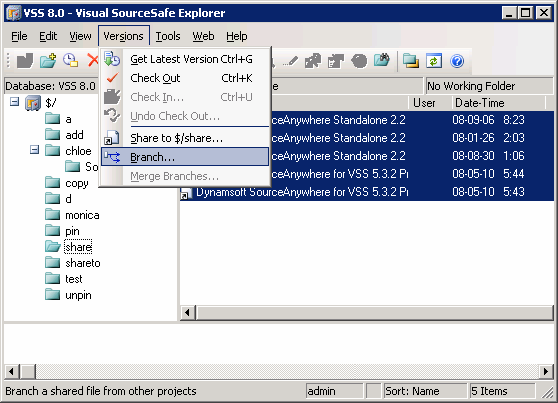
- On the Versions menu, click Branch.
- On the Branch dialog box, type a comment in the Comment box if necessary. Then we can click OK to finish the operation.
 (Branch shared files using versions menu)
How to Share and Branch
The Share command supports branching of a file immediately after sharing it. To share and branch, we can use Share on the Versions menu:
- In VSS Explorer, select the project to which the file(s) is branched.
- On the Versions menu, click Share to.
- In the Share to dialog box, use the File to share box to select the name of the file to share with the selected project.
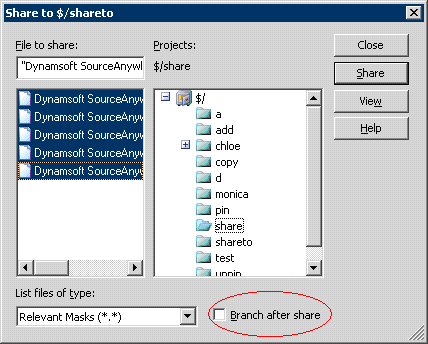
- Click Share with the Branch after share option checked.
 (Branch after share)
OR, we can use drag and drop:
- In Visual SourceSafe Explorer, right-click a file.
- Drag the item over the receiving project and drop the item.
- In the resulting menu, click Share and Branch.
How to Track Different Branches
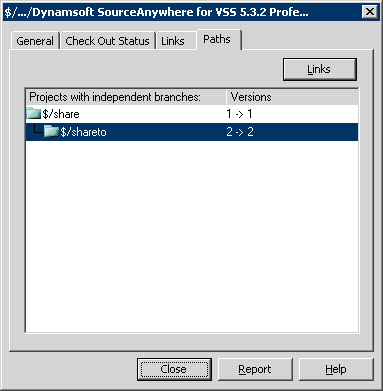
When we branch a file after sharing, the Links tab for file properties no longer shows a file relationship. However, we can track the different branches by right-clicking on the branched file, and then clicking Properties -> Paths tab.
 (Branch links)
After the file branches are modified in different projects separately, we can bring them back together using the Merge Branches command. To learn more details, please refer to another article File Merge.
The SQL Server-based Source Control Software Designed to be a SourceSafe Replacement
The Fastest SourceSafe Remote Access Tool Recommeded by Microsoft
Links: Previous article ««: Share in SourceSafe / VSS Next article »»: Cloak in SourceSafe / VSS SourceSafe How To series home page: VSS / SourceSafe Tutorial


