


How to Build an HTML5 Document Camera Scanner with JavaScript
Cameras are now ubiquitous in our life. Every mobile phone has built-in cameras which can shoot nice photos. As for document scanning, there is document camera (also called overhead scanner) which is adjustable and has high resolution.
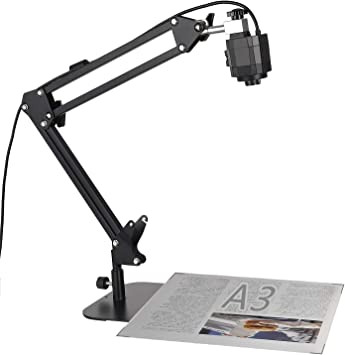
Image source: https://www.amazon.com/Conferencing-Recording-Classroom-Real-time-Definition/dp/B08V4WLPX1/
A document camera has the following benefits:
- Users don’t have to separate books into individual pages.
- The scanning speed is higher than traditional scanners.
Dynamic Web TWAIN (DWT) has a camera add-on which captures images from cameras. It has built-in video processing features which enable video streaming, edge detection and perspective adjustment.1
In this article, we will try to create a web document scanner with the camera using Dynamic Web TWAIN. The scanner can use document cameras or overhead scanners connected to PC devices or mobile devices’ built-in cameras to capture images.
PS:
- The camera add-on uses HTML5’s
MediaDevicesAPI. It works on modern browsers on both desktop and mobile devices. If you need to use cameras on PCs with old browsers, like the Internet Explorer, you can use the webcam add-on. - What document cameras are supported? UVC-compatible cameras are supported.
Deprecation Note: the document scanning via camera feature in Dynamic Web TWAIN has been separated as Mobile Web Capture. Please use this instead.
What you’ll build: A browser-based document scanner that streams video from a USB document camera (or mobile camera), detects document edges in real time, and saves captured pages as PDF, JPG, or TIFF — all using Dynamic Web TWAIN’s HTML5 camera add-on.
Key Takeaways
- Dynamic Web TWAIN’s camera add-on uses the HTML5 MediaDevices API to access UVC-compatible document cameras directly in the browser — no plugins required.
- The
showVideomethod supports adocumentmode with automatic edge detection and perspective correction, and apicturemode for consecutive captures. - The SDK runs as a WebAssembly module (
UseLocalService = false), making it compatible with modern browsers on both desktop and mobile devices. - Captured images can be saved as multi-page PDF, TIFF, or single-page JPEG files directly from the browser.
Common Developer Questions
How do I access a USB document camera from an HTML5 web page using JavaScript?
Use Dynamic Web TWAIN’s camera add-on, enumerate available sources, let the user choose a UVC-compatible camera, and start the stream with the browser’s MediaDevices-backed APIs. That gives your page direct access to document cameras without requiring a native desktop viewer.
Does Dynamic Web TWAIN support automatic edge detection when scanning with a document camera?
Yes. The showVideo workflow can run in document mode, where the SDK detects page edges and supports perspective correction before the frame is committed into the buffer.
How do I save scanned document images as PDF from a browser-based camera scanner?
After capture, keep the images in the Dynamic Web TWAIN buffer and export them with the SDK’s PDF save APIs. The same buffer can also be written as TIFF or JPEG, depending on which output format the user chooses.
Prerequisites
- Dynamic Web TWAIN SDK — download and extract the
Resourcesfolder into your project. - A UVC-compatible document camera (overhead scanner) or a device with a built-in camera.
- A modern browser that supports the MediaDevices API (Chrome, Firefox, Edge, Safari).
- Get a 30-day free trial license for Dynamic Web TWAIN.
Build an HTML5 Document Camera Scanner Step by Step
In the previous article, we created a mobile document scanner. We are gonna build the web scanner based on its design. The previous article uses the play API while in this article, we are gonna use the showVideo API which has more features like edge detection. Also, we will focus on using document cameras.
A screenshot of the running result:
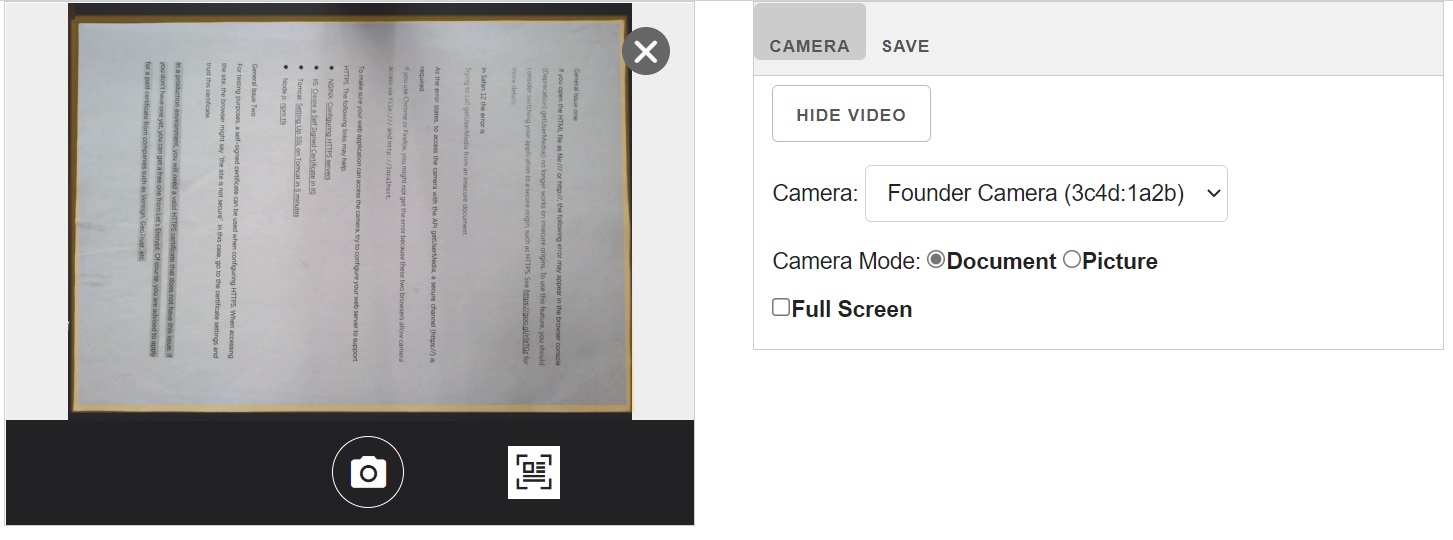
It can list connected cameras, show camera preview of the selected, capture one frame and save captured data to PDF, JPG or TIFF files.
Here is a step-by-step guide:
Step 1: Include the Dynamic Web TWAIN SDK
<script type="text/javascript" src="Resources/dynamsoft.webtwain.initiate.js"></script>
<script type="text/javascript" src="Resources/dynamsoft.webtwain.config.js"></script>
<script type="text/javascript" src="Resources/addon/dynamsoft.webtwain.addon.camera.js"></script>
You can find the Resources folder in DWT’s packages.
Step 2: Initialize the Web TWAIN Control
HTML:
<div id="dwtcontrolContainer" style="float:left;width:100%"></div>
Initialize the control with the following JavaScript (added in body):
var console = window['console'] ? window['console'] : { 'log': function () { } };
Dynamsoft.DWT.RegisterEvent('OnWebTwainReady', Dynamsoft_OnReady);
var DWObject;

function Dynamsoft_OnReady() {
    DWObject = Dynamsoft.DWT.GetWebTwain('dwtcontrolContainer');
    if (DWObject) {
        DWObject.Viewer.width="100%";
        DWObject.SetViewMode(2, 2);
    }
}
Step 3: List Available Document Cameras
HTML:
Camera: <select id="camerasource"></select>
JavaScript:
function Dynamsoft_OnReady() {
    if (DWObject) {
        //......
        DWObject.Addon.Camera.getSourceList().then(function (sourceName) {
            var iCount = sourceName.length;
            for (var i = 0; i < iCount; i++) {
                document.getElementById("camerasource").options.add(new Option(sourceName[i].label, sourceName[i].deviceId));
            }
        });
        //......
    }
}
Step 4: Start and Stop the Camera Stream
HTML:
<input id="switchButton" type="button" value="Show Video" onclick="SwitchViews();" />
Use showVideo and closeVideo in JavaScript to control the camera:
function SetIfWebcamPlayVideo(bShow) {
    if (bShow) {
        var camerasource = document.getElementById("camerasource").options[document.getElementById("camerasource").selectedIndex].value;
        var cameramode = "document";
        if (document.getElementById("cameraModePic").checked){
            cameramode = "picture";
        }
        document.getElementById("switchButton").value = "Loading";
        DWObject.Addon.Camera.showVideo(camerasource, { width: 2594, height: 1920 }, cameramode, false).then(function (r) {
            isVideoOn = true;
            document.getElementById("switchButton").value = "Hide Video";
        }, function (ex) {
            console.log(ex.message);
            DWObject.Addon.Camera.stop();
            document.getElementById("switchButton").value = "Show Video";
        });
    }
    else {
        DWObject.Addon.Camera.closeVideo();
        isVideoOn = false;
        document.getElementById("switchButton").value = "Show Video";
    }
}

function SwitchViews() {
    if (isVideoOn == false) {
        // continue the video
        SetIfWebcamPlayVideo(true);
    } else {
        // stop the video
        SetIfWebcamPlayVideo(false);
    }
}
showVideo is the key function of the scanning process.
Its syntax:
/**
 * Start streaming video from the current camera in the viewer.
 * @param deviceId Specify a camera.
 * @param resolution Specify the initial resolution.
 * @param mode Specify the mode.
 * @param fill Whether to fill the viewer area with the video stream and leave no margin.
 */
showVideo(deviceId?: string,
    resolution?: Resolution,
    mode?: string,
    fill?: boolean
): Promise<Resolution>;
There are two available modes: document and picture.
picture: border detection is turned off and supports taking images consecutively.document: border detection will be on and only supports taking one image at a time.
To use showVideo, we need to set UseLocalService to false so that Dynamic Web TWAIN will load required WebAssembly modules:
Dynamsoft.DWT.UseLocalService=false;
Radio-type inputs are used to select camera mode:
<div>
    Camera Mode:
    <label>
        <input type="radio" value="document" name="cameraMode" id="cameraModeDoc" checked/>Document</label>
    <label>
        <input type="radio" value="picture" name="cameraMode" id="cameraModePic"/>Picture</label>
</div>
Step 5: Enable Fullscreen Camera Preview
If the fullscreen option is checkd, when the camera is on, the camera container will be fullscreen.
HTML:
<div id="fullScreenContainer">
    <label>
         <input id="fullScreen" type="checkbox" onchange="makeFullScreenIfChecked();">Full Screen</label>
</div>
JavaScript:
function makeFullScreenIfChecked(){
    if (document.getElementById("fullScreen").checked==true){
        document.getElementsByClassName("dvs-cameraContainer")[0].style.position="fixed";
        document.getElementsByClassName("dvs-cameraContainer")[0].style.left="0";
        document.getElementsByClassName("dvs-cameraContainer")[0].style.top="0";
        document.getElementsByClassName("dvs-cameraContainer")[0].style.width="100%";
        document.getElementsByClassName("dvs-cameraContainer")[0].style.height="100%";
        console.log(document.getElementsByClassName("dvs-cameraContainer")[0]);
        return true;
    }
    return false;
}
It is used after showVideo:
DWObject.Addon.Camera.showVideo(camerasource, { width: 2594, height: 1920 }, cameramode, false).then(function (r) {
            isVideoOn = true;
            makeFullScreenIfChecked();
            //......
        }
Step 6: Save Scanned Documents as PDF, JPG, or TIFF
We can save the captured data to JPG, TIFF or PDF files.
HTML:
Default Filename: <input type="text" id="filename" value="DynamicWebTWAIN"/>
<input onclick="SaveWithFileDialog();" type="button" value="Save">
<div>
    <label>
        <input type="radio" value="jpg" name="ImageType" id="imgTypejpeg" />JPEG</label>
    <label>
        <input type="radio" value="tif" name="ImageType" id="imgTypetiff" />TIFF</label>
    <label>
        <input type="radio" value="pdf" name="ImageType" id="imgTypepdf" checked="checked" />PDF</label>
</div>
JavaScript:
function SaveWithFileDialog() {
    if (DWObject) {
        if (DWObject.HowManyImagesInBuffer > 0) {
            DWObject.IfShowFileDialog = true;
            var filename=document.getElementById("filename").value;
            if (document.getElementById("imgTypejpeg").checked == true) {
                //If the current image is B&W
                //1 is B&W, 8 is Gray, 24 is RGB
                if (DWObject.GetImageBitDepth(DWObject.CurrentImageIndexInBuffer) == 1)
                    //If so, convert the image to Gray
                    DWObject.ConvertToGrayScale(DWObject.CurrentImageIndexInBuffer);
                //Save image in JPEG
                DWObject.SaveAsJPEG(filename+".jpg", DWObject.CurrentImageIndexInBuffer);
            }
            else if (document.getElementById("imgTypetiff").checked == true)
                DWObject.SaveAllAsMultiPageTIFF(filename+".tiff", OnSuccess, OnFailure);
            else if (document.getElementById("imgTypepdf").checked == true)
                DWObject.SaveAllAsPDF(filename+".pdf", OnSuccess, OnFailure);
        }
    }
}

//Callback functions for async APIs
function OnSuccess() {
    console.log('successful');
}

function OnFailure(errorCode, errorString) {
    alert(errorString);
}
You can find the complete code here.
Enhance the Document Scanner with Advanced Features
Configure Camera Resolution for Best Image Quality
Have you noticed that a predefined resolution is specified in showVideo, which is { width: 2594, height: 1920 }?
Dynamic Web TWAIN will try to use the specified resolution and if the camera does not support this resolution, it will use a similar resolution, say 2560x1440.
In some scenarios, we may need to adjust the resolution by ourselves. For example, we want to make the scanned documents have a 4:3 ratio resolution and the highest resolution supported by the camera.
It is possible to get a resolution list using the getResolution function. We have to select a camera first with selectSource before running this function.
Loading a resolution list takes time, we can also define a resolution list beforehand if we know what resolution the scanner supports. We create a LoadPresetResolution function to do this.
Added HTML:
Resolution: <select id="resolution"></select>
<input type="button" value="Load Resolution List" onclick="LoadResolutionList();" />
Added JavaScript:
function SelectCamera(deviceId){
    DWObject.Addon.Camera.selectSource(deviceId).then(function () {
            if (isVideoOn){
                SetIfWebcamPlayVideo(false);
                SetIfWebcamPlayVideo(true);
            }
    }, function (ex) { console.log(ex.message); });
}

function LoadResolutionList(){
    var res = document.getElementById("resolution");
    res.innerHTML="";
    LoadPresetResolution();
    DWObject.Addon.Camera.getResolution().then(function (Resolution) {
        if (Resolution){
            for (var i = 0; i < Resolution.length; i++) {
                var width=Resolution[i].width;
                var height=Resolution[i].height;
                var name = width+"x"+height;
                res.options.add(new Option(name, name));
            }
        }
    }, function (ex) { console.log(ex.message); });
}

function LoadPresetResolution(){
    var res = document.getElementById("resolution");
    var name = "2594x1920";
    res.options.add(new Option(name, name));
}

function GetSelectedResolution(){
    var resolution = document.getElementById("resolution").options[document.getElementById("resolution").selectedIndex].value;
    var width = parseInt(resolution.split("x")[0]);
    var height = parseInt(resolution.split("x")[1]);
    return {width: width, height: height};
}
Change the showVideo line to this to use the selected resolution:
DWObject.Addon.Camera.showVideo(camerasource, GetSelectedResolution(), cameramode, false)
Select the first camera as the default:
DWObject.Addon.Camera.getSourceList().then(function (sourceName) {
    var iCount = sourceName.length;
    for (var i = 0; i < iCount; i++) {
        document.getElementById("camerasource").options.add(new Option(sourceName[i].label, sourceName[i].deviceId));
    }
    if (iCount>0){                            //newly added
        SelectCamera(sourceName[0].deviceId);
    }
});
We also have to add the SelectCamera function in the camerasource onchange event.
document.getElementById('camerasource').onchange = function () {
    var deviceId = document.getElementById("camerasource").options[document.getElementById("camerasource").selectedIndex].value;
    SelectCamera(deviceId);
}
Rotate Captured Images to Correct Orientation
A document camera may give a rotated image. We can run a batch rotation to rectify captured images using the RotateAsync function.
Added HTML:
<div class="tab" style="display:flex;overflow-x:auto">
    <button class="tablinks" onclick="switchTab(event, 'edit')">Edit</button>
</div>

<div id="edit" class="tabcontent">
    <input onclick="RotateAll()" type="button" value="Rotate All" />
    Rotation: <input type="range" id="rotation" min="0" max="360" step="10" value="0" onchange="degreeChanged(this.value)"/>
    <span id="degreeVal">0</span>
</div>
Added JavaScript:
async function RotateAll(){
    var degree = document.getElementById("rotation").value;
    for (var i=0; i<DWObject.HowManyImagesInBuffer; i++){
        await DWObject.RotateAsync(parseInt(i),parseInt(degree),true);
    }
}

function degreeChanged(degree){
    document.getElementById("degreeVal").innerText=degree;
}
Common Issues and Edge Cases
- Camera not detected in the browser: Ensure the document camera is UVC-compatible and that the browser has permission to access the camera. Some browsers block camera access on non-HTTPS pages — serve the page over HTTPS or use
localhostduring development. - Captured image is rotated or upside down: Document cameras may output frames at unexpected orientations depending on mounting angle. Use the
RotateAsyncfunction (see above) to batch-correct all captured images before saving. - Resolution fallback produces blurry scans: If the requested resolution (e.g.,
2594x1920) is not supported by the camera, Dynamic Web TWAIN falls back to the nearest available resolution. UsegetResolution()to discover supported resolutions and select the highest one matching your target aspect ratio.
Source Code
Download the project’s source code to have a try on your own: Get the complete sample project source code on GitHub
Online Demo
Dynamic Web TWAIN can scan documents from cameras as well as scanners. You can try its online demo here: https://demo.dynamsoft.com/web-twain/Webcam/online_demo_scan_Webcam.aspx.
References
-
https://www.dynamsoft.com/web-twain/docs/info/schedule/stable.html?ver=latest#161-08042020 ↩