


Flutter MRZ Scanner Tutorial: Read Passport & ID Card Data on Android and iOS
Machine Readable Zone (MRZ) scanning is a critical feature in identity verification, border control, hotel check-in, and know-your-customer (KYC) workflows. Passports and ICAO-compliant ID cards embed personal data in two or three lines of OCR-B printed text at the bottom of the data page — the MRZ. A mobile app that can decode this in real time cuts manual data-entry errors, speeds up workflows, and improves user experience.
This tutorial walks you through building a Flutter MRZ scanner for Android and iOS using the Dynamsoft MRZ Scanner SDK.
This article is Part 2 in a 3-Part Series.
What you’ll build: A production-ready Flutter MRZ scanner app that reads Machine Readable Zone data from passports and ID cards in real time on Android and iOS, using the Dynamsoft MRZ Scanner SDK.
Key Takeaways
- Flutter with the Dynamsoft MRZ Scanner SDK decodes TD1, TD2, and TD3 MRZ formats from passports and ID cards on both Android and iOS.
- The SDK returns a structured
MRZDataobject with parsed fields (name, nationality, date of birth, expiry date), eliminating the need to write manual OCR-B parse logic. - A
minSdkof 21 (Android 5.0) and a physical device with a camera are required — MRZ scanning does not work on an emulator. - This architecture applies directly to production KYC, border control, and hotel check-in workflows.
Common Developer Questions
- How do I build a Flutter MRZ scanner that reads passports on Android and iOS?
- Why does the Flutter MRZ scanner fail or crash on an Android emulator?
- How do I configure iOS camera permissions for a Flutter MRZ scanner app?
Demo Video: Flutter MRZ Scanner
Prerequisites
| Requirement | Version |
|---|---|
| Flutter SDK | ≥ 3.8 |
| Dart SDK | ≥ 3.8 |
| Android Studio or VS Code | Latest |
| Xcode (for iOS builds) | Latest |
| A Dynamsoft license key | 30-day free trial |
You also need a physical Android or iOS device — the MRZ scanner cannot run on an emulator because it requires a real camera.
How MRZ Formats Work: TD1, TD2, and TD3
The International Civil Aviation Organization (ICAO) defines three Travel Document formats under doc 9303:
- TD1 — 3-line, 30 characters per line — used on national ID cards
- TD2 — 2-line, 36 characters per line — used on some national ID cards
- TD3 — 2-line, 44 characters per line — used on passports and travel documents
Each line encodes fields using a fixed positional schema with check digits. Manually implementing the parse logic is error-prone, which is why a dedicated SDK is the right choice.
Set Up Your Flutter MRZ Scanner Project
Create the Flutter Project
flutter create --org com.dynamsoft.flutter mrz_scanner
cd mrz_scanner
Add the Dynamsoft MRZ Scanner Dependency
Open pubspec.yaml and add the SDK under dependencies:
name: mrz_scanner
description: >-
  A production-ready Flutter MRZ scanner that reads passport and ID card data.
version: 1.0.0+1
publish_to: 'none'

environment:
  sdk: ^3.8.1

dependencies:
  flutter:
    sdk: flutter
  cupertino_icons: ^1.0.8
  dynamsoft_mrz_scanner_bundle_flutter: ^3.2.5000

dev_dependencies:
  flutter_test:
    sdk: flutter
  flutter_lints: ^5.0.0

flutter:
  uses-material-design: true
Then fetch the packages:
flutter pub get
Understand the Project Architecture
The following structure is used in this project:
lib/
├── main.dart                  ← App bootstrap and Material 3 theme
├── config/
│   └── app_config.dart        ← License key and app-wide constants
├── models/
│   └── mrz_result_model.dart  ← View-model that wraps raw MRZData
├── screens/
│   ├── home_screen.dart       ← Landing page with instructions + scan CTA
│   └── result_screen.dart     ← Full-screen display of parsed MRZ fields
└── widgets/
    └── mrz_result_card.dart   ← Reusable card that renders one MRZ field row
This structure keeps each file focused, makes unit-testing individual pieces straightforward, and scales well when you add more features (history, export, dark-mode toggle, etc.).
Step 1: Configure the App License Key
Centralize the license key and any app-wide constants in a single file so they are easy to find and replace:
// lib/config/app_config.dart
class AppConfig {
  AppConfig._();

  /// Replace with your own Dynamsoft license key.
  /// https://www.dynamsoft.com/customer/license/trialLicense/?product=dcv&package=cross-platform
  static const String licenseKey =
      'LICENSE_KEY_HERE';

  static const String appName = 'MRZ Scanner';
}
Step 2: Build the MRZ Result View-Model
The raw MRZData object returned by the SDK contains all the data you need, but a view-model layer converts it into display-ready strings and a list of field records:
// lib/models/mrz_result_model.dart
import 'package:dynamsoft_mrz_scanner_bundle_flutter/dynamsoft_mrz_scanner_bundle_flutter.dart';

class MrzResultModel {
  MrzResultModel({required MRZData data}) : _data = data;

  final MRZData _data;

  String get fullName => '${_data.firstName} ${_data.lastName}'.trim();
  String get sex => _capitalize(_data.sex);
  String get age => _data.age.toString();
  String get documentType => _data.documentType;
  String get documentNumber => _data.documentNumber;
  String get issuingState => _data.issuingState;
  String get nationality => _data.nationality;
  String get dateOfBirth => _data.dateOfBirth;
  String get dateOfExpiry => _data.dateOfExpire;

  String _capitalize(String s) {
    if (s.isEmpty) return s;
    return s[0].toUpperCase() + s.substring(1).toLowerCase();
  }

  List<({String label, String value})> get fields => [
        (label: 'Full Name',       value: fullName),
        (label: 'Sex',             value: sex),
        (label: 'Age',             value: age),
        (label: 'Document Type',   value: documentType),
        (label: 'Document Number', value: documentNumber),
        (label: 'Issuing State',   value: issuingState),
        (label: 'Nationality',     value: nationality),
        (label: 'Date of Birth',   value: dateOfBirth),
        (label: 'Date of Expiry',  value: dateOfExpiry),
      ];
}
The fields getter returns Dart 3 record types — a concise, type-safe approach that avoids defining a separate FieldEntry class for such simple data.
Step 3: Create Reusable MRZ Result Widgets
Build a small widget library that the screens can compose:
// lib/widgets/mrz_result_card.dart
import 'package:flutter/material.dart';
import '../models/mrz_result_model.dart';

class MrzResultCard extends StatelessWidget {
  const MrzResultCard({super.key, required this.result});
  final MrzResultModel result;

  @override
  Widget build(BuildContext context) {
    final theme = Theme.of(context);
    return Card(
      elevation: 0,
      shape: RoundedRectangleBorder(
        borderRadius: BorderRadius.circular(16),
        side: BorderSide(color: theme.colorScheme.outlineVariant),
      ),
      child: Padding(
        padding: const EdgeInsets.all(20),
        child: Column(
          crossAxisAlignment: CrossAxisAlignment.start,
          children: [
            Row(children: [
              Icon(Icons.badge_outlined, color: theme.colorScheme.primary),
              const SizedBox(width: 8),
              Text('Travel Document',
                  style: theme.textTheme.titleMedium?.copyWith(
                    fontWeight: FontWeight.bold,
                    color: theme.colorScheme.primary,
                  )),
            ]),
            const Divider(height: 24),
            ...result.fields.map((f) => _FieldTile(label: f.label, value: f.value)),
          ],
        ),
      ),
    );
  }
}

class _FieldTile extends StatelessWidget {
  const _FieldTile({required this.label, required this.value});
  final String label;
  final String value;

  @override
  Widget build(BuildContext context) {
    final theme = Theme.of(context);
    return Padding(
      padding: const EdgeInsets.symmetric(vertical: 6),
      child: Row(
        crossAxisAlignment: CrossAxisAlignment.start,
        children: [
          SizedBox(
            width: 140,
            child: Text(label,
                style: theme.textTheme.bodyMedium?.copyWith(
                  color: theme.colorScheme.onSurfaceVariant,
                  fontWeight: FontWeight.w500,
                )),
          ),
          Expanded(
            child: Text(value.isNotEmpty ? value : '—',
                style: theme.textTheme.bodyMedium?.copyWith(
                  fontWeight: FontWeight.w600,
                )),
          ),
        ],
      ),
    );
  }
}
Step 4: Implement the Home Screen and Scan Flow
The home screen handles all scan logic. Key production concerns are addressed here:
- Loading guard —
_isScanningprevents a second scanner from launching while one is already open. - Switch on enum — Dart exhaustive
switchensures allEnumResultStatuscases are handled at compile time. - Mounted guard —
if (!mounted) returnprevents callingsetStateorNavigatoron a disposed widget. - SnackBar feedback — Errors and unexpected states surface to the user without crashing.
// lib/screens/home_screen.dart (key excerpt)
Future<void> _startScan() async {
  if (_isScanning) return;
  setState(() => _isScanning = true);

  try {
    final config = MRZScannerConfig(license: AppConfig.licenseKey);
    final result = await MRZScanner.launch(config);

    if (!mounted) return;

    switch (result.status) {
      case EnumResultStatus.finished:
        final model = MrzResultModel(data: result.mrzData!);
        await Navigator.of(context).push(
          MaterialPageRoute(builder: (_) => ResultScreen(result: model)),
        );
      case EnumResultStatus.canceled:
        break; // user dismissed — no action needed
      case EnumResultStatus.exception:
        _showError('Scan failed: ${result.errorMessage} (${result.errorCode})');
    }
  } catch (e) {
    if (mounted) _showError('Unexpected error: $e');
  } finally {
    if (mounted) setState(() => _isScanning = false);
  }
}
The UI uses FilledButton (Material 3) and shows an inline CircularProgressIndicator while scanning is in progress — a much better UX than disabling the button silently.
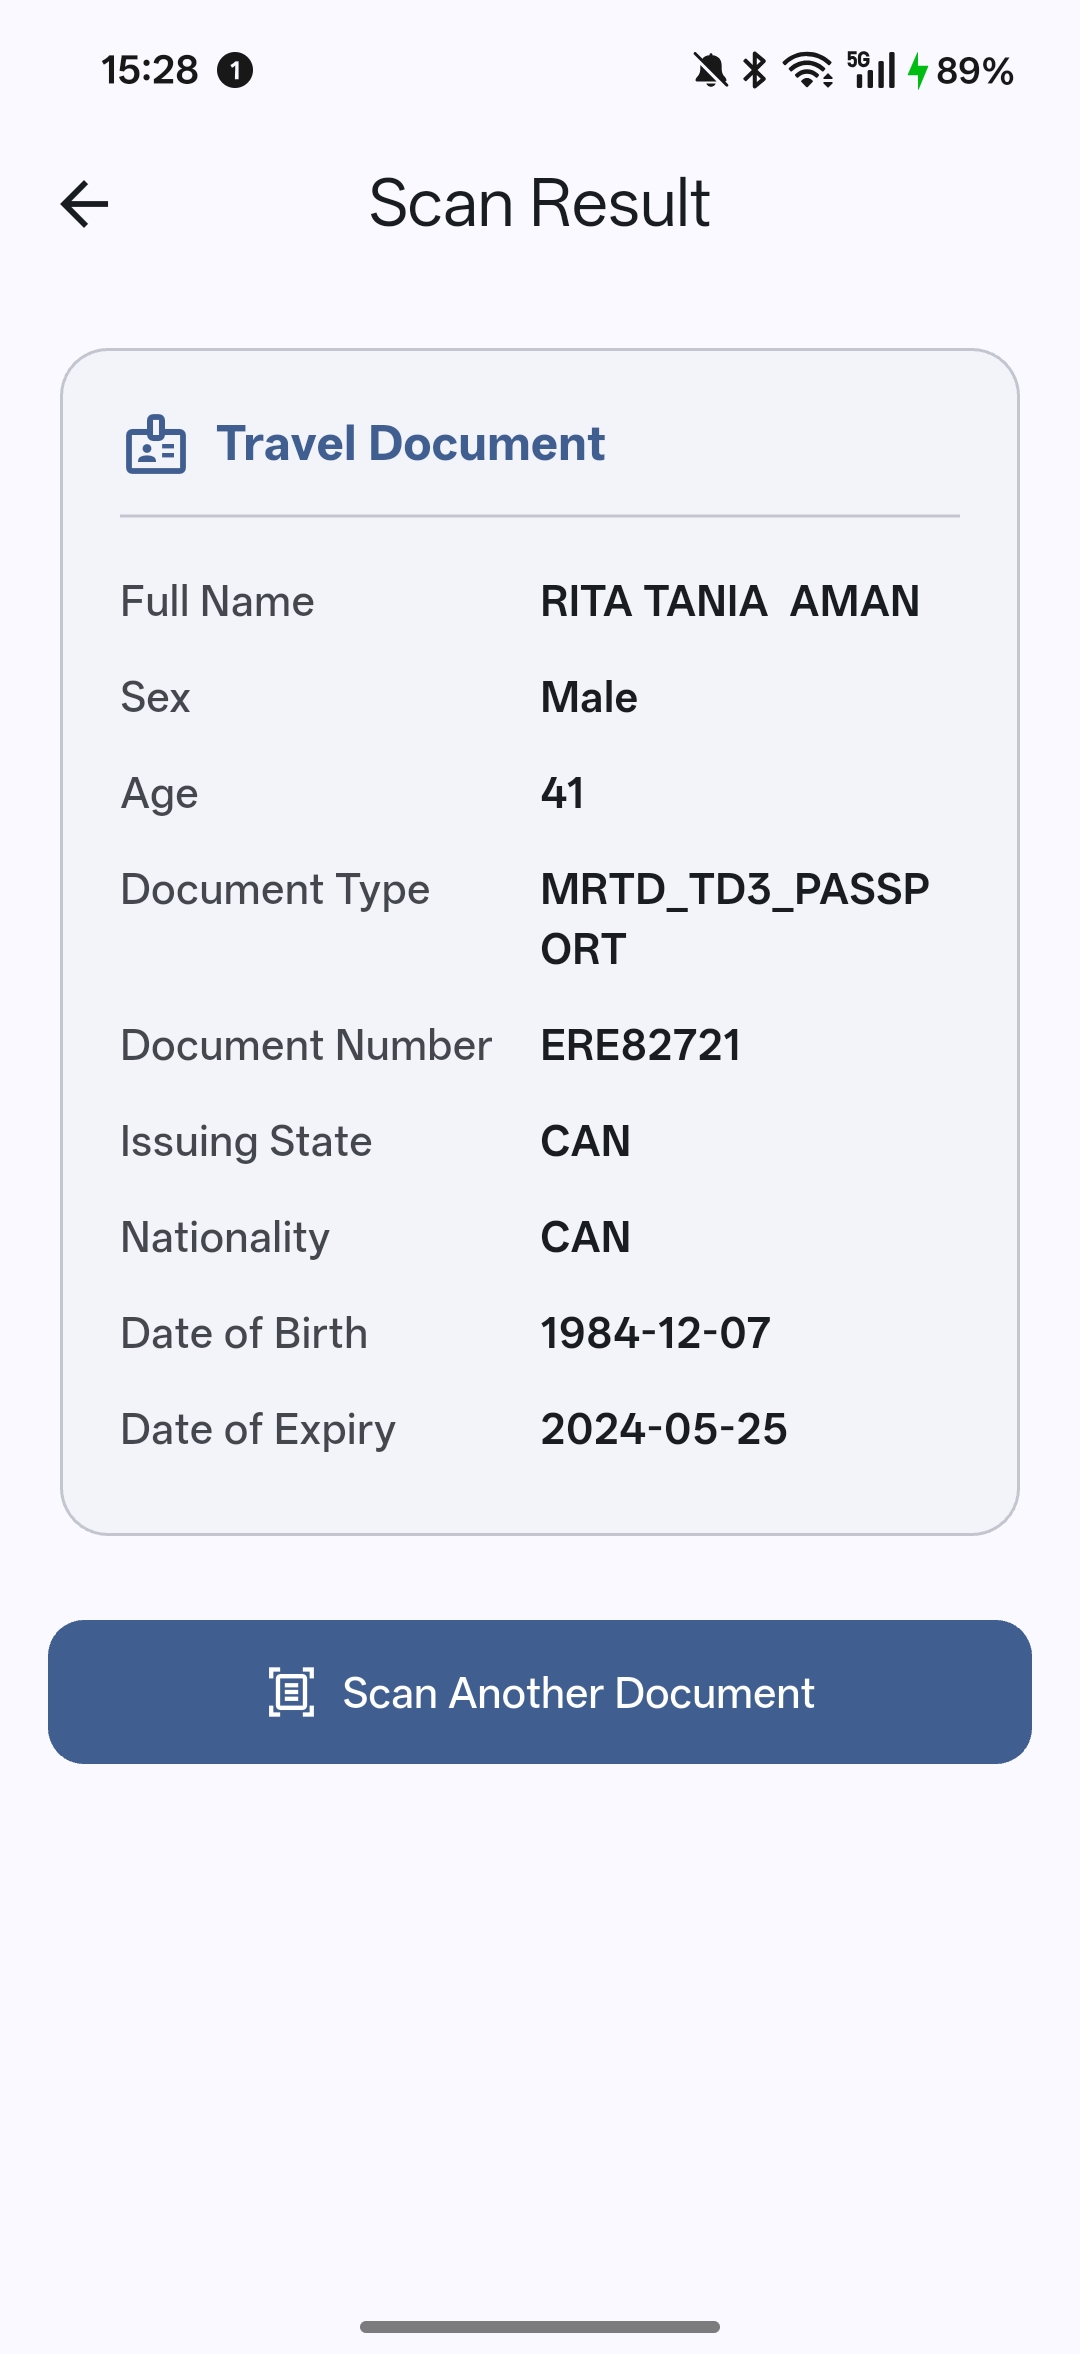
Step 5: Display Parsed MRZ Results on a Dedicated Screen
// lib/screens/result_screen.dart
import 'package:flutter/material.dart';
import '../models/mrz_result_model.dart';
import '../widgets/mrz_result_card.dart';

class ResultScreen extends StatelessWidget {
  const ResultScreen({super.key, required this.result});
  final MrzResultModel result;

  @override
  Widget build(BuildContext context) {
    return Scaffold(
      appBar: AppBar(title: const Text('Scan Result'), centerTitle: true),
      body: SafeArea(
        child: SingleChildScrollView(
          padding: const EdgeInsets.all(16),
          child: Column(
            crossAxisAlignment: CrossAxisAlignment.stretch,
            children: [
              MrzResultCard(result: result),
              const SizedBox(height: 24),
              FilledButton.icon(
                onPressed: () => Navigator.of(context).pop(),
                icon: const Icon(Icons.document_scanner_outlined),
                label: const Text('Scan Another Document'),
                style: FilledButton.styleFrom(
                  padding: const EdgeInsets.symmetric(vertical: 14),
                  shape: RoundedRectangleBorder(
                      borderRadius: BorderRadius.circular(12)),
                ),
              ),
            ],
          ),
        ),
      ),
    );
  }
}
Step 6: Wire the App Entry Point with Material 3
// lib/main.dart
import 'package:flutter/material.dart';
import 'package:flutter/services.dart';
import 'screens/home_screen.dart';
import 'config/app_config.dart';

void main() {
  WidgetsFlutterBinding.ensureInitialized();
  SystemChrome.setPreferredOrientations([
    DeviceOrientation.portraitUp,
    DeviceOrientation.portraitDown,
  ]);
  runApp(const MrzScannerApp());
}

class MrzScannerApp extends StatelessWidget {
  const MrzScannerApp({super.key});

  @override
  Widget build(BuildContext context) {
    return MaterialApp(
      title: AppConfig.appName,
      debugShowCheckedModeBanner: false,
      theme: ThemeData(
        useMaterial3: true,
        colorScheme: ColorScheme.fromSeed(
          seedColor: const Color(0xFF1565C0),
          brightness: Brightness.light,
        ),
      ),
      darkTheme: ThemeData(
        useMaterial3: true,
        colorScheme: ColorScheme.fromSeed(
          seedColor: const Color(0xFF1565C0),
          brightness: Brightness.dark,
        ),
      ),
      themeMode: ThemeMode.system,
      home: const HomeScreen(),
    );
  }
}
Notable production choices:
debugShowCheckedModeBanner: false— removes the debug banner from release screenshots.themeMode: ThemeMode.system— automatically follows the device dark/light preference.- Portrait lock via
SystemChrome.setPreferredOrientations— consistent scanning frame.
Step 7: Configure Android Permissions and Build Settings
android/app/build.gradle.kts
android {
    namespace = "com.dynamsoft.flutter.mrz_scanner"
    compileSdk = flutter.compileSdkVersion
    ndkVersion = flutter.ndkVersion

    defaultConfig {
        applicationId = "com.dynamsoft.flutter.mrz_scanner"
        minSdk = 21          // Android 5.0 — SDK minimum requirement
        targetSdk = flutter.targetSdkVersion
        versionCode = flutter.versionCode
        versionName = flutter.versionName
    }

    buildTypes {
        release {
            // TODO: Add your own signing config for the release build.
            signingConfig = signingConfigs.getByName("debug")
        }
    }
}
android/app/src/main/AndroidManifest.xml
Add the camera permission and the Android 13+ predictive back gesture opt-in:
<manifest xmlns:android="http://schemas.android.com/apk/res/android">
    <uses-permission android:name="android.permission.CAMERA" />
    <uses-feature android:name="android.hardware.camera" android:required="true" />

    <application
        android:label="MRZ Scanner"
        android:enableOnBackInvokedCallback="true"
        ...>
Step 8: Configure iOS Camera Permissions
ios/Runner/Info.plist
iOS requires an explicit NSCameraUsageDescription. An empty string will be rejected by App Store review:
<key>NSCameraUsageDescription</key>
<string>Camera access is required to scan the Machine Readable Zone (MRZ) on passports and ID cards.</string>
Also update the display name:
<key>CFBundleDisplayName</key>
<string>MRZ Scanner</string>
Install CocoaPods Dependencies
cd ios/
pod install --repo-update
Run and Test Your Flutter MRZ Scanner
Android
flutter devices          # list connected devices
flutter run -d <ID>      # run debug build
flutter run --release    # run optimised release build
iOS
Open ios/Runner.xcworkspace in Xcode, select your device, configure your Apple Developer team under Signing & Capabilities, then press Run.
Common Issues & Edge Cases
- Scanner fails on emulator:
MRZScanner.launch()requires a physical camera. Running on an Android emulator returnsEnumResultStatus.exceptionwith a camera-unavailable error — always test on a real device. NSCameraUsageDescriptionApp Store rejection: Apple rejects submissions with an empty or missing camera usage string. Use a specific description that explains the MRZ scanning purpose, as shown in Step 8.- Expired or invalid license key: The SDK surfaces
EnumResultStatus.exceptionwithresult.errorCodecontaining a license error. Verify your key in the Dynamsoft customer portal and ensureAppConfig.licenseKeyis set correctly before building for release.
Source Code
https://github.com/yushulx/flutter-barcode-mrz-document-scanner/tree/main/examples/dynamsoft_mrz