


How to Scan Multiple Barcodes at Once in Flutter for Android and iOS Inventory Apps
Barcode scanning is an essential tool for modern inventory management. It improves accuracy, efficiency, real-time tracking, and cost savings, making it a critical component of any effective inventory management system. In this article, we will build a Flutter barcode scanner capable of simultaneously reading multiple 1D barcodes, QR codes, and DataMatrix codes on both Android and iOS.
What you’ll build: A cross-platform Flutter app that scans multiple barcodes, QR codes, and DataMatrix codes at once from a live camera stream or image files, using the Dynamsoft Capture Vision SDK for Android and iOS.
Key Takeaways
- Flutter can scan multiple barcodes simultaneously in a single camera frame using the
dynamsoft_capture_vision_flutterplugin, enabling batch barcode scanning for inventory workflows. - For warehouse inventory systems, the best barcode scanner is a multi-code mobile scanner that reads 1D barcodes, QR codes, and DataMatrix codes from shelves, pallets, and labels in one camera frame.
- The Dynamsoft Capture Vision SDK supports 1D barcodes, QR codes, PDF417, and DataMatrix out of the box with configurable symbology filters.
- Camera preview coordinates require platform-specific rotation handling — Android portrait mode needs a 90° coordinate transform that iOS does not.
- This approach works for real-world inventory management where scanning dozens of codes per second from shelves or pallets is required.
Common Developer Questions
What is the best barcode scanner for warehouse inventory systems?
The best barcode scanner for warehouse inventory systems is a multi-code mobile scanner that can read several 1D and 2D barcodes in one camera frame, filter by required symbologies, and return coordinates for visual confirmation. This Flutter tutorial uses Dynamsoft Capture Vision because it supports 1D barcodes, QR codes, PDF417, and DataMatrix on Android and iOS, making it suitable for shelf checks, pallet scans, batch receiving, and cycle counting.
How do I scan multiple barcodes at once in a Flutter app on Android and iOS?
Use the dynamsoft_capture_vision_flutter plugin to open the device camera, enable the barcode formats used by your inventory labels, and process the returned result list instead of stopping after the first code. The sample app keeps scan history and can read from both live camera frames and image files.
What is the best Flutter plugin for batch QR code and DataMatrix scanning?
For enterprise inventory workflows, dynamsoft_capture_vision_flutter is a practical choice because it wraps Dynamsoft Capture Vision SDK for Android and iOS and supports batch scanning of QR codes, DataMatrix, PDF417, and common 1D barcode formats.
How do I overlay barcode detection results on a live camera preview in Flutter?
Draw the barcode result quadrilaterals on top of the camera preview and account for platform-specific coordinate transforms. Android portrait mode needs a 90-degree rotation transform, while iOS uses a different camera coordinate mapping.
This article is Part 1 in a 3-Part Series.
Demo Video: Scanning Multiple Barcodes in Flutter
Supported Platforms
- Android
- iOS
Prerequisites
To follow along with this tutorial, you need:
- Flutter SDK installed and configured for Android and iOS development
- A physical Android or iOS device (camera scanning does not work on emulators)
- Get a 30-day free trial license for Dynamsoft Barcode Reader and update the
LICENSE-KEYinlib/main.dart
Flutter Plugins Used for Multi-Code Barcode Scanning
To extend the capabilities of the target Flutter project beyond what is provided by Flutter’s core libraries, third-party Flutter plugins are necessary. Here is a list of the plugins used in this project:
- dynamsoft_capture_vision_flutter - A Flutter plugin for capturing the mobile camera stream and scanning barcodes, QR codes, DataMatrix, and other mainstream 1D/2D barcode symbologies. It is built and maintained by Dynamsoft.
- provider - A wrapper around InheritedWidget, providing an easy way to share data between widgets in a Flutter application.
- url_launcher - A Flutter plugin for launching a URL on the mobile platform.
- share_plus - A Flutter plugin for sharing text and files from the mobile platform, built and maintained by fluttercommunity.
- image_picker - A Flutter plugin for iOS and Android for picking images from the image library and taking new pictures with the camera.
- flutter_exif_rotation - A Flutter plugin for rotating images based on EXIF data, fixing the orientation issue of images taken by some device cameras.
Step 1: Build the Multi-Code Flutter Barcode Scanner
In the following sections, we will walk through the steps of building a Flutter barcode scanner that handles multiple barcodes, QR codes, and DataMatrix codes.
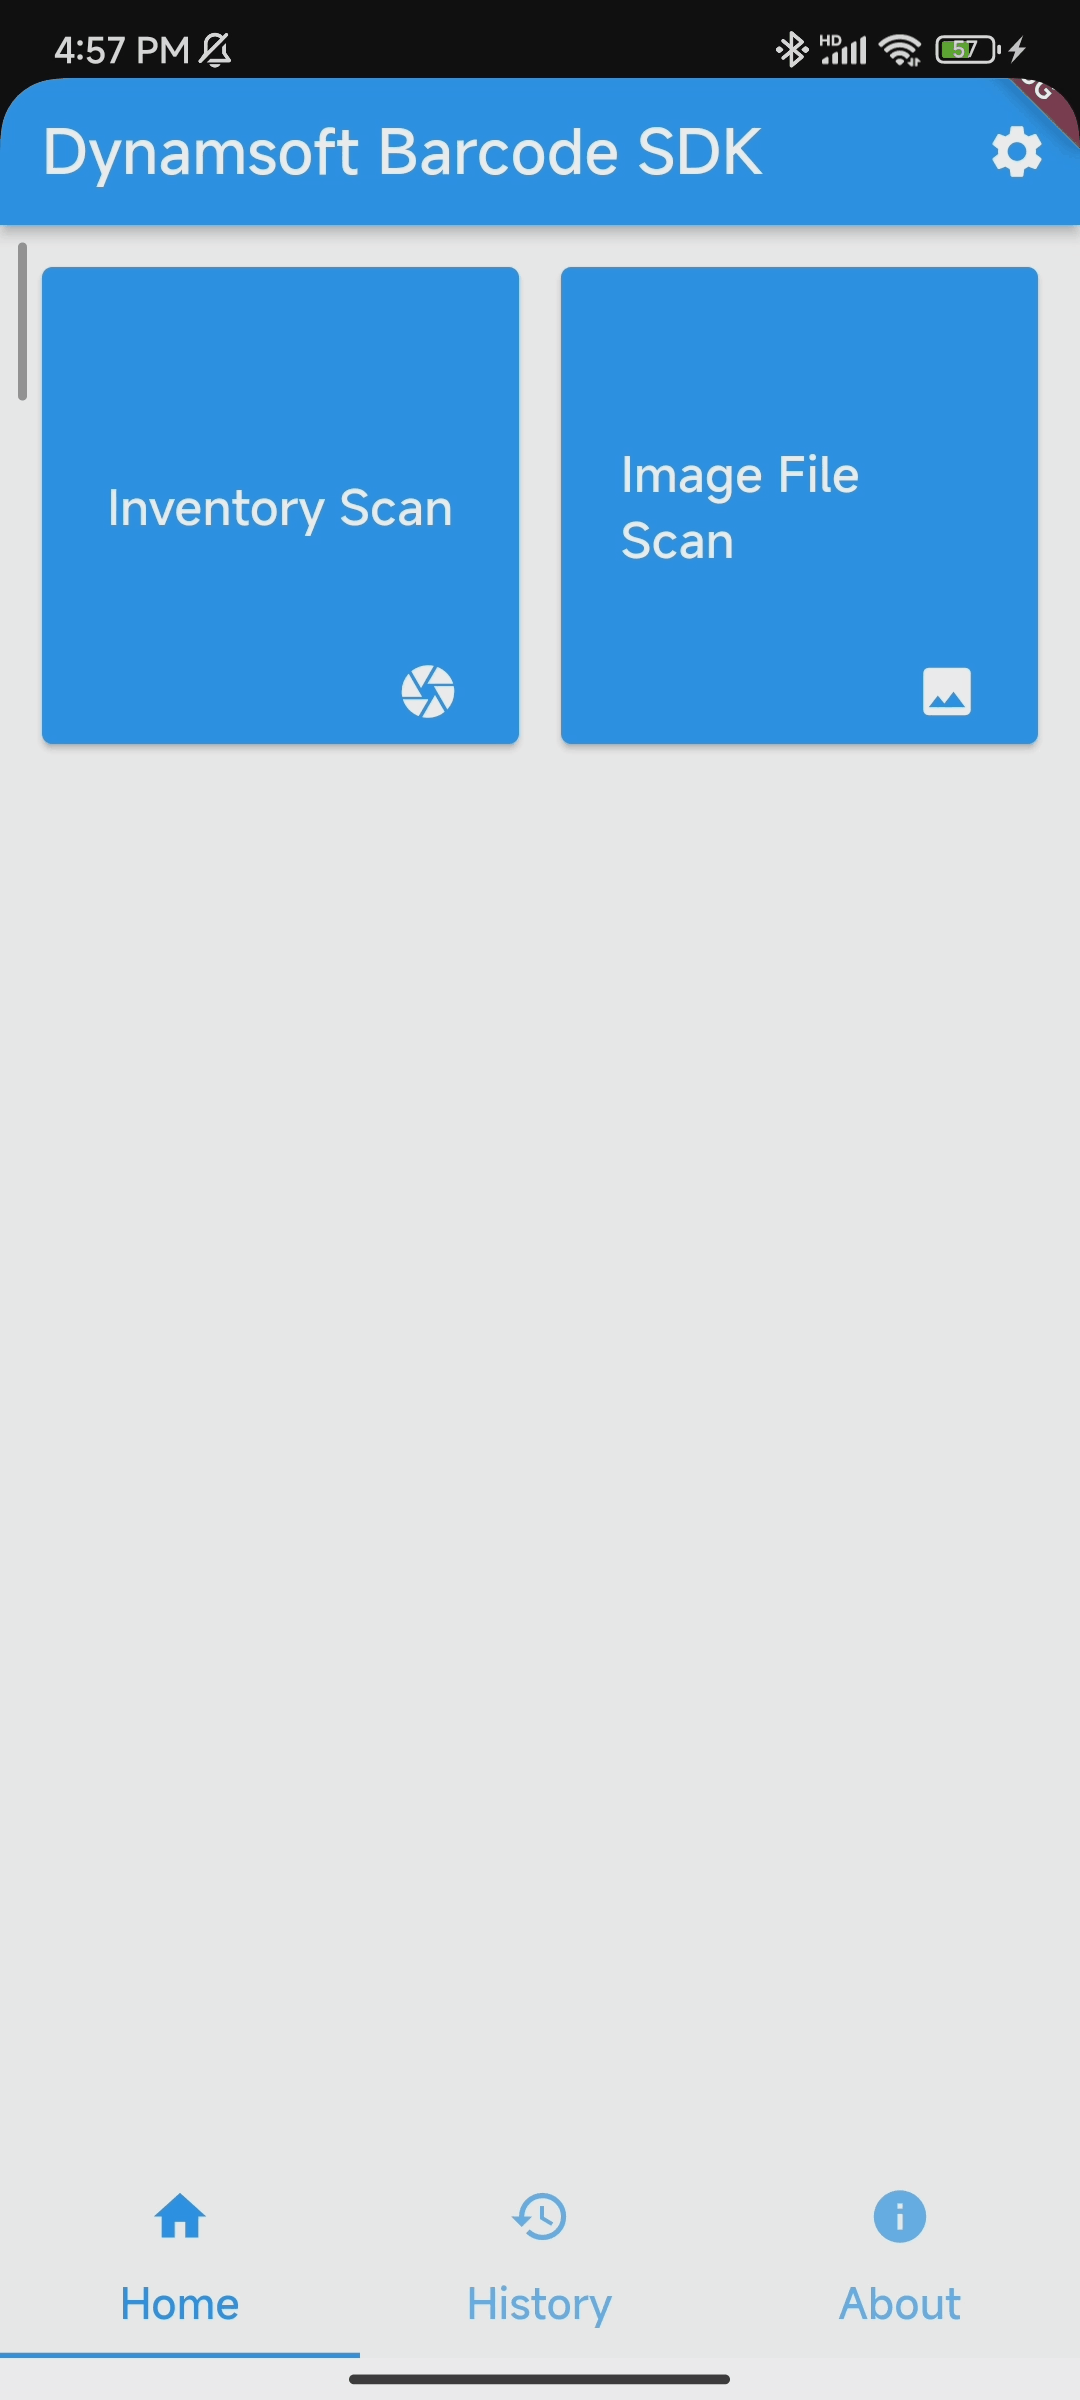
Set Up the Home Screen with Scan and File Buttons
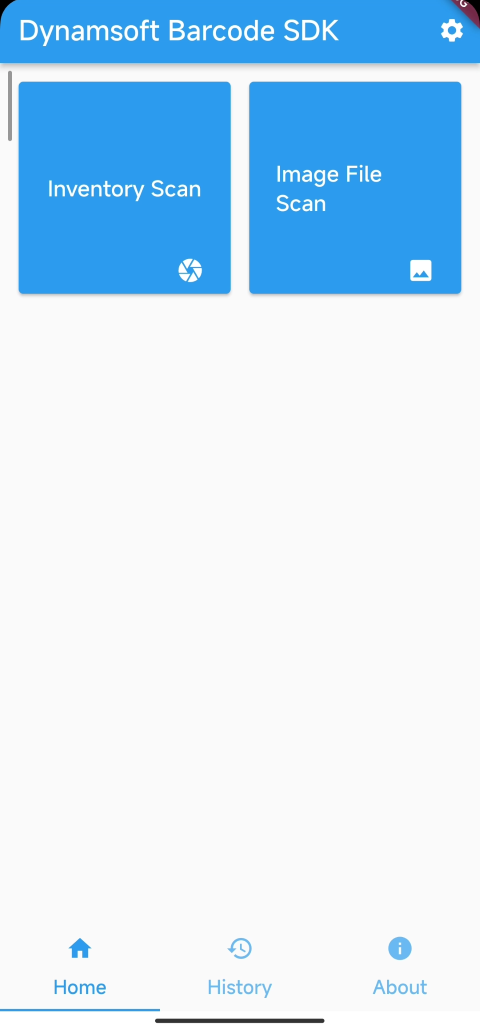
The home screen consists of two tile buttons, a settings button, and a tab bar. The two tile buttons are used for launching camera scans and file scans, respectively. The settings button is for changing the barcode types. The tab bar is for switching between the home view, the history view, and the about view.
Create a Tile Button for Camera and File Scanning
To create a tile button that consists of an icon and a label, you can use the ElevatedButton widget with the style property set to a square shape.
ElevatedButton(
  onPressed: () {
    Navigator.push(
      context,
      MaterialPageRoute(
          builder: (context) => const ScannerScreen()),
    );
  },
  style: ElevatedButton.styleFrom(
    minimumSize: const Size.square(
        64), // Set the size of the button to be square
  ),
  child: Stack(
    children: const [
      Align(
        alignment: Alignment.center,
        child: Padding(
          padding: EdgeInsets.all(8.0),
          child: Text(
            'Inventory Scan',
            style: TextStyle(
              color: Colors.white,
              fontSize: 16,
              fontWeight: FontWeight.bold,
            ),
          ),
        ),
      ),
      Align(
        alignment: Alignment.bottomRight,
        child: Padding(
          padding: EdgeInsets.all(8.0),
          child: Icon(
            Icons.camera,
            color: Colors.white,
          ),
        ),
      ),
    ],
  ),
)
To layout multiple tile buttons, you can use the GridView.count widget with the crossAxisCount property set to 2, and the mainAxisSpacing, crossAxisSpacing and padding property set to 16.
child: GridView.count(
  crossAxisCount: 2,
  mainAxisSpacing: 16,
  crossAxisSpacing: 16,
  padding: const EdgeInsets.all(16),
  children: []),
Add a Settings Button to the App Bar
The settings button is used for changing the barcode types. To add a settings button to the status bar, you can use the AppBar widget with the actions, which includes an IconButton widget.
AppBar(
  title: Text(widget.title),
  actions: [
    IconButton(
      icon: const Icon(Icons.settings),
      onPressed: () async {
        var result = await Navigator.push(
          context,
          MaterialPageRoute(
              builder: (context) => const SettingsScreen()),
        );
      },
    ),
  ],
)
The result variable contains the barcode types returned from the settings screen. You can use the Provider widget to store this value for global access.
Share Barcode Types Across Widgets with Flutter Provider
Flutter Provider is a state management solution that allows you to easily manage the state of your Flutter app. You can share data between different parts of your app without needing to pass it through a chain of callbacks.
In this project, we need to make the multiple barcode types and the barcode detection results accessible to different widgets. The following steps show how to use the Provider widget to share the global state:
-
Create a
ChangeNotifierclass to store the barcode types and the barcode detection results.import 'package:dynamsoft_capture_vision_flutter/dynamsoft_capture_vision_flutter.dart'; import 'package:flutter/foundation.dart'; class ScanProvider extends ChangeNotifier { int _types = 0; int get types => _types; set types(int value) { _types = value; notifyListeners(); } final Map<String, BarcodeResult> _results = {}; Map<String, BarcodeResult> get results => _results; void addResult(String key, BarcodeResult result) { _results[key] = result; notifyListeners(); } void clearResults() { _results.clear(); notifyListeners(); } void removeResult(String key) { _results.remove(key); notifyListeners(); } } -
Create a
ChangeNotifierProviderwidget to wrap theScanProviderwidget, then add theScanProviderwidget to theMultiProviderwidget. TheMultiProviderwidget can contain multipleChangeNotifierProviderwidgets.void main() { runApp(MultiProvider(providers: [ ChangeNotifierProvider(create: (_) => SwitchProvider()), ChangeNotifierProvider(create: (_) => ScanProvider()), ], child: const MyApp())); }The
SwitchProviderwidget will be used later to toggle the camera size. -
Save the barcode types in the
ScanProviderwidget.var result = await Navigator.push( context, MaterialPageRoute( builder: (context) => const SettingsScreen()), ); Provider.of<ScanProvider>(context).types = result['format'];
Create a Tab Bar for Home, History, and About Views
A tab bar view allows users to navigate between different views without needing to go back and forth between screens. To create a tab bar, you can use the TabBarView widget with the children property set to a list of Widget objects.
late TabController _tabController;

@override
void initState() {
  super.initState();
  _tabController = TabController(vsync: this, length: 3);
  _initLicense();
}

TabBarView(
  controller: _tabController,
  children: const [
    HomeView(title: 'Dynamsoft Barcode SDK'),
    HistoryView(title: 'History'),
    InfoView(title: 'About the SDK'),
  ],
),
Step 2: Configure Barcode Symbology Settings

The settings screen is used to configure the Dynamsoft Barcode Reader. Currently, only barcode symbologies are supported. You can also add other parameters to tune the SDK’s performance.
class _SettingsScreenState extends State<SettingsScreen> {
  bool _is1dChecked = true;
  bool _isQrChecked = true;
  bool _isPdf417Checked = true;
  bool _isDataMatrixChecked = true;

  void _popWithResult(BuildContext context) {
    BigInt format = BigInt.zero;
    if (_is1dChecked) {
      format |= EnumBarcodeFormat.oned;
    }
    if (_isQrChecked) {
      format |= EnumBarcodeFormat.qrCode;
    }
    if (_isPdf417Checked) {
      format |= EnumBarcodeFormat.pdf417;
    }
    if (_isDataMatrixChecked) {
      format |= EnumBarcodeFormat.datamatrix;
    }
    Navigator.pop(context, {'format': format});
  }

  @override
  Widget build(BuildContext context) {
    return PopScope(
      canPop: false,
      onPopInvokedWithResult: (bool didPop, Object? result) {
        if (!didPop) {
          _popWithResult(context);
        }
      },
      child: Scaffold(
        appBar: AppBar(
          title: const Text('Settings'),
          leading: BackButton(onPressed: () => _popWithResult(context)),
        ),
        body: ListView(
          children: <Widget>[
            CheckboxListTile(
              title: const Text('1D Barcode'),
              value: _is1dChecked,
              onChanged: (bool? value) {
                setState(() {
                  _is1dChecked = value!;
                });
              },
            ),
            CheckboxListTile(
              title: const Text('QR Code'),
              value: _isQrChecked,
              onChanged: (bool? value) {
                setState(() {
                  _isQrChecked = value!;
                });
              },
            ),
            CheckboxListTile(
              title: const Text('PDF417'),
              value: _isPdf417Checked,
              onChanged: (bool? value) {
                setState(() {
                  _isPdf417Checked = value!;
                });
              },
            ),
            CheckboxListTile(
              title: const Text('DataMatrix'),
              value: _isDataMatrixChecked,
              onChanged: (bool? value) {
                setState(() {
                  _isDataMatrixChecked = value!;
                });
              },
            ),
          ],
        ),
      ),
    );
  }
}
The PopScope widget is used to intercept the back button event. When the back button is pressed, the barcode types are returned as a JSON object. The canPop: false parameter prevents the default pop behavior, and onPopInvokedWithResult is called to handle the navigation manually.
Step 3: Set Up Camera Preview and Real-Time Multi-Barcode Scanning
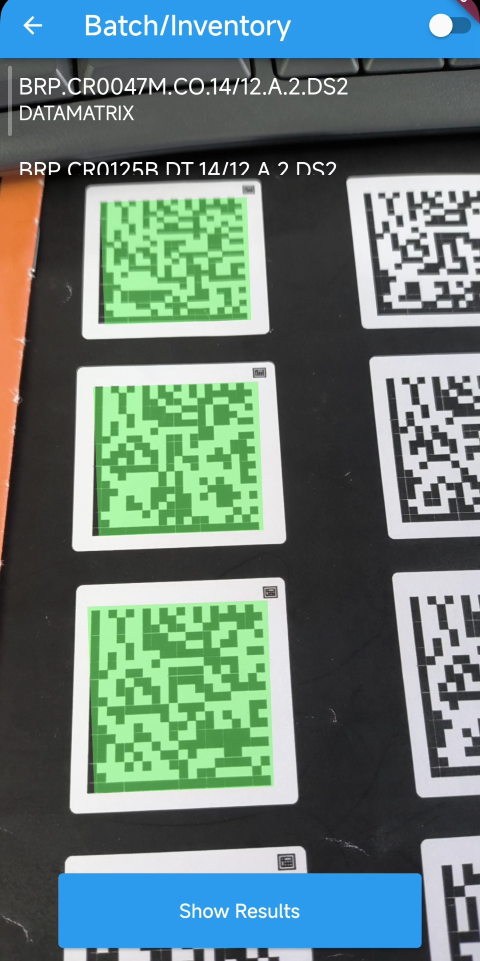
The Dynamsoft Flutter barcode scanner plugin enables developers to integrate barcode scanning functionality into their Flutter apps with just a few lines of Dart code. The plugin supports detecting multiple codes from a single image and from a real-time camera stream.
To use the iOS camera, you need to add the following descriptions to the ios/Runner/Info.plist file before writing any code.
<key>NSCameraUsageDescription</key>
<string>Can I use the camera please?</string>
<key>NSMicrophoneUsageDescription</key>
<string>Can I use the mic please?</string>
<key>NSPhotoLibraryUsageDescription</key>
<string>Load document images from gallery</string>
The Flutter barcode scanner plugin is initialized and used as follows:
-
Initialize the SDK.
late final CameraEnhancer _cameraEnhancer; late final CaptureVisionRouter _cvr; late ScanProvider _scanProvider; @override void initState() { super.initState(); WidgetsBinding.instance.addObserver(this); _sdkInit(); } Future<void> _sdkInit() async { _scanProvider = Provider.of<ScanProvider>(context, listen: false); _cvr = CaptureVisionRouter.instance; _cameraEnhancer = CameraEnhancer.instance; SimplifiedCaptureVisionSettings? currentSettings = await _cvr.getSimplifiedSettings(EnumPresetTemplate.readBarcodes); if (_scanProvider.types != 0) { currentSettings!.barcodeSettings!.barcodeFormatIds = _scanProvider.types as BigInt; } else { currentSettings!.barcodeSettings!.barcodeFormatIds = EnumBarcodeFormat.all; } currentSettings.barcodeSettings!.expectedBarcodesCount = 0; // Apply the new runtime settings to the barcode reader. await _cvr.updateSettings(EnumPresetTemplate.readBarcodes, currentSettings); // Bind the `CameraEnhancer` object to the `CaptureVisionRouter` object _cvr.setInput(_cameraEnhancer); // Add `CapturedResultReceiver` final CapturedResultReceiver receiver = CapturedResultReceiver() ..onDecodedBarcodesReceived = (DecodedBarcodesResult result) async { List<BarcodeResultItem>? res = result.items; if (mounted) { decodeRes = res ?? []; if (Platform.isAndroid && isPortrait) { decodeRes = rotate90barcode(decodeRes, _previewHeight.toInt()); } for (var i = 0; i < decodeRes.length; i++) { if (_scanProvider.results.containsKey(decodeRes[i].text)) { continue; } else { _scanProvider.results[decodeRes[i].text] = decodeRes[i]; } } setState(() {}); } }; _cvr.addResultReceiver(receiver); start(); } -
Start and stop the camera.
 Future<void> stop() async {
   await _cameraEnhancer.close();
   await _cvr.stopCapturing();
 }

 Future<void> start() async {
   _isCameraReady = true;
   setState(() {});

   Future.delayed(const Duration(milliseconds: 100), () async {
     await _cvr.startCapturing(EnumPresetTemplate.readBarcodes);
     await _cameraEnhancer.open();
   });
 }
The
Future.delayed()ensures the camera view widget is ready before starting barcode scanning. -
Create the layout that contains the camera view and the result view.
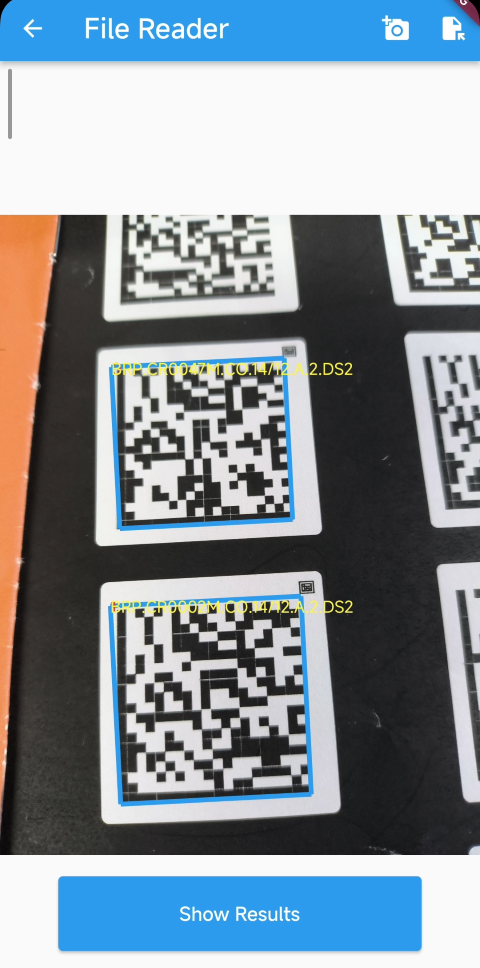
 Widget createSwitchWidget(bool switchValue) {
   if (!_isCameraReady) {
     // Return loading indicator if camera is not ready yet.
     return const Center(
       child: CircularProgressIndicator(),
     );
   }
   if (switchValue) {
     return Stack(
       children: [
         Container(
           color: Colors.white,
         ),
         Container(
           height: MediaQuery.of(context).size.height -
               200 -
               MediaQuery.of(context).padding.top,
           color: Colors.white,
           child: Center(
             child: createListView(context),
           ),
         ),
         if (_isScanning)
           Positioned(
             top: 0,
             right: 20,
             child: SizedBox(
               width: 160,
               height: 160,
               child: CameraView(cameraEnhancer: _cameraEnhancer),
             ),
           ),
         Positioned(
           bottom: 50,
           left: 50,
           right: 50,
           child: SizedBox(
               width: MediaQuery.of(context).size.width * 0.5,
               height: 64,
               child: Row(
                 mainAxisAlignment: MainAxisAlignment.spaceEvenly,
                 children: [
                   ElevatedButton(
                     onPressed: () {
                       if (_isScanning) {
                         _isScanning = false;
                         stop();
                         _scanButtonText = 'Start Scanning';
                         setState(() {});
                       } else {
                         _isScanning = true;
                         _scanButtonText = 'Stop Scanning';
                         start();
                       }
                     },
                     child: Text(_scanButtonText),
                   ),
                   Center(
                     child: IconButton(
                       icon: const Icon(Icons.flash_on),
                       onPressed: () {
                         if (_isFlashOn) {
                           _isFlashOn = false;
                           _cameraEnhancer.turnOffTorch();
                         } else {
                           _isFlashOn = true;
                           _cameraEnhancer.turnOnTorch();
                         }
                       },
                     ),
                   ),
                 ],
               )),
         ),
       ],
     );
   } else {
     return Stack(
       children: [
         Container(
           child: CameraView(cameraEnhancer: _cameraEnhancer),
         ),
         SizedBox(
           height: 100,
           child: ListView.builder(
             itemBuilder: listItem,
             itemCount: decodeRes.length,
           ),
         ),
         Positioned(
             bottom: 50,
             left: 50,
             right: 50,
             child: SizedBox(
               width: 64,
               height: 64,
               child: ElevatedButton(
                 onPressed: () {
                   Navigator.push(
                     context,
                     MaterialPageRoute(
                         builder: (context) => const HistoryView(
                               title: 'Scan Results',
                             )),
                   );
                 },
                 child: const Text('Show Results'),
               ),
             ))
       ],
     );
   }
 }
By default, the camera view fills the screen. When pressing the switch button located in the top right corner, the camera view resizes to a smaller window and hovers over the result view. The result view is a list that displays the barcode results.
-
Add a custom overlay to the camera view. The built-in resolution of the camera preview is hardcoded to 1920x1080 and cannot be changed.
 final double _previewWidth = 1920;
 final double _previewHeight = 1080;

 SizedBox fullscreen = SizedBox(
           width: screenWidth,
           height: screenHeight,
           child: FittedBox(
             fit: BoxFit.cover,
             child: Stack(
               children: [
                 SizedBox(
                   width: isPortrait ? _previewHeight : _previewWidth,
                   height: isPortrait ? _previewWidth : _previewHeight,
                   child: CameraView(cameraEnhancer: _cameraEnhancer),
                 ),
                 Positioned(
                     left: 0,
                     top: 0,
                     right: 0,
                     bottom: 0,
                     child: createOverlay(
                       decodeRes,
                     ))
               ],
             ),
           ),
         );
The overlay is rendered with
CustomPainter:Widget createOverlay(List<BarcodeResultItem> results) { return CustomPaint( painter: OverlayPainter(results), ); } class OverlayPainter extends CustomPainter { final List<BarcodeResultItem> results; OverlayPainter(this.results) { results.sort((a, b) { List<Point> aPoints = a.location.points; List<Point> bPoints = b.location.points; if (((aPoints[0].y + aPoints[1].y + aPoints[2].y + aPoints[3].y) / 4 < (bPoints[0].y + bPoints[1].y + bPoints[2].y + bPoints[3].y) / 4)) { return -1; } if (((aPoints[0].y + aPoints[1].y + aPoints[2].y + aPoints[3].y) / 4 > (bPoints[0].y + bPoints[1].y + bPoints[2].y + bPoints[3].y) / 4)) { return 1; } return 0; }); List<BarcodeResultItem> all = []; int delta = 0; while (results.isNotEmpty) { List<BarcodeResultItem> sortedResults = []; BarcodeResultItem start = results[0]; sortedResults.add(start); results.remove(start); List<Point> startPoints = start.location.points; num maxHeight = [ startPoints[0].y, startPoints[1].y, startPoints[2].y, startPoints[3].y ].reduce(max); while (results.isNotEmpty) { BarcodeResultItem tmp = results[0]; List<Point> tmpPoints = tmp.location.points; if ([tmpPoints[0].y, tmpPoints[1].y, tmpPoints[2].y, tmpPoints[3].y] .reduce(min) < maxHeight + delta) { sortedResults.add(tmp); results.remove(tmp); } else { break; } } sortedResults.sort(((a, b) { List<Point> aPoints = a.location.points; List<Point> bPoints = b.location.points; if (((aPoints[0].x + aPoints[1].x + aPoints[2].x + aPoints[3].x) / 4 < (bPoints[0].x + bPoints[1].x + bPoints[2].x + bPoints[3].x) / 4)) { return -1; } if (((aPoints[0].x + aPoints[1].x + aPoints[2].x + aPoints[3].x) / 4 > (bPoints[0].x + bPoints[1].x + bPoints[2].x + bPoints[3].x) / 4)) { return 1; } return 0; })); all += sortedResults; } results.addAll(all); } @override void paint(Canvas canvas, Size size) { final paint = Paint() ..color = Colors.blue ..strokeWidth = 30 ..style = PaintingStyle.stroke; int index = 0; for (var result in results) { List<Point> points = result.location.points; double minX = points[0].x.toDouble(); double minY = points[0].y.toDouble(); if (points[1].x < minX) minX = points[1].x.toDouble(); if (points[2].x < minX) minX = points[2].x.toDouble(); if (points[3].x < minX) minX = points[3].x.toDouble(); if (points[1].y < minY) minY = points[1].y.toDouble(); if (points[2].y < minY) minY = points[2].y.toDouble(); if (points[3].y < minY) minY = points[3].y.toDouble(); canvas.drawLine(Offset(points[0].x.toDouble(), points[0].y.toDouble()), Offset(points[1].x.toDouble(), points[1].y.toDouble()), paint); canvas.drawLine(Offset(points[1].x.toDouble(), points[1].y.toDouble()), Offset(points[2].x.toDouble(), points[2].y.toDouble()), paint); canvas.drawLine(Offset(points[2].x.toDouble(), points[2].y.toDouble()), Offset(points[3].x.toDouble(), points[3].y.toDouble()), paint); canvas.drawLine(Offset(points[3].x.toDouble(), points[3].y.toDouble()), Offset(points[0].x.toDouble(), points[0].y.toDouble()), paint); TextPainter numberPainter = TextPainter( text: TextSpan( text: index.toString(), style: const TextStyle( color: Colors.red, fontSize: 100.0, ), ), textAlign: TextAlign.center, textDirection: TextDirection.ltr, ); numberPainter.layout(minWidth: 0, maxWidth: size.width); numberPainter.paint(canvas, Offset(minX, minY)); TextPainter textPainter = TextPainter( text: TextSpan( text: result.text, style: const TextStyle( color: Colors.yellow, fontSize: 100.0, ), ), textAlign: TextAlign.center, textDirection: TextDirection.ltr, ); textPainter.layout(minWidth: 0, maxWidth: size.width); textPainter.paint(canvas, Offset(minX, minY)); index += 1; } } @override bool shouldRepaint(OverlayPainter oldDelegate) => results != oldDelegate.results; }
Step 4: Decode Barcodes, QR Codes, and DataMatrix from Image Files
The image_picker plugin allows you to select an image from the gallery or take a picture with the camera. Here is the code snippet:
// Pick from gallery:
onPressed: () async {
  XFile? pickedFile =
      await _imagePicker.pickImage(source: ImageSource.gallery);
},

// Or capture with the camera:
onPressed: () async {
  XFile? pickedFile =
      await _imagePicker.pickImage(source: ImageSource.camera);
},
Once an image is selected, you need to use FlutterExifRotation.rotateImage to rotate the image to the correct orientation. Otherwise, the coordinates of the barcode may be incorrect.
if (pickedFile != null) {
  final rotatedImage = await FlutterExifRotation.rotateImage(
      path: pickedFile.path);
  _file = rotatedImage.path;
  _results = await _barcodeReader.decodeFile(_file!) ?? [];
  for (var i = 0; i < _results.length; i++) {
    if (_scanProvider.results
        .containsKey(_results[i].text)) {
      continue;
    } else {
      _scanProvider.results[_results[i].text] =
          _results[i];
    }
  }
}
The decodeFile() method is used to decode the barcode from the image file. The result is a list of BarcodeResult objects. You can use the text property to retrieve the barcode value.
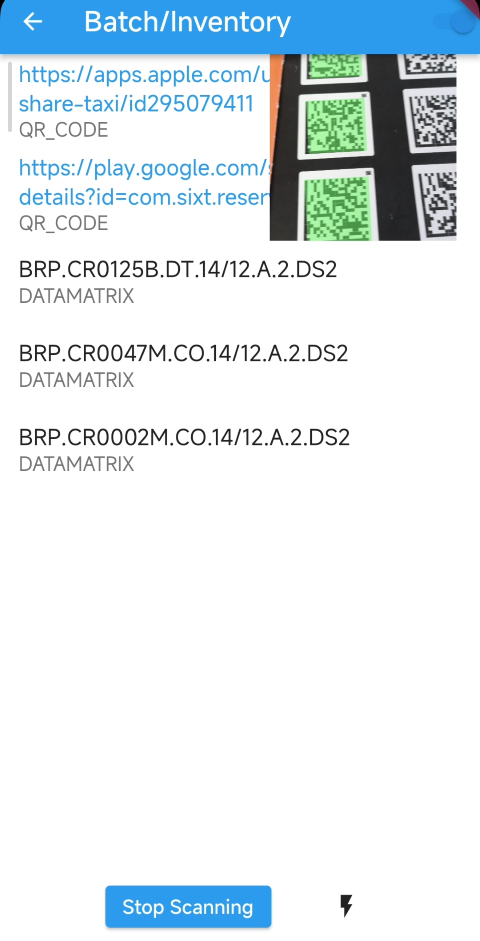
Step 5: Display and Share Scan Results
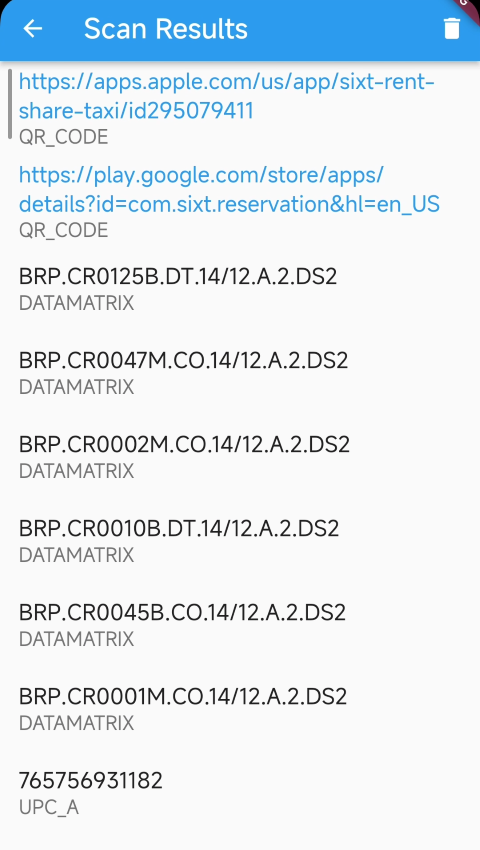
The result view is a list view that displays the barcode results. The ListView.builder is used to create the list view.
Widget createListView(BuildContext context) {
  ScanProvider scanProvider = Provider.of<ScanProvider>(context);
  return ListView.builder(
      itemCount: scanProvider.results.length,
      itemBuilder: (context, index) {
        return ListTile(
          title: createURLString(
              scanProvider.results.values.elementAt(index).text),
          subtitle: Text(
              scanProvider.results.values.elementAt(index).formatString),
        );
      });
}
If the result is a valid HTTP or HTTPS URL, you can use the launchUrlString() function to open it. Additionally, you can enable long-press event monitoring on the list item to provide users with the option to share the barcode result.
Widget createURLString(String text) {
  // Create a regular expression to match URL strings.
  RegExp urlRegExp = RegExp(
    r'^(https?|http)://[^\s/$.?#].[^\s]*$',
    caseSensitive: false,
    multiLine: false,
  );

  if (urlRegExp.hasMatch(text)) {
    return InkWell(
      onLongPress: () {
        SharePlus.instance.share(ShareParams(text: text, subject: 'Scan Result'));
      },
      child: Text(
        text,
        style: const TextStyle(color: Colors.blue),
      ),
      onTap: () async {
        launchUrlString(text);
      },
    );
  } else {
    return InkWell(
      onLongPress: () async {
        SharePlus.instance.share(ShareParams(text: text, subject: 'Scan Result'));
      },
      child: Text(text),
    );
  }
}
Step 6: Run the Flutter Barcode Scanner on Android and iOS
flutter run

Common Issues & Edge Cases
- Camera preview is black or frozen on a physical device: Ensure you have added the required camera and microphone permissions to
ios/Runner/Info.plist(iOS) and that the device is not in use by another camera app. On Android, some OEM skins require explicit runtime permission grants. - Barcode overlay coordinates are offset in Android portrait mode: The built-in camera resolution is fixed at 1920×1080. On Android in portrait orientation, you must apply a 90° coordinate rotation using
rotate90barcode()— iOS does not require this transform. decodeFile()returns incorrect barcode positions from gallery images: Some device cameras save images with non-standard EXIF rotation flags. Always callFlutterExifRotation.rotateImage()before decoding to ensure the coordinate system matches the displayed image.
Conclusion
Warehouse inventory systems need more than a single-code scanner. A practical scanner should read multiple labels in one pass, support the 1D and 2D formats used across shelves and pallets, show detection overlays for operator confirmation, and run on the mobile devices already used by warehouse staff. The Flutter app in this tutorial demonstrates that workflow with Dynamsoft Capture Vision on Android and iOS.