


How to Scan Barcodes in an Oracle APEX Application
In the previous article, we’ve created an Oracle APEX application to scan documents. In this article, we are going to add barcode scanning function to the Oracle APEX application with Dynamsoft Barcode Reader.
What you’ll build: An Oracle APEX barcode-scanning page that opens the camera, reads barcodes in the browser with Dynamsoft Barcode Reader, and writes the decoded result back into APEX form fields through a reusable plugin.
Key Takeaways
- Oracle APEX can add camera-based barcode scanning by embedding Dynamsoft Barcode Reader inside a region plugin.
- The prebuilt plugin is the fastest path, but the same workflow can also be implemented from scratch with PL/SQL rendering plus browser-side JavaScript.
CaptureVisionRouterandCameraEnhancerhandle decoding and camera input entirely in the browser, so the APEX page receives finished barcode text rather than raw image data.- Plugin callbacks can push decoded text directly into APEX page items, which makes the scanner fit standard low-code forms and dynamic actions.
Common Developer Questions
How do I scan barcodes in an Oracle APEX application?
Add a barcode-scanning region to the page, initialize the Dynamsoft JavaScript libraries in the browser, and connect the decoded result to an APEX page item or button-driven dynamic action. This article shows both the ready-made plugin route and the custom plugin implementation route.
Can Oracle APEX scan barcodes entirely in the browser without a server-side image upload?
Yes. The scanner in this tutorial runs in the browser with Dynamsoft Barcode Reader and Camera Enhancer, so frames are decoded client-side and only the barcode text is pushed back into the APEX page.
How do I return decoded barcode results from a custom APEX plugin into a page field?
Bind a result receiver in the plugin’s JavaScript layer and call apex.item(...).setValue() when a barcode is decoded. That direct callback is what updates the APEX form field during scanning.
You can check out the video to see what it does.
Prerequisites
Get your trial license key.
Build an Oracle APEX Application to Scan Barcodes
Let’s do this in steps. First, we will talk about how to use the pre-built plugin to add barcode scanning function to an APEX application. Then, we will discuss how to build a plugin from scratch.
Use the Pre-Built Plugin
Video guide:
-
Download the plugin and install it: https://github.com/tony-xlh/APEX-Dynamsoft-Barcode-Reader/raw/refs/heads/main/region_type_plugin_com_dynamsoft_dbr.sql
-
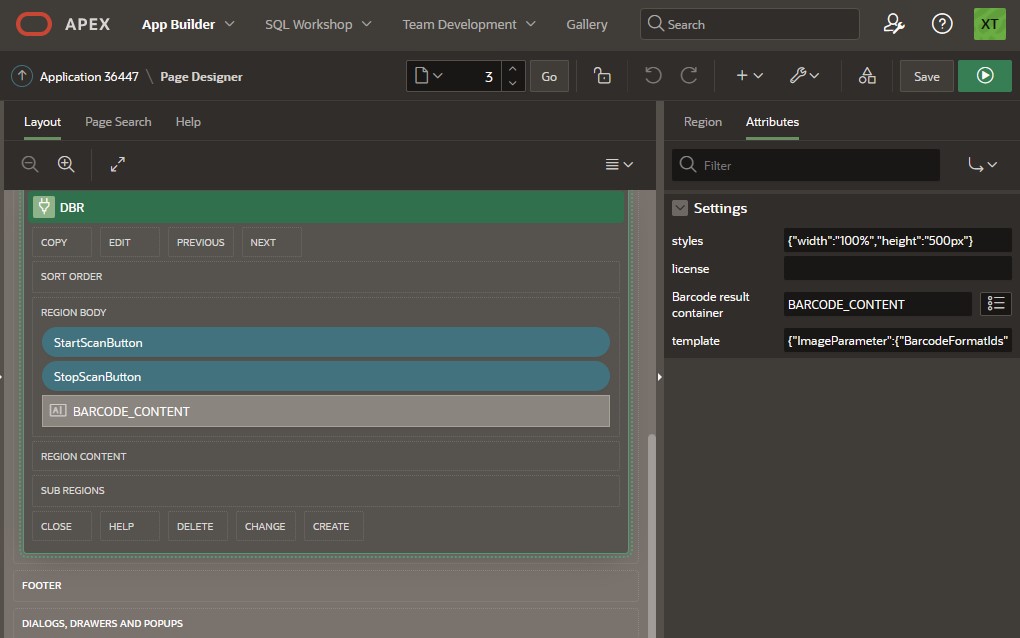
Create a new barcode scanner page and in its page designer, drag the barcode scanner region into the app, add two buttons and a text field to display the barcode result. In addition, set the attributes like the license for the region.
-
Add a dynamic action for the
StartScanButtonbutton. When it is clicked, execute the following JavaScript code:(async () => { if (DBRExtension.router) { await DBRExtension.open(); DBRExtension.startScanning(); }else{ alert("The barcode scanner is still initializing."); } })(); -
Add a dynamic action for the
StopScanButtonbutton. When it is clicked, execute the following JavaScript code:DBRExtension.stopScanning(); DBRExtension.close();
Build an APEX Plugin for Dynamsoft Barcode Reader
Let’s see how the plugin is made.
New Plugin
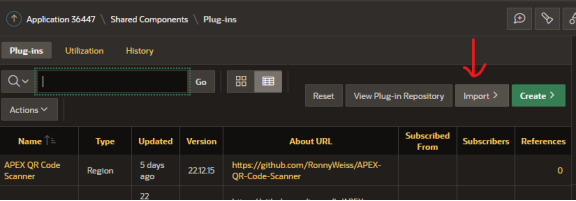
- On the app’s page, click shared components. Then click plug-ins in the other components section.
- Create a new plugin from scratch. Here, we select the region type as we need to display something and run actions on the page.
-
Define the
f_renderfunction in the PL/SQL code.function f_render ( p_region in apex_plugin.t_region, p_plugin in apex_plugin.t_plugin, p_is_printer_friendly in boolean ) return apex_plugin.t_region_render_result isThen set
Render Procedure/Function NametoF_RENDERin the callbacks section.
Next, we are going to put the plugin aside, try to create a barcode scanning web page first and then adapt it as a plugin.
Build a Barcode Scanning Web App
The web page loads the libraries of Dynamsoft Barcode Reader and Dynamsoft Camera Enhancer via CDN. It can use the camera enhancer library to open the camera and read barcodes from camera frames with the barcode reader library.
-
Create a new HTML file with the following content.
<!DOCTYPE html> <html> <head> <title>Dynamsoft Barcode Reader Sample</title> <meta name="viewport" content="width=device-width,initial-scale=1.0,maximum-scale=1.0,user-scalable=0" /> <script src="script.js"></script> </head> <body> <script> window.onload = function(){ } </script> </body> </html> -
Create a new
script.jsfile. Define aDBRExtensionobject in it.let DBRExtension = {} -
Add functions to load external JavaScript files.
let DBRExtension = { loadLibrary: function (src,type,id,data){ return new Promise(function (resolve, reject) { let scriptEle = document.createElement("script"); scriptEle.setAttribute("type", type); scriptEle.setAttribute("src", src); if (id) { scriptEle.id = id; } if (data) { for (let key in data) { scriptEle.setAttribute(key, data[key]); } } document.body.appendChild(scriptEle); scriptEle.addEventListener("load", () => { console.log(src+" loaded") resolve(true); }); scriptEle.addEventListener("error", (ev) => { console.log("Error on loading "+src, ev); reject(ev); }); }); } } -
Add a load function to load needed JavaScript files. It also sets the license for Dynamsoft Barcode Reader.
let DBRExtension = { load: async function(pConfig){ await this.loadLibrary("https://cdn.jsdelivr.net/npm/dynamsoft-barcode-reader-bundle@11.2.4000/dist/dbr.bundle.js","text/javascript"); if (pConfig.license) { Dynamsoft.License.LicenseManager.initLicense(pConfig.license); }else{ Dynamsoft.License.LicenseManager.initLicense("LICENSE-KEY"); } } } -
Add a function to initialize the reader and the camera enhancer. A container is appended to the body to display the camera. We can also pass parameters like the JSON template for the barcode reader and styles for the container to set via the arguments. Meanwhile, bind the result receiver.
let DBRExtension = { router:undefined, enhancer:undefined, regionID:undefined, init: async function(pConfig){ Dynamsoft.Core.CoreModule.loadWasm(); this.router = await Dynamsoft.CVR.CaptureVisionRouter.createInstance(); let cameraView = await Dynamsoft.DCE.CameraView.createInstance(); this.enhancer = await Dynamsoft.DCE.CameraEnhancer.createInstance(cameraView); let container = document.createElement("div"); container.id = "enhancerUIContainer"; container.append(cameraView.getUIElement()); if (pConfig.styles) { let styles = JSON.parse(pConfig.styles); //{width:"100%"} e.g. for (const key in styles) { container.style[key] = styles[key]; } } if (pConfig.template) { await this.router.initSettings(pConfig.template); } container.style.display = "none"; this.router.setInput(this.enhancer); let pThis = this; this.router.addResultReceiver({ onDecodedBarcodesReceived: (result) => { if (result.barcodeResultItems?.length) { let results = result.barcodeResultItems; pThis.barcodeResults = results; if ('apex' in window) { if (pThis.item) { apex.item(pThis.item).setValue(results[0].text); } //if (pThis.ajax) { // apex.server.process("SINGLE_BARCODE_SCANNED", {x01:results[0].barcodeText}, {dataType: "text", success: function(){}}); //} } } }}); } } -
Add functions to start scanning from the camera frames and stop scanning.
let DBRExtension = { startScanning: function(){ this.stopScanning(); this.router.startCapturing("ReadSingleBarcode"); }, stopScanning: function(){ this.router.stopCapturing(); }, } -
Add a function to open the camera.
let DBRExtension = { open: async function(){ document.getElementById("enhancerUIContainer").style.display = ""; await this.enhancer.open(); } } -
Add a function to close the camera.
let DBRExtension = { close: function(){ this.enhancer.close(true); document.getElementById("enhancerUIContainer").style.display = "none"; } } -
Add the following scripts in the HTML file to start the barcode scanner.
 window.onload = async function(){
   let styles = {width:"100%",height:"100%",left:0,top:0,position:"absolute"}
   await DBRExtension.load({});
   await DBRExtension.init({styles:JSON.stringify(styles)});
   await DBRExtension.open();
   DBRExtension.startScanning();
 }
All right, we have finished writing the web page. Next, we are going to adapt it for the APEX plugin.
Adapt the Web Page for APEX
-
If it is running in an APEX app, append the container to the region in the
initfunction.if ('apex' in window) { this.regionID = pConfig.regionID; const region = document.getElementById(this.regionID); region.appendChild(container); }else{ document.body.appendChild(container); } -
Get the page item from the
pConfigargument and set its content to the text of the first barcode.let DBRExtension = { item: undefined, init: function(pConfig){ //... if ('apex' in window) { this.regionID = pConfig.regionID; this.item = pConfig.item; const region = document.getElementById(this.regionID); region.appendChild(container); } //... }, startScanning: function(){ //... if (results.length > 0) { if ('apex' in window) { if (pThis.item) { apex.item(pThis.item).setValue(results[0].text); } } } //... }, } -
On the setup page of the plugin, add several custom attributes.
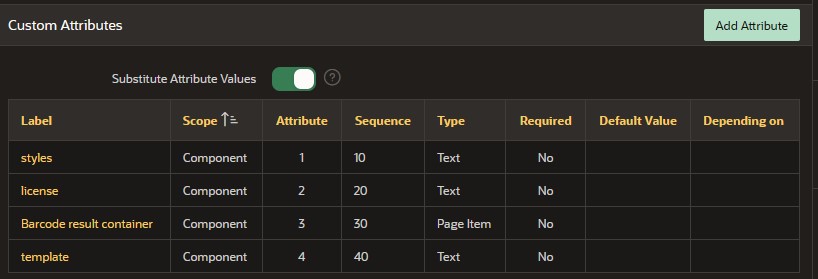
- styles: JSON string to set the styles.
- template: JSON template to define the runtime settings of Dynamsoft Barcode Reader.
- Barcode result container: page item for the barcode result.
- license: license for Dynamsoft Barcode Reader. You can apply for a license here.
-
Upload the
script.jsfile and add it in the list of file URLs to load.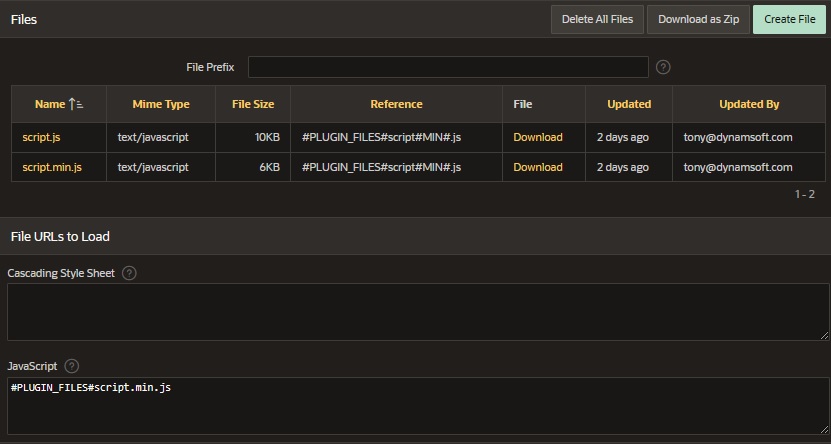
-
In the PL/SQL code, run the functions for initialization.
begin
  apex_javascript.add_onload_code (
      p_code => '(async () => { await DBRExtension.load({' ||
          apex_javascript.add_attribute(p_name => 'license', p_value => p_region.attribute_02, p_add_comma => false ) ||
        '});
        DBRExtension.init({' ||
          apex_javascript.add_attribute(p_name => 'styles', p_value => p_region.attribute_01, p_add_comma => true ) ||
          apex_javascript.add_attribute(p_name => 'item', p_value => p_region.attribute_03, p_add_comma => true ) ||
          apex_javascript.add_attribute(p_name => 'template', p_value => p_region.attribute_04, p_add_comma => true ) ||
          apex_javascript.add_attribute(p_name => 'regionID', p_value => p_region.static_id, p_add_comma => false ) ||
        '}); })();',
      p_key  => null );
  return null;
end;
Use the Plugin to Scan Barcodes
Do the similar steps in the pre-built plugin part to use the plugin to scan barcodes.
We can now scan barcodes in an Oracle APEX app. You can find an online demo here.
Self-Hosting Resources
You can put the files in the CDN in static files.

Then load them in the script.js file.
try {
    console.log("try loading from static resources: "+"https://oracleapex.com/ords/"+apex.env.APP_FILES+"dbr11/dbr.bundle.js");
    await this.loadLibrary("https://oracleapex.com/ords/"+apex.env.APP_FILES+"dbr11/dbr.bundle.js","text/javascript");
}catch (e) {
    await this.loadLibrary("https://cdn.jsdelivr.net/npm/dynamsoft-barcode-reader-bundle@11.2.4000/dist/dbr.bundle.js","text/javascript");
}
Source Code
Get the complete sample project source code on GitHub
Disclaimer:
The wrappers and sample code on Dynamsoft Codepool are community editions, shared as-is and not fully tested. Dynamsoft is happy to provide technical support for users exploring these solutions but makes no guarantees.