How to Set up a Simple Barcode Reading Server in Python
Python is a programming language commonly used for scripting, data science, web development, etc. In this article, we are going to talk about how to set up a simple barcode reading server in Python with the Flask web framework.
This article is Part 1 in a 3-Part Series.
Install Dependencies
- Install Dynamsoft Barcode Reader:
pip install dbr - Install Flask:
pip install Flask
Write a CLI Tool to Test Reading Barcodes from Images
Let’s first explore how to use the Python edition of Dynamsoft Barcode Reader by writing a CLI tool to read barcodes from a local image.
- Create a new file named
cli.py. -
Import the package of Dynamsoft Barcode Reader.
from dbr import * -
Initialize the license.
error = BarcodeReader.init_license("<insert DBR license key here>")
if error[0] != EnumErrorCode.DBR_OK:
   # Add your code for license error processing
   print("License error: "+ error[1])
You can apply for a license key from the portal of Dynamsoft.
-
Create an instance of Dynamsoft Barcode Reader.
reader = BarcodeReader() -
Read barcodes from an image file and print the results.
image_path = r"test.jpg"
results = reader.decode_file(image_path)
if results != None:
    i = 1
    for result in results:
       print("{}. {}: {}".format(i, result.barcode_format_string, result.barcode_text))
       i = i+1
Output example:
> python .\cli.py
1. QR_CODE: https://www.dynamsoft.com/
2. QR_CODE: Dynamsoft Barcode Reader SDK saves you months of added development time and extra costs
You can learn more about its usage in the docs.
Write a Web Server with Flask
Next, let’s write a web server with Flask to provide a web API for reading barcodes from images.
-
Import needed modules from the Flask package.
from flask import Flask, request -
Create an instance of the Flask web app with its static folder set to the root so that we can serve HTML files.
app = Flask(__name__, static_url_path='/', static_folder='./') -
Initialize an instance of Dynamsoft Barcode Reader. The license is retrieved from the environment. If it is not set, then use a one-day public trial license.
DBR_license = os.environ.get('DBRLicense') if DBR_license == None: DBR_license = "LICENSE-KEY" error = BarcodeReader.init_license(DBR_license) if error[0] != EnumErrorCode.DBR_OK: print("License error: " + error[1]) reader = BarcodeReader() -
Create a function to read barcodes from the bytes of an image file. Here, we save the barcode results in a list, with the basic info like the text, format, and location.
def decode_bytes(img_bytes): result_dict = {} results = [] text_results = reader.decode_file_stream(img_bytes) for tr in text_results: result = {} result["barcodeFormat"] = tr.barcode_format_string result["barcodeText"] = tr.barcode_text result["barcodeBytes"] = str(base64.b64encode(tr.barcode_bytes))[2:-1] result["confidence"] = tr.extended_results[0].confidence points = tr.localization_result.localization_points result["x1"] = points[0][0] result["y1"] = points[0][1] result["x2"] = points[1][0] result["y2"] = points[1][1] result["x3"] = points[2][0] result["y3"] = points[2][1] result["x4"] = points[3][0] result["y4"] = points[3][1] results.append(result) result_dict["results"] = results -
Add a route for receiving the image content encoded in base64 and returning the barcode results of the image as JSON.
import time import base64 import json @app.route('/readBarcodes', methods=['GET', 'POST']) def read_barcodes(): if request.method == 'POST': data = request.get_json() if 'base64' in data: bytes_decoded = base64.b64decode(data['base64']) start_time = time.time() response = decode_bytes(bytes_decoded) end_time = time.time() elapsed_time = int((end_time - start_time) * 1000) response["elapsedTime"] = elapsed_time return json.dumps(response) else: return "" -
Add CORS support.
If we need to call the API from a web page from a different domain. We need to enable CORS. Here are the steps to do this:
- Install
Flask Cors:pip install Flask_Cors. -
Enable CORS for the app.
from flask_cors import CORS, cross_origin cors = CORS(app) app.config['CORS_HEADERS'] = 'Content-Type' -
Add the
@cross_origin()decorator to the handler function.@cross_origin() def read_barcodes():
- Install
Write a Test
We can then write a command line script to test the performance of the API server. It uses the multiprocessing package to simulate 100 requests made concurrently.
import base64
import requests
import json
import time
from multiprocessing import Process, Value

def get_picture_base64_data(image_path):
    with open(image_path, 'rb') as image_file:
        base64_data = base64.b64encode(image_file.read())
    return base64_data.decode('utf-8')

def decode(index, completed_number, success_number, files_number, start_time):
    base64 = get_picture_base64_data("../AllSupportedBarcodeTypes.png")
    body = {"base64": base64}
    json_data = json.dumps(body)
    headers = {'Content-type': 'application/json'}
    r = requests.post('http://127.0.0.1:8888', data=json_data, headers=headers)
    completed_number.value = completed_number.value + 1
    if r.status_code == 200:
        success_number.value = success_number.value + 1
        print("success "+str(index))
    if completed_number.value == files_number.value:
        end_time = time.time()
        elapsed_time = int((end_time - start_time.value) * 1000)
        print("Successfully decoded " + str(success_number.value) + " images in " + str(elapsed_time) + "ms.")


if __name__ == "__main__":
    iteration_times = 100
    completed_number = Value('d', 0.0)
    success_number = Value('d', 0.0)
    files_number = Value('d', iteration_times)
    start_time = Value('d', time.time())
    for i in range(iteration_times):
        p = Process(target=decode, args=(i, completed_number, success_number, files_number, start_time))
        p.start()
Output:
...
success 66
success 97
success 35
Successfully decoded 100.0 images in 23601ms.
HTML Front-End
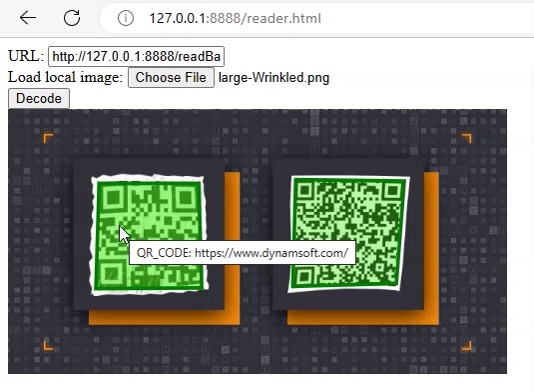
With the back-end server, we can now add a basic front-end to consume the API and add the results to the DOM via AJAX. We are not going to cover this in detail. You can check out the source code in the GitHub repo.

Deploy to Vercel for Production
We need to deploy the app for production. Here, we choose to deploy the app to Vercel to use its free serverless functions hosting service.
-
Create the
requirements.txtusingpipreqs:pipreqs . -
Structure the app as below following Vercel’s Flask template.
│ .gitignore │ README.md │ requirements.txt │ vercel.json │ ├─ api │ AllSupportedBarcodeTypes.png │ cli.py │ index.py │ reader.html -
Install Vercel.
npm i -g vercel -
Run the project locally.
vercel dev -
Deploy the app for production.
vercel --prod
Here is the link to the online demo: https://barcode-reading-server.vercel.app/reader.html
Source Code
The source code of the project is available here: https://github.com/tony-xlh/Barcode-Reading-Server


