


How OCR Helps Organize and Search Bulk Scanned Documents: A Developer's Guide
When dealing with bulk document scanning, one of the biggest challenges is making scanned documents searchable and organized. Unlike digital-born documents, scanned images are essentially pictures—you can’t search them, copy text from them, or organize them by content. This is where Optical Character Recognition (OCR) becomes invaluable.
What You’ll Build
In this tutorial, we’ll build a web-based document scanner that:
- Scans documents directly from TWAIN/WIA scanners
- Automatically extracts text using OCR
- Stores documents locally with searchable text
- Provides full-text search with visual highlights
- Enables text selection from scanned images
Demo Video: Web Document Scanner with OCR and Text Search
Key Takeaways
- Headless DWT architecture: Use Dynamic Web TWAIN without its built-in viewer for complete UI control over scanning, OCR, and display.
- Dual-canvas rendering: Stack an image canvas, a highlight canvas, and a transparent text layer to enable both search highlighting and text selection from scanned images.
- Coordinate transformation: OCR coordinates are in original image dimensions—you must scale them to match the displayed canvas size for accurate highlighting and selection.
- IndexedDB for local storage: Store scanned images, OCR text, and word coordinates entirely client-side so the app works without a backend.
- OCR is Windows-only for Web TWAIN: The OCR add-on currently requires a Windows installation step, which limits cross-platform deployment.
Common Developer Questions
Can I use this on macOS or Linux?
The scanning functionality works cross-platform via TWAIN/WIA and SANE drivers, but the OCR add-on for Dynamic Web TWAIN currently requires a Windows installation. On other platforms, you would need a server-side OCR solution.
Why use a headless DWT object instead of the built-in viewer?
Binding DWT to a DOM element gives you the default viewer, which doesn’t support custom overlays like search highlights or transparent text selection layers. The headless approach separates scanning logic from presentation.
How accurate is the OCR on low-quality scans?
Accuracy depends on image resolution, contrast, and font clarity. For best results, scan at 300 DPI or higher and ensure good lighting. The OCR engine works well on printed text but may struggle with handwriting or highly stylized fonts.
Can I search across multiple scanned documents at once?
Yes. The tutorial stores all documents in IndexedDB with their OCR text. The search function iterates over all stored documents and navigates to matches across the entire collection.
Does the text selection work on mobile browsers?
The transparent text overlay technique relies on absolute positioning and user-select: text, which is supported on modern mobile browsers. However, the TWAIN scanning component requires a desktop browser with the DWT service installed.
Prerequisites
- Get a 30-day free trial license
- OCR requires installing the OCR add-on (Windows Only). Download
DynamicWebTWAINOCRResources.zipfrom Dynamsoft’s website and run the installer as administrator.
Step 1: Understand the Headless DWT Architecture
The Challenge with Traditional Approaches
Most document scanning solutions bind the scanner SDK directly to a DOM element, giving you limited control over the UI. For advanced features like search highlighting and text selection overlays, we need a different approach.
Our Solution: Headless DWT + Custom Viewer
We’ll use Dynamic Web TWAIN SDK in “headless” mode:
- No UI binding to the SDK’s built-in viewer
- Custom dual-canvas architecture for complete control
- Separation of concerns: scanning, OCR, display, and storage
Architecture Overview:
┌──────────────┐    ┌──────────────┐    ┌──────────────┐
│   Scanner    │───▶│  DWT Object  │───▶│   OCR Kit    │
└──────────────┘    └──────────────┘    └──────────────┘
                            │                    │
                            ▼                    ▼
                    ┌──────────────────────────────┐
                    │       IndexedDB              │
                    │  {image, text, coordinates}  │
                    └──────────────────────────────┘
                            │
                            ▼
                    ┌──────────────────────────────┐
                    │    Custom Canvas Viewer      │
                    │  • Image Layer               │
                    │  • Highlight Layer           │
                    │  • Text Selection Layer      │
                    └──────────────────────────────┘
Step 2: Set Up the HTML Structure with Layered Canvases
Create index.html with three key sections:
1. Scanner Controls
<div class="controls">
    <h2>Scanner</h2>
    <select id="source"></select>
    <button onclick="acquireImage()">Scan</button>
    <button onclick="loadImage()">Load</button>
</div>
2. Custom Viewer with Layered Canvases
<div id="custom-viewer">
    <!-- Image rendering layer -->
    <canvas id="image-canvas" width="800" height="600"></canvas>

    <!-- Search highlight overlay -->
    <canvas id="highlight-canvas" width="800" height="600"></canvas>

    <!-- Selectable text layer -->
    <div id="text-layer"></div>

    <!-- Navigation controls -->
    <div class="viewer-controls">
        <button onclick="previousImage()">◀ Prev</button>
        <span id="image-counter">0 / 0</span>
        <button onclick="nextImage()">Next ▶</button>
    </div>
</div>
3. Search Interface
<div class="search-controls">
    <input type="text" id="search-input" placeholder="Search documents...">
    <button onclick="searchText()">Search</button>
    <button onclick="clearSearch()">Clear</button>
    <button onclick="previousMatch()">◀</button>
    <button onclick="nextMatch()">▶</button>
</div>
Step 3: Align Canvas Layers with CSS Absolute Positioning
The key to our dual-canvas approach is perfect alignment using absolute positioning:
#custom-viewer {
    position: relative;
    width: 95%;
    max-height: 85vh;
    margin: 20px auto;
    display: flex;
    justify-content: center;
    align-items: center;
    background: #2a2a2a;
}

#image-canvas {
    position: relative;
    display: block;
    z-index: 1;
}

#highlight-canvas {
    position: absolute;
    top: 0;
    left: 0;
    z-index: 2;
    pointer-events: none; /* Allow clicks to pass through */
}

#text-layer {
    position: absolute;
    top: 0;
    left: 0;
    z-index: 3;
    cursor: text;
}

.text-word {
    position: absolute;
    color: transparent; /* Invisible but selectable */
    user-select: text;
}
Why This Works:
#image-canvasisrelative- establishes positioning context#highlight-canvasand#text-layerareabsolute- overlay on top- Z-index layering: image(1) → highlights(2) → text(3)
pointer-events: noneon highlights allows text selection underneath
Step 4: Initialize Dynamic Web TWAIN in Headless Mode
// Configuration
Dynamsoft.DWT.ProductKey = "YOUR-LICENSE-KEY";
Dynamsoft.DWT.ResourcesPath = "https://unpkg.com/dwt@19.3.0/dist/";
Dynamsoft.DWT.AutoLoad = false;

let DWTObject = null;

function initDWT() {
    return new Promise((resolve, reject) => {
        Dynamsoft.DWT.CreateDWTObjectEx(
            { WebTwainId: "dwtControl" },
            function (obj) {
                DWTObject = obj;

                DWTObject.IfShowUI = false;

                // No viewer binding - we use custom canvas
                populateScanners();
                resolve();
            },
            function (err) {
                reject(err);
            }
        );
    });
}
Key Points:
- No
.Bind()call - Complete UI independence - DWT only handles scanning and OCR
Step 5: Create the IndexedDB Schema for Document Storage
const DB_NAME = "DocuScanOCR";
const STORE_NAME = "documents";

const dbPromise = new Promise((resolve, reject) => {
    const request = indexedDB.open(DB_NAME, 2);

    request.onupgradeneeded = (event) => {
        const db = event.target.result;

        if (!db.objectStoreNames.contains(STORE_NAME)) {
            const store = db.createObjectStore(STORE_NAME, {
                keyPath: "id",
                autoIncrement: true
            });
            store.createIndex("timestamp", "timestamp", { unique: false });
        }
    };

    request.onsuccess = (event) => resolve(event.target.result);
    request.onerror = (event) => reject(event.target.errorCode);
});
Document Schema:
{
    id: 1,                    // Auto-increment
    imageData: "data:image/png;base64,...",  // Base64 image
    ocrText: "Full extracted text...",       // Searchable text
    words: [                  // Word coordinates for highlighting
        {text: "Hello", x: 120, y: 45, width: 80, height: 25},
        {text: "World", x: 210, y: 45, width: 85, height: 25}
    ],
    timestamp: 1706025600000
}
Step 6: Scan Documents and Extract OCR Text with Coordinates
Step 1: Acquire Image from Scanner
async function acquireImage() {
    const devices = await DWTObject.GetDevicesAsync();
    const device = devices[selectedIndex];

    await DWTObject.SelectDeviceAsync(device);

    const startCount = DWTObject.HowManyImagesInBuffer;

    await DWTObject.AcquireImageAsync({
        IfCloseSourceAfterAcquire: true
    });

    const endCount = DWTObject.HowManyImagesInBuffer;

    // Process newly scanned images
    for (let i = startCount; i < endCount; i++) {
        await processAndSaveImage(i);
    }

    // Clear buffer after saving
    DWTObject.RemoveAllImages();
}
Step 2: Convert to Base64
const imageData = await new Promise((resolve, reject) => {
    DWTObject.ConvertToBase64(
        [dwtIndex],
        Dynamsoft.DWT.EnumDWT_ImageType.IT_PNG,
        function(result, indices, type) {
            const dataURL = `data:image/png;base64,${result.getData(0, result.getLength())}`;
            resolve(dataURL);
        },
        function(errorCode, errorString) {
            reject(new Error(errorString));
        }
    );
});
Step 3: Perform OCR and Extract Coordinates
async function processAndSaveImage(dwtIndex) {
    // Convert to base64
    const imageData = await convertToBase64(dwtIndex);

    // Perform OCR
    let ocrText = "";
    let words = [];

    if (DWTObject.Addon && DWTObject.Addon.OCRKit) {
        const result = await DWTObject.Addon.OCRKit.Recognize(dwtIndex, {
            settings: { language: "eng" }
        });

        // Extract text and coordinates
        if (result && result.blocks) {
            result.blocks.forEach((block) => {
                if (block.lines) {
                    block.lines.forEach((line) => {
                        if (line.words) {
                            line.words.forEach((word) => {
                                ocrText += word.value + " ";

                                // Extract geometry and convert to x, y, width, height
                                if (word.geometry) {
                                    const geo = word.geometry;
                                    words.push({
                                        text: word.value,
                                        x: geo.left,
                                        y: geo.top,
                                        width: geo.right - geo.left,
                                        height: geo.bottom - geo.top
                                    });
                                }
                            });
                            ocrText += "\n";
                        }
                    });
                }
            });
        }
    }

    // Save to IndexedDB
    await saveDocument(imageData, ocrText.trim(), words);
}
Understanding OCR Geometry:
- OCRKit returns
geometry: {left, top, right, bottom} - We convert to
{x, y, width, height}for easier use - Coordinates are in original image dimensions
Step 7: Render Scanned Images on Canvas with Coordinate Transformation
function displayCurrentImage() {
    const doc = documents[currentImageIndex];
    const img = new Image();

    img.onload = function() {
        // Calculate display size (scale to fit viewport)
        const maxWidth = window.innerWidth * 0.9;
        const maxHeight = window.innerHeight * 0.75;

        let displayWidth = img.width;
        let displayHeight = img.height;

        if (displayWidth > maxWidth || displayHeight > maxHeight) {
            const scale = Math.min(maxWidth / displayWidth, maxHeight / displayHeight);
            displayWidth = Math.floor(displayWidth * scale);
            displayHeight = Math.floor(displayHeight * scale);
        }

        // Resize both canvases
        imageCanvas.width = displayWidth;
        imageCanvas.height = displayHeight;
        highlightCanvas.width = displayWidth;
        highlightCanvas.height = displayHeight;

        // Draw scaled image
        imageCtx.clearRect(0, 0, imageCanvas.width, imageCanvas.height);
        imageCtx.drawImage(img, 0, 0, displayWidth, displayHeight);

        // Calculate scale factors for coordinate transformation
        const scaleX = displayWidth / img.width;
        const scaleY = displayHeight / img.height;

        // Render text layer and highlights
        renderTextLayer(doc.words, scaleX, scaleY);
    };

    img.src = doc.imageData;
}
Critical Concept: Coordinate Transformation
OCR coordinates are in original image dimensions, but we display scaled images. We must transform coordinates:
const scaleX = displayWidth / originalWidth;
const scaleY = displayHeight / originalHeight;

const displayX = ocrX * scaleX;
const displayY = ocrY * scaleY;
Step 8: Build a Transparent Text Selection Layer Over the Image
Create invisible but selectable text spans positioned over the image:
function renderTextLayer(words, scaleX = 1, scaleY = 1) {
    const textLayer = document.getElementById('text-layer');

    // Match canvas dimensions
    textLayer.style.width = imageCanvas.width + 'px';
    textLayer.style.height = imageCanvas.height + 'px';

    textLayer.innerHTML = '';

    words.forEach(word => {
        if (word.width > 0 && word.height > 0) {
            const span = document.createElement('span');
            span.textContent = word.text;
            span.className = 'text-word';

            // Transform coordinates
            span.style.left = (word.x * scaleX) + 'px';
            span.style.top = (word.y * scaleY) + 'px';
            span.style.width = (word.width * scaleX) + 'px';
            span.style.height = (word.height * scaleY) + 'px';

            // Scale font size
            span.style.fontSize = (word.height * scaleY * 0.8) + 'px';

            // Invisible but selectable
            span.style.color = 'transparent';
            span.style.userSelect = 'text';

            textLayer.appendChild(span);
        }
    });
}
How It Works:
- Each word becomes a
<span>positioned absolutely - Font size matches original text height
color: transparentmakes text invisibleuser-select: textenables selection- User can click and drag to select text like a normal document!
Step 9: Implement Full-Text Search with Highlight Navigation
Search Implementation
async function searchText() {
    const query = document.getElementById("search-input").value.trim().toLowerCase();

    searchMatches = [];

    documents.forEach((doc, docIndex) => {
        if (doc.ocrText.toLowerCase().includes(query)) {
            const matchingWords = [];

            doc.words.forEach(word => {
                if (word.text.toLowerCase().includes(query)) {
                    matchingWords.push(word);
                }
            });

            if (matchingWords.length > 0) {
                searchMatches.push({ docIndex, words: matchingWords });
            }
        }
    });

    if (searchMatches.length > 0) {
        currentMatchIndex = 0;
        navigateToMatch(0);
    }
}
Drawing Highlights on Canvas
function drawHighlightsOnCanvas(words, scaleX = 1, scaleY = 1) {
    highlightCtx.clearRect(0, 0, highlightCanvas.width, highlightCanvas.height);

    words.forEach((word) => {
        if (word.width > 0 && word.height > 0) {
            // Transform coordinates
            const x = word.x * scaleX;
            const y = word.y * scaleY;
            const width = word.width * scaleX;
            const height = word.height * scaleY;

            // Draw yellow semi-transparent box
            highlightCtx.fillStyle = 'rgba(255, 255, 0, 0.4)';
            highlightCtx.fillRect(x, y, width, height);

            // Draw border for emphasis
            highlightCtx.strokeStyle = 'rgba(255, 180, 0, 1)';
            highlightCtx.lineWidth = 3;
            highlightCtx.strokeRect(x, y, width, height);
        }
    });
}
Search Navigation
function navigateToMatch(index) {
    currentMatchIndex = index;
    const match = searchMatches[index];

    // Navigate to the document containing the match
    currentImageIndex = match.docIndex;
    displayCurrentImage();

}

function nextMatch() {
    if (searchMatches.length === 0) return;
    const nextIndex = (currentMatchIndex + 1) % searchMatches.length;
    navigateToMatch(nextIndex);
}

function previousMatch() {
    if (searchMatches.length === 0) return;
    const prevIndex = (currentMatchIndex - 1 + searchMatches.length) % searchMatches.length;
    navigateToMatch(prevIndex);
}
Step 10: Add Document Management (Delete and Clear)
async function removeSelected() {
    const doc = documents[currentImageIndex];
    await deleteDocument(doc.id);
    await loadDocumentsFromDB();

    // Adjust index if needed
    if (currentImageIndex >= documents.length && documents.length > 0) {
        currentImageIndex = documents.length - 1;
    }

    clearHighlights();
}

async function removeAll() {
    if (!confirm("Remove all documents?")) return;

    await clearAllDocuments();
    await loadDocumentsFromDB();

    clearHighlights();
    currentImageIndex = 0;
}
Running the Application Locally
To run the application locally, follow these steps:
- Serve via HTTP server (required for TWAIN SDK):
# Python 3 python -m http.server 8000 # Node.js npx http-server -p 8000 -
Open
http://localhost:8000in a modern web browser.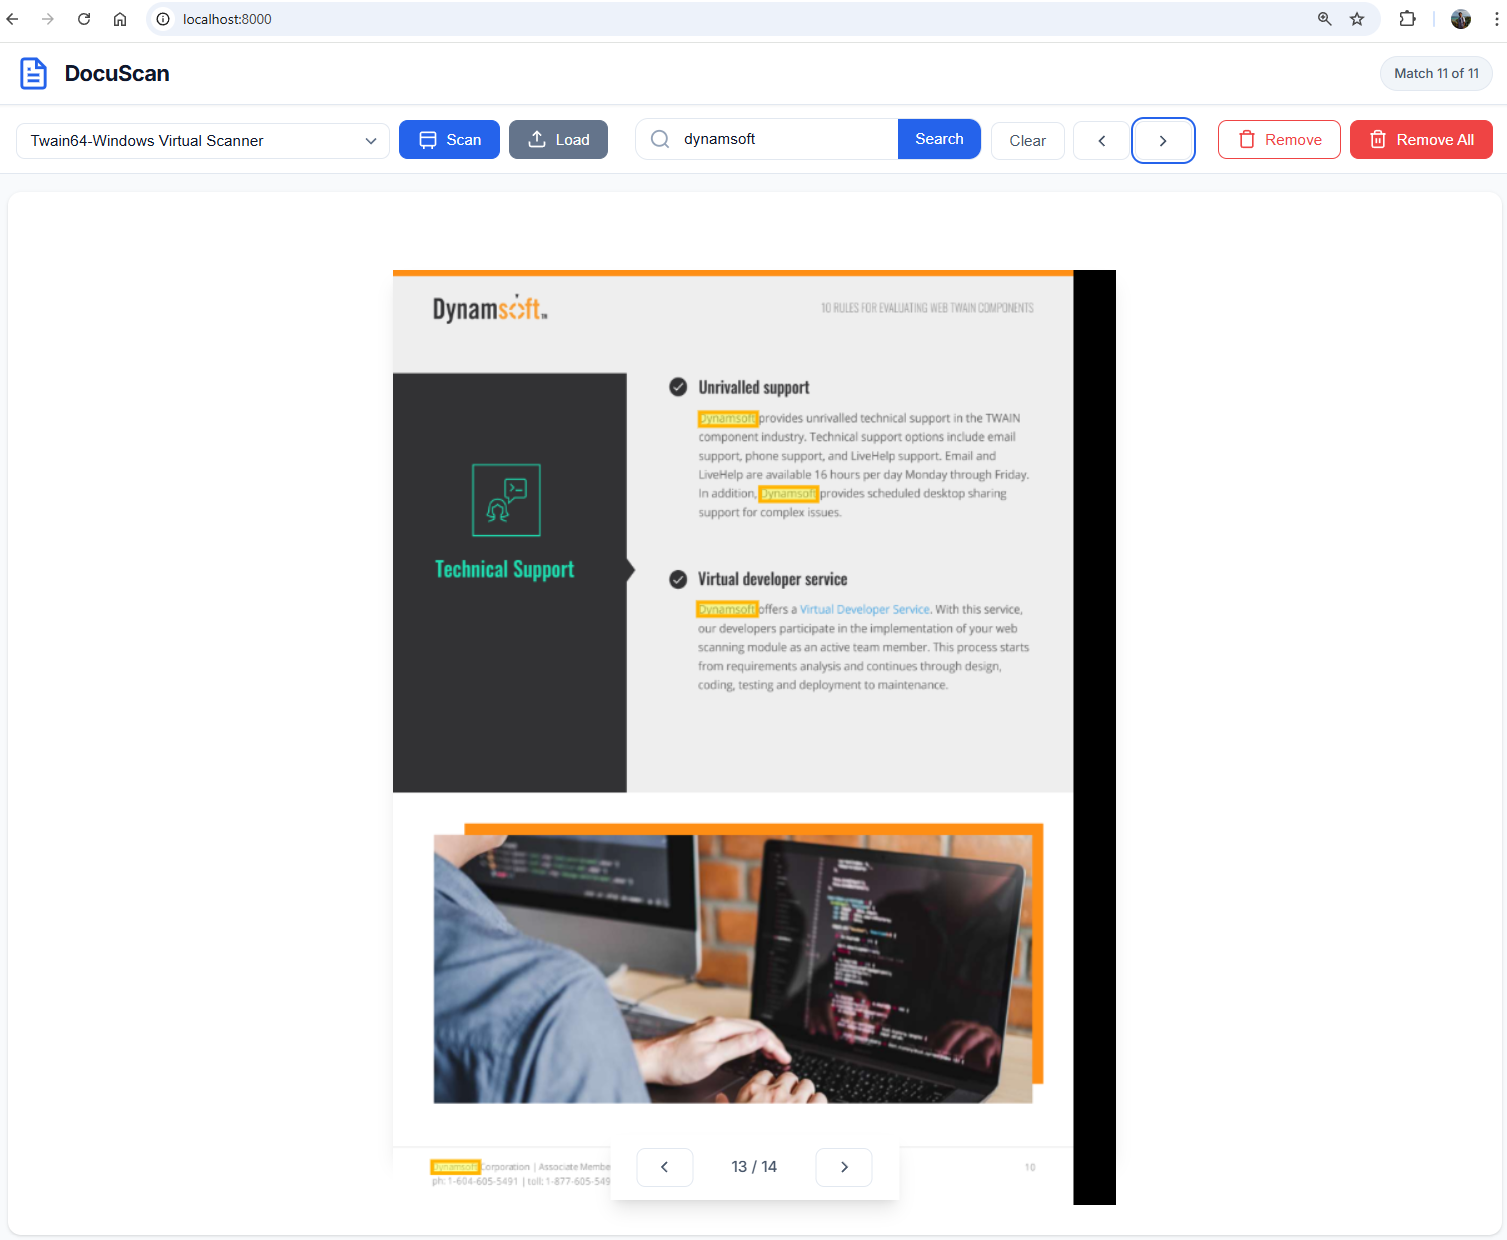
Common Issues & Edge Cases
OCR returns empty text for some scanned pages
This usually happens when the image resolution is too low (below 200 DPI) or the scan is too dark or blurry. Re-scan at 300 DPI or higher, and ensure the scanner brightness is set appropriately.
Highlights appear misaligned on the image
OCR coordinates are in the original image pixel space. If the canvas display size changes (for example, after a window resize), you must re-render the text layer and highlights with updated scaleX and scaleY values. Without a resize handler, the highlights will drift after the browser window changes size.
Text selection doesn’t work in some browsers
The transparent text overlay depends on user-select: text and absolute positioning. Older versions of Safari may not handle color: transparent with selection correctly. A workaround is to use color: rgba(0,0,0,0.01) instead.
IndexedDB storage fills up with large scan batches
Each scanned page stores a full Base64-encoded PNG image plus OCR text and coordinates. For high-volume scanning, consider compressing images to JPEG before storage, or offloading storage to a server-side database.