


Build a Vue.js Document Scanning App with Dynamic Web TWAIN
Wrapping an HTML element as a component is a common front-end development pattern. This tutorial builds a component-based document scanning app using Vue.js, Vuetify, and Dynamic Web TWAIN.
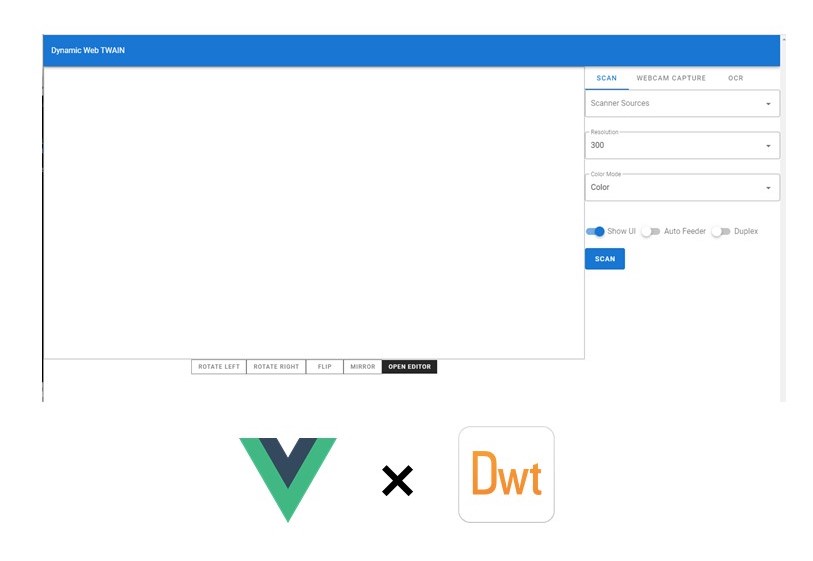
What you’ll build: A Vue.js component-based document scanning app with scan, webcam capture, and OCR panels, powered by Dynamic Web TWAIN and Vuetify.
Key Takeaways
- Dynamic Web TWAIN integrates into Vue.js as a reusable component via
CreateDWTObjectEx— no iframe or third-party plugin required. - The SDK’s
BindViewerAPI connects the scanned image buffer directly to a Vue-managed DOM element for real-time preview and editing. - Separating the app into
Scan.vue,Viewer.vue, andWebcam.vuecomponents keeps each scanning feature isolated and independently maintainable. - This component pattern supports scan, webcam capture, and OCR in one cohesive Vue app, suitable for enterprise document workflows.
Common Developer Questions
How do I integrate Dynamic Web TWAIN into a Vue.js component?
Create the SDK object with CreateDWTObjectEx() in mounted(), then keep the returned reference in component state so child panels can use it for scanning and editing. That gives Vue a reusable scanner object without relying on a global viewer initialization path.
How do I bind a document scanner viewer inside a Vue single-file component?
Call BindViewer() only after the Vue component has rendered the target DOM element. Once the binding succeeds, the image buffer is displayed directly inside the Vue-managed container and stays in sync with scan or delete actions.
How do I add OCR text recognition to a Vue.js document scanning app?
Keep OCR in its own panel and invoke the SDK’s OCR add-on APIs from that dedicated component, while Scan.vue, Viewer.vue, and Webcam.vue stay focused on acquisition and display. That separation keeps the Vue app easier to maintain than mixing OCR logic into the main scan viewer.
Note:
This article uses old versions of Vue and Dynamic Web TWAIN. Check out this article for Vue 3 + Dynamic Web TWAIN 18 usage.
Prerequisites
Beforehand, we should install Dynamic Web TWAIN plus some tools to support our development. Dynamic Web TWAIN can be downloaded from https://www.dynamsoft.com/web-twain/downloads/
Modern web application development requires a Node.js environment and its accompanying package manager: NPM. If you have not installed them yet, referring to https://nodejs.dev/ and follow their tutorial to finalize your preparation work.
Once you finalized your development environment, let’s install vue-cli to help us create a project with templates: npm install -g @vue/cli
Step 1: Create the Vue Project
Vue-CLI makes rapid prototyping easily. We use the command “vue create dwt-vue” to create a project named dwt-vue. Vue-CLI provides presets of initializing a project, or you can select the features manually.
Once this step has been done, a Vue project is successfully created.
Next, we are going to import vuetify and Dynamic Web TWAIN:
vue add vuetify
npm install dwt
Finally, run the app:
npm run serve
If you see the information page of Vuetify or Vue.js, you have successfully initialized the project.
Step 2: Configure Dynamic Web TWAIN
Configure the Project Files
We installed dwt in the previous step. But that is far from ready for development. In fact, Dynamic Web TWAIN requires extra steps to configure it properly.
Firstly, we still have to install an extra package called ncp. It helps us copy files from one folder to another. In your terminal, enter:
npm install ncp
Secondly, we need to modify the command script in package.json. Since Dynamic Web TWAIN relies on the path, we need to ensure the scripts are placed under the proper folder. Open package.json with an editor and make the following changes:
"scripts": {
    "serve": "ncp node _modules/dwt/dist public/resources/dwt && vue-cli-service serve",
    "build": "vue-cli-service build && ncp node _modules/dwt/dist public/resources/dwt",
    "lint": "vue-cli-service lint"
  }
The command “ncp node_modules/dwt/dist public/resources/dwt” tells webpack to copy the resources file to the correct path. Subsequently, make the folder specified in the script:
cd public
mkdir resources
cd resources
mkdir dwt
Apply for a Trial License
Dynamic Web TWAIN is a commercial SDK that requires a license key to run. Get a 30-day free trial license for Dynamic Web TWAIN, then paste the key into the licenseKey field in DWT.vue.
Step 3: Build the Document Scanning Component
Initialize the Dynamic Web TWAIN Object
We are now well-prepared for development. It is time to write down the code.
In src/components, we create a vue template DWT.vue. Then, put the following code in the file:
<template>
  <div id="dwt-container">
  </div>
</template>

<script>
import dwt from 'dwt'

export default {
  name: 'dwt',
  data () {
    return {
      dwt: {
        obj: null,
        id: 'dwtObject',
        licenseKey: ''  // Your license key here
      }
    }
  },
  mounted () {
    this.mountDWT()
  },
  methods: {
    mountDWT () {
      return new Promise((res, rej) => {
        this.unmountDWT()
          .then(() => {
            dwt.WebTwainEnv.UseLocalService = true;
            dwt.WebTwainEnv.ResourcesPath = "resources/dwt";
            dwt.WebTwainEnv.ProductKey = this.dwt.licenseKey
            dwt.WebTwainEnv.AutoLoad = false;
            dwt.WebTwainEnv.Containers = [];
            dwt.WebTwainEnv.IfAddMD5InUploadHeader = false;
            dwt.WebTwainEnv.IfConfineMaskWithinTheViewer = false;
            let dwtConfig = { WebTwainId: this.dwt.id }
            // By default, use local service is true
            dwt.WebTwainEnv.CreateDWTObjectEx(
                  dwtConfig,
                  (dwtObject) => { this.dwt.obj = dwtObject; res(true);},
                  (errStr) => { console.log(`failed to initialize dwt, message: ${errStr}`); rej(false);}
            )
          })
      })
    },
    /**
     * Delete dwt instance
     */
    unmountDWT () {
      return new Promise((res, rej) => {
        if (dwt.WebTwainEnv.DeleteDWTObject(this.dwt.id)) {
          res(true)
        } else {
          rej(false)
        }
      })
    }
  }
}
</script>

<style scoped>

</style>
Next, import the component you just created into App.vue.
In the
<script>
import HelloWorld from './components/HelloWorld';
import DWT from './components/DWT';

export default {
  name: 'App',

  components: {
    HelloWorld,
    DWT
  },

  data: () => ({
    //
  }),
};
</script>
In the template section, we add <DWT />:
<v-main>
    <HelloWorld/>
    <DWT />
</v-main>
Save and run the serve command. Afterward, open the browser to check our webpage with the inspect tool. If you have the Vue debugging tool, you would see the instance is created successfully and mounted to the component.
DWT successfully initiated and mouted to DWT instance.
Implement the Core Scanning Feature
Now. Let’s implement our first feature, which is the essential feature of Dynamic Web TWAIN. We need a button to invoke the scan operation. Meanwhile, we delete the information page of Vuetify or Vue.js.
Add a button in the template:
<div id="dwt-control">
  <v-btn color="primary" large depressed @click="acquireImage">
    Scan
  </v-btn>
</div>
Add corresponding functions:
<div id="dwt-control">
  <v-btn color="primary" large depressed @click="acquireImage">
    Scan
  </v-btn>
</div>
Add corresponding functions:
acquireImage () {
      const DWObject = this.dwtObj;
      if (DWObject) {
        if (DWObject.UseLocalService) {
          let configure = {
            IfShowUI: this.showUI,
            PixelType: this.colorMode,
            Resolution: this.resolution,
            IfFeederEnabled: this.autoFeeder,
            IfDuplexEnabled: this.duplex,
            IfDisableSourceAfterAcquire: true,
            // Advance settings
            IfGetImageInfo: true,
            IfGetExtImageInfo: true,
            extendedImageInfoQueryLevel: 0
          }
          DWObject.SelectSourceByIndex(this.selectScanner)
          DWObject.AcquireImage(
            configure,
            () => { DWObject.CloseSource() },
            () => { DWObject.CloseSource() }
          )
        }
      }
    }
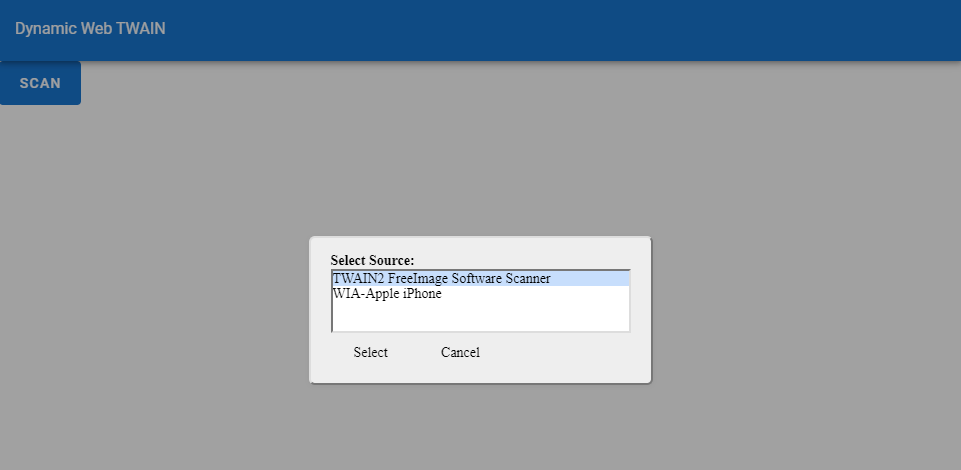
Functional WebTWAIN app: source selection
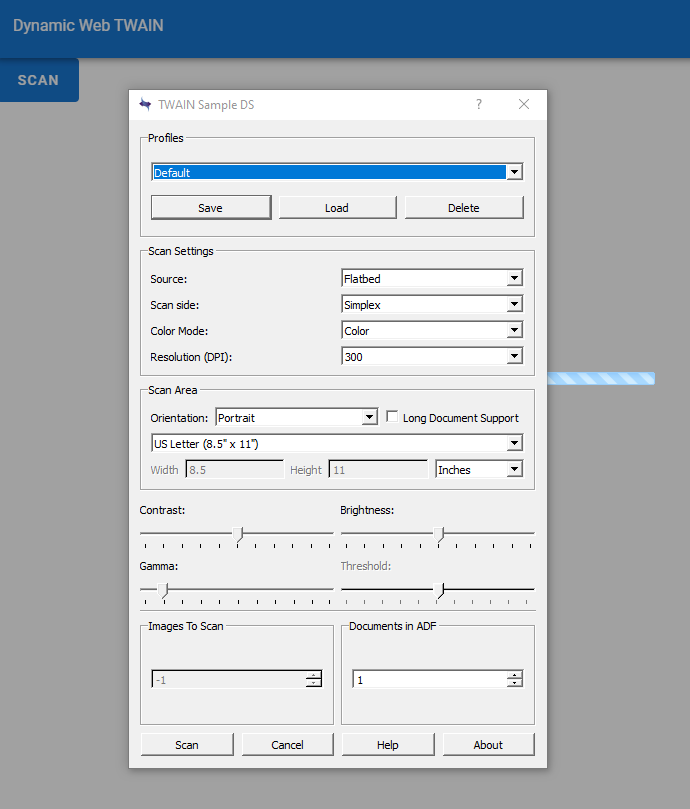
Functional WebTWAIN app: scanner setting
Bind the Document Viewer
We can scan the document with a scanner now, but how to preview the result? We need a viewer!
In of DWT.vue, we add one more <div> element to place our viewer:
<div
    :id="this.viewer.id"
    :style="{ width: this.viewer.width, height: this.viewer.height }"
>
    <!-- DWT viewer -->
</div>
In
viewer: {
    id: 'dwtViewer',
    obj: null,
    width: '100%',
    height: '400px'
}
Then, add the initialization script in methods:
bindViewer () {
      if (!this.dwt.obj) {
        alert('WebTwain Object has not been initialized yet.')
      } else {
        const dwtObj = this.dwt.obj
        let viewOptions = {
          width: this.viewer.width,
          height: this.viewer.height,
          view: {
            bShow: true,
            Width: '100%',
          }
        }
        if (dwtObj.BindViewer(this.viewer.id, viewOptions)) {
          this.viewer.obj = this.dwt.obj.Viewer
        }
      }
Finally, make changes in mounted hook:
mounted () {
    this.mountDWT()
      .then(() => {
        this.bindViewer()
      })
  }
We have finished binding the viewer.
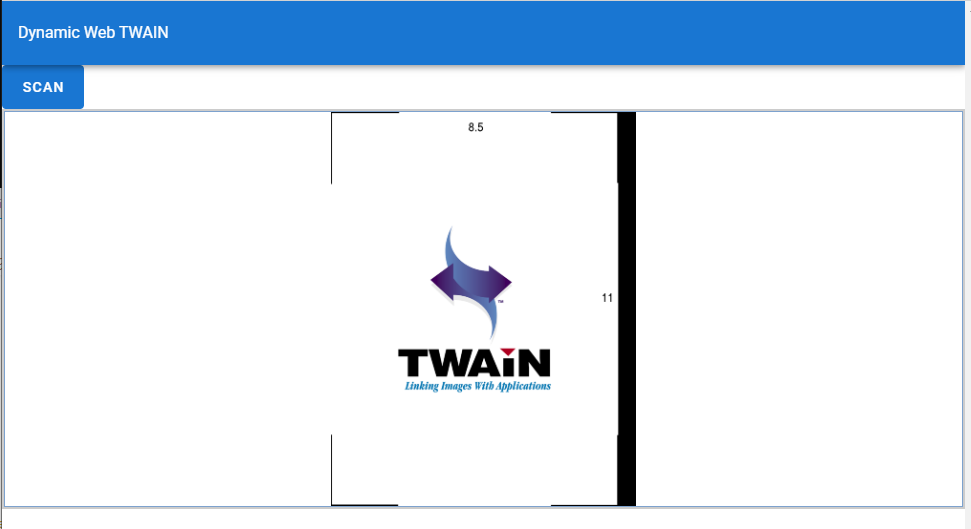
WebTWAIN app: Bind & display result
Step 4: Split the App into Reusable Vue Components
Though the app could work normally when mixing the code into a single file, it could be messy as the demands changed or features added. A better way is to split our view into several pieces of components. The benefit of making components is straightforward. When a file contains hundreds of lines of code, the maintainability decreases.
We plan two subcomponents so far, according to the features we have.
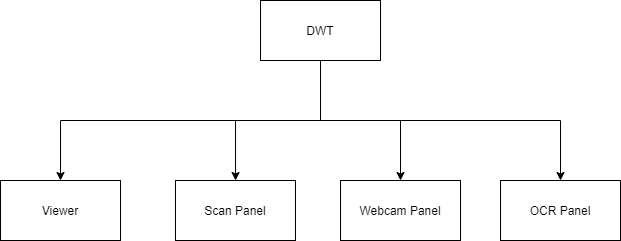
Component-based scanning app design: Component diagram
Let’s kick off by creating a folder panelunder components.
Create the Scan Panel Component
We extend the scan features to make our app do more for our users. Currently, users select the source with a popup selector. However, we need an integrated selector to guarantee the user experience is unique and consistent. Furthermore, users may hope some settings to control the scanned image is the one they want. Therefore, we list out the following features that we should do at the same time.
- Scanner sources selector
- Resolution selector
- Color type selector
- ShowUI, Duplex, and AutoFeeder switches.
We create a file (Scan.vue) to contain our scan panel. The code is shown below:
<template>
  <div id="scan-panel">
    <!-- Source selection -->
    <v-select
      v-model="selectScanner"
      :items="scanners"
      item-value="id"
      item-text="text"
      label="Scanner Sources"
      outlined
    ></v-select>
    <!-- Resolution setting -->
    <v-select
      v-model="resolution"
      :items="resolutionOptions"
      item-text="text"
      item-value="val"
      label="Resolution"
      outlined
      return-object
    ></v-select>
    <!-- Color Mode -->
    <v-select
      v-model="colorMode"
      :items="colorModeOptions"
      item-text="text"
      item-value="val"
      label="Color Mode"
      outlined
      return-object
    ></v-select>
    <div class="flex">
      <!-- Show UI Control -->
      <v-switch
        v-model="showUI"
        label="Show UI"
      ></v-switch>
      <!-- Auto Feeder Control -->
      <v-switch
        v-model="autoFeeder"
        label="Auto Feeder"
      ></v-switch>
      <!-- Duplex Control -->
      <v-switch
        v-model="duplex"
        label="Duplex"
      ></v-switch>
    </div>
    <!-- Scan button -->
    <v-btn color="primary" depressed large @click="acquireImage">Scan</v-btn>
  </div>
</template>

<script>
export default {
  name: 'scan-panel',
  props: [''],
  data () {
    return {
      dwtObj: null,
      selectScanner: null,
      scanners: [],
      colorMode: { val: 2, text: 'Color' },
      colorModeOptions: [
        { val: 0, text: 'Black & White' },
        { val: 1, text: 'Grayscale' },
        { val: 2, text: 'Color' }
      ],
      resolution: { val: 300, text: '300' },
      resolutionOptions: [
        { val: 100, text: '100' },
        { val: 150, text:'150' },
        { val: 300, text: '300' }
      ],
      showUI: true,
      autoFeeder: false,
      duplex: false
    }
  },
  methods: {
    acquireImage () {
      const DWObject = this.dwtObj;
      if (DWObject) {
        if (DWObject.UseLocalService) {
          let configure = {
            IfShowUI: this.showUI,
            PixelType: this.colorMode,
            Resolution: this.resolution,
            IfFeederEnabled: this.autoFeeder,
            IfDuplexEnabled: this.duplex,
            IfDisableSourceAfterAcquire: true,
            // Advance settings
            IfGetImageInfo: true,
            IfGetExtImageInfo: true,
            extendedImageInfoQueryLevel: 0
          }
          DWObject.SelectSourceByIndex(this.selectScanner)
          DWObject.AcquireImage(
            configure,
            () => { DWObject.CloseSource() },
            () => { DWObject.CloseSource() }
          )
        }
      }
    },
    setupScan (dwtObj) {
      this.dwtObj = dwtObj
      this.scanners = dwtObj.GetSourceNames().map((scanner, idx) => { return { id: idx, text: scanner } })
    }
  }
}
</script>

<style scoped>
.flex {
  display: flex;
  justify-content: left;
}
.flex > * {
  margin-right: 12px;;
}
</style>
Create the Viewer Component
We wrap the viewer into an independent component. Create a vue file and name it as `Viewer.vue’. Afterwards, copy the <div> element of the viewer container from DWT, then paste it into the newly created file. It needs extra manipulation to turn into a component.
In the
- Rotate image
- Call up a full-featured editor
The updated code is shown as follows:
<template>
  <div id="viewer-container" :style="{ width:width, height: height }">
    <div :id="id" style="height: inherit;"></div>
    <div id="edit-button-group">
      <v-btn outlined tile color="grey darken-1" small @click="rotate(-1)">Rotate Left</v-btn>
      <v-btn outlined tile color="grey darken-1" small @click="rotate(1)">Rotate Right</v-btn>
      <v-btn outlined tile color="grey darken-1" small @click="flip()">Flip</v-btn>
      <v-btn outlined tile color="grey darken-1" small @click="mirror()">Mirror</v-btn>
      <v-btn tile dark depressed small @click="openEditor">Open Editor</v-btn>
    </div>
  </div>
</template>

<script>
export default {
  name:'dwt-viewer',
  props: ['id', 'width', 'height', 'dwtRef'],
  data () {
    return {
      dwtObj: null,
      viewerObj: null,  // reference of viewer instance
      currIdx: 0,  // indicator of selected image
    }
  },
  methods: {
    mountViewer (dwtObj) {
      if (!dwtObj) {
        alert('WebTwain Object has not been initialized yet.')
      } else {
        let viewOptions = {
          width: this.width,
          height: this.height,
          view: {
            bShow: true,
            Width: this.width,
            Height: this.height
          }
        }
        if (dwtObj.BindViewer(this.id, viewOptions)) {
          this.dwtObj = dwtObj
          this.viewerObj = this.dwtRef.Viewer
          dwtObj.RegisterEvent('OnMouseClick', (idx) => { this.currIdx = idx })
        }
      }
    },
    rotate (direction) {
      switch (direction) {
        case -1:
        case '-1': {
          this.dwtObj.Rotate(this.currIdx, -90, true);
          break;
        }
        case 1:
        case '1': {
          this.dwtObj.Rotate(this.currIdx, 90, true);
          break;
        }
      }
    },
    flip: function() {
      this.dwtObj.Flip(this.currIdx);
    },
    mirror: function() {
      this.dwtObj.Mirror(this.currIdx);
    },
    openEditor: function () {
      if (this.dwtObj) {
        this.dwtObj.ShowImageEditor()
      }
    }
  }
}
</script>

<style scoped>
#viewer-container {
  box-sizing: content-box;
  text-align: center;
  /* width: 100%;
  height: inherit; */
}
#edit-button-group {
  display: inline-block;
}
.inherit-width {
  width: inherit;
}
.inherit-height {
  height: inherit;
}
</style>
Add Tab-Based Panel Navigation
We extend the scan features to make our app do more for our users. Currently, users select the source with a popup selector. However, we need an integrated selector to guarantee the user experience is unique and consistent. Furthermore, users may hope some settings to control the scanned image is the one they want. Therefore, we list out the following features that we should do at the same time.
We introduce a switch widget to jump between different feature panels. It makes our extending work easier by adding new switch options and corresponding panel components.
Assemble the Components into DWT.vue
We have finished the implementation of components. Now we can assemble them altogether. In `DWT.vue’, we completely rewrite the code into the following one:
<template>
  <div id="dwt-container">
    <Viewer
      :id="this.viewer.id"
      :ref="this.viewer.id"
      :dwtRef="this.dwt.obj"
      :width="this.viewer.width"
      :height="this.viewer.height"
    >
      <!-- DWT viewer -->
    </Viewer>
    <v-tabs id="dwt-control">
      <v-tab :key="0">Scan</v-tab>
      <v-tab :key="1">Camera Capture</v-tab>
      <v-tab :key="2">OCR</v-tab>
      <v-tab-item :key="0">
        <Scan :ref="'scan-panel'"></Scan>
      </v-tab-item>
    </v-tabs>
  </div>
</template>

<script>
import dwt from 'dwt'
import Viewer from '@/components/panel/Viewer'
import Scan from '@/components/panel/Scan'

export default {
  name: 'dwt',
  components: {
    Viewer,
    Scan
  },
  data () {
    return {
      dwt: {
        obj: null,
        id: 'dwtObject',
        licenseKey: ''	// Your licenseKey
      },
      viewer: {
        id: 'dwtViewer',
        width: '100%',
        height: '600px'
      }
    }
  },
  mounted () {
    this.mountDWT()
      .then(() => {
        this.initPanels()
        this.bindViewer()
      })
  },
  methods: {
    bindViewer () {
      this.$refs[this.viewer.id].mountViewer(this.dwt.obj)
    },
    mountDWT () {
      return new Promise((res, rej) => {
        this.unmountDWT()
          .then(() => {
            dwt.WebTwainEnv.UseLocalService = true;
            dwt.WebTwainEnv.ResourcesPath = "resources/dwt";
            dwt.WebTwainEnv.ProductKey = this.dwt.licenseKey
            dwt.WebTwainEnv.AutoLoad = false;
            dwt.WebTwainEnv.Containers = [];
            dwt.WebTwainEnv.IfAddMD5InUploadHeader = false;
            dwt.WebTwainEnv.IfConfineMaskWithinTheViewer = false;
            let dwtConfig = { WebTwainId: this.dwt.id }
            // By default, use local service is true
            dwt.WebTwainEnv.CreateDWTObjectEx(
                  dwtConfig,
                  (dwtObject) => { this.dwt.obj = dwtObject; res(true);},
                  (errStr) => { console.log(`failed to initialize dwt, message: ${errStr}`); rej(false);}
            )
          })
      })
    },
    /**
     * Delete dwt instance
     */
    unmountDWT () {
      return new Promise((res, rej) => {
        if (dwt.WebTwainEnv.DeleteDWTObject(this.dwt.id)) {
          res(true)
        } else {
          rej(false)
        }
      })
    },
    initPanels () {
      this.$refs['scan-panel'].setupScan(this.dwt.obj)
    }
  },
}
</script>

<style scoped>
#dwt-container {
  display: flex;
  height: inherit;
  width: inherit;
}
#dwt-control {
  max-width: 400px;
}
</style>
Step 5: Add Webcam Capture and OCR
Add Webcam Capture
We can implement other feature panels in the same way. Now, let us implement webcam capture. We define its layout and expose a method named setupWebcam. In this method, it accepts several arguments. It is free to determine what arguments to pass. Here, we specify ssl, rotateMode, and dwtObj as the required arguments. The method retrieves the webcam addon from dwtObj, video rotation parameters from rotateMode, and the SSL status from ssl:
<template>
  <div id="webcam-panel">
    <!-- Source selection -->
    <v-select
      v-model="selectedWebcam"
      :items="webcamSources"
      item-value="val"
      item-text="text"
      label="Webcam Sources"
      outlined
    ></v-select>
    <!-- Resolution setting -->
    <v-select
      v-model="resolution"
      :items="resolutionOptions"
      item-text="text"
      item-value="val"
      label="Resolution"
      outlined
    ></v-select>
    <!-- Framerates -->
    <v-select
      v-model="framerate"
      :items="framerateOptions"
      item-text="text"
      item-value="val"
      label="Frame Rate"
      outlined
    ></v-select>
    <!-- Color Mode -->
    <v-select
      v-model="mediaType"
      :items="mediaTypeOptions"
      item-text="text"
      item-value="val"
      label="Media Type"
      outlined
    ></v-select>
    <!-- Rotation -->
    <v-select
      v-model="rotate"
      :items="rotationOptions"
      item-text="text"
      item-value="val"
      label="Rotation"
      outlined
    ></v-select>
    <!-- Operation button group -->
    <v-btn color="primary" depressed large @click="capture">Capture</v-btn>
    <v-btn depressed large @click="toggleLiveView">Live Viewing {{ liveViewing ? 'OFF':'ON' }}</v-btn>
  </div>
</template>

<script>
export default {
  name: 'webcam-panel',
  props: ['ssl', 'rotateMode'],
  data () {
    return {
      dwtObj: null,
      webcamObj: null,
      selectedWebcam: null,
      webcamSources: [],
      resolution: null,
      resolutionOptions: [],
      mediaType: null,
      mediaTypeOptions: [],
      framerate: null,
      framerateOptions: [],
      rotate: 0,
      rotationOptions: [],
      liveViewing: false
    }
  },
  watch: {
    selectedWebcam () {
        this.updateWebcamOptions()
    }
  },
  methods: {
    setupWebcam (ssl, rotateMode, dwtObj) {
      this.dwtObj = dwtObj
      this.webcamObj = dwtObj.Addon.Webcam
      // Set rotate mode
      const rotation = [
        { text: 'OFF', val: rotateMode.VRM_NONE },
        { text: 'CLOCKWISE 90°', val: rotateMode.VRM_90_DEGREES_CLOCKWISE },
        { text: 'CLOCKWISE 180°', val: rotateMode.VRM_180_DEGREES_CLOCKWISE },
        { text: 'CLOCKWISE 270°', val: rotateMode.VRM_270_DEGREES_CLOCKWISE },
        { text: 'FLIP VERTICAL', val: rotateMode.VRM_FLIP_VERTICAL },
        { text: 'FLIP HORIZONTAL', val: rotateMode.VRM_FLIP_HORIZONTAL }
      ]
      this.rotationOptions = rotation
      // Set Default Webcam
      if (ssl) {
        dwtObj.IfSSL = true
        dwtObj.HTTPPort = 443
      }
      this.webcamSources = this.webcamObj.GetSourceList().map(e => { return { text: e, val: e } })
    },
    updateWebcamOptions () {
      this.webcamObj.StopVideo()
      this.webcamObj.SelectSource(this.selectedWebcam)

      function ObjToArr(obj) {
        let count = obj.GetCount()
        let arr = []
        for (let i = 0; i < count; i++) {
          arr.push({ text: obj.Get(i), val: obj.Get(i) })
        }
        return arr
      }

      new Promise((res) => {
        this.framerateOptions = ObjToArr(this.webcamObj.GetFrameRate())
        this.resolutionOptions = ObjToArr(this.webcamObj.GetResolution())
        this.mediaTypeOptions = ObjToArr(this.webcamObj.GetMediaType())
        res()
      })
      .then(() => {
        this.resolution = this.resolutionOptions[0]
        this.mediaType = this.mediaTypeOptions[0]
        this.framerate = this.framerateOptions[0]
      })
    },
    updateWebcamSetting () {
      if (this.liveViewing) { this.webcamObj.StopVideo() }
      this.webcamObj.SetFrameRate(this.framerate)
      this.webcamObj.SetMediaType(this.mediaType)
      this.webcamObj.SetResolution(this.resolution)
      this.webcamObj.SetVideoRotateMode(this.rotate)
      if (this.liveViewing) { this.webcamObj.PlayVideo() }
    },
    capture () {
      if (this.liveViewing) { this.toggleLiveView(false) }
      this.webcamObj.CaptureImage(()=>{}, (errCode, errStr) => { console.error(`${errCode} - ${errStr}`) })
    },
    toggleLiveView () {
      if (this.liveViewing) { this.setVideoPlayback(false) }
      else { this.setVideoPlayback(true) }
    },
    setVideoPlayback (show) {
      if (show) {
        this.webcamObj.StopVideo()
        setTimeout(
          () => {
            this.webcamObj.PlayVideo(this.dwtObj, 80, () => {})
            this.liveViewing = true
          },
          30
        )
      } else {
        this.webcamObj.StopVideo()
        this.liveViewing = false
      }
    }
  },
}
</script>
Last step, do not forget to import your newly implemented Webcam Panel to DWT.
Add OCR Text Recognition
OCR is more complex than Webcam capture since it requires more dependencies to download. However, it is not a difficult problem with the same methodology. We pass the resource path, download the core DLL indicator, dwt object, and dwt library as the setup method’s arguments. Inside the method, we recursively download the core DLL and language pack sequentially. Finally, we configure the OCR object and dwt library to the data field:
<template>
  <div id="ocr-panel">
    <v-btn depressed color="primary" @click="doOCR">Recognize</v-btn>
    <div class="outlined-box">
      <p v-for="(text, idx) in result" :key="idx">{{ text }}</p>
    </div>
  </div>
</template>

<script>
export default {
  name: 'ocr-panel',
  data () {
    return {
      ocrObj: null,
      dwtLib: null,
      result: ''
    }
  },
  methods: {
    setupOcr (resPath, downloadDLL, dwtObj, dwtLib) {
      new Promise((res, rej) => {
        const ocrObj = dwtObj.Addon.OCR
        let corePath = resPath + '/addon/OCR.zip'
        let langPath = resPath + '/addon/OCRBasicLanguages/English.zip'

        if (downloadDLL) {
          ocrObj.Download(
            corePath,
            this.setupOcr(resPath, false, dwtObj, dwtLib),
            (errCode, errStr) => {
              rej({errCode: errCode, errStr: errStr})
            }
          )
        } else {
          ocrObj.DownloadLangData(
            langPath,
            () => { res([ocrObj, dwtLib]); },
            (errCode, errStr) => {
              rej({errCode: errCode, errStr: errStr})
            }
          )
        }
      })
      .then((ocr) => {
        this.ocrObj = ocr[0]
        this.dwtLib = ocr[1]
      })
    },
    doOCR () {
      this.ocrObj.SetLanguage('eng')
      this.ocrObj.SetOutputFormat(0)
      this.ocrObj.RecognizeSelectedImages(
        (result) => {
          let _textResult = this.dwtLib.base64.decode(result.Get()).split(/\r?\n/g)
          let res = []
           for (let i = 0; i < _textResult.length; i++) {
            if (!_textResult[i].trim()) { continue }
            res.push(_textResult[i].trim() + '\n')
          }
          this.result = res
        },
        (errCode, errStr) => {
          console.error(`${errCode} - ${errStr}`)
        }
      )
    }
  }
}
</script>

<style scoped>
.outlined-box {
  border: 1px solid black;
}
</style>
Now, we have finished the implementation of our application. It is time to test our outcome. Open your terminal and cd into your project folder, then type npm run serve to have a try. If the compiler does not output anything wrong, you can see the following page.
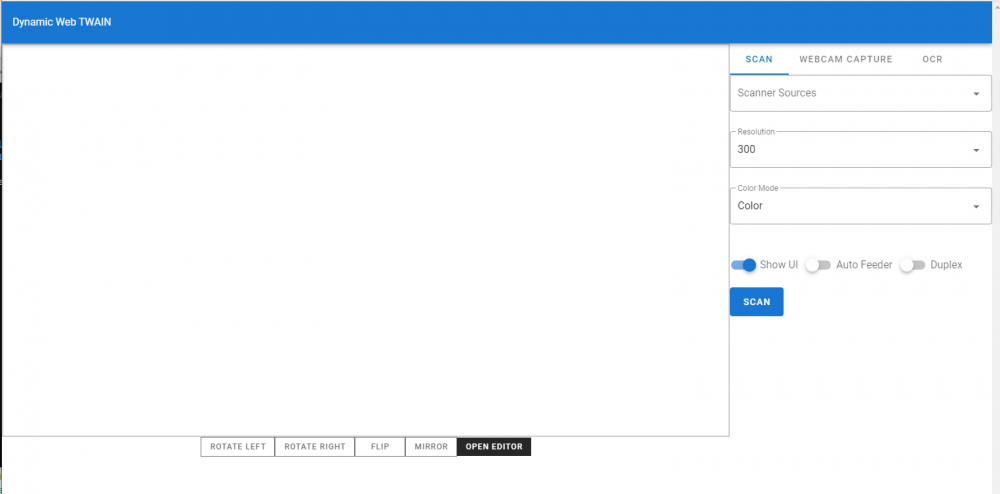
Component-based WebTWAIN application: Scan Panel
Common Issues & Edge Cases
CreateDWTObjectExnever resolves: The Dynamic Web TWAIN local service may not be installed or running. Ensure the Dynamsoft Service installer from/resources/dwt/has been run on the end user’s machine, and that ports 18622/18623 are not blocked by a firewall.- Blank viewer after
BindViewer: This usually means the container<div>was not yet mounted whenBindViewerwas called. Always invokeBindViewerinsidemounted()after theCreateDWTObjectExPromise resolves, not insidecreated(). - OCR DLL download fails silently: The
ocrObj.Downloaderror callback fires only if the DLL is absent from cache. Verify network access to theOCR.zippath and confirm thatResourcesPathpoints to the correct/resources/dwt/addon/folder.