


How to Build an Angular MRZ Scanner and Passport Reader App
The Dynamsoft Capture Vision SDK (DCV) is a modular and unified SDK that integrates barcode scanning, document detection, MRZ recognition, and more under a single pipeline-based API. One of its key modules is the MRZ scanner, which provides machine-readable zone recognition for passports, visas, and other travel documents.
This article focuses on the MRZ (Machine Readable Zone) recognition capabilities of the Dynamsoft Capture Vision SDK. You will learn how to integrate the SDK into an Angular web application to perform MRZ scanning from both image files and live camera streams.
What you’ll build: A fully functional Angular web application that reads passport MRZ zones from uploaded images and live camera feeds, extracts structured traveler data (name, nationality, document number, dates), and displays parsed results in real time — powered by the Dynamsoft Capture Vision SDK.
Key Takeaways
- The Dynamsoft Capture Vision SDK provides a unified, pipeline-based API for MRZ recognition in Angular apps, supporting TD1, TD2, and TD3 document types (passports, visas, and national ID cards).
- MRZ reading from static image files uses
CaptureVisionRouter.capture()with aReadMRZtemplate, while real-time camera scanning usesCameraEnhancerbound to the same router. - The
CodeParsermodule converts raw two-line or three-line MRZ strings into structured fields — surname, given name, nationality, passport number, birth date, and expiry date — without manual regex parsing. - This approach works on all modern browsers and supports both desktop webcams and mobile device cameras through the
CameraEnhancerAPI.
Common Developer Questions
How do I read passport MRZ data in an Angular web application?
Initialize CaptureVisionRouter with assets/template.json and run capture(file, "ReadMRZ") after image upload to detect MRZ text lines. The component then renders detection overlays and shows parsed output in a textarea for immediate verification.
What JavaScript SDK can scan and parse MRZ from a live camera stream in the browser?
Dynamsoft Capture Vision SDK can scan and parse MRZ from a live camera stream in the browser using CameraEnhancer and CameraView, bound to CaptureVisionRouter with startCapturing("ReadMRZ"). Detected text lines are returned through addResultReceiver callbacks, where each MRZ line is parsed and displayed in real time.
How do I extract structured passport fields (name, nationality, expiry) from an MRZ image using TypeScript?
Dynamsoft Capture Vision’s CodeParser module passes each detected MRZ string to CodeParser.parse() and maps the ParsedResultItem fields in handleMrzParseResult(). That mapping includes document type, issuing state, surname, given name, nationality, passport or document number, and normalized birth and expiry dates with century handling.
This article is Part 4 in a 5-Part Series.
- Part 1 - How to Implement Web TWAIN Document Scanning in an Angular Application
- Part 2 - Build an Angular Barcode and QR Code Scanner Component with Dynamsoft Capture Vision
- Part 3 - How to Build an Angular Document Scanner with Edge Detection and Auto-Crop
- Part 4 - How to Build an Angular MRZ Scanner and Passport Reader App
- Part 5 - How to Build an Angular PDF Viewer with Image Annotation and PDF Export
See the Angular MRZ Scanner in Action
Prerequisites
- Node.js
-
Angular CLI
npm install -g @angular/cli ng --version -
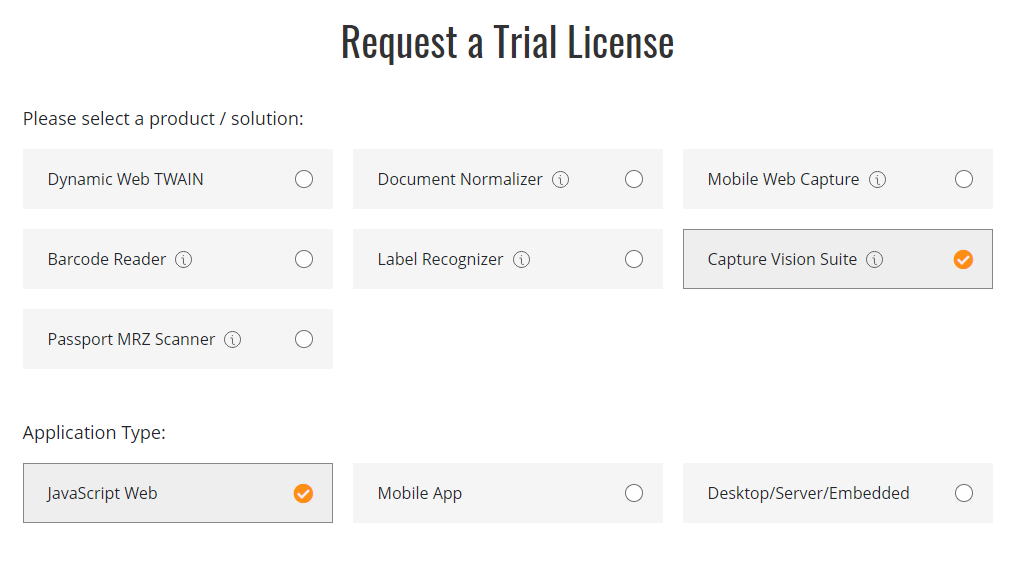
Get a 30-day free trial license for Dynamsoft Capture Vision.
Step 1: Install the Dynamsoft Capture Vision SDK
-
Install the SDK: Use npm to download and install the necessary packages
dynamsoft-capture-vision-bundleanddynamsoft-capture-vision-data.npm i dynamsoft-capture-vision-bundle dynamsoft-capture-vision-dataExplanation
- The
dynamsoft-capture-vision-bundlepackage contains the core library of Dynamsoft Capture Vision. - The
dynamsoft-capture-vision-datapackage provides model files for Dynamsoft Capture Vision.
- The
-
Configure Asset Path: Update
angular.jsonto include the paths to the new packages."assets": [ "src/favicon.ico", "src/assets", ... { "glob": "**/*", "input": "./node_modules/dynamsoft-capture-vision-bundle/dist", "output": "assets/dynamsoft-capture-vision-bundle" }, { "glob": "**/*", "input": "./node_modules/dynamsoft-capture-vision-data", "output": "assets/dynamsoft-capture-vision-data" }, ], -
Update Resource Paths in TypeScript Code: Define the full resource paths in the
CoreModule.engineResourcePathsobject within theproduct-list.component.tsfile.export function getFullUrl(endpoint: string): string { let baseUrl = `${window.location.protocol}//${window.location.host}${window.location.pathname}`; return `${baseUrl}${endpoint}`; } CoreModule.engineResourcePaths = { dcvBundle: getFullUrl('assets/dynamsoft-capture-vision-bundle/'), dcvData: getFullUrl('assets/dynamsoft-capture-vision-data/'), };
Step 2: Create the MRZ Reader and Scanner Components
-
Generate Components: Use the Angular CLI to create two new components: MRZ Reader and MRZ Scanner.
ng generate component mrz-reader ng generate component mrz-scanner -
Configure Routing: Update the
app-routing.module.tsfile to include routes for the new components.import { NgModule } from '@angular/core'; import { RouterModule, Routes } from '@angular/router'; import { ProductListComponent } from './product-list/product-list.component'; import { BarcodeReaderComponent } from './barcode-reader/barcode-reader.component'; import { BarcodeScannerComponent } from './barcode-scanner/barcode-scanner.component'; import { FileDetectionComponent } from './file-detection/file-detection.component'; import { CameraDetectionComponent } from './camera-detection/camera-detection.component'; import { MrzReaderComponent } from './mrz-reader/mrz-reader.component'; import { MrzScannerComponent } from './mrz-scanner/mrz-scanner.component'; const routes: Routes = [ { path: '', component: ProductListComponent }, { path: 'barcode-reader', component: BarcodeReaderComponent }, { path: 'barcode-scanner', component: BarcodeScannerComponent }, { path: 'file-detection', component: FileDetectionComponent }, { path: 'camera-detection', component: CameraDetectionComponent }, { path: 'mrz-reader', component: MrzReaderComponent }, { path: 'mrz-scanner', component: MrzScannerComponent } ]; -
Update Product List Template: Add navigation links to the new components in the
product-list.component.htmlfile.<h3> <div> <ng-template [ngIf]="product.id === 'reader'"> <a [title]="product.name + ' details'" [routerLink]="['/barcode-reader']">> </a> </ng-template> </div> <div> <ng-template [ngIf]="product.id === 'scanner'"> <a [title]="product.name + ' details'" [routerLink]="['/barcode-scanner']">> </a> </ng-template> </div> <div> <ng-template [ngIf]="product.id === 'file-detection'"> <a [title]="product.name + ' details'" [routerLink]="['/file-detection']">> </a> </ng-template> </div> <div> <ng-template [ngIf]="product.id === 'camera-detection'"> <a [title]="product.name + ' details'" [routerLink]="['/camera-detection']">> </a> </ng-template> </div> <div> <ng-template [ngIf]="product.id === 'mrz-reader'"> <a [title]="product.name + ' details'" [routerLink]="['/mrz-reader']">> </a> </ng-template> </div> <div> <ng-template [ngIf]="product.id === 'mrz-scanner'"> <a [title]="product.name + ' details'" [routerLink]="['/mrz-scanner']">> </a> </ng-template> </div> </h3>
Step 3: Set Up the MRZ Recognition Template
The Dynamsoft Label Recognizer allows you to customize templates for various scenarios. For detecting MRZ characters in passports and other travel documents, we will create a template named ReadMRZ and save it to assets/template.json.
Step 4: Read and Parse MRZ Data from Image Files
Workflow Overview
- Upload an image file.
- Recognize the MRZ characters with the Dynamsoft Capture Vision SDK.
- Extract the MRZ data from the recognized text using Dynamsoft Code Parser Module.
- Display the results in a text area.
Build the File Upload UI
Add the following HTML code to the mrz-reader.component.html file:
<div id="loading-indicator" class="loading-indicator" *ngIf="!isLoaded">
    <div class="spinner"></div>
</div>

<div>
    <input type="file" title="file" id="file" accept="image/*" (change)="onChange($event)" />
</div>

<div class="container" id="file_container">


    <div class="row">
        <div id="imageview" class="imageview">
            <img id="image" alt="" />
            <canvas id="overlay" class="overlay"></canvas>

        </div>
    </div>


</div>

<div>
    <textarea id="detection_result"></textarea>
</div>
Explanation
- The file input element allows users to upload an image file.
- The image element displays the uploaded image.
- The overlay canvas draws the text area boundaries.
- The text area displays the MRZ data extracted from the image.
Implement the MRZ Reader Component
-
Initialize the SDK: Create an instance of
CaptureVisionRouterand load the MRZ template.ngOnInit(): void { this.overlayManager.initOverlay(document.getElementById('overlay') as HTMLCanvasElement); (async () => { try { await CodeParserModule.loadSpec("MRTD_TD1_ID"); await CodeParserModule.loadSpec("MRTD_TD2_FRENCH_ID"); await CodeParserModule.loadSpec("MRTD_TD2_ID"); await CodeParserModule.loadSpec("MRTD_TD2_VISA"); await CodeParserModule.loadSpec("MRTD_TD3_PASSPORT"); await CodeParserModule.loadSpec("MRTD_TD3_VISA"); await CaptureVisionRouter.appendModelBuffer("MRZCharRecognition"); await CaptureVisionRouter.appendModelBuffer("MRZTextLineRecognition"); this.cvr = await CaptureVisionRouter.createInstance(); this.parser = await CodeParser.createInstance(); let ret = await this.cvr.initSettings('assets/template.json'); console.log(ret); } catch (ex) { alert(ex); } this.isLoaded = true; })(); } -
Load an image file:
onChange(event: Event) { let parser = this.parser; const element = event.currentTarget as HTMLInputElement; let textarea = document.getElementById('detection_result') as HTMLTextAreaElement; let fileList: FileList | null = element.files; if (fileList) { let file = fileList.item(0) as any; if (file) { let fr = new FileReader(); fr.onload = (event: any) => { let image = document.getElementById('image') as HTMLImageElement; if (image) { image.src = event.target.result; const img = new Image(); textarea.value = ''; img.onload = (event: any) => { this.overlayManager.updateOverlay(img.width, img.height); // TODO }; img.src = event.target.result; } }; fr.readAsDataURL(file); } } } -
Recognize MRZ: Call the
capturemethod with theReadMRZtemplate to recognize MRZ from the image file.if (this.cvr) { this.cvr.capture(file, "ReadMRZ").then(async (result: CapturedResult) => { let txts: any = []; try { let items = result.items; if (items.length > 0) { for (var i = 0; i < items.length; ++i) { if (items[i].type !== EnumCapturedResultItemType.CRIT_TEXT_LINE) { continue; // check if captured result item is a barcode } // TODO break; } } } catch (e) { alert(e); } if (txts.length === 0) { textarea.value = 'No MRZ detected.'; } }); } -
Display the Results: Cast the
CapturedResulttoTextLineResultItemand get the MRZ characters using theCodeParserinstance.let item = items[i] as TextLineResultItem; let localization = item.location; this.overlayManager.drawOverlay( localization, '' ); txts.push(item.text); textarea.value = txts.join('') + '\n'; let parseResults = await parser?.parse(item.text); textarea.value += JSON.stringify(handleMrzParseResult(parseResults!)) + '\n'; export function handleMrzParseResult(result: ParsedResultItem): any { const parseResultInfo: any = {}; let type = result.getFieldValue("documentCode"); parseResultInfo['Document Type'] = JSON.parse(result.jsonString).CodeType; let nation = result.getFieldValue("issuingState"); parseResultInfo['Issuing State'] = nation; let surName = result.getFieldValue("primaryIdentifier"); parseResultInfo['Surname'] = surName; let givenName = result.getFieldValue("secondaryIdentifier"); parseResultInfo['Given Name'] = givenName; let passportNumber = type === "P" ? result.getFieldValue("passportNumber") : result.getFieldValue("documentNumber"); parseResultInfo['Passport Number'] = passportNumber; let nationality = result.getFieldValue("nationality"); parseResultInfo['Nationality'] = nationality; let gender = result.getFieldValue("sex"); parseResultInfo["Gender"] = gender; let birthYear = result.getFieldValue("birthYear"); let birthMonth = result.getFieldValue("birthMonth"); let birthDay = result.getFieldValue("birthDay"); if (parseInt(birthYear) > (new Date().getFullYear() % 100)) { birthYear = "19" + birthYear; } else { birthYear = "20" + birthYear; } parseResultInfo['Date of Birth (YYYY-MM-DD)'] = birthYear + "-" + birthMonth + "-" + birthDay let expiryYear = result.getFieldValue("expiryYear"); let expiryMonth = result.getFieldValue("expiryMonth"); let expiryDay = result.getFieldValue("expiryDay"); if (parseInt(expiryYear) >= 60) { expiryYear = "19" + expiryYear; } else { expiryYear = "20" + expiryYear; } parseResultInfo["Date of Expiry (YYYY-MM-DD)"] = expiryYear + "-" + expiryMonth + "-" + expiryDay; return parseResultInfo; }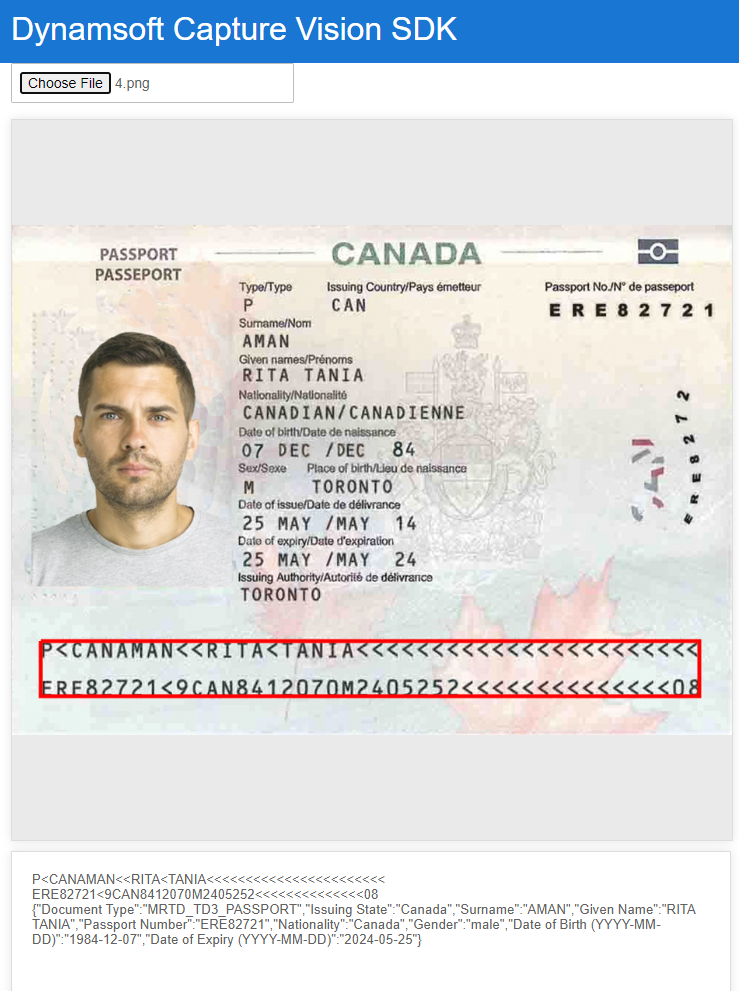
Step 5: Scan and Parse MRZ Data from a Live Camera Stream
Workflow Overview
- Register an event listener with
CaptureVisionRouterto receive detected text results. - Bind a
CameraEnhancerinstance to theCaptureVisionRouterinstance. - Start the camera stream and MRZ recognition.
- Parse and extract the MRZ data in the callback function.
- Display the results in a text area.
Build the Camera Scanner UI
Add the following HTML code to the mrz-scanner.component.html file:
<div id="loading-indicator" class="loading-indicator" *ngIf="!isLoaded">
    <div class="spinner"></div>
</div>

<div class="select">
    <label for="videoSource">Video source: </label>
    <select id="videoSource" (change)="openCamera()"></select>
</div>

<div class="container">
    <div id="videoview">
        <div class="dce-video-container" id="videoContainer"></div>
        <canvas id="overlay"></canvas>
    </div>

</div>


<div>
    <textarea id="result"></textarea>
</div>
Explanation
- The select element allows users to choose a video source.
- The video container displays the camera stream.
- The overlay canvas draws the text area boundaries in real-time.
- The text area displays the MRZ data extracted from the camera stream.
Implement the MRZ Scanner Component
-
Initialize the SDK and Register Callback: Create an instance of
CaptureVisionRouter, load the MRZ template, and register a callback function to receive detected document edges. Bind a camera view to theCaptureVisionRouterinstance.ngOnInit(): void { this.videoSelect = document.querySelector('select#videoSource') as HTMLSelectElement; this.overlayManager.initOverlay(document.getElementById('overlay') as HTMLCanvasElement); (async () => { await CodeParserModule.loadSpec("MRTD_TD1_ID"); await CodeParserModule.loadSpec("MRTD_TD2_FRENCH_ID"); await CodeParserModule.loadSpec("MRTD_TD2_ID"); await CodeParserModule.loadSpec("MRTD_TD2_VISA"); await CodeParserModule.loadSpec("MRTD_TD3_PASSPORT"); await CodeParserModule.loadSpec("MRTD_TD3_VISA"); await CaptureVisionRouter.appendModelBuffer("MRZCharRecognition"); await CaptureVisionRouter.appendModelBuffer("MRZTextLineRecognition"); this.cvr = await CaptureVisionRouter.createInstance(); this.parser = await CodeParser.createInstance(); let ret = await this.cvr.initSettings('assets/template.json'); console.log(ret); await this.initBarcodeScanner(); })(); } async initBarcodeScanner(): Promise<void> { const cameraView: CameraView = await CameraView.createInstance(); this.cameraEnhancer = await CameraEnhancer.createInstance(cameraView); let uiElement = document.getElementById('videoContainer'); if (uiElement) { uiElement.append(cameraView.getUIElement()); cameraView.getUIElement().shadowRoot?.querySelector('.dce-sel-camera')?.setAttribute('style', 'display: none'); cameraView.getUIElement().shadowRoot?.querySelector('.dce-sel-resolution')?.setAttribute('style', 'display: none'); let cameras = await this.cameraEnhancer.getAllCameras(); this.listCameras(cameras); if (this.isDestroyed) { throw Error(componentDestroyedErrorMsg); } this.cvr?.setInput(this.cameraEnhancer); this.cvr?.addResultReceiver({ onCapturedResultReceived: async (result: CapturedResult) => { // TODO }, }); this.cameraEnhancer.on('played', () => { this.updateResolution(); }); await this.openCamera(); if (this.isDestroyed) { throw Error(componentDestroyedErrorMsg); } await this.cvr?.startCapturing('ReadMRZ'); if (this.isDestroyed) { throw Error(componentDestroyedErrorMsg); } this.isLoaded = true; } } -
Process the MRZ Recognition Results: Implement the callback function to handle MRZ recognition results.
 onCapturedResultReceived: async (result: CapturedResult) => {
   this.overlayManager.clearOverlay();
   let txts: any = [];
   let resultElement = document.getElementById('result');
   try {
     let localization;
     let items = result.items
     if (items.length > 0) {
       for (var i = 0; i < items.length; ++i) {

         if (items[i].type !== EnumCapturedResultItemType.CRIT_TEXT_LINE) {
           continue;
         }

         let item = items[i] as TextLineResultItem;

         txts.push(item.text);
         localization = item.location;
         this.overlayManager.drawOverlay(
           localization,
           ''
         );

         let parseResults = await this.parser?.parse(item.text);
         if (resultElement) {
           resultElement.innerHTML = JSON.stringify(handleMrzParseResult(parseResults!)) + '\n';
         }

         break;
       }

     }
   } catch (e) {
     alert(e);
   }
 },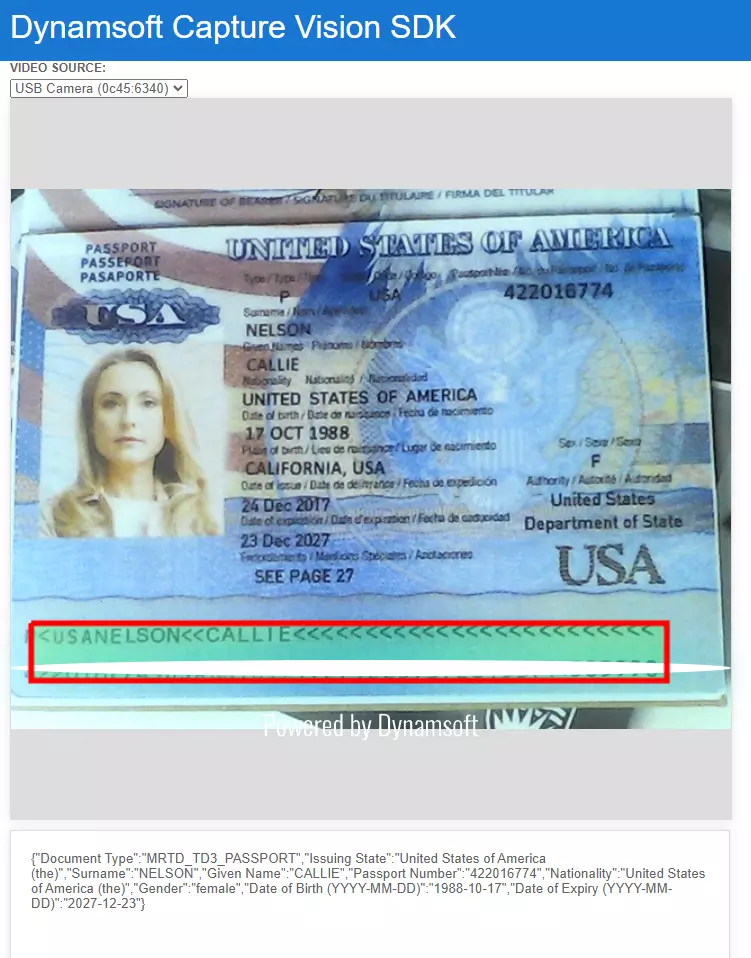
Common Issues and Edge Cases
- MRZ not detected on low-resolution images: The MRZ recognition model requires legible text. If the passport photo is blurry, low-DPI, or taken at a steep angle,
capture()may return zero results. Use images with at least 300 DPI or ensure the camera is held steady and parallel to the document. - Camera permission denied in the browser:
CameraEnhancerwill fail silently if the user denies camera access or the page is not served over HTTPS. Always serve your Angular app viahttps://in production, and handle the camera permission error gracefully in your component. - CodeParser returns empty fields for non-passport documents: The
handleMrzParseResultfunction readspassportNumberonly whendocumentCodeis"P". For TD1 (national ID) and TD2 (visa) documents, make sure to readdocumentNumberinstead. The template already supports all three TD types, but verify your parsing logic covers each case.