


Build Custom Image Filters with JavaScript Canvas API: Grayscale, Sepia, Invert, and Black & White
Filters are commonly used to adjust the rendering of images. We can use it to make images sharper, remove unwanted objects, or adjust the color tone.
In this article, we are going to build a JavaScript library to perform various image filters. It can be used together with Dynamsoft Document Viewer so that it can be easily integrated into a document scanning workflow.
What you’ll build: A reusable TypeScript image filter library that applies grayscale, sepia, invert, and black-and-white filters via the HTML5 Canvas API, packaged as an NPM module and integrated with Dynamsoft Document Viewer.
Key Takeaways
- JavaScript’s Canvas
getImageData/putImageDataAPI lets you manipulate every pixel in an image to apply custom filters without any external image-processing library. - Four production-ready filters — grayscale, sepia, invert, and black-and-white (with automatic OTSU thresholding) — can be built by extending a single base class.
- The library plugs directly into Dynamsoft Document Viewer’s
ImageFilterhandler, enabling one-click filter switching inside a document scanning workflow. - Packaging the filters as a Vite library produces UMD and ES module builds that work in any bundler or via a
<script>tag.
Common Developer Questions
How do I apply custom image filters using the JavaScript Canvas API?
Draw the source image onto a canvas, read its pixels with getImageData(), transform each RGBA group in a loop, and then write the modified pixels back with putImageData(). This article wraps that logic in a reusable base filter class so different effects only need to override the pixel conversion step.
How do I convert a photo to grayscale or black-and-white in JavaScript without a library?
Use the canvas pixel array directly and compute a new gray value for each pixel, then either assign that gray value back to all RGB channels or apply a threshold for black-and-white output. The black-and-white implementation here also supports OTSU thresholding so the cutoff can be computed automatically.
How do I integrate a custom image filter into Dynamsoft Document Viewer?
Create the filter as a reusable class, then plug it into Dynamsoft Document Viewer’s editing workflow so the selected page image is passed through the canvas-based processor before being shown in the editor. That lets the same filter code work both as a standalone NPM library and as part of a document scanning UI.
Prerequisites
To follow this tutorial you need:
- Node.js 16 or later
- A modern browser that supports the HTML5 Canvas API
- Get a 30-day free trial license for Dynamsoft Document Viewer (only required for the Document Viewer integration step)
Step 1: Create a New Vite + TypeScript Project
Create a new project with Vite and the typescript template:
npm create vite@latest ImageFilter -- --template vanilla-ts
Step 2: Implement the Image Filter Library
Next, let’s implement the image filter.
Define the ImageFilter Interface
Define an ImageFilter interface in src/ImageFilter.ts.
export interface ImageFilter {
  cvs:HTMLCanvasElement;
  process(img:HTMLImageElement|HTMLCanvasElement|HTMLVideoElement): void;
  convert(r:number,g:number,b:number,a:number): {r:number,g:number,b:number,a:number};
}
An image filter has two functions. One is a process function which saves the image with the filter applied onto a canvas. The other is a convert function which defines how the pixels are converted exactly.
Create the Base Filter Class
Create a GenericImageFilter class which implements ImageFilter in src/GenericImageFilter.ts. Here, we draw the image onto a canvas to manipulate its pixels.
export class GenericImageFilter implements ImageFilter {
  cvs:HTMLCanvasElement;
  constructor(cvs:HTMLCanvasElement) {
    this.cvs = cvs;
  }

  process(img:HTMLImageElement|HTMLCanvasElement|HTMLVideoElement){
    let width;
    let height;
    if (img instanceof HTMLImageElement) {
      width = img.naturalWidth;
      height = img.naturalHeight;
    }else if (img instanceof HTMLCanvasElement){
      width = img.width;
      height = img.height;
    }else{
      width = img.videoWidth;
      height = img.videoHeight;
    }
    const context = this.cvs.getContext('2d');
    this.cvs.width = width;
    this.cvs.height = height;
    if (context) {
      context.drawImage(img, 0, 0);
      const imageData = context.getImageData(0, 0, this.cvs.width, this.cvs.height);
      const pixels = imageData.data; //[r,g,b,a,...]
      for (var i = 0; i < pixels.length; i += 4) {
        const red = pixels[i];
        const green = pixels[i + 1];
        const blue = pixels[i + 2];
        const alpha = pixels[i + 3];
        const converted = this.convert(red, green, blue, alpha)
        pixels[i] = converted.r;
        pixels[i + 1] = converted.g;
        pixels[i + 2] = converted.b;
        pixels[i + 3] = converted.a;
      }
      context.putImageData(imageData, 0, 0);
    }
  }

  convert(r:number,g:number,b:number,a:number){
    return {r:r,g:g,b:b,a:a};
  }
}
Build Filter Variants from the Base
Next, we can simply create new image filters which extend the base class and override its functions.
-
Grayscale Filter.
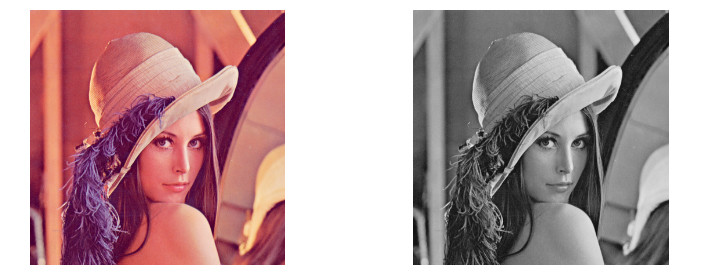
export class GrayscaleFilter extends GenericImageFilter {
  convert(r: number, g: number, b: number, a: number): { r: number; g: number; b: number; a: number; } {
    const gray = (r * 6966 + g * 23436 + b * 2366) >> 15;
    return {r:gray,g:gray,b:gray,a:a};
  }
}
It turns an image into a grayscale one composed only of 256 different shades of gray.
-
Sepia Filter.
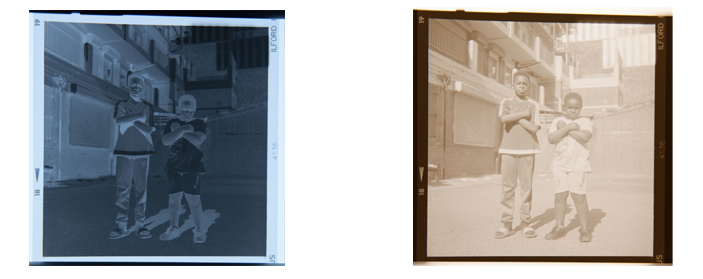
export class SepiaFilter extends GenericImageFilter {
  convert(r: number, g: number, b: number, a: number): { r: number; g: number; b: number; a: number; } {
    const red = (r * 0.393)+(g * 0.769)+(b * 0.189);
    const green = (r * 0.349)+(g * 0.686)+(b * 0.168);
    const blue = (r * 0.272)+(g * 0.534)+(b * 0.131);
    return {r:red,g:green,b:blue,a:a};
  }
}
It adds a reddish-brown tone to an image.

-
Invert Filter.
export class InvertFilter extends GenericImageFilter {
  convert(r: number, g: number, b: number, a: number): { r: number; g: number; b: number; a: number; } {
    r = 255 - r;
    g = 255 - g;
    b = 255 - b;
    return {r:r,g:g,b:b,a:a};
  }
}
It inverts the pixels of an image. It is useful to process scanned negative films.
-
Black and White Filter. This filter is a bit complex. We have to override both
processandconvertfunctions. In addition, its constructor is also modified to accept two extra arguments:thresholdandotsuEnabled. IfotsuEnabledis set to true, the threshold will be calculated automatically using the OTSU’s method.import otsu from 'otsu'; export class BlackwhiteFilter extends GenericImageFilter { threshold:number = 127; otsuEnabled:boolean = false; constructor(cvs:HTMLCanvasElement,threshold:number,otsuEnabled:boolean){ super(cvs); this.threshold = threshold; this.otsuEnabled = otsuEnabled; } process(img:HTMLImageElement|HTMLCanvasElement|HTMLVideoElement):number{ let width; let height; if (img instanceof HTMLImageElement) { width = img.naturalWidth; height = img.naturalHeight; }else if(img instanceof HTMLCanvasElement){ width = img.width; height = img.height; }else{ width = img.videoWidth; height = img.videoHeight; } const context = this.cvs.getContext('2d'); this.cvs.width = width; this.cvs.height = height; let threshold; if (context) { context.drawImage(img, 0, 0); const imageData = context.getImageData(0, 0, this.cvs.width, this.cvs.height); const pixels = imageData.data; //[r,g,b,a,...] const grayscaleValues = []; for (var i = 0; i < pixels.length; i += 4) { const red = pixels[i]; const green = pixels[i + 1]; const blue = pixels[i + 2]; const grayscale = this.grayscale(red, green, blue); grayscaleValues.push(grayscale); } if (this.otsuEnabled) { threshold = otsu(grayscaleValues); }else{ threshold = this.threshold; } let grayscaleIndex = 0; for (var i = 0; i < pixels.length; i += 4) { const gray = grayscaleValues[grayscaleIndex]; grayscaleIndex = grayscaleIndex + 1; let value = 255; if (gray < threshold) { value = 0; } pixels[i] = value; pixels[i + 1] = value; pixels[i + 2] = value; } context.putImageData(imageData, 0, 0); } return threshold; } grayscale(r: number, g: number, b: number): number { return (r * 6966 + g * 23436 + b * 2366) >> 15; } setThreshold(threshold:number){ this.threshold = threshold; } setOTSUEnabled(enabled:boolean){ this.otsuEnabled = enabled; } }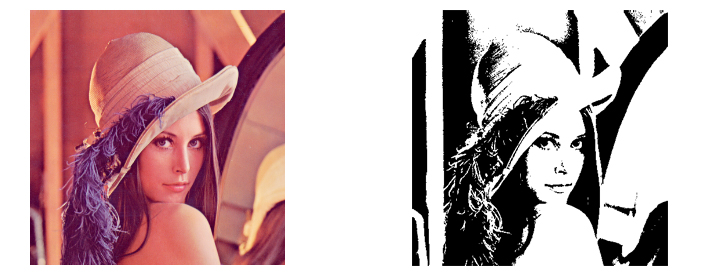
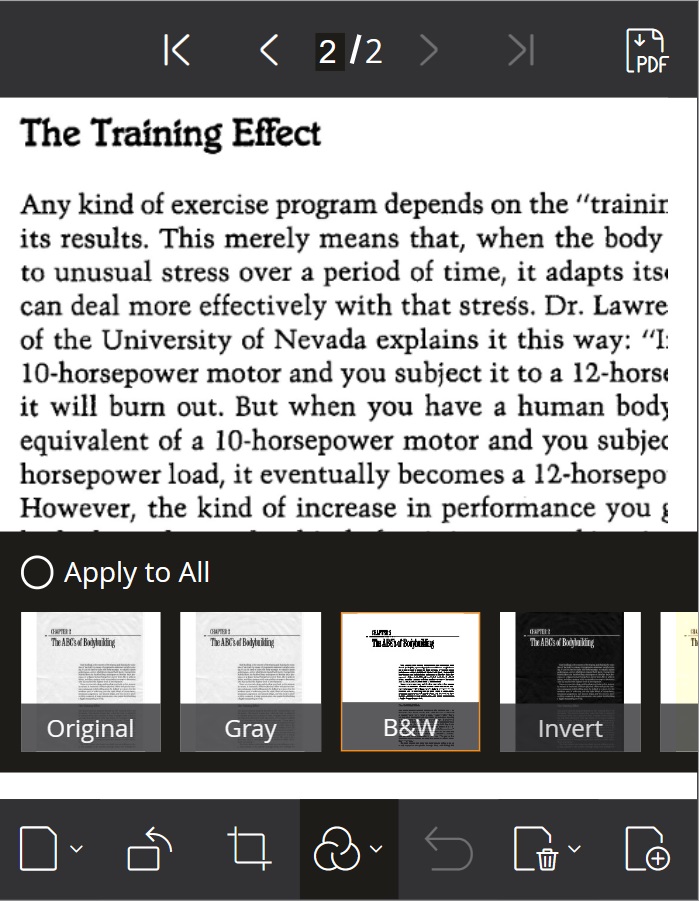
Step 3: Integrate with Dynamsoft Document Viewer
Dynamsoft Document Viewer provides several viewers for the document scanning process. We can use its Edit Viewer to view and edit scanned document images.
It provides an interface to allow defining a custom handler to use third-party image filters.
Let’s define such a handler so that we can use the image filter library in a document scanning process.
-
Create a new file named
FilterHandler.tswith the following template.let DDV; //allows setting the DDV namespace. It is needed if Dynamsoft Document Viewer (DDV) is installed with NPM. export function setDDV(DocumentViewer:any) { DDV = DocumentViewer; } if ((window as any)["Dynamsoft"]) { const Dynamsoft = (window as any)["Dynamsoft"]; DDV = Dynamsoft.DDV; } export class ImageFilterHandler extends DDV.ImageFilter {} -
Override the
querySupportedfunction in the class which returns a list of filters.querySupported() { return [ { type: "original", label: "Original" }, { type: "grayscale", label: "Gray", }, { type: "BW", label: "B&W" }, { type: "invert", label: "Invert" }, { type: "sepia", label: "Retro", } ] }; -
Override the
applyFilterfunction to apply the selected image filter.async applyFilter(image:any, type:string) { if (type === "original") { return new Promise((r, _j) => { r(image.data) }); }else{ let img = await imageFromBlob(image.data); if (type === "BW") { let blackwhiteFilter = new BlackwhiteFilter(canvas,127,true); blackwhiteFilter.process(img); }else if (type === "sepia") { let sepiaFilter = new SepiaFilter(canvas); sepiaFilter.process(img); }else if (type === "grayscale") { let grayscaleFilter = new GrayscaleFilter(canvas); grayscaleFilter.process(img); }else if (type === "invert") { let invertFilter = new InvertFilter(canvas); invertFilter.process(img); } let blob = await canvasToBlob(); return new Promise((r, _j) => { r(blob) }); } };We have to use the following functions to convert the blob provided in the
imageto an image element for the filters to use and convert the canvas as blob for the handler to use.const canvasToBlob = async () => { return new Promise<Blob>((resolve, reject) => { canvas.toBlob((blob) => { if (blob) { resolve(blob); }else{ reject(); } },"image/jpeg",100); }) } const imageFromBlob = async (blob:Blob):Promise<HTMLImageElement> => { return new Promise<HTMLImageElement>((resolve, _reject) => { let img = document.createElement("img"); img.onload = function () { resolve(img); } let url = URL.createObjectURL(blob); img.src = url; }) } -
Use
originalas the default filter.get defaultFilterType() { return "original" }; -
Use the handler to create a new instance of Edit Viewer.
let filterHandler = new ImageFilterHandler();
// Configure image filter feature
Dynamsoft.DDV.setProcessingHandler("imageFilter", filterHandler);
// Create an edit viewer
editViewer = new Dynamsoft.DDV.EditViewer({
  container: "container",
});
Open Edit Viewer and we can see that we can use the image filters in its UI.
Step 4: Package as an NPM Library
We can publish it as a library onto NPM for ease of use.
-
Install
devDependencies:npm install -D @types/node vite-plugin-dts -
Create a new
vite.config.tsfile:// vite.config.ts import { resolve } from 'path'; import { defineConfig } from 'vite'; import dts from 'vite-plugin-dts'; // https://vitejs.dev/guide/build.html#library-mode export default defineConfig({ build: { lib: { entry: resolve(__dirname, 'src/index.ts'), name: 'image-filter', fileName: 'image-filter', }, }, plugins: [dts()], }); -
Add the entry points of our package to
package.json.{ "main": "./dist/image-filter.umd.cjs", "module": "./dist/image-filter.js", "types": "./dist/index.d.ts", "exports": { "import": { "types": "./dist/index.d.ts", "default": "./dist/image-filter.js" }, "require": { "types": "./dist/index.d.ts", "default": "./dist/image-filter.umd.cjs" } }, "files": [ "dist/*.css", "dist/*.js", "dist/*.cjs", "dist/*.d.ts" ] }
Run npm run build. Then, we can have the packaged files in the dist.
Common Issues & Edge Cases
- Canvas tainted by cross-origin images. If the source image is loaded from a different domain without CORS headers,
getImageDatathrows aSecurityError. Ensure the image server sendsAccess-Control-Allow-Originand setimg.crossOrigin = "anonymous"before assigning thesrc. - Large images cause jank or memory spikes. Pixel-by-pixel processing on images above ~4000 × 4000 px can freeze the main thread. Offload the work to a Web Worker, or downscale the canvas before applying the filter.
- OTSU threshold produces unexpected results on low-contrast photos. OTSU’s method assumes a bimodal histogram; images with uniform lighting (e.g., a white document on a white desk) may yield a threshold that turns the entire image black or white. In those cases, expose a manual threshold slider as a fallback.