


How to Build an iOS MRZ Scanner with SwiftUI: Real-Time Passport and ID Card Recognition
Passports and national ID cards carry Machine Readable Zones (MRZ) — standardized text lines that encode holder identity, document numbers, and expiry dates. Reading these zones reliably from a mobile camera is critical for border control, hotel check-in, and KYC workflows. This tutorial walks through building a SwiftUI iOS app that captures, verifies, and parses MRZ data in real-time using the Dynamsoft Capture Vision SDK (v3.4).
This article is Part 4 in a 4-Part Series.
- Part 1 - How to Build a Python MRZ Scanner with Passport Portrait and Face Extraction
- Part 2 - How to Extract Structured Data and Photos from Passports in JavaScript with Dynamsoft Capture Vision
- Part 3 - How to Build an Android Passport Scanner with MRZ and Portrait Detection
- Part 4 - How to Build an iOS MRZ Scanner with SwiftUI: Real-Time Passport and ID Card Recognition
What you’ll build: A SwiftUI iOS app that detects document boundaries, reads MRZ text lines from passports and ID cards, extracts portrait photos, and displays structured results — all from a live camera feed.
Demo Video
Key Takeaways
- Dynamsoft Capture Vision provides a complete MRZ pipeline: camera capture → document detection → text recognition → code parsing, all configurable via JSON templates
MultiFrameResultCrossFilterverifies results across multiple frames, eliminating false positives from single-frame OCR noise- The
CameraViewDrawingLayer API renders document quads, MRZ text line regions, and portrait zones as live overlays on the camera preview IdentityProcessor.findPortraitZone()computes the face photo location from intermediate pipeline results, enabling portrait extraction without a separate detection model
Common Developer Questions
How do I read passport MRZ from an iOS camera feed using Swift?
Feed the live camera frames into Dynamsoft Capture Vision, load an MRZ template such as ReadPassportAndId, and let the SDK return verified MRZ text and parsed fields only after enough consistent frames are seen. That gives the iOS app stable real-time scanning rather than noisy single-frame OCR.
How do I draw overlays on the Dynamsoft CameraView in SwiftUI?
Wrap the UIKit CameraView in UIViewRepresentable, then configure its drawing layers to render quads, text regions, and other overlays on top of the preview feed. This is the bridge that lets SwiftUI host Dynamsoft’s native overlay system.
How do I extract the portrait photo from a passport or ID card?
Use IdentityProcessor.findPortraitZone() with the intermediate capture results to compute the portrait region from the same document frame. That way the face photo is derived from the MRZ/document pipeline instead of relying on a separate face-detection model.
What is the difference between TD1, TD2, and TD3 MRZ formats?
TD1 is the three-line 30-character format used on many ID cards, TD2 is the two-line 36-character format used on some identity and visa documents, and TD3 is the two-line 44-character passport format. The parser layer needs to understand these layouts so it can map each field correctly when displaying results.
Prerequisites
- Xcode 15+ on macOS
- iOS 16.0+ deployment target
- A physical iOS device with a camera (simulators do not support camera input)
- A Dynamsoft Capture Vision license key
Get a 30-day free trial license at dynamsoft.com/customer/license/trialLicense
Step 1: Create the Xcode Project and Add SDK Dependencies
Create a new SwiftUI app project in Xcode. Add the two required SPM packages via File → Add Package Dependencies:
| Package | Repository |
|---|---|
capture-vision-spm |
https://github.com/Dynamsoft/capture-vision-spm |
mrz-scanner-spm |
https://github.com/Dynamsoft/mrz-scanner-spm |
capture-vision-spm provides the core engine (CameraEnhancer, CaptureVisionRouter, ImageProcessor). mrz-scanner-spm provides the MRZ-specific pipeline (IdentityProcessor, code parser, and MRZ templates).
Add camera permission to Info.plist by setting the following build setting in your Xcode target:
INFOPLIST_KEY_NSCameraUsageDescription = Camera is required for scanning ID documents and reading MRZ data.
Step 2: Initialize the License and Configure the Capture Vision Pipeline
Create a ScannerController class that conforms to both CapturedResultReceiver and IntermediateResultReceiver. This controller owns the entire Dynamsoft pipeline.
import SwiftUI
import UIKit
import Combine
import DynamsoftCaptureVisionBundle

@MainActor
class ScannerController: NSObject, ObservableObject,
    CapturedResultReceiver, IntermediateResultReceiver
{
    @Published var statusText: String = ""
    @Published var mrzResultText: String = ""
    @Published var isCapturing: Bool = true
    @Published var pendingLabelMap: [String: String]?
    @Published var pendingPortraitImage: UIImage?
    @Published var showResult: Bool = false
    @Published var errorMessage: String?

    let cameraView = CameraView()
    private let dce = CameraEnhancer()
    private let cvr = CaptureVisionRouter()
    private let idProcessor = IdentityProcessor()
}
In the setup() method, initialize the license, configure the camera, set up the cross-verification filter, and load the MRZ template:
func setup() {
    // Initialize license
    MrzParser.initLicense()

    // Camera setup
    dce.cameraView = cameraView
    dce.enableEnhancedFeatures(.frameFilter)

    // Cross-verification filter for stable multi-frame results
    let filter = MultiFrameResultCrossFilter()
    filter.enableResultCrossVerification([.textLine, .detectedQuad], isEnabled: true)
    let criteria = CrossVerificationCriteria()
    criteria.frameWindow = 5
    criteria.minConsistentFrames = 2
    filter.setResultCrossVerificationCriteria(criteria, resultItemTypes: .detectedQuad)
    cvr.addResultFilter(filter)

    // Load MRZ template configuration
    if let templatePath = Bundle.main.path(forResource: "mrz-mobile", ofType: "json") {
        try? cvr.initSettingsFromFile(templatePath)
    }

    // Set camera as input and configure pipeline
    try? cvr.setInput(dce)

    if let settings = try? cvr.getSimplifiedSettings("ReadPassportAndId") {
        settings.documentSettings?.minQuadrilateralAreaRatio = 2
        try? cvr.updateSettings("ReadPassportAndId", settings: settings)
    }

    // Register result receivers
    cvr.getIntermediateResultManager().addResultReceiver(self)
    cvr.addResultReceiver(self)

    configureDrawingLayers()
}
The MultiFrameResultCrossFilter is essential — it requires at least 2 consistent frames within a 5-frame window before accepting a document quad, which eliminates flickering and false detections.
Step 3: Bridge the Camera View to SwiftUI
Dynamsoft’s CameraView is a UIKit UIView. Wrap it with UIViewRepresentable for SwiftUI:
import SwiftUI
import DynamsoftCaptureVisionBundle

struct CameraPreview: UIViewRepresentable {
    let cameraView: CameraView

    func makeUIView(context: Context) -> UIView {
        let container = UIView()
        container.backgroundColor = .black
        cameraView.translatesAutoresizingMaskIntoConstraints = false
        container.addSubview(cameraView)
        NSLayoutConstraint.activate([
            cameraView.topAnchor.constraint(equalTo: container.topAnchor),
            cameraView.bottomAnchor.constraint(equalTo: container.bottomAnchor),
            cameraView.leadingAnchor.constraint(equalTo: container.leadingAnchor),
            cameraView.trailingAnchor.constraint(equalTo: container.trailingAnchor),
        ])
        return container
    }

    func updateUIView(_ uiView: UIView, context: Context) {}
}
Use this in your ContentView with .ignoresSafeArea() for a full-screen camera preview.
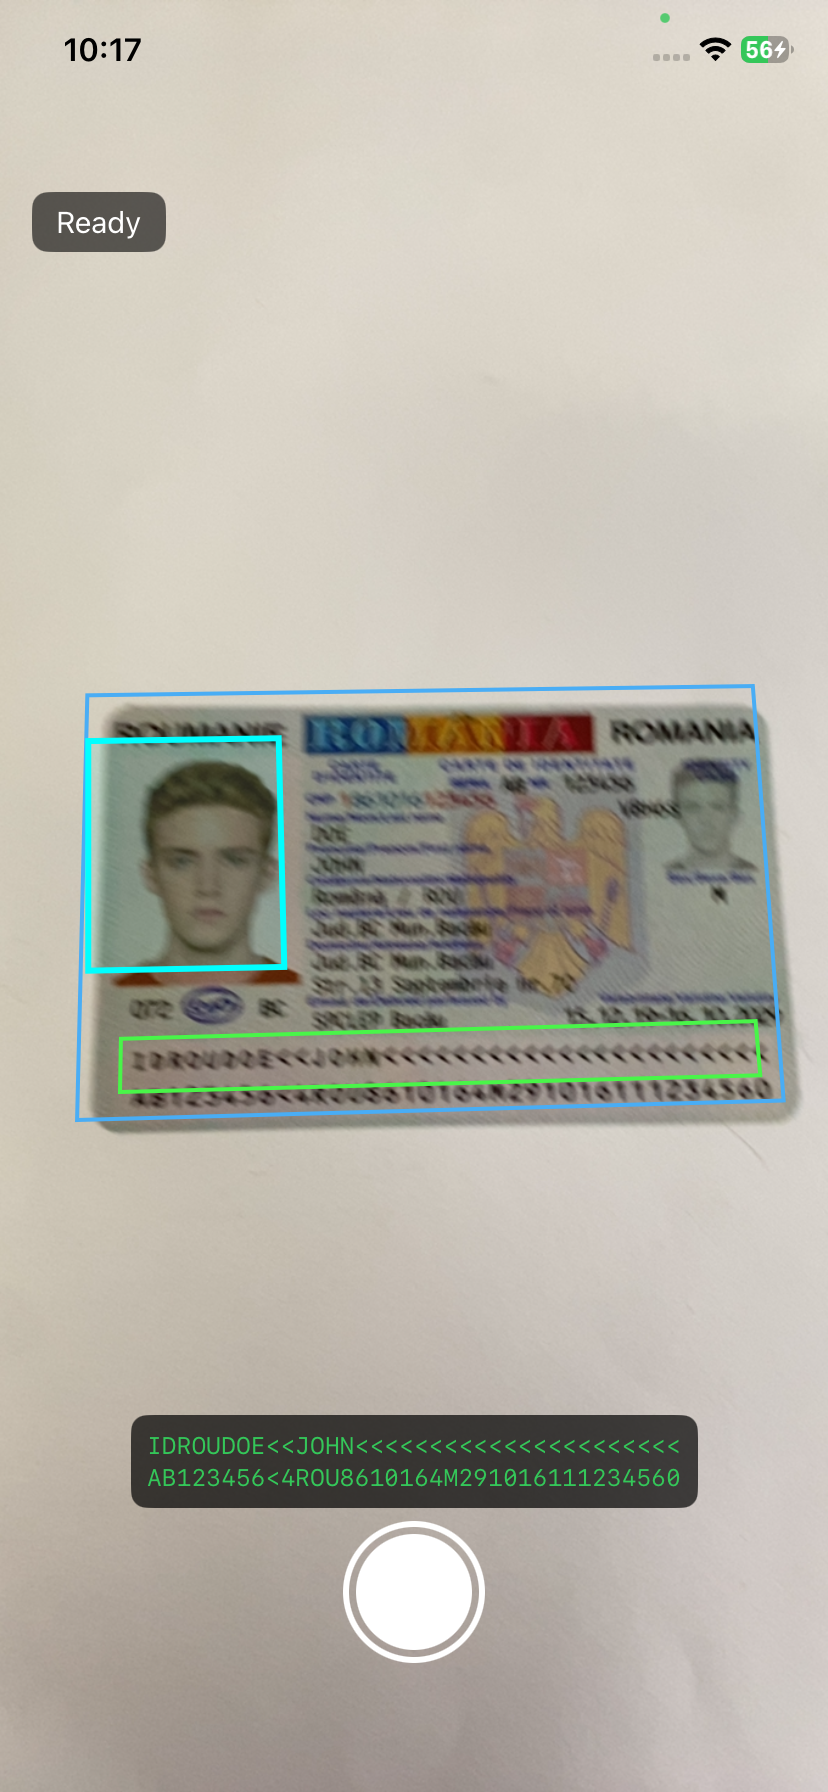
Step 4: Configure Drawing Layers for Live Document Overlays
The CameraView exposes a DrawingLayer system for rendering overlays on the camera feed. Configure three layers during setup:
private var portraitLayerId: UInt = 100

private func configureDrawingLayers() {
    // Make preset layers visible for auto-drawing
    cameraView.getDrawingLayer(1)?.visible = true   // DDN layer (document quad)
    cameraView.getDrawingLayer(3)?.visible = true   // DLR layer (MRZ text lines)

    // Create a custom portrait layer with cyan stroke style
    let portraitStyleId = DrawingStyleManager.createDrawingStyle(
        .cyan, strokeWidth: 3,
        fill: UIColor.cyan.withAlphaComponent(0.1),
        textColor: .white, font: .systemFont(ofSize: 12)
    )
    let portraitLayer = cameraView.createDrawingLayer()
    portraitLayer.visible = true
    portraitLayer.setDefaultStyle(portraitStyleId)
    portraitLayerId = portraitLayer.layerId
}
- Layer 1 (DDN) draws the detected document boundary as a quadrilateral
- Layer 3 (DLR) draws rectangles around recognized MRZ text lines
- Custom layer (100+) draws the portrait zone with a distinct cyan style
When detection results arrive, update the overlays:
private func drawOverlays(result: CapturedResult, portraitZone: Quadrilateral?) {
    let ddnLayer = cameraView.getDrawingLayer(1)
    if let quadItem = result.processedDocumentResult?.detectedQuadResultItems?.first {
        ddnLayer?.clearDrawingItems()
        ddnLayer?.addDrawingItems([QuadDrawingItem(quadrilateral: quadItem.location)])
    } else {
        ddnLayer?.clearDrawingItems()
    }

    let portraitLayer = cameraView.getDrawingLayer(portraitLayerId)
    if let pz = portraitZone {
        portraitLayer?.clearDrawingItems()
        portraitLayer?.addDrawingItems([QuadDrawingItem(quadrilateral: pz)])
    } else {
        portraitLayer?.clearDrawingItems()
    }
}
Each overlay is cleared when its source data disappears, keeping the UI in sync with what the camera actually sees.
Step 5: Receive and Process MRZ Recognition Results
Implement CapturedResultReceiver to handle final pipeline output — parsed MRZ fields and document quads:
public func onCapturedResultReceived(_ result: CapturedResult) {
    guard let parsedItem = result.parsedResult?.items?.first else { return }
    let map = MrzParser.parse(parsedItem)
    guard !map.isEmpty else { return }

    let quadItem = result.processedDocumentResult?.detectedQuadResultItems?.first
    var portraitZone = findPortraitZone()

    // Validate portrait is inside document and proportionally reasonable
    if let pz = portraitZone, let quad = quadItem {
        let docRegion = quad.location
        let allInside = pz.points.allSatisfy { docRegion.contains($0.cgPointValue) }
        let areaRatioOk = docRegion.area / pz.area >= 3
        if !allInside || !areaRatioOk {
            portraitZone = nil
        }
    }

    // Crop portrait from original image
    var portrait: UIImage?
    if let pz = portraitZone,
       let imageData = cvr.getIntermediateResultManager().getOriginalImage(result.originalImageHashId) {
        portrait = try? ImageProcessor().cropAndDeskewImage(imageData, quad: pz).toUIImage()
    }

    DispatchQueue.main.async { [weak self] in
        self?.drawOverlays(result: result, portraitZone: portraitZone)
    }

    DispatchQueue.main.async { [weak self] in
        self?.pendingLabelMap = map
        self?.pendingPortraitImage = portrait
        self?.isCapturing = false
    }
}
The portrait validation step is important: it checks that the detected portrait zone lies entirely within the document boundary and that the document is at least 3× larger than the portrait, preventing false positives.
Step 6: Extract Portrait Zone from Intermediate Pipeline Results
Portrait detection uses intermediate pipeline data rather than a separate model. Implement IntermediateResultReceiver to collect the required units:
public func onScaledColourImageUnitReceived(_ unit: ScaledColourImageUnit, info: IntermediateResultExtraInfo) {
    DispatchQueue.main.async { self.scaledColourImageUnit = unit }
}

public func onLocalizedTextLinesReceived(_ unit: LocalizedTextLinesUnit, info: IntermediateResultExtraInfo) {
    DispatchQueue.main.async { self.localizedTextLinesUnit = unit }
}

public func onDetectedQuadsReceived(_ unit: DetectedQuadsUnit, info: IntermediateResultExtraInfo) {
    DispatchQueue.main.async { self.detectedQuadsUnit = unit }
}

public func onDeskewedImageReceived(_ unit: DeskewedImageUnit, info: IntermediateResultExtraInfo) {
    DispatchQueue.main.async { self.deskewedImageUnit = unit }
}
Then use IdentityProcessor to compute the portrait zone, filtering by confidence:
private func findPortraitZone() -> Quadrilateral? {
    guard let scaledUnit = scaledColourImageUnit,
          let localizedUnit = localizedTextLinesUnit,
          let textLinesUnit = recognizedTextLinesUnit,
          let quadsUnit = detectedQuadsUnit,
          quadsUnit.getCount() > 0,
          let imageUnit = deskewedImageUnit,
          let elements = localizedUnit.getAuxiliaryRegionElements() else {
        return nil
    }

    var hasHighConfidence = false
    for element in elements {
        if element.getName() == "PortraitZone" && element.getConfidence() > 60 {
            hasHighConfidence = true
            break
        }
    }
    guard hasHighConfidence else { return nil }

    return idProcessor.findPortraitZone(
        scaledUnit,
        localizedTextLinesUnit: localizedUnit,
        recognizedTextLinesUnit: textLinesUnit,
        detectedQuadsUnit: quadsUnit,
        deskewedImageUnit: imageUnit
    )
}
The confidence threshold of 60 filters out low-quality portrait detections from cluttered backgrounds.
Step 7: Parse MRZ Fields into Structured Data
The ParsedResultItem from Capture Vision contains raw MRZ fields. Create an MrzParser that extracts and formats them:
struct MrzParser {
    private static let licenseKey = "YOUR_LICENSE_KEY"

    static func initLicense() {
        LicenseManager.initLicense(licenseKey, verificationDelegate: nil)
    }

    static func parse(_ item: ParsedResultItem) -> [String: String] {
        let entry = item.parsedFields
        var properties: [String: String] = [:]

        let codeType = item.codeType
        var docType = "PASSPORT"
        if codeType.contains("TD1") || codeType.contains("ID") {
            docType = "ID"
        } else if codeType.contains("VISA") {
            docType = "VISA"
        }

        let number = getFirstNonNull(entry, keys: ["passportNumber", "documentNumber", "idNumber"])
        let firstName = getFirstNonNull(entry, keys: ["secondaryIdentifier", "givenNames"])
        let lastName = getFirstNonNull(entry, keys: ["primaryIdentifier", "lastName"])

        properties["Document Type"] = docType
        properties["Name"] = lastName.isEmpty ? firstName : "\(lastName), \(firstName)"
        properties["Document Number"] = number.isEmpty ? "—" : number
        properties["Nationality"] = entry["nationality"] ?? "Unknown"
        properties["Issuing State"] = entry["issuingState"] ?? "Unknown"
        // ... additional fields: sex, age, dates
        return properties
    }
}
The getFirstNonNull helper tries multiple field name variants because different MRZ formats use different key names. TD3 passports use passportNumber, while TD1/TD2 ID cards use documentNumber or idNumber.
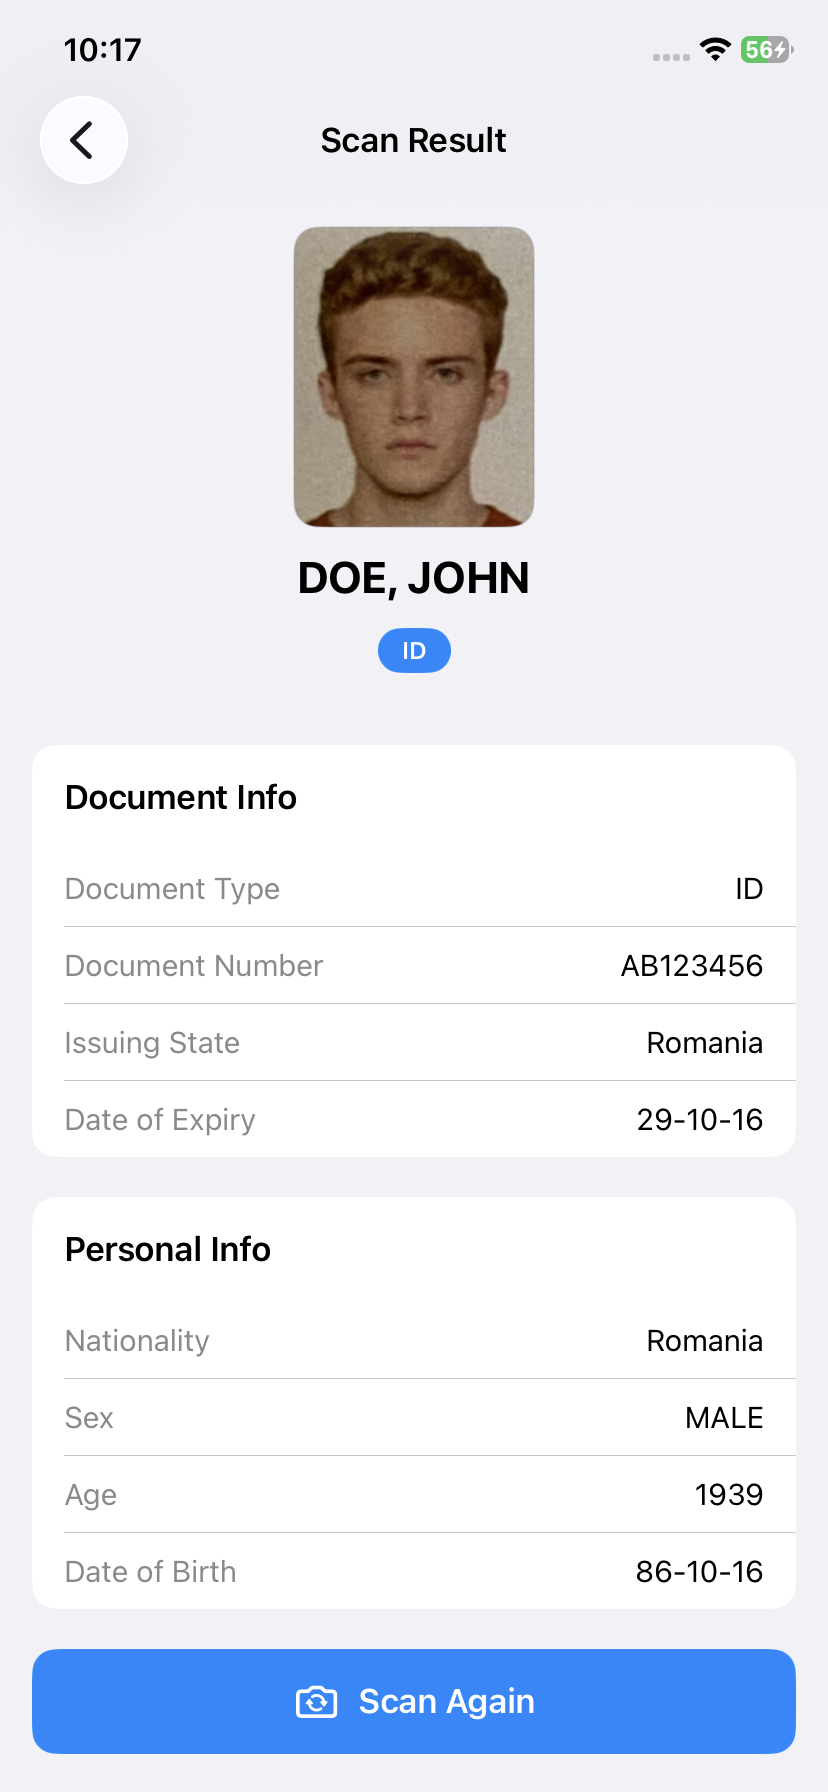
Step 8: Display Structured Results in a Result View
Present the parsed data in a SwiftUI result view with profile header, document info card, and personal info card:
struct ScanResultView: View {
    let labelMap: [String: String]
    let portraitImage: UIImage?
    @Environment(\.dismiss) private var dismiss

    var body: some View {
        ScrollView {
            VStack(spacing: 20) {
                profileHeader
                documentInfoCard
                personalInfoCard
                Button(action: { dismiss() }) {
                    HStack {
                        Image(systemName: "camera.rotate")
                        Text("Scan Again")
                    }
                    .font(.headline)
                    .foregroundColor(.white)
                    .frame(maxWidth: .infinity)
                    .padding()
                    .background(Color.blue)
                    .cornerRadius(12)
                }
                .padding(.horizontal)
            }
        }
        .navigationTitle("Scan Result")
    }
}
The result view shows the cropped portrait image (or a placeholder), the holder’s name, document type badge, and structured field cards. Dismissing the view triggers .onAppear on ContentView, which restarts scanning automatically.
Step 9: Add the MRZ Template Configuration File
The Capture Vision pipeline is configured via a JSON template file. Add mrz-mobile.json to your Xcode project target. This template defines three capture modes:
- ReadPassportAndId — The default mode that handles both passports and ID cards
- ReadPassport — Optimized for TD3 passports (2 lines × 44 characters)
- ReadId — Optimized for TD1 (3 lines × 30 characters) and TD2 (2 lines × 36 characters) ID cards
The template specifies text line recognition parameters including character set, line count, and expected character length per format, plus the code parser configuration that converts raw MRZ text into structured fields.
Step 10: Build the Full-Screen Camera UI with Overlays
Wire up the full-screen camera view with status text, MRZ result overlay, and capture button:
struct ContentView: View {
    @StateObject private var controller = ScannerController()

    var body: some View {
        ZStack {
            CameraPreview(cameraView: controller.cameraView)
                .ignoresSafeArea()

            VStack {
                HStack {
                    if !controller.statusText.isEmpty {
                        Text(controller.statusText)
                            .font(.subheadline)
                            .foregroundColor(.white)
                            .padding(.horizontal, 12)
                            .padding(.vertical, 6)
                            .background(Color.black.opacity(0.6))
                            .cornerRadius(8)
                    }
                    Spacer()
                }
                .padding(.horizontal)

                Spacer()

                if !controller.mrzResultText.isEmpty {
                    Text(controller.mrzResultText)
                        .font(.system(.caption, design: .monospaced))
                        .foregroundColor(.green)
                        .padding(8)
                        .background(Color.black.opacity(0.7))
                        .cornerRadius(8)
                        .padding(.horizontal)
                }

                // Capture button
                HStack {
                    Spacer()
                    Button(action: { controller.onCapture() }) {
                        ZStack {
                            Circle().stroke(Color.white, lineWidth: 3)
                                .frame(width: 68, height: 68)
                            Circle().fill(controller.isCapturing ? Color.gray : Color.white)
                                .frame(width: 58, height: 58)
                            if controller.isCapturing {
                                ProgressView()
                                    .progressViewStyle(CircularProgressViewStyle(tint: .white))
                            }
                        }
                    }
                    .disabled(controller.isCapturing || controller.pendingLabelMap == nil)
                    Spacer()
                }
                .padding(.bottom, 32)
            }
        }
        .navigationBarHidden(true)
        .navigationDestination(isPresented: $controller.showResult) {
            ScanResultView(
                labelMap: controller.pendingLabelMap ?? [:],
                portraitImage: controller.pendingPortraitImage
            )
        }
        .onAppear {
            controller.setup()
            controller.startScanning()
        }
        .onDisappear {
            controller.stopScanning()
        }
    }
}
The capture button is disabled until MRZ data is available (pendingLabelMap != nil) and shows a spinner while the pipeline is still capturing.
Common Issues & Edge Cases
-
Camera permission crash: iOS requires
NSCameraUsageDescriptioninInfo.plist. Without it, the app crashes immediately whendce.open()is called. Add the key via build settings:INFOPLIST_KEY_NSCameraUsageDescription. -
Background thread UI updates: Dynamsoft callbacks run on background threads. All
@Publishedproperty updates andCameraViewdrawing layer modifications must be wrapped inDispatchQueue.main.asyncto avoid the “Publishing changes from background threads” warning and potential crashes. -
Overlay flickering: Without
MultiFrameResultCrossFilter, document quads and text lines flicker between frames. The filter withminConsistentFrames: 2andframeWindow: 5ensures only stable, verified results are rendered.
Conclusion
This SwiftUI app demonstrates a complete MRZ scanning pipeline using Dynamsoft Capture Vision SDK — from live camera capture through document detection, multi-frame verification, MRZ text recognition, portrait extraction, and structured result display. The DrawingLayer API provides real-time visual feedback that helps users align their documents correctly. For next steps, explore the Dynamsoft Capture Vision documentation to customize templates for additional document types.