How to Package JNI Shared Library into Jar File
This article is not about creating Java native methods to invoke C/C++ APIs. Instead, it aims to help developers build a JAR package containing a JNI shared library, made with Dynamsoft Barcode Reader, for Windows, Linux, and macOS from scratch. In this article, I will demonstrate how to create JNI shared libraries with CMake and package class files and shared libraries into JAR files using Eclipse and Maven.
This article is Part 1 in a 5-Part Series.
- Part 1 - How to Package JNI Shared Library into Jar File
- Part 2 - How to Develop a DotCode Reader in Java Using a Webcam and OpenCV
- Part 3 - How to Build Desktop Barcode Scanner in Java and Kotlin
- Part 4 - How to Read Multiple Barcode and QR Code with Dynamsoft Java Barcode SDK
- Part 5 - Building Java Barcode QR Code Reading Apps: Dynamsoft vs. ZXing
How to Use Maven with Dynamsoft Barcode Reader
Dynamsoft provides a comprehensive Java development package, which you can use with Maven as follows:
<repositories>
    <repository>
      <id>dbr</id>
      <url>https://download2.dynamsoft.com/maven/dbr/jar</url>
    </repository>
  </repositories>
<dependencies>
    <dependency>
      <groupId>com.dynamsoft</groupId>
      <artifactId>dbr</artifactId>
      <version>9.6.40.1</version>
    </dependency>
  </dependencies>
If you are not interested in building such a JAR package step by step, you can skip the following sections.
How to Define Native Methods in Java
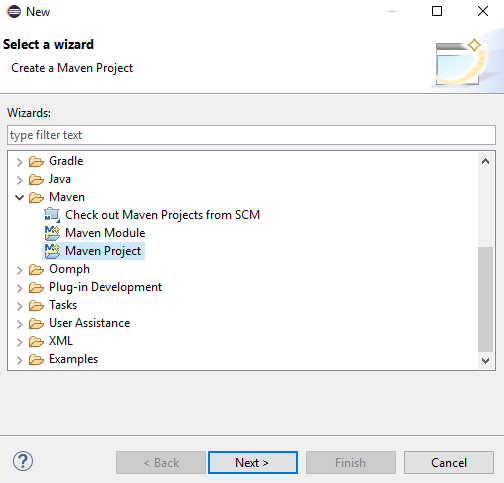
First, create a new Maven project in Eclipse.
Next, create a Java class named NativeBarcodeReader.java:
public class NativeBarcodeReader {

	private long nativePtr = 0;

	static {
		if (System.getProperty("java.vm.vendor").contains("Android")) {
			System.loadLibrary("dbr");
		} else {
			try {
				if (NativeLoader.load()) {
					System.out.println("Successfully loaded Dynamsoft Barcode Reader.");
				}
			} catch (Exception e) {
				// TODO Auto-generated catch block
				e.printStackTrace();
			}
		}
	}

	public NativeBarcodeReader() {
		nativePtr = nativeCreateInstance();
	}

	public void destroyInstance() {
		if (nativePtr != 0)
			nativeDestroyInstance(nativePtr);
	}

	public void setLicense(String license) {
		nativeInitLicense(nativePtr, license);
	}

	public void decodeFile(String fileName) {
		nativeDecodeFile(nativePtr, fileName);
	}

	private native int nativeInitLicense(long nativePtr, String license);

	private native long nativeCreateInstance();

	private native void nativeDestroyInstance(long nativePtr);

	private native void nativeDecodeFile(long nativePtr, String fileName);
}
Note: If you use the System.load() method, ensure all dependencies are loaded before loading the JNI shared library.
Eclipse will automatically compile the source code into a class file. Use javah to generate a C header file NativeBarcodeReader.h from the class in the jni folder.
mkdir jni
cd jni
javah -cp ..\target\classes -o NativeBarcodeReader.h com.dynamsoft.barcode.NativeBarcodeReader
Create the corresponding NativeBarcodeReader.cxx file:
#include "NativeBarcodeReader.h"
#include "DynamsoftBarcodeReader.h"

#ifdef __cplusplus
extern "C"
{
#endif

    /*
    * Class:     com_dynamsoft_barcode_NativeBarcodeReader
    * Method:    nativeInitLicense
    * Signature: (JLjava/lang/String;)I
    */
    JNIEXPORT jint JNICALL Java_com_dynamsoft_barcode_NativeBarcodeReader_nativeInitLicense(JNIEnv *env, jobject, jlong hBarcode, jstring license)
    {
        const char *pszLicense = env->GetStringUTFChars(license, NULL);

        if (hBarcode)
        {
            DBR_InitLicense((void *)hBarcode, pszLicense);
        }

        env->ReleaseStringUTFChars(license, pszLicense);
        return 0;
    }

    /*
    * Class:     com_dynamsoft_barcode_NativeBarcodeReader
    * Method:    nativeCreateInstance
    * Signature: ()J
    */
    JNIEXPORT jlong JNICALL Java_com_dynamsoft_barcode_NativeBarcodeReader_nativeCreateInstance(JNIEnv *, jobject)
    {
        return (jlong)DBR_CreateInstance();
    }

    /*
    * Class:     com_dynamsoft_barcode_NativeBarcodeReader
    * Method:    nativeDestroyInstance
    * Signature: (J)V
    */
    JNIEXPORT void JNICALL Java_com_dynamsoft_barcode_NativeBarcodeReader_nativeDestroyInstance(JNIEnv *, jobject, jlong hBarcode)
    {
        if (hBarcode)
        {
            DBR_DestroyInstance((void *)hBarcode);
        }
    }

    /*
    * Class:     com_dynamsoft_barcode_NativeBarcodeReader
    * Method:    nativeDecodeFile
    * Signature: (JLjava/lang/String;)V
    */
    JNIEXPORT void JNICALL Java_com_dynamsoft_barcode_NativeBarcodeReader_nativeDecodeFile(JNIEnv *env, jobject, jlong ptr, jstring fileName)
    {
        if (ptr)
        {
            void *hBarcode = (void *)ptr;
            const char *pszFileName = env->GetStringUTFChars(fileName, NULL);

            DBR_DecodeFile(hBarcode, pszFileName, "");

            STextResultArray *paryResult = NULL;
            DBR_GetAllTextResults(hBarcode, &paryResult);

            int count = paryResult->nResultsCount;
            int i = 0;
            for (; i < count; i++)
            {
                printf("Index: %d, Type: %s, Value: %s\n", i, paryResult->ppResults[i]->pszBarcodeFormatString, paryResult->ppResults[i]->pszBarcodeText); // Add results to list
            }

            // Release memory
            DBR_FreeTextResults(&paryResult);

            env->ReleaseStringUTFChars(fileName, pszFileName);
        }
    }

#ifdef __cplusplus
}
#endif
This code serves as a basic example. You can expand it with more functionalities as needed.
Dynamsoft C++ Barcode SDK
Download the Dynamsoft Barcode Reader for Windows, Linux and macOS.
Copy the OS-dependent shared libraries to the jni/platforms folder.
- jni/platforms/win
- DBRx64.lib
- DynamicPdfx64.dll
- DynamsoftBarcodeReaderx64.dll
- vcomp110.dll
- DynamsoftLicClientx64.dll
- DynamsoftLicenseClientx64.dll
- jni/platforms/linux
- libDynamicPdf.so
- libDynamsoftBarcodeReader.so
- libDynamLicenseClient.so
- libDynamsoftLicenseClient.so
- jni/platforms/macos
- libDynamsoftBarcodeReader.dylib
- libDynamsoftLicenseClient.dylib
- libDynamicPdf.dylib
How to Use CMake to Build a JNI Shared Library
Create a CMakeLists.txt file.
Define the Java include and library directories:
find_package(JNI REQUIRED)
include_directories(${JNI_INCLUDE_DIRS})

MESSAGE( STATUS "JAVA_INCLUDE: " ${JAVA_INCLUDE})

# Check platforms
if (CMAKE_HOST_WIN32)
    set(WINDOWS 1)
elseif(CMAKE_HOST_APPLE)
    set(MACOS 1)
elseif(CMAKE_HOST_UNIX)
    set(LINUX 1)
endif()

# Set RPATH
if(CMAKE_HOST_UNIX)
    if(CMAKE_HOST_APPLE)
        SET(CMAKE_CXX_FLAGS "-std=c++11 -O3 -Wl,-rpath,@loader_path")
        SET(CMAKE_INSTALL_RPATH "@loader_path")
    else()
        SET(CMAKE_CXX_FLAGS "-std=c++11 -O3 -Wl,-rpath=$ORIGIN")
        SET(CMAKE_INSTALL_RPATH "$ORIGIN")
    endif()
    SET(CMAKE_INSTALL_RPATH_USE_LINK_PATH TRUE)
endif()

if(WINDOWS)
    if(CMAKE_CXX_COMPILER_ID STREQUAL "GNU")
        link_directories("${PROJECT_SOURCE_DIR}/platforms/win/bin/" ${JNI_LIBRARIES})
    else()
        link_directories("${PROJECT_SOURCE_DIR}/platforms/win/lib/" ${JNI_LIBRARIES})
    endif()
elseif(LINUX)
    if (CMAKE_SYSTEM_PROCESSOR STREQUAL x86_64)
        MESSAGE( STATUS "Link directory: ${PROJECT_SOURCE_DIR}/platforms/linux/" )
        link_directories("${PROJECT_SOURCE_DIR}/platforms/linux/" ${JNI_LIBRARIES})
    elseif(CMAKE_SYSTEM_PROCESSOR STREQUAL armv7l OR ARM32_BUILD)
        MESSAGE( STATUS "Link directory: ${PROJECT_SOURCE_DIR}/platforms/arm32/" )
        link_directories("${PROJECT_SOURCE_DIR}/platforms/arm32/" ${JNI_LIBRARIES})
    elseif(CMAKE_SYSTEM_PROCESSOR STREQUAL aarch64)
        MESSAGE( STATUS "Link directory: ${PROJECT_SOURCE_DIR}/platforms/aarch64/" )
        link_directories("${PROJECT_SOURCE_DIR}/platforms/aarch64/" ${JNI_LIBRARIES})
    endif()
elseif(MACOS)
    MESSAGE( STATUS "Link directory: ${PROJECT_SOURCE_DIR}/platforms/macos/" )
    link_directories("${PROJECT_SOURCE_DIR}/platforms/macos/" ${JNI_LIBRARIES})
endif()
include_directories("${PROJECT_BINARY_DIR}" "${PROJECT_SOURCE_DIR}/include/")
Link Dynamsoft Barcode Reader to generate JNI shared libraries for different platforms. Rename the file suffix from dylib to jnilib for macOS:
add_library(dbr SHARED NativeBarcodeReader.cxx)
if(MACOS)
    set_target_properties(dbr PROPERTIES SUFFIX ".jnilib")
endif()
if(WINDOWS)
    if(CMAKE_CXX_COMPILER_ID STREQUAL "GNU")
        target_link_libraries (${PROJECT_NAME} "DynamsoftBarcodeReaderx64")
    else()
        if(CMAKE_CL_64)
            target_link_libraries (${PROJECT_NAME} "DBRx64")
        else()
            target_link_libraries (${PROJECT_NAME} "DBRx86")
        endif()
    endif()
else()
    target_link_libraries (${PROJECT_NAME} "DynamsoftBarcodeReader" pthread)
endif()

if(WINDOWS)
    add_custom_command(TARGET ${PROJECT_NAME} POST_BUILD
    COMMAND ${CMAKE_COMMAND} -E copy_directory
    "${PROJECT_SOURCE_DIR}/platforms/win/bin/"
    $<TARGET_FILE_DIR:dbr>)
endif()
Install the libraries:
set(CMAKE_INSTALL_PREFIX "${PROJECT_SOURCE_DIR}/../src/main/")
set(ECLIPSE_PATH "java/com/dynamsoft/barcode/native")
set(MAVEN_PATH "resources/com/dynamsoft/barcode/native")
if(WINDOWS)
    install (DIRECTORY "${PROJECT_SOURCE_DIR}/platforms/win/bin/" DESTINATION "${CMAKE_INSTALL_PREFIX}${ECLIPSE_PATH}/win")
    install (DIRECTORY "${PROJECT_SOURCE_DIR}/platforms/win/bin/" DESTINATION "${CMAKE_INSTALL_PREFIX}${MAVEN_PATH}/win")
    install (TARGETS dbr DESTINATION "${CMAKE_INSTALL_PREFIX}${ECLIPSE_PATH}/win")
    install (TARGETS dbr DESTINATION "${CMAKE_INSTALL_PREFIX}${MAVEN_PATH}/win")
elseif(LINUX)
    install (DIRECTORY "${PROJECT_SOURCE_DIR}/platforms/linux/" DESTINATION "${CMAKE_INSTALL_PREFIX}${ECLIPSE_PATH}/linux")
    install (DIRECTORY "${PROJECT_SOURCE_DIR}/platforms/linux/" DESTINATION "${CMAKE_INSTALL_PREFIX}${MAVEN_PATH}/linux")
    install (TARGETS dbr DESTINATION "${CMAKE_INSTALL_PREFIX}${ECLIPSE_PATH}/linux")
    install (TARGETS dbr DESTINATION "${CMAKE_INSTALL_PREFIX}${MAVEN_PATH}/linux")
elseif(MACOS)
    install (DIRECTORY "${PROJECT_SOURCE_DIR}/platforms/macos/" DESTINATION "${CMAKE_INSTALL_PREFIX}${ECLIPSE_PATH}/macos")
    install (DIRECTORY "${PROJECT_SOURCE_DIR}/platforms/macos/" DESTINATION "${CMAKE_INSTALL_PREFIX}${MAVEN_PATH}/macos")
    install (TARGETS dbr DESTINATION "${CMAKE_INSTALL_PREFIX}${ECLIPSE_PATH}/macos")
    install (TARGETS dbr DESTINATION "${CMAKE_INSTALL_PREFIX}${MAVEN_PATH}/macos")
endif()
The ECLIPSE_PATH is used to export JAR files by Eclipse, whereas the MAVEN_PATH is used to export JAR files by Maven.
Build the JNI Shared Library
Windows
mkdir build
cd build
cmake -DCMAKE_GENERATOR_PLATFORM=x64 ..
cmake --build . --config Release --target install
Linux & macOS
mkdir build
cd build
cmake ..
cmake --build . --config Release --target install
How to Package Native Libraries into a JAR File
Edit the pom.xml file to include the directory of shared libraries:
<project xmlns="http://maven.apache.org/POM/4.0.0"
	xmlns:xsi="http://www.w3.org/2001/XMLSchema-instance" xsi:schemaLocation="http://maven.apache.org/POM/4.0.0 http://maven.apache.org/xsd/maven-4.0.0.xsd">
	<modelVersion>4.0.0</modelVersion>
	<groupId>com.dynamsoft</groupId>
	<artifactId>barcode</artifactId>
	<version>1.0.0</version>
	<properties>
		<project.build.sourceEncoding>UTF-8</project.build.sourceEncoding>
	</properties>
	<build>
		<resources>
			<resource>
				<directory>src/main/resources</directory>
				<excludes>
					<exclude>**/*.md</exclude>
					<exclude>**/*.h</exclude>
					<exclude>**/*.lib</exclude>
				</excludes>
			</resource>
		</resources>
		<plugins>
			<plugin>
				<groupId>org.apache.maven.plugins</groupId>
				<artifactId>maven-compiler-plugin</artifactId>
				<version>2.5.1</version>
				<configuration>
					<source>1.7</source>
					<target>1.7</target>
				</configuration>
			</plugin>
		</plugins>
	</build>
</project>
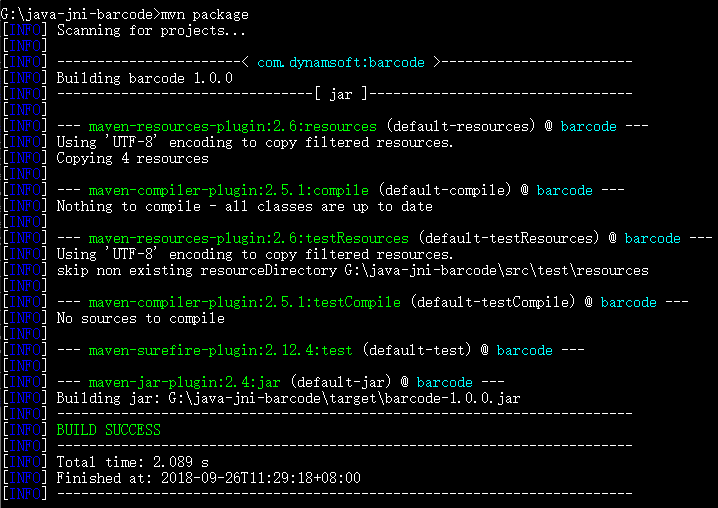
Generate the JAR file in the target folder:
mvn package
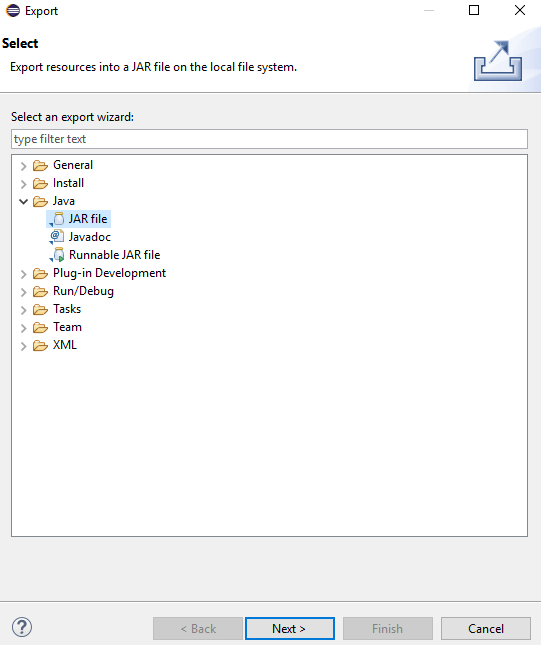
Alternatively, you can use Eclipse to export the JAR file.
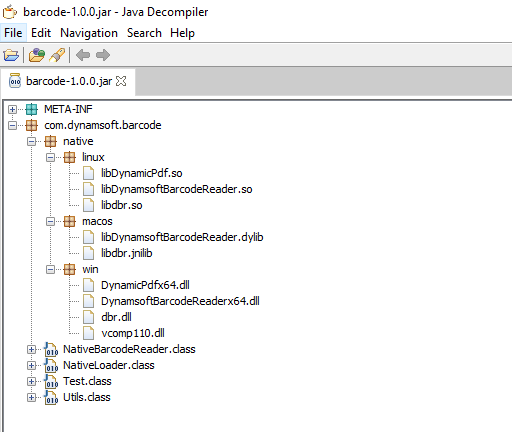
Here is the generated JAR file.

How to Load JNI Shared Libraries from a JAR File
List all dependent library files:
private static boolean extractResourceFiles(String dbrNativeLibraryPath, String dbrNativeLibraryName,
			String tempFolder) throws IOException {
    String[] filenames = null;
    if (Utils.isWindows()) {
        filenames = new String[] {"vcomp110.dll", "DynamicPdfx64.dll", "DynamsoftBarcodeReaderx64.dll", "dbr.dll", "DynamsoftLicClientx64.dll", "DynamsoftLicenseClientx64.dll"};
    }
    else if (Utils.isLinux()) {
        filenames = new String[] {"libDynamicPdf.so", "libDynamsoftBarcodeReader.so", "libdbr.so", "libDynamLicenseClient.so", "libDynamsoftLicenseClient.so"};
    }
    else if (Utils.isMac()) {
        filenames = new String[] {"libDynamsoftBarcodeReader.dylib", "libdbr.jnilib", "libDynamsoftLicenseClient.dylib", "libDynamicPdf.dylib"};
    }

    boolean ret = true;

    for (String file : filenames) {
        ret &= extractAndLoadLibraryFile(dbrNativeLibraryPath, file, tempFolder);
    }

    return ret;
}
Extract the shared libraries to a temporary folder:
private static boolean extractAndLoadLibraryFile(String libFolderForCurrentOS, String libraryFileName,
			String targetFolder) {
		String nativeLibraryFilePath = libFolderForCurrentOS + "/" + libraryFileName;

		String extractedLibFileName = libraryFileName;
		File extractedLibFile = new File(targetFolder, extractedLibFileName);

		try {
			if (extractedLibFile.exists()) {
				// test md5sum value
				String md5sum1 = md5sum(NativeBarcodeReader.class.getResourceAsStream(nativeLibraryFilePath));
				String md5sum2 = md5sum(new FileInputStream(extractedLibFile));

				if (md5sum1.equals(md5sum2)) {
					return loadNativeLibrary(targetFolder, extractedLibFileName);
				} else {
					// remove old native library file
					boolean deletionSucceeded = extractedLibFile.delete();
					if (!deletionSucceeded) {
						throw new IOException(
								"failed to remove existing native library file: " + extractedLibFile.getAbsolutePath());
					}
				}
			}

			// Extract file into the current directory
			InputStream reader = NativeBarcodeReader.class.getResourceAsStream(nativeLibraryFilePath);
			FileOutputStream writer = new FileOutputStream(extractedLibFile);
			byte[] buffer = new byte[1024];
			int bytesRead = 0;
			while ((bytesRead = reader.read(buffer)) != -1) {
				writer.write(buffer, 0, bytesRead);
			}

			writer.close();
			reader.close();

			if (!System.getProperty("os.name").contains("Windows")) {
				try {
					Runtime.getRuntime().exec(new String[] { "chmod", "755", extractedLibFile.getAbsolutePath() })
							.waitFor();
				} catch (Throwable e) {
				}
			}

			return loadNativeLibrary(targetFolder, extractedLibFileName);
		} catch (IOException e) {
			System.err.println(e.getMessage());
			return false;
		}

	}
Load libraries with an absolute path:
private static synchronized boolean loadNativeLibrary(String path, String name) {
		File libPath = new File(path, name);
		if (libPath.exists()) {
			try {
				System.load(new File(path, name).getAbsolutePath());
				return true;
			} catch (UnsatisfiedLinkError e) {
				System.err.println(e);
				return false;
			}

		} else
			return false;
	}
Run the test:
java -cp target/barcode-1.0.0.jar Test.java <image file>


