


How to Scan, Split, Merge, and Export PDF Documents Programmatically in JavaScript
A modern web-based document management application is essential for organizations looking to digitize their paper-based workflows and streamline document processing. In this tutorial, we’ll build a professional document management application that demonstrates the four core features essential for modern document processing: scan, split, merge through drag-and-drop, and save as PDF. Our app will feature a modern UI design and be built entirely with HTML5 and JavaScript using the Dynamic Web TWAIN.
This article is Part 1 in a 3-Part Series.
What you’ll build: A browser-based document management app that scans paper documents via a TWAIN-compatible scanner, splits and reorders pages using drag-and-drop, and exports each document group as a multi-page PDF — all with Dynamic Web TWAIN in JavaScript.
Key Takeaways
- Dynamic Web TWAIN’s
CreateDWTObjectExAPI initializes a headless scanner object that runs entirely in the browser without a backend server. - The
OnBufferChangedevent drives real-time thumbnail generation — every freshly scanned page is immediately displayed viaGetImageURL()andIndexToImageID(). - Document splitting is achieved by dynamically creating new DOM containers and moving image wrapper elements between them, keeping visual order in sync via
ImageIDToIndex(). SaveSelectedImagesAsMultiPagePDF()preserves the exact drag-and-drop page order becauseSelectImages()is called with DOM-ordered image IDs before saving.
Common Developer Questions
How do I scan, split, and merge PDF documents programmatically in JavaScript?
Create a headless scanner object with CreateDWTObjectEx(), use the buffer events to generate thumbnails, then move page wrappers between DOM groups to represent split and merge operations. PDF export happens after the visual order is finalized, so the same browser app covers scanning, grouping, and saving.
How do I preserve drag-and-drop page order when saving a multi-page PDF with Dynamic Web TWAIN?
Keep an imageid on each thumbnail element, then translate the current DOM order back to SDK indexes with ImageIDToIndex() before calling SelectImages(). That way SaveSelectedImagesAsMultiPagePDF() uses the same order the user sees after drag-and-drop.
How do I render scanned document thumbnails in a browser without uploading to a server?
Listen to OnBufferChanged, then generate preview URLs for new pages with GetImageURL() and store stable IDs from IndexToImageID(). Those local URLs are enough to render thumbnails entirely in the browser without a backend image service.
Demo Video
Online Demo
https://yushulx.me/web-twain-document-scan-management/examples/split_merge_document/
Prerequisites
- Get a 30-day free trial license for Dynamic Web TWAIN.
Primary Features We’ll Build
Our document management application focuses on four essential document processing capabilities:
1. Document Scanning
- Direct scanning from TWAIN-compatible scanners
- Automatic thumbnail generation
2. Document Splitting
- Split multi-page documents at any point
- Create separate document groups
3. Drag-and-Drop Merging
- Intuitive page reordering within documents
- Cross-document page movement for merging
- Visual feedback during drag operations
4. PDF Generation
- Save documents as multi-page PDFs
Step 1: Set Up the HTML Foundation
First, let’s create our main HTML file with the basic structure:
<!DOCTYPE html>
<html lang="en">
<head>
    <meta charset="UTF-8">
    <title>Document Management App - Dynamsoft</title>
    <meta name="viewport" content="width=device-width, initial-scale=1.0">
    <script type="text/javascript" src="https://unpkg.com/dwt/dist/dynamsoft.webtwain.min.js"></script>
    <link href="css/index.css" rel="stylesheet" />
</head>
<body>
    <!-- License Activation Overlay -->
    <div id="licenseOverlay" class="license-overlay">
    </div>

    <div id="appContainer" class="app-container">
    </div>
</body>
</html>
Key Points:
- We’re loading the Dynamic Web TWAIN from CDN
- The structure separates license activation from the main app
Step 2: Create the License Activation Interface
Add the license activation overlay inside the licenseOverlay div:
<div id="licenseOverlay" class="license-overlay">
    <div class="license-card">
        <div class="license-header">
            <h1>🚀 Activate Your License</h1>
            <p>Enter your Dynamsoft license key to get started with full features</p>
        </div>

        <div class="trial-info">
            <h3>📝 Need a License Key?</h3>
            <p>Get a free trial license key to unlock all features and start scanning documents right away.</p>
            <a href="https://www.dynamsoft.com/customer/license/trialLicense/?product=dcv&package=cross-platform"
               target="_blank" rel="noopener noreferrer" class="trial-link">Apply for Free Trial License →</a>
        </div>

        <form class="license-form" id="licenseForm">
            <div class="form-group">
                <label for="licenseKey" class="form-label">License Key</label>
                <input type="text" id="licenseKey" class="form-input"
                       placeholder="Enter your license key here..." spellcheck="false">
            </div>

            <div class="button-group">
                <button type="submit" class="btn btn-primary" id="activateBtn">
                    <span id="activateText">Activate License</span>
                    <span id="activateSpinner" class="loading-spinner ds-hidden"></span>
                </button>
                <button type="button" class="btn btn-secondary" id="useTrialBtn">
                    Use Trial License
                </button>
            </div>
        </form>
    </div>
</div>
Step 3: Build the Main Application Interface
Create the main application interface:
<div id="appContainer" class="app-container">
    <div class="app-header">
        <h1 class="app-title">📄 Document Management</h1>
        <div class="license-status">
            <span class="status-indicator"></span>
            <span id="licenseStatusText">License Active</span>
        </div>
    </div>

    <div class="container">
        <div class="sidebar">
            <div class="sidebar-section">
                <h3 class="section-title">🎯 Actions</h3>
                <div class="action-buttons">
                    <button class="action-btn" id="btnAcquireImage" onclick="DWTManager.acquireImage();">
                        📷 Scan Document
                    </button>
                    <button class="action-btn" id="btnLoadImage" onclick="DWTManager.loadImage();">
                        📁 Load Images
                    </button>
                </div>
            </div>

            <div class="sidebar-section files">
                <h3 class="section-title">📋 Files</h3>
                <ul class="file-list">
                    <li data-group="group-1" class="initial-hidden">
                        <div class="file-info">
                            <div class="title-name"></div>
                            <em><div class="page-number"></div></em>
                        </div>
                        <label class="checkbox-label">
                            <input type="checkbox" checked data-group="group-1">
                            <span class="visually-hidden">Show/hide document group</span>
                        </label>
                    </li>
                </ul>
            </div>
        </div>

        <div class="main">
            <div class="ds-imagebox-wrapper">
                <div id="imagebox-1" docID="1" class="doc initial-hidden" data-group="group-1">
                    <div class="doc-title">
                        <span class="title-name"></span>
                        <div class="doc-buttons">
                            <button onclick="FileManager.save(this);">💾 Save File</button>
                            <button onclick="FileManager.delete(this);">🗑️ Delete</button>
                        </div>
                    </div>
                    <div class="ds-imagebox mt10 thumbnails"></div>
                </div>
            </div>

            <div class="dwt-container h600">
                <div id="dwtcontrolContainer" class="h600"></div>
            </div>
        </div>
    </div>
</div>
Step 4: Configure Global Variables and the SDK Resource Path
Set up the JavaScript variables and constants that will be used throughout the application:
'use strict';

const DEFAULT_LICENSE = "YOUR_TRIAL_LICENSE_KEY_HERE";
const STORAGE_KEY = 'dynamsoft_license_key';
const NOTIFICATION_DURATION = 3000;

let currentLicenseKey = null;
let isLicenseActivated = false;
let DWTObject = null;
let imageCount = 0;
let pdfName = '';

Dynamsoft.DWT.ResourcesPath = 'https://unpkg.com/dwt/dist/';
Note: To load the Dynamic Web TWAIN SDK correctly, the Dynamsoft.DWT.ResourcesPath must point to the location of the SDK files.
Step 5: Build the License Manager
Create the license management module:
const LicenseManager = {
    init() {
        this.bindEvents();
        this.checkStoredLicense();
    },

    bindEvents() {
        const licenseForm = document.getElementById('licenseForm');
        const useTrialBtn = document.getElementById('useTrialBtn');

        licenseForm.addEventListener('submit', this.handleLicenseSubmit.bind(this));
        useTrialBtn.addEventListener('click', () => this.activateLicense(DEFAULT_LICENSE, true));
    },

    checkStoredLicense() {
        const storedLicense = localStorage.getItem(STORAGE_KEY);
        if (storedLicense && storedLicense !== DEFAULT_LICENSE) {
            document.getElementById('licenseKey').value = storedLicense;
        }
    },

    async activateLicense(licenseKey, isTrial = false) {
        this.setLoadingState(true);

        try {
            Dynamsoft.DWT.ProductKey = licenseKey;
            currentLicenseKey = licenseKey;

            if (!isTrial) {
                localStorage.setItem(STORAGE_KEY, licenseKey);
            }

            document.getElementById('licenseOverlay').style.display = 'none';
            document.getElementById('appContainer').classList.add('active');

            this.updateLicenseStatus(isTrial);

            isLicenseActivated = true;

            DWTManager.initialize();

            const message = isTrial ? 'Trial license activated successfully!' : 'License activated successfully!';
            Utils.showNotification(message, 'success');

        } catch (error) {
            console.error('License activation failed:', error);
            Utils.showNotification('License activation failed. Please check your license key.', 'error');
        } finally {
            this.setLoadingState(false);
        }
    },

    setLoadingState(loading) {
        const activateBtn = document.getElementById('activateBtn');
        const useTrialBtn = document.getElementById('useTrialBtn');
        const activateText = document.getElementById('activateText');
        const activateSpinner = document.getElementById('activateSpinner');

        if (loading) {
            activateBtn.disabled = true;
            useTrialBtn.disabled = true;
            activateText.textContent = 'Activating...';
            activateSpinner.classList.remove('ds-hidden');
        } else {
            activateBtn.disabled = false;
            useTrialBtn.disabled = false;
            activateText.textContent = 'Activate License';
            activateSpinner.classList.add('ds-hidden');
        }
    }
};
Step 6: Connect the Scanner with the DWT Manager
The DWT (Dynamic Web TWAIN) Manager is the heart of our scanning functionality. This module handles all interactions with the Dynamic Web TWAIN:
const DWTManager = {
    initialize() {
        if (!isLicenseActivated) {
            console.warn('Cannot initialize DWT: License not activated');
            return;
        }

        pdfName = Utils.generateScanFilename();
        this.updateTitles();
        imageCount = 0;

        Dynamsoft.DWT.CreateDWTObjectEx({
            WebTwainId: 'mydwt-' + Date.now()
        }, (obj) => {
            DWTObject = obj;
            this.registerEvents();
            console.log('DWT Object initialized successfully');
        }, (err) => {
            console.error('DWT initialization failed:', err);
            Utils.showNotification('Failed to initialize scanner. Please check your license.', 'error');
        });
    },

    registerEvents() {
        DWTObject.RegisterEvent('OnBufferChanged', (bufferChangeInfo) => {
            if (bufferChangeInfo['action'] === 'add') {
                ImageManager.insert();
                imageCount++;
            }
        });
    },

    acquireImage() {
        if (!DWTObject) {
            Utils.showNotification('Scanner not initialized. Please activate your license first.', 'error');
            return;
        }

        DWTObject.SelectSourceAsync()
            .then(() => {
                return DWTObject.AcquireImageAsync({
                    IfCloseSourceAfterAcquire: true
                });
            })
            .then(() => {
                PageManager.showPages("group-1");
                Utils.showNotification('Document scanned successfully!', 'success');
            })
            .catch((exp) => {
                console.error(exp.message);
                Utils.showNotification('Scanning failed: ' + exp.message, 'error');
            });
    },

    loadImage() {
        if (!DWTObject) {
            Utils.showNotification('Scanner not initialized. Please activate your license first.', 'error');
            return;
        }

        DWTObject.LoadImageEx('', -1,
            () => {
                console.log('Images loaded successfully');
                PageManager.showPages("group-1");
                Utils.showNotification('Images loaded successfully!', 'success');
            },
            (a, b, c) => {
                console.error([a, b, c, DWTObject.ErrorCause]);
                Utils.showNotification('Failed to load images', 'error');
            }
        );
    }
};
Key Concepts Explained:
-
Buffer Management: DWT maintains an internal buffer of images. The
OnBufferChangedevent is crucial for detecting when new images are added. -
Asynchronous Operations: Scanner operations are asynchronous. We use promises to handle the scanning workflow properly.
-
Error Handling: Always check if DWTObject exists before operations to prevent runtime errors.
Step 7: Display Scanned Pages as Interactive Thumbnails
The ImageManager handles converting DWT buffer images into visible thumbnails in our UI. This is where scanned images become interactive elements:
const ImageManager = {
    insert() {
        if (!DWTObject) return;

        const currentImageIndex = imageCount;

        const currentImageUrl = DWTObject.GetImageURL(currentImageIndex);

        const currentImageID = DWTObject.IndexToImageID(currentImageIndex);

        const img = new Image();
        img.className = "ds-dwt-image";
        img.setAttribute("imageID", currentImageID);
        img.src = currentImageUrl;

        img.onload = () => {
            const wrapper = this.createImageWrapper(img);
            this.addToImageBox(wrapper);
        };
    },

    createImageWrapper(img) {
        const wrapper = document.createElement('div');
        wrapper.className = "ds-image-wrapper";
        wrapper.setAttribute("draggable", "true");
        wrapper.appendChild(img);

        wrapper.addEventListener('dragstart', DragDrop.handleDragStart);
        wrapper.addEventListener('dragend', DragDrop.handleDragEnd);
        wrapper.addEventListener('mousedown', (e) => ImageInteraction.handleMouseDown(e));

        return wrapper;
    },

    addToImageBox(wrapper) {
        const imageBox = document.getElementById('imagebox-1');

        if (imageBox.classList.contains('initial-hidden')) {
            imageBox.classList.remove('initial-hidden');

            const fileListItem = document.querySelector('li[data-group="group-1"]');
            if (fileListItem) {
                fileListItem.classList.remove('initial-hidden');
                fileListItem.style.display = 'flex';
            }
        }

        imageBox.lastElementChild.appendChild(wrapper);
    }
};
Understanding the Image Flow:
-
DWT Buffer → URL:
GetImageURL()creates a temporary URL for displaying images from the DWT buffer in the browser. -
Image ID Tracking: Each image gets a unique
imageIDthat links the DOM element back to the DWT buffer. This is crucial for operations like saving and deleting. -
Wrapper Pattern: We wrap each image in a container div to handle drag-and-drop and interaction events without interfering with the image itself.
-
Lazy Loading: Using
img.onloadensures the image is fully loaded before adding to DOM, preventing layout issues.
Step 8: Implement Drag-and-Drop for Document Merging
The drag-and-drop system enables users to merge documents by moving pages between different document groups. This is one of the most complex but essential features:
const DragDrop = {
    handleDragStart(e) {
        draggedElement = this;
        draggedImageBox = this.closest('.ds-imagebox');

        e.dataTransfer.effectAllowed = 'move';
        e.dataTransfer.setData('text/html', this.outerHTML);

        this.style.opacity = '0.5';
    },

    handleDragEnd() {
        this.style.opacity = '';
        draggedElement = null;
        draggedImageBox = null;

        document.querySelectorAll('.ds-imagebox').forEach(box => {
            box.classList.remove('drag-over');
        });
    },

    handleDragOver(e) {
        if (e.preventDefault) {
            e.preventDefault();
        }
        e.dataTransfer.dropEffect = 'move';
        return false;
    },

    handleDrop(e) {
        if (e.stopPropagation) {
            e.stopPropagation();
        }

        const targetImageBox = e.currentTarget;
        targetImageBox.classList.remove('drag-over');

        if (!draggedElement) return false;

        if (targetImageBox !== draggedImageBox) {
            DragDrop.insertAtPosition(targetImageBox, e.clientX);
        } else {
            DragDrop.reorderInSameBox(targetImageBox, e.clientX);
        }

        PageManager.updateAll();
        return false;
    },

    insertAtPosition(targetImageBox, clientX) {
        const rect = targetImageBox.getBoundingClientRect();
        const x = clientX - rect.left;
        const children = Array.from(targetImageBox.children);
        let insertIndex = children.length;

        for (let i = 0; i < children.length; i++) {
            const child = children[i];
            const childRect = child.getBoundingClientRect();
            const childX = childRect.left - rect.left + childRect.width / 2;

            if (x < childX) {
                insertIndex = i;
                break;
            }
        }

        if (insertIndex >= children.length) {
            targetImageBox.appendChild(draggedElement);
        } else {
            targetImageBox.insertBefore(draggedElement, children[insertIndex]);
        }
    },

    reorderInSameBox(targetImageBox, clientX) {
        const rect = targetImageBox.getBoundingClientRect();
        const x = clientX - rect.left;

        const children = Array.from(targetImageBox.children).filter(child => child !== draggedElement);
        let insertIndex = children.length;

        for (let i = 0; i < children.length; i++) {
            const child = children[i];
            const childRect = child.getBoundingClientRect();
            const childX = childRect.left - rect.left + childRect.width / 2;

            if (x < childX) {
                insertIndex = i;
                break;
            }
        }

        if (insertIndex >= children.length) {
            targetImageBox.appendChild(draggedElement);
        } else {
            targetImageBox.insertBefore(draggedElement, children[insertIndex]);
        }
    }
};
Drag-and-Drop Logic Explained:
-
Visual Feedback: We use opacity changes and CSS classes to show users what’s happening during the drag operation.
-
Position Calculation: The
clientXcoordinate tells us where the user dropped the item. We compare this to child element positions to determine insertion point. -
Merge vs. Reorder: The system automatically detects whether the user is merging documents (different containers) or just reordering pages (same container).
-
DOM Manipulation: We use
insertBefore()andappendChild()to physically move elements in the DOM, which immediately updates the visual order.
Step 9: Save Documents as Multi-Page PDFs
The FileManager handles the critical Save as PDF functionality, ensuring that the visual page order from drag-and-drop operations is preserved in the final PDF:
const FileManager = {
    save(button) {
        const docDiv = button.closest('.doc');

        const imageTags = docDiv.querySelectorAll('img[imageid]');

        const imageIndexes = Array.from(imageTags).map(img => {
            const imageid = img.getAttribute('imageid');
            return DWTObject.ImageIDToIndex(imageid);
        });

        console.log('Saving images in DOM order:', imageIndexes);

        DWTObject.SelectImages(imageIndexes);

        DWTObject.SaveSelectedImagesAsMultiPagePDF(
            pdfName,
            () => {
                console.log("PDF saved successfully");
                Utils.showNotification('PDF saved successfully!', 'success');
            },
            (errorCode, errorString) => {
                console.error('Save error:', errorString);
                Utils.showNotification('Failed to save PDF: ' + errorString, 'error');
            }
        );
    },

    delete(button) {
        const docDiv = button.closest('.doc');
        const imageTags = docDiv.querySelectorAll('img[imageid]');

        const imageIndexes = Array.from(imageTags).map(img => {
            const imageid = img.getAttribute('imageid');
            return DWTObject.ImageIDToIndex(imageid);
        });

        imageCount = imageCount - imageIndexes.length;

        DWTObject.SelectImages(imageIndexes);
        DWTObject.RemoveAllSelectedImages();

        if (docDiv) {
            const docId = docDiv.getAttribute('docid');

            if (docId === '1') {
                const wrappers = docDiv.querySelectorAll('.ds-image-wrapper');
                wrappers.forEach(wrapper => wrapper.remove());

                const remainingImages = docDiv.querySelectorAll('.ds-dwt-image');
                if (remainingImages.length === 0) {
                    docDiv.classList.add('initial-hidden');
                    const fileListItem = document.querySelector('li[data-group="group-1"]');
                    if (fileListItem) {
                        fileListItem.classList.add('initial-hidden');
                    }
                }
            } else {
                docDiv.remove();
                const group = docDiv.getAttribute('data-group');
                const groupItem = document.querySelector(`li[data-group="${group}"]`);
                if (groupItem) {
                    groupItem.remove();
                }
            }
        }

        Utils.showNotification('Document deleted successfully!', 'success');
    }
};
Step 10: Split a Multi-Page Document into Separate Groups
Document splitting allows users to break multi-page documents into separate groups at any point. This feature is essential for organizing scanned documents:
const DocumentSplitter = {
    splitImage(imageEl) {
        const imageWrapperDiv = imageEl.parentNode;
        const previousDivEl = imageWrapperDiv.previousSibling;

        if (previousDivEl) {
            this.createNextDocument(previousDivEl);
        }
    },

    createNextDocument(divImageWrapperEl) {
        const imageboxWrapper = document.querySelector('.ds-imagebox-wrapper');
        const currentDocumentEl = imageboxWrapper.lastElementChild;

        const documentID = 1 + parseInt(currentDocumentEl.getAttribute("docID"));

        const newDocGroup = this.createDocumentGroup(documentID);
        const newImageBox = this.createImageBox();

        newDocGroup.appendChild(this.createDocTitle());
        newDocGroup.appendChild(newImageBox);
        imageboxWrapper.appendChild(newDocGroup);

        while (divImageWrapperEl.nextElementSibling) {
            const siblingWrapper = divImageWrapperEl.nextElementSibling;
            this.prepareImageWrapper(siblingWrapper);
            newImageBox.appendChild(siblingWrapper);
        }

        this.createFileListItem(documentID);
        Utils.showNotification('Document split successfully!', 'success');
    },

    createDocumentGroup(documentID) {
        const newDivGroup = document.createElement('div');
        newDivGroup.id = 'imagebox-' + documentID;
        newDivGroup.setAttribute('docID', documentID);
        newDivGroup.setAttribute('data-group', 'group-' + documentID);
        newDivGroup.className = "doc";
        return newDivGroup;
    },

    createDocTitle() {
        const docTitle = document.createElement('div');
        docTitle.className = "doc-title";

        const titleName = document.createElement('span');
        titleName.className = "title-name";
        titleName.innerText = pdfName;

        const buttons = document.createElement('div');
        buttons.className = "doc-buttons";

        const saveBtn = document.createElement('button');
        saveBtn.textContent = '💾 Save File';
        saveBtn.onclick = function () { FileManager.save(this); };

        const deleteBtn = document.createElement('button');
        deleteBtn.textContent = '🗑️ Delete';
        deleteBtn.onclick = function () { FileManager.delete(this); };

        buttons.appendChild(saveBtn);
        buttons.appendChild(deleteBtn);
        docTitle.appendChild(titleName);
        docTitle.appendChild(buttons);

        return docTitle;
    },

    createImageBox() {
        const imageBox = document.createElement('div');
        imageBox.className = "ds-imagebox mt10 thumbnails";

        imageBox.addEventListener('drop', (e) => DragDrop.handleDrop.call(imageBox, e));
        imageBox.addEventListener('dragover', (e) => DragDrop.handleDragOver.call(imageBox, e));
        imageBox.addEventListener('dragenter', (e) => DragDrop.handleDragEnter.call(imageBox, e));
        imageBox.addEventListener('dragleave', (e) => DragDrop.handleDragLeave.call(imageBox, e));

        return imageBox;
    },

    createFileListItem(documentID) {
        const ul = document.querySelector('ul.file-list');
        const newLiGroup = document.createElement('li');
        newLiGroup.setAttribute('data-group', 'group-' + documentID);

        const fileInfo = document.createElement('div');
        fileInfo.className = 'file-info';

        const titleName = document.createElement('div');
        titleName.className = 'title-name';
        titleName.innerText = pdfName;

        const pageNumber = document.createElement('div');
        pageNumber.className = "page-number";

        const checkboxLabel = document.createElement('label');
        checkboxLabel.className = 'checkbox-label';

        const checkbox = document.createElement('input');
        checkbox.type = 'checkbox';
        checkbox.checked = true;
        checkbox.setAttribute('data-group', 'group-' + documentID);
        checkbox.addEventListener('change', EventHandlers.changeCheckboxValue);

        fileInfo.appendChild(titleName);
        fileInfo.appendChild(document.createElement('em').appendChild(pageNumber));
        checkboxLabel.appendChild(checkbox);
        newLiGroup.appendChild(fileInfo);
        newLiGroup.appendChild(checkboxLabel);
        ul.appendChild(newLiGroup);

        const newDocGroup = document.querySelector(`[data-group="group-${documentID}"].doc`);
        if (newDocGroup) {
            const images = newDocGroup.querySelectorAll('.ds-dwt-image');
            pageNumber.textContent = `${images.length} pages`;
        }
    }
};
Document Splitting Workflow:
- User Action: Right-click on an image → Select “Split”
- Find Split Point: Locate the image wrapper and identify where to split
- Create New Document: Generate new container with unique ID
- Move Images: Transfer all images after split point to new document
- Update UI: Add new document to file list with page count
- Preserve Functionality: Ensure new document has save/delete buttons and drag-and-drop
Step 11: Add a Context Menu for Splitting and Deleting Pages
Add utility functions and context menu system to complete the splitting functionality:
const ContextMenu = {
    init() {
        this.bindEvents();
    },

    bindEvents() {
        document.addEventListener('contextmenu', this.handleContextMenu.bind(this));
        document.addEventListener('click', this.handleClick.bind(this));

        document.getElementById('liSplit').addEventListener('click', this.handleSplit.bind(this));
        document.getElementById('liDelete').addEventListener('click', this.handleDelete.bind(this));
        document.getElementById('liMultiDelete').addEventListener('click', this.handleMultiDelete.bind(this));
    },

    handleContextMenu(e) {
        e.preventDefault();
        currentImgEl = null;

        const menu = document.querySelector('.ds-context-menu');
        if (!menu) return;

        let targetElement = e.target;
        if (targetElement.classList.contains('ds-image-wrapper')) {
            targetElement = targetElement.querySelector('img');
        }

        currentImgEl = targetElement;
        if (currentImgEl && currentImgEl.tagName === 'IMG') {
            menu.style.left = e.pageX + 'px';
            menu.style.top = e.pageY + 'px';
            menu.className = "ds-context-menu";
        } else {
            menu.className = "ds-context-menu ds-hidden";
        }
    },

    handleSplit() {
        if (currentImgEl) {
            DocumentSplitter.splitImage(currentImgEl);
        }
        PageManager.updateAll();
    }
};

const Utils = {
    generateScanFilename() {
        const now = new Date();
        const day = now.getDate().toString().padStart(2, '0');
        const monthNames = ['Jan', 'Feb', 'Mar', 'Apr', 'May', 'Jun',
            'Jul', 'Aug', 'Sep', 'Oct', 'Nov', 'Dec'];
        const month = monthNames[now.getMonth()];
        const year = now.getFullYear();
        let hour = now.getHours();
        const minute = now.getMinutes().toString().padStart(2, '0');
        const second = now.getSeconds().toString().padStart(2, '0');
        const isAM = hour < 12;
        const period = isAM ? 'AM' : 'PM';
        hour = hour % 12 || 12;
        hour = hour.toString().padStart(2, '0');

        return `Scan - ${day} ${month} ${year} ${hour}_${minute}_${second} ${period}.pdf`;
    },

    showNotification(message, type) {
        const notification = document.createElement('div');
        notification.className = `notification notification-${type}`;
        notification.style.cssText = `
            position: fixed;
            top: 20px;
            right: 20px;
            padding: 1rem 1.5rem;
            border-radius: 8px;
            color: white;
            font-weight: 600;
            z-index: 10000;
            animation: slideIn 0.3s ease;
            ${type === 'success' ? 'background: #10b981;' : 'background: #ef4444;'}
        `;
        notification.textContent = message;

        if (!document.getElementById('notification-styles')) {
            const style = document.createElement('style');
            style.id = 'notification-styles';
            style.textContent = `
                @keyframes slideIn {
                    from { transform: translateX(100%); opacity: 0; }
                    to { transform: translateX(0); opacity: 1; }
                }
            `;
            document.head.appendChild(style);
        }

        document.body.appendChild(notification);

        setTimeout(() => {
            notification.style.animation = 'slideIn 0.3s ease reverse';
            setTimeout(() => {
                if (notification.parentNode) {
                    notification.parentNode.removeChild(notification);
                }
            }, 300);
        }, NOTIFICATION_DURATION);
    }
};

const PageManager = {
    updateAll() {
        document.querySelectorAll('.file-list input[type="checkbox"]').forEach(checkbox => {
            const group = checkbox.getAttribute('data-group');
            this.showPages(group);
        });
    },

    showPages(group) {
        const groupItem = document.querySelector(`li[data-group="${group}"]`);
        if (!groupItem) return;

        const pageNumberEl = groupItem.querySelector('.page-number');
        if (!pageNumberEl) return;

        const targetGroup = document.querySelector(`.doc[data-group="${group}"]`);
        if (targetGroup) {
            const images = targetGroup.querySelectorAll('.ds-dwt-image');
            pageNumberEl.textContent = `${images.length} pages`;
        }
    }
};
Context Menu HTML Structure:
<div class="ds-context-menu ds-hidden">
    <ul>
        <li id="liSplit">✂️ Split</li>
        <li id="liDelete">🗑️ Delete</li>
        <li id="liMultiDelete">🗑️ Multi Delete</li>
    </ul>
</div>
Step 12: Initialize and Wire All Application Modules
Finally, let’s initialize the application and tie all modules together:
const App = {
    init() {
        LicenseManager.init();
        ContextMenu.init();
        EventHandlers.initializeCheckboxes();
    }
};

const EventHandlers = {
    changeCheckboxValue() {
        const group = this.getAttribute('data-group');
        const targetGroup = document.querySelector(`.doc[data-group="${group}"]`);

        if (this.checked) {
            targetGroup.style.display = "";
        } else {
            targetGroup.style.display = "none";
        }
    },

    initializeCheckboxes() {
        document.querySelectorAll('.file-list input[type="checkbox"]').forEach(checkbox => {
            checkbox.addEventListener('change', this.changeCheckboxValue);
        });

        document.querySelectorAll('.file-list input[type="checkbox"]:checked').forEach(checkbox => {
            const group = checkbox.getAttribute('data-group');
            const targetGroup = document.querySelector(`.doc[data-group="${group}"]`);
            if (targetGroup) {
                targetGroup.classList.add('active');
            }
        });
    }
};

document.addEventListener('DOMContentLoaded', App.init);
Step 13: Run and Test the Application Locally
-
Start a local server with Python’s built-in HTTP server for quick testing:
python -m http.server 8000 -
Navigate to
http://localhost:8000in your web browser.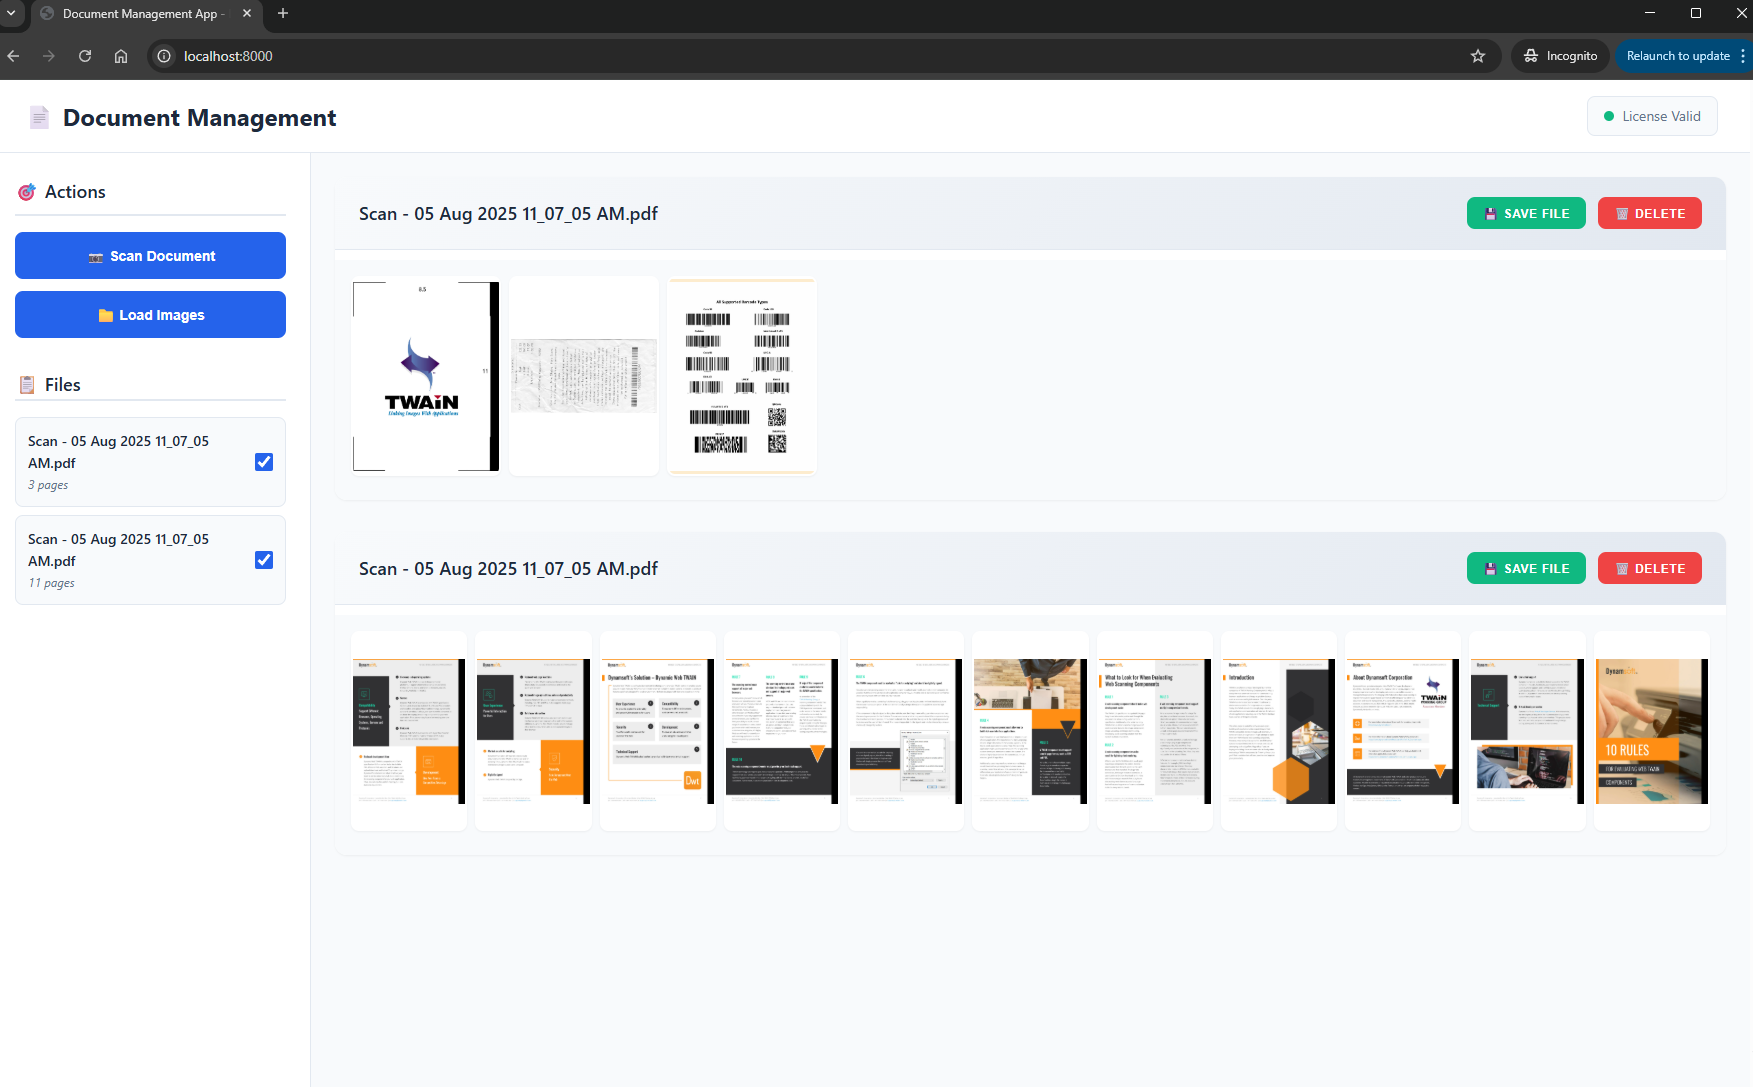
Common Issues & Edge Cases
- Scanner not detected after license activation: The DWT object is created asynchronously via
CreateDWTObjectEx. IfSelectSourceAsync()throws immediately, ensure the Dynamsoft Service desktop agent is installed and running — it bridges the browser and your TWAIN drivers. - Page order not preserved in saved PDF: The saved PDF order depends entirely on the DOM order of
img[imageid]elements at the momentSelectImages()is called. If pages appear shuffled, verify that every drag-and-drop drop event callsPageManager.updateAll()to rebuild the selection array. - Split creates an empty document group:
splitImage()checkspreviousSiblingto find the split point. Right-clicking the very first page of a document has no previous sibling, so the split is silently skipped. Always right-click a page after the first one to trigger a split.