


How to Integrate Document Scan and Annotation JavaScript APIs into Your Angular Application
Building a seamless document processing experience on the web requires more than just capturing documents. You also need intuitive ways to display and annotate e-documents directly in the browser. In this tutorial, we will walk through integrating two powerful JavaScript libraries from Dynamsoft:
- Dynamic Web TWAIN for scanning and capturing documents
- Document Viewer for in-browser viewing and annotation
By combining the two, we can implement a complete document workflow: from acquiring documents via scanners to annotating and exporting them as PDFs.
What you’ll build: An Angular web application that combines Dynamic Web TWAIN and Dynamsoft Document Viewer so users can acquire documents from scanners, files, or cameras, annotate them in the browser, and export the result as PDF.
Key Takeaways
- Dynamic Web TWAIN handles document acquisition from scanners and other capture sources, while Dynamsoft Document Viewer handles browser-side viewing and annotation.
- A custom toolbar button can bridge the two SDKs by letting users choose whether to load content from local files, cameras, or scanners.
- Angular can host the full edit workflow through
EditViewerwith desktop and mobileUiConfigvariants. - This combined approach keeps acquisition and annotation in one Angular application instead of splitting them into separate tools.
Common Developer Questions
How do I combine scanner acquisition and document annotation in an Angular web app?
Use Dynamic Web TWAIN for acquisition and pass the captured pages into Dynamsoft Document Viewer for in-browser editing and annotation. The two SDKs complement each other because one owns device access and the other owns the document editing surface.
How do I let Angular users load documents from a scanner, file, or camera in one toolbar?
Add a custom toolbar button to the viewer config, attach a click handler such as toggleDropdown, and use that dropdown to expose the available sources. This tutorial uses that pattern so one button can route to file, camera, or scanner input.
What is the role of Dynamsoft Document Viewer when Dynamic Web TWAIN is already present?
Dynamic Web TWAIN focuses on acquisition and preprocessing, but it does not provide the same browser-side annotation workflow as Document Viewer. DDV adds the viewing, markup, and PDF export layer that completes the end-user document experience.
This article is Part 5 in a 5-Part Series.
- Part 1 - How to Add Barcodes to a PDF Using JavaScript on the Client Side
- Part 2 - How to Read DataMatrix Barcodes from PDF Files Using JavaScript
- Part 3 - How to Add Electronic Signatures to PDF Documents Using JavaScript and HTML5
- Part 4 - Build an HTML5 JavaScript Document Scanner: Detect, Crop, and Save to PDF
- Part 5 - How to Integrate Document Scan and Annotation JavaScript APIs into Your Angular Application
Demo: Document Scanning and Annotation in Angular
Online Demo
https://yushulx.me/angular-barcode-mrz-document-scanner/
Prerequisites
- Install Node.js and Angular CLI on your machine.
- Obtain a 30-day free trial license.
-
Clone the open-source project angular-barcode-mrz-document-scanner, which demonstrates how to use Dynamic Web TWAIN and Dynamsoft Document Viewer APIs in an Angular application.
Dynamic Web TWAIN UI

Dynamsoft Document Viewer UI

Comparing Dynamic Web TWAIN and Dynamsoft Document Viewer
The table below highlights the key differences between Dynamic Web TWAIN and Dynamsoft Document Viewer, helping you understand how they complement each other when building a complete document scanning and annotation workflow in a web application.
| Feature | Dynamic Web TWAIN | Dynamsoft Document Viewer |
|---|---|---|
| Purpose | Scanning, uploading, and processing documents via local devices | Viewing, annotating, and managing documents (PDF, images) in the browser |
| Device Access | ✔️ Yes – supports scanners (TWAIN, ICA, SANE), webcams | ❌ No – works with files already loaded in browser memory |
| Document Storage Location | 📦 Stored in DynamsoftService (background service) |
🧠 Stored in browser memory (front-end only) |
| Annotation Tools | ❌ Not supported | ✔️ Text, highlight, shape, stamp, and drawing tools |
| Image Editing | ✔️ Crop, rotate, deskew, filp, zoom | ✔️ Crop, rotate, zoom, filter, annotate |
| PDF Support | ✔️ Supports scanning/uploading as PDF | ✔️ Web PDF rendering and saving |
| Editing Location | 🖥️ Service-side (via JavaScript API calls to local service) | 🌐 Client-side (fully browser-based using JavaScript) |
| Integration | JavaScript SDK with local service dependency | JavaScript SDK with WebAssembly (no service dependency) |
| Best For | Front-end + service-side scanning and preprocessing | Front-end document viewing and annotation |
Steps to Implement Document Scanning and Annotation in Angular
Here’s the final outcome we want to achieve: an Angular web application that allows users to scan documents, view them in the browser, annotate them with various tools, and save the annotated documents as PDFs.

Step 1: Add an Icon Button to the Toolbar
-
In
document-viewer.component.ts, create a custom button object for the toolbar.dropdownButton = { type: DDV.Elements.Button, className: "ddv-button ddv-load-image", tooltip: "Sources: File, Camera, Scanner", events: { click: "toggleDropdown", }, }; -
Add the button object to the
UiConfigobjects:pcEditViewerUiConfig: UiConfig = { type: DDV.Elements.Layout, flexDirection: "column", className: "ddv-edit-viewer-desktop", children: [ { type: DDV.Elements.Layout, className: "ddv-edit-viewer-header-desktop", children: [ { type: DDV.Elements.Layout, children: [ DDV.Elements.ThumbnailSwitch, DDV.Elements.Zoom, DDV.Elements.FitMode, DDV.Elements.Crop, DDV.Elements.Filter, DDV.Elements.Undo, DDV.Elements.Redo, DDV.Elements.DeleteCurrent, DDV.Elements.DeleteAll, DDV.Elements.Pan, DDV.Elements.AnnotationSet, this.dropdownButton, ], }, { type: DDV.Elements.Layout, children: [ { type: DDV.Elements.Pagination, className: "ddv-edit-viewer-pagination-desktop", }, DDV.Elements.Load, DDV.Elements.Download, ], }, ], }, DDV.Elements.MainView, ], }; mobileEditViewerUiConfig: UiConfig = { type: DDV.Elements.Layout, flexDirection: "column", className: "ddv-edit-viewer-mobile", children: [ { type: DDV.Elements.Layout, className: "ddv-edit-viewer-header-mobile", children: [ DDV.Elements.Pagination, DDV.Elements.Load, DDV.Elements.Download, ], }, DDV.Elements.MainView, { type: DDV.Elements.Layout, className: "ddv-edit-viewer-footer-mobile", children: [ DDV.Elements.Crop, DDV.Elements.Filter, DDV.Elements.Undo, DDV.Elements.Delete, DDV.Elements.AnnotationSet, this.dropdownButton, ], }, ], }; -
Instantiate
EditViewerwith the updatedUiConfigin thengOnInitmethod:this.editViewer = new DDV.EditViewer({ container: editContainer, viewerConfig: { scrollToLatest: true, }, uiConfig: this.isMobile() ? this.mobileEditViewerUiConfig : this.pcEditViewerUiConfig }); -
Run the Angular application and verify that the custom button appears in the toolbar.

Step 2: Implement the Button Click Handler to List Input Sources
-
Register the click event handler for the custom button:
this.editViewer.on("toggleDropdown", this.toggleDropdown); -
Dynamically create a context menu and append it to the DOM:
toggleDropdown = (e: any) => { e[0].stopPropagation(); if (!this.dropdown) { this.dropdown = this.createDropdownMenu(); this.dropdown.style.position = "absolute"; } this.dropdown.style.display = this.dropdown.style.display === "block" ? "none" : "block"; const rect = e[0].target.getBoundingClientRect(); this.dropdown.style.left = `${rect.left}px`; this.dropdown.style.top = `${rect.bottom + 5}px`; } createDropdownMenu(): HTMLElement { const dropdown = document.createElement("div"); dropdown.classList.add("dropdown-menu"); dropdown.innerHTML = ` <button class="selected" onclick="handleDropdownSelect(this)">Scanner (Dynamic Web TWAIN)</button> `; document.body.appendChild(dropdown); return dropdown; } constructor() { (window as any).handleDropdownSelect = (btn: HTMLElement) => { document.querySelectorAll(".dropdown-menu button").forEach(el => el.classList.remove("selected")); btn.classList.add("selected"); if (this.dropdown) { this.dropdown.style.display = "none"; } if (btn.textContent === "Scanner (Dynamic Web TWAIN)") { this.popDWTScanner(); } }; window.addEventListener("click", () => { if (this.dropdown) this.dropdown.style.display = "none"; }); } -
Reload the Angular app and click the custom button. A context menu should appear.

Step 3: Pop Up a Dialog to Select Available Scanners
-
Define a pop-up dialog in
document-viewer.component.html:<div id="pop-scanner" class="overlay"> <div class="popup"> <div class="form-group"> <label for="sources">Scanner Source:</label> <select id="sources"> </select> </div> <div class="form-group"> <label for="ADF">Auto Feeder:</label> <input type="checkbox" id="ADF" checked="checked"> </div> <div class="form-group"> <label for="Resolution">Resolution:</label> <select id="Resolution"> <option value="100">100</option> <option value="150">150</option> <option value="200">200</option> <option value="300">300</option> </select> </div> <div class="button-group"> <button class="button" id="acquireDocument">OK</button> <button class="button" id="cancelCapture">Cancel</button> </div> </div> </div> -
Create a Dynamic Web TWAIN object:
dwtObject?: WebTwain; ngOnInit(): void { ... Dynamsoft.DWT.AutoLoad = false; Dynamsoft.DWT.Containers = [{ WebTwainId: "dwtObj" }] Dynamsoft.DWT.Load(); Dynamsoft.DWT.RegisterEvent("OnWebTwainReady", () => { this.dwtObject = Dynamsoft.DWT.GetWebTwain("dwtObj") as WebTwain; }) ... } -
Populate the scanner list in
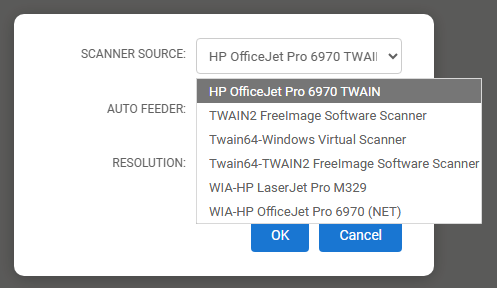
popDWTScannermethod:sourceList?: Device[]; async popDWTScanner(): Promise<void> { if (!this.dwtObject) { alert("Dynamic Web TWAIN is not initialized."); return; } try { this.sourceList = await this.dwtObject.GetDevicesAsync(); let select = document.getElementById('sources') as HTMLSelectElement; select.innerHTML = ''; for (let i = 0; i < this.sourceList.length; i++) { let device: any = this.sourceList[i]; let option = document.createElement("option"); option.text = device.displayName; option.value = i.toString(); select.add(option); }; } catch (error) { alert(error); return; } const popScanner = document.getElementById("pop-scanner"); if (popScanner) { popScanner.style.display = "flex"; } } -
Reload the app and confirm the scanner list appears.
Step 4: Implement the Document Scanning Logic
-
Add event listeners for the “OK” and “Cancel” buttons:
const cancelBtn = document.getElementById('cancelCapture'); const acquireBtn = document.getElementById('acquireDocument'); if (cancelBtn) { cancelBtn.addEventListener('click', () => { const popScanner = document.getElementById('pop-scanner'); if (popScanner) popScanner.style.display = 'none'; }); } if (acquireBtn) { acquireBtn.addEventListener('click', async () => { const popScanner = document.getElementById('pop-scanner'); if (popScanner) popScanner.style.display = 'none'; const select = document.getElementById('sources') as HTMLSelectElement; const scanner = select?.value; if (!scanner || scanner.length === 0) { alert('Please select a scanner.'); return; } const resolutionSelect = document.getElementById('Resolution') as HTMLSelectElement; const adfCheck = document.getElementById('ADF') as HTMLInputElement; if (!this.dwtObject || !this.sourceList) return; this.dwtObject.IfShowUI = false; await this.dwtObject.SelectDeviceAsync(this.sourceList[select.selectedIndex]); await this.dwtObject.OpenSourceAsync(); await this.dwtObject.AcquireImageAsync({ IfFeederEnabled: adfCheck?.checked, PixelType: 2, Resolution: parseInt(resolutionSelect?.value || '200'), IfDisableSourceAfterAcquire: true }); await this.dwtObject.CloseSourceAsync(); }); } -
After calling
await this.dwtObject.CloseSourceAsync();, all scanned images will be stored in theDynamsoftServicebackground service. We can then convert these images toBloband load them into the document viewer.for (let i = 0; i < this.dwtObject.HowManyImagesInBuffer; i++) { let blob = await this.convertToBlobAsync(this.dwtObject, [i], Dynamsoft.DWT.EnumDWT_ImageType.IT_JPG); if (blob) { await this.load(blob, ''); } } this.dwtObject.RemoveAllImages(); async load(blob: Blob, password: string) { try { if (!this.currentDoc) { this.currentDoc = this.editViewer?.currentDocument == null ? DDV.documentManager.createDocument({ name: Date.now().toString(), author: "DDV", }) : this.editViewer.currentDocument; } const source = { fileData: blob, password: password, renderOptions: { renderAnnotations: "loadAnnotations" } }; await this.currentDoc!.loadSource([source]); if (this.editViewer && this.currentDoc) { this.editViewer.openDocument(this.currentDoc); this.editViewer.goToPage(this.editViewer.getPageCount() - 1); } } catch (error: any) { console.error(error); } }