


How to Add Barcodes to a PDF Using JavaScript on the Client Side
You can generate QR codes, PDF417, DataMatrix, and other barcode types in the browser and embed them into PDF documents as permanent annotations using HTML5, JavaScript, bwip-js, and the Dynamsoft Document Viewer SDK. The entire workflow runs client-side, so no server upload or backend PDF processing is required.
What you’ll build: A browser-based PDF editor that generates QR codes, PDF417, DataMatrix, and other barcode types with bwip-js and inserts them as flattened annotations into PDF pages using the Dynamsoft Document Viewer SDK.
Key Takeaways
- You can add barcodes to PDF documents entirely client-side using JavaScript — no server upload or backend processing needed.
- The Dynamsoft Document Viewer SDK renders PDFs in-browser and supports stamp annotations, which are used to embed generated barcode images.
- The bwip-js library generates barcodes (QR Code, PDF417, DataMatrix, EAN-13, Code 128, Code 39) on a canvas, which is then converted to a blob for annotation insertion.
- Saving with
saveAnnotation: "flatten"permanently embeds the barcode into the PDF so it is visible in any PDF reader.
Common Developer Questions
How do I add a barcode to a PDF using JavaScript without a server?
Generate the barcode in the browser, convert it into an image blob, insert it as a stamp-style annotation on the target PDF page, and then save the modified document locally. The full workflow stays client-side, so no backend PDF service is required.
Which JavaScript library can generate QR codes and insert them into PDF pages client-side?
Use bwip-js to generate QR codes, PDF417, DataMatrix, and other barcode images, then use Dynamsoft Document Viewer to place those images into the PDF as annotations. The two libraries complement each other: one creates the barcode, the other manages the PDF page.
How do I embed a barcode as a permanent annotation in a PDF document with JavaScript?
After inserting the barcode image as an annotation, save the document with saveAnnotation: "flatten" so the barcode becomes part of the PDF page content. That makes the inserted code visible in standard PDF readers without depending on editable annotation support.
This article is Part 1 in a 5-Part Series.
- Part 1 - How to Add Barcodes to a PDF Using JavaScript on the Client Side
- Part 2 - How to Read DataMatrix Barcodes from PDF Files Using JavaScript
- Part 3 - How to Add Electronic Signatures to PDF Documents Using JavaScript and HTML5
- Part 4 - Build an HTML5 JavaScript Document Scanner: Detect, Crop, and Save to PDF
- Part 5 - How to Integrate Document Scan and Annotation JavaScript APIs into Your Angular Application
Web PDF Editor Demo Video
Try the Online Demo
https://yushulx.me/web-document-annotation/
Prerequisites
-
Dynamsoft Document Viewer: This JavaScript SDK allows for seamless viewing and annotation of various document formats, including PDFs and common image files such as JPEG, PNG, TIFF, and BMP. With its robust feature set, you can render PDFs, navigate pages, enhance image quality, and save annotated documents. Install the package from npm to get started.
-
Dynamsoft Capture Vision Trial License: To access the full capabilities of the Dynamsoft SDKs, sign up for a 30-day free trial license. This trial offers complete access to all features, enabling you to explore the SDKs in-depth.
Build a Client-Side PDF Editor with Barcode Insertion
In the following paragraphs, we’ll walk you through the process of creating a web-based PDF document editor with barcode insertion capabilities. The editor will enable users to load PDF documents, insert barcodes as annotations, and save the modified PDF files locally.
Step 1: Load the Dynamsoft Document Viewer SDK via CDN
In the <head> section of your HTML file, add the following script tags to include the Dynamsoft Document Viewer SDK:
<link rel="stylesheet" href="https://cdn.jsdelivr.net/npm/dynamsoft-document-viewer@2.0.0/dist/ddv.css">
<script src="https://cdn.jsdelivr.net/npm/dynamsoft-document-viewer@2.0.0/dist/ddv.js"></script>
Step 2: Activate the Document Viewer with Your License Key
-
In
index.html, create an input element for the license key and a button to activate the SDK:<input type="text" placeholder="LICENSE-KEY" id="licensekey"> <button id="activateButton">Activate SDK</button> -
Implement the activation logic in
main.js:async function activate(license) { try { Dynamsoft.DDV.Core.license = license; Dynamsoft.DDV.Core.engineResourcePath = "https://cdn.jsdelivr.net/npm/dynamsoft-document-viewer@2.0.0/dist/engine"; await Dynamsoft.DDV.Core.init(); Dynamsoft.DDV.setProcessingHandler("imageFilter", new Dynamsoft.DDV.ImageFilter()); docManager = Dynamsoft.DDV.documentManager; } catch (error) { console.error(error); toggleLoading(false); } }Explanation
- The
engineResourcePathmust point to the location of the Dynamsoft Document Viewer engine files. setProcessingHandlersets the image filter for enhancing image quality.- The
documentManagerobject is used to manage the document viewer and editor.
- The
Step 3: Initialize the Built-In PDF Viewer and Editor
The Dynamsoft Document Viewer SDK provides a built-in document editor that requires minimal code to construct a web PDF viewer application.
-
Create a container element for the document viewer in
index.html:<div class="document-viewer"> <div id="edit-viewer"></div> </div> -
Initialize the document viewer in
main.js:async function showViewer() { if (!docManager) return; let editContainer = document.getElementById("edit-viewer"); editContainer.parentNode.style.display = "block"; editViewer = new Dynamsoft.DDV.EditViewer({ container: editContainer, uiConfig: DDV.getDefaultUiConfig("editViewer", { includeAnnotationSet: true }) }); }The
uiConfigparameter specifies the default UI configuration for the document viewer, including annotation tools.
Step 4: Add a Custom Barcode Button to the Toolbar
Dynamsoft Document Viewer allows for customization of UI elements and event handlers. According to the official documentation, you can add custom buttons.
A Custom Barcode Button with Google’s Material Icons
Define a custom button object in main.js:
const qrButton = {
    type: Dynamsoft.DDV.Elements.Button,
    className: "material-icons icon-qr_code",
    tooltip: "Add a QR code. Ctrl+Q",
    events: {
        click: "addQr",
    },
};
The className points to Google fonts. Use the material-icons class to display the qr_code icon in the button.
<link href="https://fonts.googleapis.com/icon?family=Material+Icons" rel="stylesheet">
<style>
    .icon-qr_code::before {
        content: "qr_code";
    }

    .icon-qr_code {
        display: flex;
        font-size: 1.5em;
    }
</style>
Add the Barcode Button to the Toolbar
To add the button to the toolbar, modify the uiConfig parameter in the showViewer function:
const pcEditViewerUiConfig = {
    type: Dynamsoft.DDV.Elements.Layout,
    flexDirection: "column",
    className: "ddv-edit-viewer-desktop",
    children: [
        {
            type: Dynamsoft.DDV.Elements.Layout,
            className: "ddv-edit-viewer-header-desktop",
            children: [
                {
                    type: Dynamsoft.DDV.Elements.Layout,
                    children: [
                        Dynamsoft.DDV.Elements.ThumbnailSwitch,
                        Dynamsoft.DDV.Elements.Zoom,
                        Dynamsoft.DDV.Elements.FitMode,
                        Dynamsoft.DDV.Elements.DisplayMode,
                        Dynamsoft.DDV.Elements.RotateLeft,
                        Dynamsoft.DDV.Elements.RotateRight,
                        Dynamsoft.DDV.Elements.Crop,
                        Dynamsoft.DDV.Elements.Filter,
                        Dynamsoft.DDV.Elements.Undo,
                        Dynamsoft.DDV.Elements.Redo,
                        Dynamsoft.DDV.Elements.DeleteCurrent,
                        Dynamsoft.DDV.Elements.DeleteAll,
                        Dynamsoft.DDV.Elements.Pan,
                        Dynamsoft.DDV.Elements.AnnotationSet,
                        qrButton,
                    ],
                },
                {
                    type: Dynamsoft.DDV.Elements.Layout,
                    children: [
                        {
                            type: Dynamsoft.DDV.Elements.Pagination,
                            className: "ddv-edit-viewer-pagination-desktop",
                        },
                        Dynamsoft.DDV.Elements.Load,
                        {
                            type: Dynamsoft.DDV.Elements.Button,
                            className: "ddv-button ddv-button-download",
                            events: {
                                click: "download",
                            }
                        }
                    ],
                },
            ],
        },
        Dynamsoft.DDV.Elements.MainView,
    ],
};

editViewer = new Dynamsoft.DDV.EditViewer({
    container: editContainer,
    uiConfig: pcEditViewerUiConfig
});
Press the Button to Pop Up a Barcode Generation Dialog
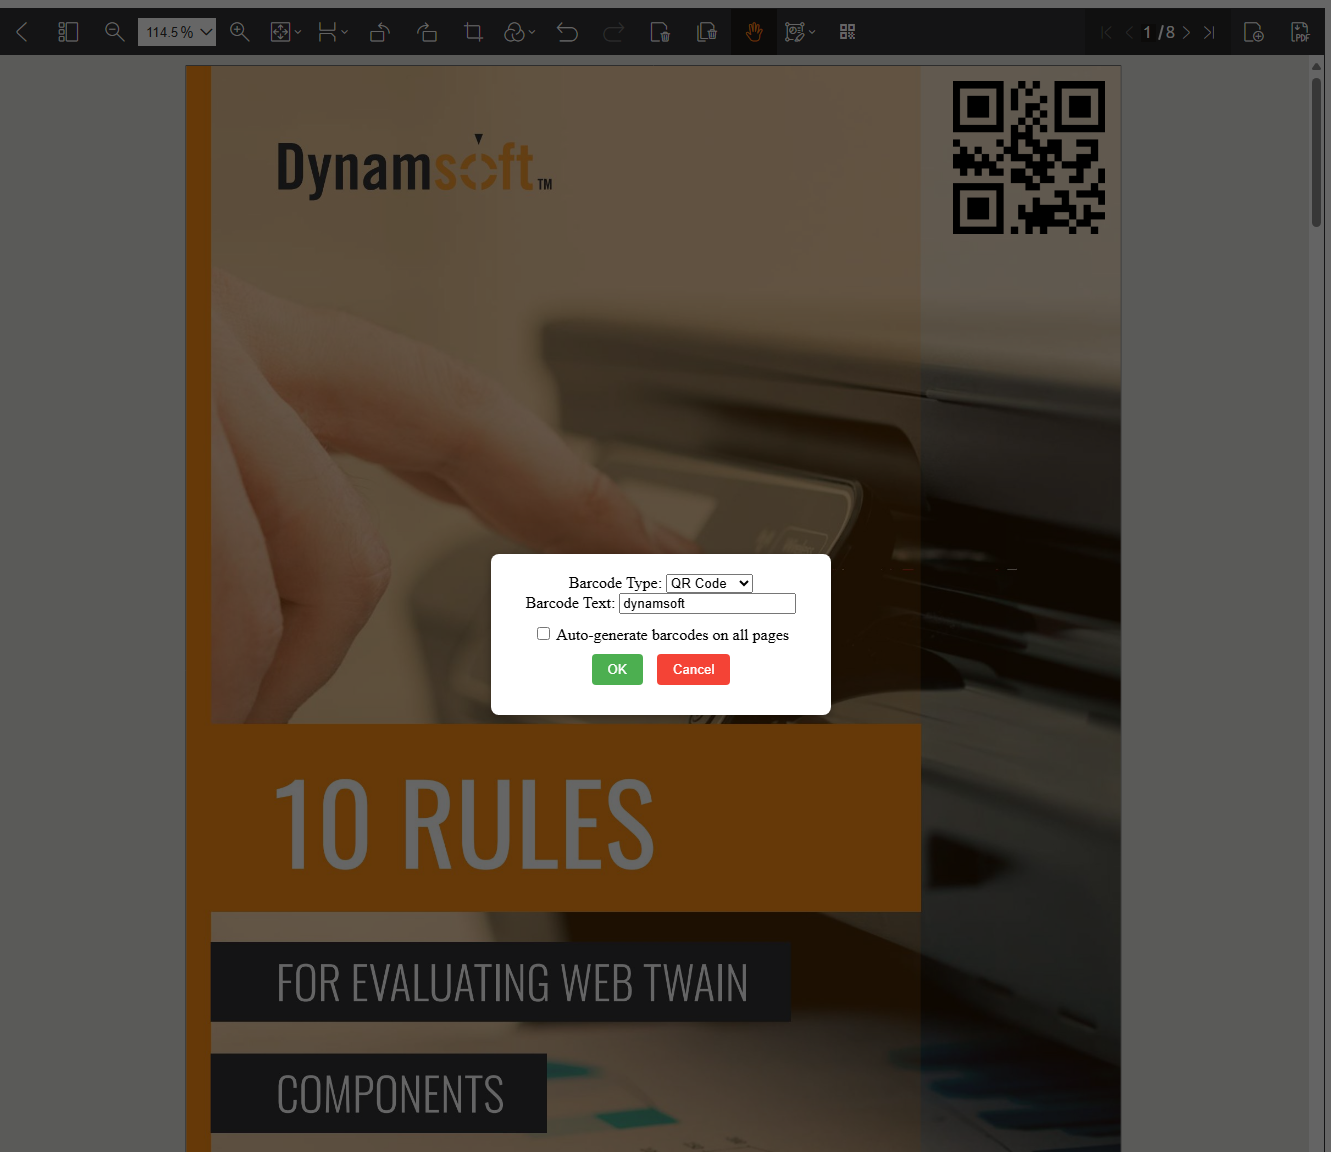
When the barcode button is clicked, a pop-up dialog will appear for users to input the barcode content and select the barcode type:
editViewer.on("addQr", addQr);
The dialog contains the following elements:
- A dropdown list for selecting barcode types.
- An input field for entering barcode content.
- An
OKbutton to submit the data. - A
Cancelbutton to close the pop-up without submitting.
Here’s the full code:
<style>
    .popup {
        background: #fff;
        padding: 20px;
        border-radius: 8px;
        width: 300px;
        box-shadow: 0 2px 10px rgba(0, 0, 0, 0.3);
        text-align: center;
    }

    .popup button {
        margin: 10px 5px;
        padding: 8px 16px;
        border: none;
        border-radius: 4px;
        cursor: pointer;
    }

    .popup .return-btn {
        background-color: #4CAF50;
        color: white;
    }

    .popup .cancel-btn {
        background-color: #f44336;
        color: white;
    }
</style>

<div id="popupOverlay" class="overlay">
    <div class="popup">
        <div>
            <label for="barcodeType">Barcode Type:</label>
            <!-- Dropdown for Barcode Types -->
            <select id="barcodeType">
                <option value="qrcode">QR Code</option>
                <option value="pdf417">PDF417</option>
                <option value="maxicode">MaxiCode</option>
                <option value="datamatrix">DataMatrix</option>
                <option value="ean13">EAN13</option>
                <option value="code128">CODE128</option>
                <option value="code39">CODE39</option>
            </select>
        </div>

        <div>
            <label for="barcodeContent">Barcode Text:</label>
            <input type="text" id="barcodeContent" placeholder="Enter barcode content">
        </div>

        <div style="margin-top: 10px;">
            <label>
                <input type="checkbox" id="applyToAllPages"> Auto-generate barcodes on all pages
            </label>
        </div>

        <button class="return-btn" onclick="returnResults()">OK</button>
        <button class="cancel-btn" onclick="closePopup()">Cancel</button>
    </div>
</div>

<script>
    function openPopup() {
    let docs = docManager.getAllDocuments();
    if (docs.length == 0) {
        alert("Please load a document first.");
        return;
    }

    document.getElementById("popupOverlay").style.display = "flex";
}

function closePopup() {
    document.getElementById("popupOverlay").style.display = "none";
}

function returnResults() {
    const barcodeType = document.getElementById("barcodeType").value;
    const barcodeContent = document.getElementById("barcodeContent").value;
    const applyToAllPages = document.getElementById("applyToAllPages").checked;

    if (!barcodeContent) {
        alert("Please enter barcode content.");
        return;
    }

    closePopup();

    let docs = docManager.getAllDocuments();

    let tempCanvas = document.createElement('canvas');
    if (barcodeContent !== null) {
        // TODO
    }
}
</script>
Step 5: Generate a Barcode and Insert It as a PDF Annotation
Include the bwip-js library in index.html. This library is used to generate barcodes in various formats, such as QR Code, PDF417, and DataMatrix.
<script src="https://cdn.jsdelivr.net/npm/bwip-js@4.1.2"></script>
After retrieving the barcode content and type, use bwipjs to draw the generated barcode on a canvas. Then, convert the canvas to a blob and insert it as an annotation to the PDF document.
if (barcodeContent !== null) {
    try {

        bwipjs.toCanvas(tempCanvas, {
            bcid: barcodeType,
            text: barcodeContent,
            scale: 3,
            includetext: false,
        });

        tempCanvas.toBlob(async (blob) => {
            if (blob) {
                let currentPageId = docs[0].pages[editViewer.getCurrentPageIndex()];
                let pageData = await docs[0].getPageData(currentPageId);

                const option = {
                    stamp: blob,
                    x: pageData.mediaBox.width - 110,
                    y: 10,
                    width: 100,
                    height: 100,
                    opacity: 1.0,
                    flags: {
                        print: false,
                        noView: false,
                        readOnly: false,

                    }
                }

                if (applyToAllPages) {
                    for (let i = 0; i < docs[0].pages.length; i++) {
                        await Dynamsoft.DDV.annotationManager.createAnnotation(docs[0].pages[i], "stamp", option)
                    }
                } else {

                    await Dynamsoft.DDV.annotationManager.createAnnotation(currentPageId, "stamp", option)
                }
            }
        }, 'image/png');
    } catch (e) {
        console.log(e);
    }
}
Step 6: Save the Annotated PDF with Embedded Barcodes
Create a download() function and bind it to the download button in the toolbar:
editViewer.on("download", download);

async function download() {
    try {
        const pdfSettings = {
            saveAnnotation: "flatten",
        };

        let blob = await editViewer.currentDocument.saveToPdf(pdfSettings);

        saveBlob(blob, `document_${Date.now()}.pdf`);
    } catch (error) {
        console.log(error);
    }

}

function saveBlob(blob, fileName) {
    const url = URL.createObjectURL(blob);
    const a = document.createElement('a');
    a.href = url;
    a.download = fileName;
    document.body.appendChild(a);
    a.click();
    document.body.removeChild(a);
    URL.revokeObjectURL(url);
}
When saving the PDF document, the saveAnnotation option is set to flatten, ensuring that annotations, including the barcodes, are embedded in the document.
Run and Test the Web PDF Document Editor
-
Start a web server in the root directory of your project:
python -m http.server - Open
http://localhost:8000in your web browser. - Load a PDF document.
-
Insert a barcode as an annotation into the PDF document.
Verify Barcodes by Reading Them from the PDF
Once the PDF document is saved to your local disk, you can verify the barcode content by reading it with the Dynamsoft Barcode Reader.
-
Install
barcode4nodejs, a Node.js wrapper built with the Dynamsoft C++ Barcode Reader SDK.npm i barcode4nodejs -
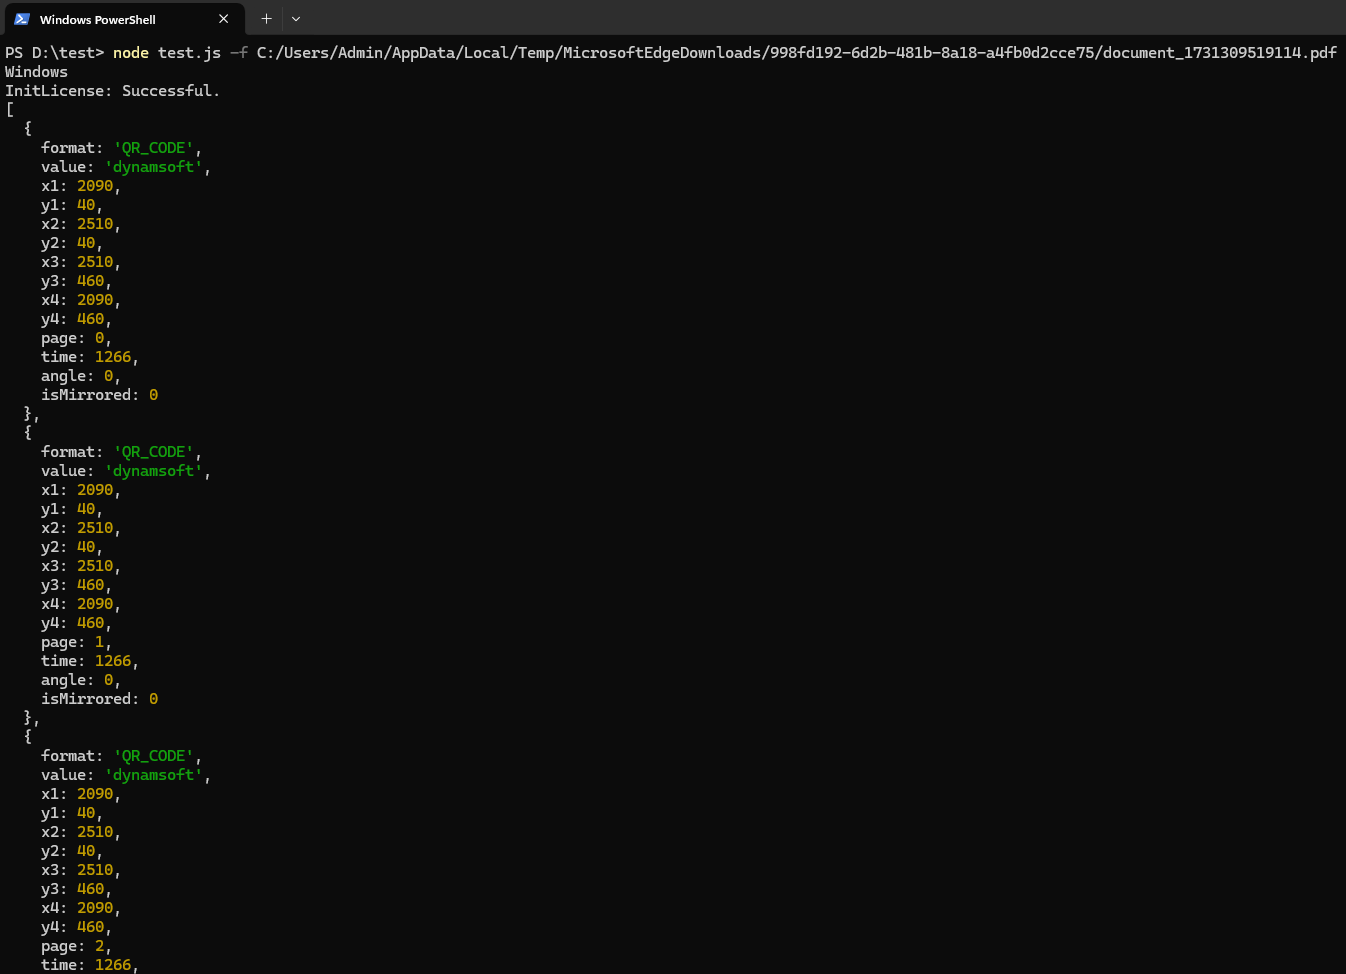
Create a script file,
test.js, to read barcodes from the PDF document:var dbr = require('barcode4nodejs'); var barcodeTypes = dbr.formats.ALL; dbr.initLicense("LICENSE-KEY"); let args = process.argv; if (args.includes('-f')) { let fIndex = args.indexOf('-f'); if (args[fIndex + 1]) { (async function () { try { var result = await dbr.decodeFileAsync(args[fIndex + 1], barcodeTypes, ""); console.log(result); setTimeout(() => { console.log('terminated'); }, 1000); } catch (error) { console.log(error); } })(); } else { console.log('Please add a file.'); } }Note: You need to replace the
LICENSE-KEYwith your own. -
Run the script with the path to a PDF file:
node test.js -f <pdf file>The barcode content will be printed in the console.
Common Issues and Edge Cases
- Barcode not visible after saving the PDF: Ensure the
saveAnnotationoption is set to"flatten"when callingsaveToPdf(). Without flattening, the barcode annotation may not render in external PDF viewers. - bwip-js throws an error for certain barcode types: Some barcode formats (e.g., EAN-13) require specific input lengths or character sets. Verify that the barcode content matches the format’s specification before generation.
- Barcode appears too small or positioned off-page: The
x,y,width, andheightvalues in the annotation option are in PDF points. Adjust them relative topageData.mediaBox.widthandpageData.mediaBox.heightto ensure proper placement across different page sizes.