


How to Build a .NET MAUI Barcode and QR Code Scanner in C#
Recently, Dynamsoft released a new .NET MAUI Barcode SDK for building barcode scanning applications on Android and iOS. In this tutorial, we will use Visual Studio Code to create a .NET MAUI Barcode Scanner from scratch. Our application will decode barcodes and QR codes from both image files and camera video stream.
What you’ll build: A cross-platform .NET MAUI barcode and QR code scanner app that decodes barcodes from image files and scans them in real time from the camera stream on Android and iOS, using the Dynamsoft Barcode Reader SDK.
Key Takeaways
- The Dynamsoft .NET MAUI Barcode SDK (
Dynamsoft.BarcodeReaderBundle.Maui) provides aCaptureVisionRouterAPI to decode 1D/2D barcodes from both static images and live camera frames. - A single
CaptureVisionRouter.Capture()call handles image file decoding, whileCameraEnhancerpaired withICapturedResultReceiverenables real-time camera scanning. - The SDK works on both Android and iOS from a shared C# codebase, with platform-specific permissions configured in
AndroidManifest.xmlandInfo.plist. - Barcode overlay rendering uses MAUI’s
GraphicsViewandIDrawableto draw bounding boxes and decoded text over detected barcodes.
Common Developer Questions
How do I integrate a barcode scanner into a .NET MAUI app on Android and iOS?
Install the MAUI barcode NuGet package, add the required Android and iOS permissions, initialize the license, and then wire CaptureVisionRouter plus CameraEnhancer into shared C# pages. That gives the same MAUI app two barcode flows: static image decoding and real-time camera scanning.
How to decode QR codes from image files in C# using .NET MAUI?
Let the user pick an image from the gallery, pass that file into CaptureVisionRouter.Capture(), and then render the decoded barcode results back into the MAUI UI. The article uses a dedicated picture page for this so file-based decoding and live-camera scanning stay cleanly separated.
Why is canvas.DrawString not rendering text on iOS in .NET MAUI GraphicsView?
canvas.DrawString can fail to render overlay text correctly on iOS even when the barcode boxes themselves draw normally. In this tutorial that limitation matters because barcode results are painted on top of the preview, so the workaround is to adjust the overlay strategy instead of assuming GraphicsView text behaves the same on every platform.
.NET MAUI Barcode Scanner Demo Video
This article is Part 1 in a 5-Part Series.
- Part 1 - How to Build a .NET MAUI Barcode and QR Code Scanner in C#
- Part 2 - How to Build a .NET MAUI Document Scanner App with Capture, Normalize, and Share
- Part 3 - Build a Passport MRZ Scanner for Android and iOS in C# with .NET MAUI
- Part 4 - Build a .NET MAUI Windows Desktop Barcode Scanner with Live Camera Feed
- Part 5 - Build a .NET MAUI Cross-Platform Camera Barcode Scanner for Windows, Android, and iOS
Prerequisites
To get started, you’ll need to install the following tools:
- .NET 8.0 SDK
- Visual Studio Code
- .NET MAUI extension for Visual Studio Code
- C# Kit
- Android SDK
- iOS SDK
For detailed installation instructions, refer to the Microsoft tutorial.
Get a 30-day free trial license for Dynamsoft Barcode Reader to follow along with this tutorial.
Why Not Visual Studio for Mac?
Microsoft has announced the retirement of Visual Studio for Mac, with support ending on August 31, 2024. The new .NET MAUI extension for Visual Studio Code offers a superior development experience for cross-platform applications.
Step 1: Create a New .NET MAUI Project
Create a new .NET MAUI project in Visual Studio Code:
- Open the command palette by pressing
Cmd + Shift + PorF1. - Type
> .NET: New Projectand pressEnter. - Select
.NET MAUI Appand pressEnter. - Enter the project name and choose the location to save the project.
To run the project on an Android device or iOS device:
-
Open the command palette and type
> .NET MAUI: Pick Android Deviceor> .NET MAUI: Pick iOS Deviceto select a device.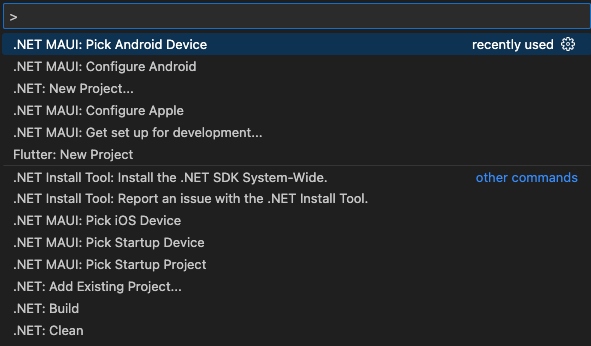
-
Press
F5to build and run the project.
Step 2: Install Barcode Detection and Lifecycle NuGet Packages
To enable barcode detection and handle Android lifecycle notifications, install the following NuGet packages:
- Dynamsoft.BarcodeReaderBundle.Maui: A .NET MAUI barcode SDK.
- CommunityToolkit.Mvvm: A messaging library for Android lifecycle notifications.
Run the following commands to add these packages to your project:
dotnet add package Dynamsoft.BarcodeReaderBundle.Maui
dotnet add package CommunityToolkit.Mvvm
Next, configure the dependencies in the MauiProgram.cs file:
using Microsoft.Extensions.Logging;
using Dynamsoft.CameraEnhancer.Maui;
using Dynamsoft.CameraEnhancer.Maui.Handlers;
using CommunityToolkit.Maui;
using Microsoft.Maui.LifecycleEvents;
using CommunityToolkit.Mvvm.Messaging;

namespace BarcodeQrScanner;

public static class MauiProgram
{
	public static MauiApp CreateMauiApp()
	{
		var builder = MauiApp.CreateBuilder();
		builder
			.UseMauiApp<App>().UseMauiCommunityToolkit()
			.ConfigureFonts(fonts =>
			{
				fonts.AddFont("OpenSans-Regular.ttf", "OpenSansRegular");
				fonts.AddFont("OpenSans-Semibold.ttf", "OpenSansSemibold");
			})
			.ConfigureLifecycleEvents(events =>
                            {
#if ANDROID
                                events.AddAndroid(android => android
                                    .OnResume((activity) =>
                                    {
										NotifyPage("Resume");
									})
                                    .OnStop((activity) =>
                                    {
										NotifyPage("Stop");
                                    }));
#endif
                            })
							.ConfigureMauiHandlers(handlers =>
            {
                handlers.AddHandler(typeof(CameraView), typeof(CameraViewHandler));
            });

#if DEBUG
		builder.Logging.AddDebug();
#endif

		return builder.Build();
	}

	private static void NotifyPage(string eventName)
	{
		WeakReferenceMessenger.Default.Send(new LifecycleEventMessage(eventName));
	}
}
Step 3: Configure Camera and Storage Permissions for Android and iOS
To enable the application to pick images from the gallery and access the camera, you need to add permission descriptions in the AndroidManifest.xml and Info.plist files.
Android
Add the following permissions to your AndroidManifest.xml file:
<uses-permission android:name="android.permission.READ_EXTERNAL_STORAGE" />
<uses-permission android:name="android.permission.WRITE_EXTERNAL_STORAGE" />
<uses-permission android:name="android.permission.CAMERA" />
iOS
Add the following keys to your Info.plist file to describe why your app needs access to the photo library, camera, and microphone:
<key>NSPhotoLibraryUsageDescription</key>
<string>App needs access to the photo library to pick images.</string>
<key>NSCameraUsageDescription</key>
<string>This app is using the camera</string>
<key>NSMicrophoneUsageDescription</key>
<string>This app needs access to microphone for taking videos.</string>
By adding these permission descriptions, you ensure that your application has the necessary access to the device’s camera and photo library, complying with Android and iOS security requirements.
Step 4: Activate the Barcode Reader SDK with a License Key
To use the Dynamsoft Barcode Reader SDK, you need to activate it with a valid license key in the MainPage.xaml.cs file. You can obtain a 30-day free trial license from Dynamsoft.
public partial class MainPage : ContentPage, ILicenseVerificationListener
{
    public MainPage()
    {
        InitializeComponent();
        LicenseManager.InitLicense("LICENSE-KEY", this);
    }

    public void OnLicenseVerified(bool isSuccess, string message)
    {
        if (!isSuccess)
        {
            Debug.WriteLine(message);
        }
    }
}
Step 5: Build the Main Page with Image and Camera Navigation
First, create a PicturePage for decoding barcodes from image files and a CameraPage for scanning barcodes from the camera video stream. Then, add two buttons to the main page: one for picking an image from the gallery and navigating to PicturePage, and another for requesting camera permissions and navigating to CameraPage.
MainPage.xaml
<?xml version="1.0" encoding="utf-8" ?>
<ContentPage xmlns="http://schemas.microsoft.com/dotnet/2021/maui"
             xmlns:x="http://schemas.microsoft.com/winfx/2009/xaml"
             x:Class="BarcodeQrScanner.MainPage"
             >

    <ScrollView>
        <StackLayout>
            <Button x:Name="takePhotoButton" Text="Image File" HorizontalOptions="Center" VerticalOptions="CenterAndExpand" Clicked="OnTakePhotoButtonClicked" />
            <Button x:Name="takeVideoButton" Text="Video Stream" HorizontalOptions="Center" VerticalOptions="CenterAndExpand" Clicked="OnTakeVideoButtonClicked" />
        </StackLayout>
    </ScrollView>

</ContentPage>
MainPage.xaml.cs
async void OnTakePhotoButtonClicked(object sender, EventArgs e)
{
    try
    {
        var result = await FilePicker.Default.PickAsync(new PickOptions
        {
            FileTypes = FilePickerFileType.Images,
            PickerTitle = "Please select an image"
        });

        if (result != null)
        {
            await Navigation.PushAsync(new PicturePage(result));
        }
    }
    catch (Exception ex)
    {
        // Handle exceptions if any
        Console.WriteLine($"An error occurred: {ex.Message}");
    }
}

async void OnTakeVideoButtonClicked(object sender, EventArgs e)
{

    var status = await Permissions.CheckStatusAsync<Permissions.Camera>();
    if (status == PermissionStatus.Granted)
    {
        await Navigation.PushAsync(new CameraPage());
    }
    else
    {
        status = await Permissions.RequestAsync<Permissions.Camera>();
        if (status == PermissionStatus.Granted)
        {
            await Navigation.PushAsync(new CameraPage());
        }
        else
        {
            await DisplayAlert("Permission needed", "I will need Camera permission for this action", "Ok");
        }
    }
}
Step 6: Decode Barcodes from Image Files
-
Add an
Imagecontrol to display the selected image and aGraphicsViewcontrol to overlay the barcode results.<ContentPage xmlns="http://schemas.microsoft.com/dotnet/2021/maui" xmlns:x="http://schemas.microsoft.com/winfx/2009/xaml" x:Class="BarcodeQrScanner.PicturePage" Title="Barcode Reader"> <Grid> <Image x:Name="PickedImage" Aspect="AspectFit" VerticalOptions="CenterAndExpand" HorizontalOptions="CenterAndExpand" SizeChanged="OnImageSizeChanged"/> <GraphicsView x:Name="OverlayGraphicsView" /> </Grid> </ContentPage>Ensure the size of the
GraphicsViewmatches the size of the Image control, and update theGraphicsViewsize when theImagecontrol size changes.private void OnImageSizeChanged(object sender, EventArgs e) { // Adjust the GraphicsView size to match the Image size OverlayGraphicsView.WidthRequest = PickedImage.Width; OverlayGraphicsView.HeightRequest = PickedImage.Height; } -
Get the image width and height for calculating the overlay position:
public PicturePage(FileResult result) { InitializeComponent(); LoadImageWithOverlay(result); } async private void LoadImageWithOverlay(FileResult result) { // Get the file path var filePath = result.FullPath; var stream = await result.OpenReadAsync(); float originalWidth = 0; float originalHeight = 0; try { var image = PlatformImage.FromStream(stream); originalWidth = image.Width; originalHeight = image.Height; ... } catch (Exception ex) { Console.WriteLine($"An error occurred: {ex.Message}"); } } -
Reset the file stream position for displaying the image:
stream.Position = 0; ImageSource imageSource = ImageSource.FromStream(() => stream); PickedImage.Source = imageSource; -
Decode barcodes from the image file:
private CaptureVisionRouter router = new CaptureVisionRouter(); CapturedResult capturedResult = router.Capture(filePath, EnumPresetTemplate.PT_READ_BARCODES); DecodedBarcodesResult? barcodeResults = null; if (capturedResult != null) { // Get the barcode results barcodeResults = capturedResult.DecodedBarcodesResult; } -
Draw the barcode results over the image:
 public class ImageWithOverlayDrawable : IDrawable
 {
     private readonly DecodedBarcodesResult? _barcodeResults;
     private readonly float _originalWidth;
     private readonly float _originalHeight;

     private bool _isFile;

     public ImageWithOverlayDrawable(DecodedBarcodesResult? barcodeResults, float originalWidth, float originalHeight, bool isFile = false)
     {
         _barcodeResults = barcodeResults;
         _originalWidth = originalWidth;
         _originalHeight = originalHeight;
         _isFile = isFile;
     }

     public void Draw(ICanvas canvas, RectF dirtyRect)
     {
         // Calculate scaling factors
         float scaleX = (int)dirtyRect.Width / _originalWidth;
         float scaleY = (int)dirtyRect.Height / _originalHeight;

         // Set scaling to maintain aspect ratio
         float scale = Math.Min(scaleX, scaleY);

         canvas.StrokeColor = Colors.Red;
         canvas.StrokeSize = 2;
         canvas.FontColor = Colors.Red;

         if (_barcodeResults != null) {
             var items = _barcodeResults.Items;
             foreach (var item in items) {
                 Microsoft.Maui.Graphics.Point[] points = item.Location.Points;

                 if (_isFile){
                     canvas.DrawLine((float)points[0].X * scale, (float)points[0].Y * scale, (float)points[1].X * scale, (float)points[1].Y * scale);
                     canvas.DrawLine((float)points[1].X * scale, (float)points[1].Y * scale, (float)points[2].X * scale, (float)points[2].Y * scale);
                     canvas.DrawLine((float)points[2].X * scale, (float)points[2].Y * scale, (float)points[3].X * scale, (float)points[3].Y * scale);
                     canvas.DrawLine((float)points[3].X * scale, (float)points[3].Y * scale, (float)points[0].X * scale, (float)points[0].Y * scale);
                 }

                 canvas.DrawString(item.Text, (float)points[0].X * scale, (float)points[0].Y * scale - 10, HorizontalAlignment.Left);
             }
         }
     }
 }

 var drawable = new ImageWithOverlayDrawable(barcodeResults, originalWidth, originalHeight, true);

 // Set drawable to GraphicsView
 OverlayGraphicsView.Drawable = drawable;
 OverlayGraphicsView.Invalidate();
Step 7: Scan Barcodes in Real Time from the Camera Stream
-
In the
CameraPagelayout, add aCameraViewcontrol to display the camera video stream and aGraphicsViewcontrol to overlay the barcode results on the video stream.<?xml version="1.0" encoding="utf-8" ?> <ContentPage xmlns="http://schemas.microsoft.com/dotnet/2021/maui" xmlns:x="http://schemas.microsoft.com/winfx/2009/xaml" xmlns:controls="clr-namespace:Dynamsoft.CameraEnhancer.Maui;assembly=Dynamsoft.CaptureVisionRouter.Maui" x:Class="BarcodeQrScanner.CameraPage" Title="Barcode Scanner"> <Grid Margin="0"> <controls:CameraView x:Name="CameraPreview" SizeChanged="OnImageSizeChanged"/> <GraphicsView x:Name="OverlayGraphicsView"/> </Grid> </ContentPage>private void OnImageSizeChanged(object sender, EventArgs e) { // Adjust the GraphicsView size to match the Image size OverlayGraphicsView.WidthRequest = PickedImage.Width; OverlayGraphicsView.HeightRequest = PickedImage.Height; } -
In the
CameraPage.xaml.csfile, instantiateCameraEnhancerand start the camera preview. UseWeakReferenceMessengerto handle Android lifecycle events.using Dynamsoft.Core.Maui; using Dynamsoft.CaptureVisionRouter.Maui; using Dynamsoft.BarcodeReader.Maui; using Dynamsoft.CameraEnhancer.Maui; using System.Diagnostics; using CommunityToolkit.Mvvm.Messaging; public partial class CameraPage : ContentPage, ICapturedResultReceiver, ICompletionListener { private CameraEnhancer? enhancer = null; private CaptureVisionRouter router; private float previewWidth = 0; private float previewHeight = 0; public CameraPage() { InitializeComponent(); enhancer = new CameraEnhancer(); router = new CaptureVisionRouter(); router.SetInput(enhancer); router.AddResultReceiver(this); WeakReferenceMessenger.Default.Register<LifecycleEventMessage>(this, (r, message) => { if (message.EventName == "Resume") { if (this.Handler != null && enhancer != null) { enhancer.Open(); } } else if (message.EventName == "Stop") { enhancer?.Close(); } }); } protected override void OnHandlerChanged() { base.OnHandlerChanged(); if (this.Handler != null && enhancer != null) { enhancer.SetCameraView(CameraPreview); enhancer.Open(); } } protected override async void OnAppearing() { base.OnAppearing(); await Permissions.RequestAsync<Permissions.Camera>(); router?.StartCapturing(EnumPresetTemplate.PT_READ_BARCODES, this); } protected override void OnDisappearing() { base.OnDisappearing(); enhancer?.Close(); router?.StopCapturing(); } } -
Receive the barcode results via callback functions and draw them on the video stream using the
GraphicsView.public void OnCapturedResultReceived(CapturedResult result) { MainThread.BeginInvokeOnMainThread(() => { var drawable = new ImageWithOverlayDrawable(null, previewWidth, previewHeight, false); // Set drawable to GraphicsView OverlayGraphicsView.Drawable = drawable; OverlayGraphicsView.Invalidate(); }); } public void OnDecodedBarcodesReceived(DecodedBarcodesResult result) { if (previewWidth == 0 && previewHeight == 0) { IntermediateResultManager manager = router.GetIntermediateResultManager(); ImageData data = manager.GetOriginalImage(result.OriginalImageHashId); // Create a drawable with the barcode results previewWidth = (float)data.Width; previewHeight = (float)data.Height; } MainThread.BeginInvokeOnMainThread(() => { var drawable = new ImageWithOverlayDrawable(result, previewWidth, previewHeight, false); // Set drawable to GraphicsView OverlayGraphicsView.Drawable = drawable; OverlayGraphicsView.Invalidate(); }); }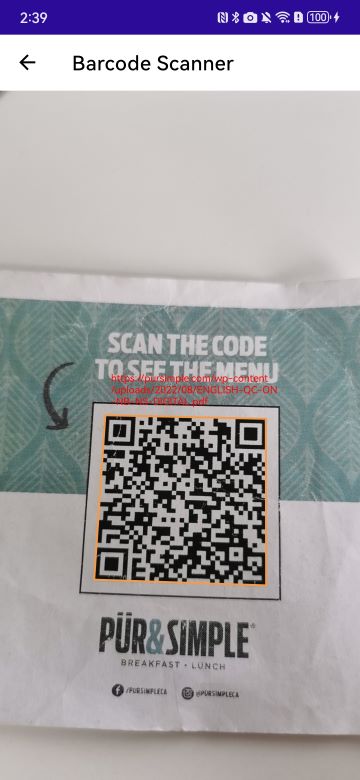
Common Issues and Edge Cases
iOS Text Rendering Issue
The canvas.DrawString method does not work properly on iOS, resulting in no text being rendered on the GraphicsView. As a workaround, consider using a Label overlay positioned at the barcode coordinates instead of drawing text directly on the canvas.
Camera Preview Appears Black on Android Emulator Some Android emulator configurations do not support camera passthrough. Test on a physical device, or configure the emulator’s advanced camera settings to use a virtual scene.
Barcode Not Detected from Low-Resolution Images
If CaptureVisionRouter.Capture() returns no results, verify that the input image resolution is sufficient. Blurry or heavily compressed images may fail to decode — try cropping the barcode region before scanning.