


How to Build a Desktop Document Scanner with Python, PySide6, and Dynamsoft Capture Vision
Digitizing paper documents from a webcam usually means fighting with skewed angles, poor lighting, and manual cropping. This project is a production-style desktop scanner app that detects document boundaries in real time, corrects perspective distortion, and exports the results as PDFs, individual images, or stitched long images. The app is built with Python, PySide6, and the Dynamsoft Capture Vision SDK.
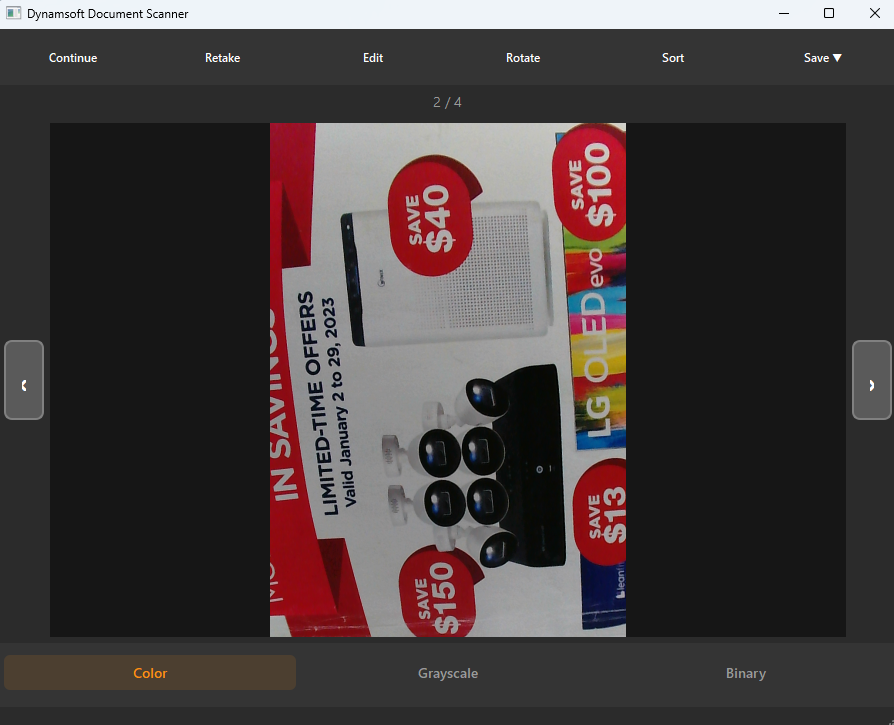
What you’ll build: A PySide6 desktop document scanner that uses the Dynamsoft Capture Vision SDK to detect, normalize, filter, rotate, reorder, and export documents captured from a USB camera or imported image files.
This article is Part 5 in a 5-Part Series.
- Part 1 - How to Build an Android Document Scanner with Auto-Capture and PDF Export
- Part 2 - How to Build a JavaScript Multi-Page Document Scanner Web App with Auto-Capture and PDF Export
- Part 3 - How to Build a Flutter Document Scanner App with Edge Detection, Editing, and PDF Export
- Part 4 - Build a SwiftUI iOS Document Scanner with Stable Auto Capture and PDF Export
- Part 5 - How to Build a Desktop Document Scanner with Python, PySide6, and Dynamsoft Capture Vision
Demo Video: Desktop Document Scanner in Action
Key Takeaways
- This tutorial demonstrates how to build a real-time desktop document scanner in Python using PySide6 and Dynamsoft Capture Vision.
- Dynamsoft Capture Vision’s
CaptureVisionRouterprovides document boundary detection and perspective normalization through preset templates. - The app processes camera frames on a background thread pool and downsamples detection input to keep the UI responsive at ~30 fps.
- Detected quads are stabilized with IoU and area-delta checks before auto-capture, reducing false captures from shaky hands.
- The resulting pages can be filtered, rotated, reordered, and exported as PDF, separate images, or a vertically stitched long image.
Common Developer Questions
How do I detect document boundaries from a webcam in a Python desktop app?
Use the Dynamsoft Capture Vision CaptureVisionRouter with the DetectDocumentBoundaries_Default preset template. Pass each camera frame as ImageData, then read the returned quadrilateral locations.
How does the app open the default camera?
The PySide6 document scanner app calls cv2.VideoCapture(0) to open the first available camera using OpenCV’s default backend, which works across Windows, Linux, and macOS.
How do I convert between OpenCV numpy images and Dynamsoft Capture Vision ImageData?
Wrap the numpy buffer with the ImageData constructor and specify the pixel format (IPF_RGB_888 for RGB or IPF_GRAYSCALED for grayscale). Convert back by reshaping the returned bytes according to the output pixel format.
What happens if no document is detected during capture?
The capture worker falls back to saving the original frame so the user never loses an image, and the UI shows a toast message explaining that no document was found.
How can I export scanned pages as a PDF or long image?
The PySide6 scanner app uses reportlab to render each page onto A4 PDF sheets and OpenCV template matching to estimate overlaps before vertically stitching pages into a single long image.
Prerequisites
- Dynamsoft Capture Vision Bundle >=3.0.0
- Python 3.9+, PySide6 >=6.5.0, OpenCV >=4.8.0, Pillow, reportlab, numpy
- A valid Dynamsoft license key. Get a 30-day free trial license.
Step 1: Install Dependencies and Initialize the SDK
Start by declaring the Python packages in requirements.txt and create a DCVScanner wrapper that initializes the license and CaptureVisionRouter.
# requirements.txt
dynamsoft-capture-vision-bundle>=3.6.4000
PySide6>=6.5.0
opencv-python>=4.8.0
Pillow>=10.0.0
reportlab>=4.0.0
numpy>=1.24.0
# scanner.py
from dynamsoft_capture_vision_bundle import (
    CaptureVisionRouter,
    LicenseManager,
    EnumErrorCode,
)

DEFAULT_LICENSE_KEY = (
    "LICENSE-KEY"
)

DETECT_TEMPLATE = "DetectDocumentBoundaries_Default"
NORMALIZE_TEMPLATE = "NormalizeDocument_Default"

class DCVScanner:
    def __init__(self, license_key: str = DEFAULT_LICENSE_KEY):
        self.license_key = license_key
        self.cvr = None
        self._initialized = False

    def init(self):
        if self._initialized:
            return EnumErrorCode.EC_OK, "OK"
        ec, msg = LicenseManager.init_license(self.license_key)
        if ec != EnumErrorCode.EC_OK:
            return ec, msg
        self.cvr = CaptureVisionRouter()
        self._initialized = True
        return EnumErrorCode.EC_OK, "OK"
Step 2: Convert Between OpenCV Images and DCV ImageData
The SDK works with ImageData objects, while OpenCV and PySide6 use numpy arrays. Add helpers to move between the two formats without copying more data than necessary.
# scanner.py
import numpy as np
import cv2
from dynamsoft_capture_vision_bundle import (
    EnumImagePixelFormat,
    ImageData,
)

def np_to_image_data(image: np.ndarray) -> ImageData:
    if image.ndim == 2:
        h, w = image.shape
        stride = image.strides[0]
        return ImageData(image.tobytes(), w, h, stride, EnumImagePixelFormat.IPF_GRAYSCALED)
    if image.shape[2] == 3:
        h, w = image.shape[:2]
        stride = image.strides[0]
        return ImageData(image.tobytes(), w, h, stride, EnumImagePixelFormat.IPF_RGB_888)
    if image.shape[2] == 4:
        h, w = image.shape[:2]
        stride = image.strides[0]
        return ImageData(image.tobytes(), w, h, stride, EnumImagePixelFormat.IPF_ARGB_8888)
    rgb = cv2.cvtColor(image, cv2.COLOR_BGR2RGB)
    h, w = rgb.shape[:2]
    stride = rgb.strides[0]
    return ImageData(rgb.tobytes(), w, h, stride, EnumImagePixelFormat.IPF_RGB_888)

def image_data_to_np(image_data: ImageData) -> np.ndarray:
    fmt = image_data.get_image_pixel_format()
    w = image_data.get_width()
    h = image_data.get_height()
    stride = image_data.get_stride()
    buf = image_data.get_bytes()
    if fmt == EnumImagePixelFormat.IPF_GRAYSCALED:
        arr = np.frombuffer(buf, dtype=np.uint8).reshape((h, stride))
        gray = arr[:, :w]
        return cv2.cvtColor(gray, cv2.COLOR_GRAY2RGB)
    if fmt == EnumImagePixelFormat.IPF_RGB_888:
        arr = np.frombuffer(buf, dtype=np.uint8).reshape((h, stride))
        arr = arr[:, :w * 3]
        return arr.reshape((h, w, 3))
    # ... additional format handling in the source file
Step 3: Detect and Normalize Document Boundaries
With the router initialized, call the detect template to find the best document quad, then pass that quad into the normalize template to deskew and crop the page.
# scanner.py
class DCVScanner:
    def detect_document(self, image: np.ndarray):
        if not self._initialized:
            self.init()
        img_data = np_to_image_data(image)
        result = self.cvr.capture(img_data, DETECT_TEMPLATE)
        if result.get_error_code() != EnumErrorCode.EC_OK:
            return None
        processed = result.get_processed_document_result()
        if not processed:
            return None
        quads = processed.get_detected_quad_result_items()
        if not quads:
            return None
        best = max(quads, key=lambda q: q.get_confidence_as_document_boundary())
        loc = best.get_location()
        return [QuadPoint(p.x, p.y) for p in loc.points]

    def normalize_document(self, image: np.ndarray, quad_points=None):
        if not self._initialized:
            self.init()
        img_data = np_to_image_data(image)
        template_name = NORMALIZE_TEMPLATE
        if quad_points and len(quad_points) == 4:
            ec, msg, settings = self.cvr.get_simplified_settings(template_name)
            if ec == EnumErrorCode.EC_OK:
                quad = Quadrilateral()
                quad.points = [Point(int(round(p.x)), int(round(p.y))) for p in quad_points]
                settings.roi = quad
                settings.roi_measured_in_percentage = 0
                ec2, msg2 = self.cvr.update_settings(template_name, settings)
                if ec2 != EnumErrorCode.EC_OK:
                    print(f"update_settings warning: {msg2}")
        result = self.cvr.capture(img_data, template_name)
        if result.get_error_code() != EnumErrorCode.EC_OK:
            return None
        processed = result.get_processed_document_result()
        if not processed:
            return None
        items = processed.get_enhanced_image_result_items()
        if not items:
            return None
        return image_data_to_np(items[0].get_image_data())
Step 4: Build the PySide6 UI and Camera Preview
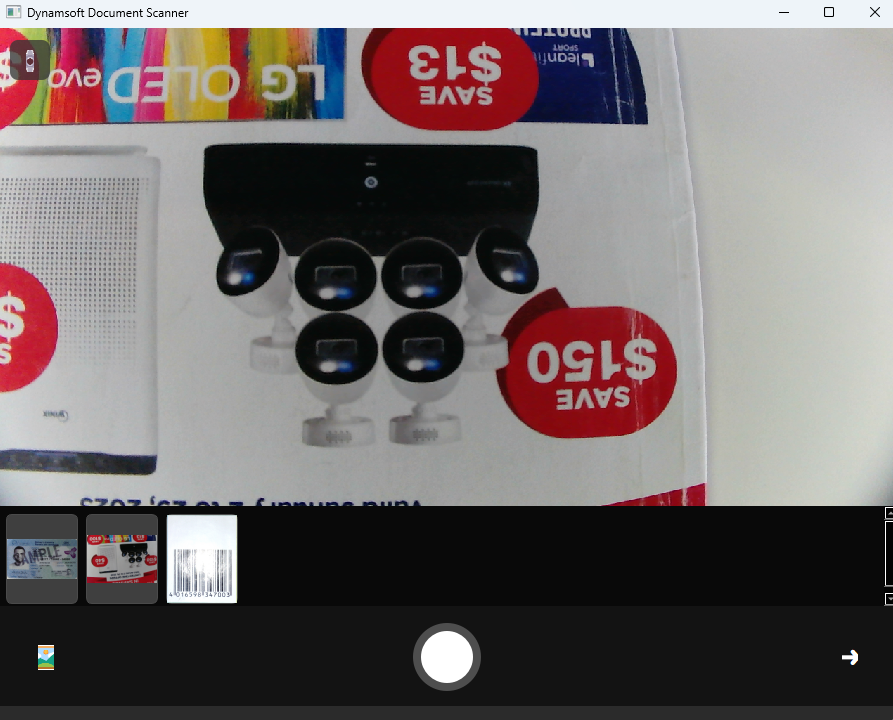
The entry point creates a QApplication in Fusion style and shows the main window. The main window opens the default camera with OpenCV, converts each BGR frame to RGB, and displays it in a custom CameraWidget.
# main.py
import sys
from PySide6.QtWidgets import QApplication
from app import DocumentScannerApp

def main():
    app = QApplication(sys.argv)
    app.setStyle("Fusion")
    window = DocumentScannerApp()
    window.show()
    sys.exit(app.exec())

if __name__ == "__main__":
    main()
# app.py
class DocumentScannerApp(QMainWindow):
    def __init__(self):
        super().__init__()
        self.setWindowTitle("Dynamsoft Document Scanner")
        self.setMinimumSize(900, 700)
        self.scanner = DCVScanner()
        self.thread_pool = QThreadPool()
        self.thread_pool.setMaxThreadCount(4)
        # ... UI setup and license screen

    def _init_camera(self):
        self.cap = cv2.VideoCapture(0)
        if self.cap and self.cap.isOpened():
            self.cap.set(cv2.CAP_PROP_FRAME_WIDTH, 1920)
            self.cap.set(cv2.CAP_PROP_FRAME_HEIGHT, 1080)
        self.camera_timer.start(33)  # ~30 fps preview

    def _on_camera_frame(self):
        if not self.cap or not self.cap.isOpened():
            return
        ret, frame = self.cap.read()
        if not ret or frame is None:
            return
        rgb = cv2.cvtColor(frame, cv2.COLOR_BGR2RGB)
        self.latest_frame = rgb
        self.camera_widget.set_frame(rgb)
Step 5: Add Auto-Capture, Manual Capture, and File Import
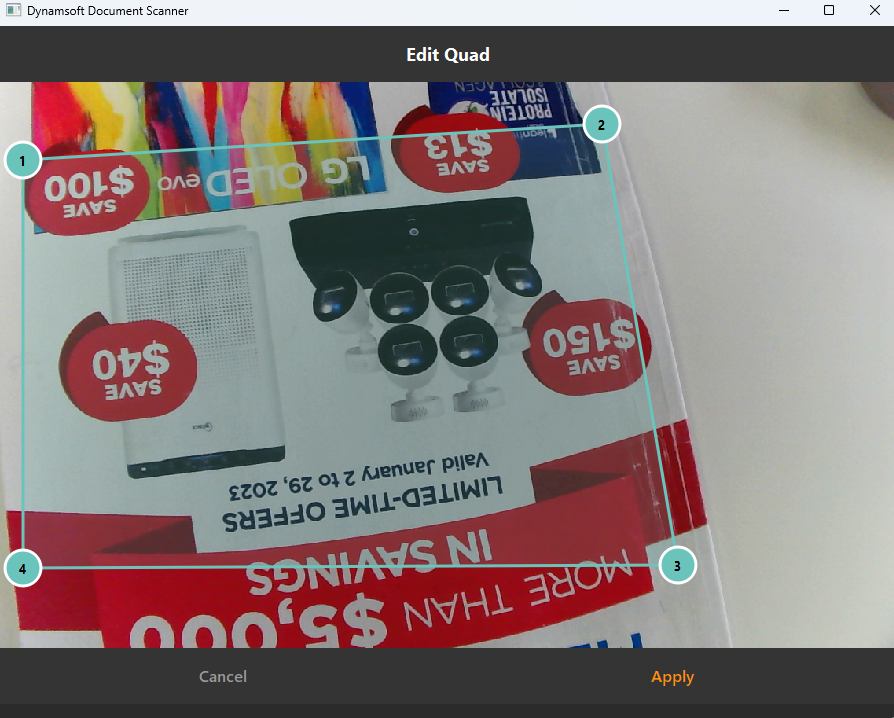
Run detection on a downscaled frame in a background worker to keep the UI smooth. When the detected quad stays stable across several frames, the app auto-captures. A shutter button also triggers manual capture with a short timeout fallback.
# app.py
class DocumentScannerApp(QMainWindow):
    def _on_detection_tick(self):
        if not self.is_scanning or self.is_processing_frame or self.is_capture_in_progress:
            return
        if self.latest_frame is None:
            return
        self.is_processing_frame = True
        h, w = self.latest_frame.shape[:2]
        scale = min(1.0, 640 / w)
        if scale < 1.0:
            small = cv2.resize(self.latest_frame, (int(w * scale), int(h * scale)), interpolation=cv2.INTER_AREA)
        else:
            small = self.latest_frame.copy()
        worker = DetectWorker(self.scanner, small)
        worker.signals.result.connect(lambda quad: self._on_detection_result(quad, scale))
        worker.signals.error.connect(lambda msg: self._on_detection_result(None, scale))
        self.thread_pool.start(worker)

    def _on_detection_result(self, quad, scale):
        self.is_processing_frame = False
        if quad:
            full_quad = [QuadPoint(p.x / scale, p.y / scale) for p in quad] if scale < 1.0 else quad
            self.latest_detected_quad = full_quad
            self.camera_widget.set_overlay(full_quad)
            if self.manual_capture_pending:
                self.manual_capture_pending = False
                self._reset_stabilizer()
                self._perform_capture(False, full_quad)
                return
            if self.last_quad is None:
                self.last_quad = full_quad
                self.stable_counter = 1
            elif is_quad_stable(full_quad, self.last_quad, self.quad_stabilizer["iou_threshold"], self.quad_stabilizer["area_delta_threshold"]):
                self.stable_counter += 1
                self.last_quad = full_quad
            else:
                self.stable_counter = 0
                self.last_quad = full_quad
            if self.quad_stabilizer["enabled"] and self.stable_counter >= self.quad_stabilizer["stable_frame_count"]:
                self._reset_stabilizer()
                self._perform_capture(True, full_quad)
        else:
            self.camera_widget.set_overlay(None)
            self._reset_stabilizer()
Step 6: Filter, Rotate, Reorder, and Export Pages
After capture, each page is stored as a Page object. The app applies color, grayscale, or binary filters through DCV’s ImageProcessor, rotates pages 90 degrees at a time, lets users drag to reorder, and exports to PDF, individual PNGs, or a stitched long image.
# scanner.py
from dynamsoft_capture_vision_bundle import ImageProcessor

def apply_filter(image: np.ndarray, mode: str) -> np.ndarray:
    if mode == "color":
        return image.copy()
    processor = ImageProcessor()
    img_data = np_to_image_data(image)
    if mode == "grayscale":
        result_data = processor.convert_to_gray(img_data)
        return image_data_to_np(result_data)
    if mode == "binary":
        result_data = processor.convert_to_binary_global(img_data, threshold=140, invert=True)
        return image_data_to_np(result_data)
    return image.copy()

def rotate_image_90(image: np.ndarray) -> np.ndarray:
    return cv2.rotate(image, cv2.ROTATE_90_CLOCKWISE)
# app.py
class DocumentScannerApp(QMainWindow):
    def _on_rotate(self):
        if not self.pages:
            return
        page = self.pages[self.current_page_index]
        page.base_image = rotate_image_90(page.base_image)
        self._render_result()
        self._update_thumbnail_bar()

    def _on_sort(self):
        if len(self.pages) < 2:
            self._show_toast("Need at least 2 pages to reorder.")
            return
        dialog = SortDialog(self.pages, self)
        if dialog.exec() == QDialog.Accepted:
            order = dialog.get_order()
            self.pages = [self.pages[i] for i in order]
            self.current_page_index = 0
            self._render_result()
            self._update_thumbnail_bar()

    def _on_export_pdf(self):
        if not self.pages:
            return
        path, _ = QFileDialog.getSaveFileName(self, "Save PDF", "documents.pdf", "PDF Files (*.pdf)")
        if not path:
            return
        pdf = pdf_canvas.Canvas(path, pagesize=A4)
        page_width, page_height = A4
        for i, page in enumerate(self.pages):
            if i > 0:
                pdf.showPage()
            img = apply_filter(page.base_image, page.filter_mode)
            h, w = img.shape[:2]
            ratio = min(page_width / w, page_height / h)
            draw_w = w * ratio
            draw_h = h * ratio
            x = (page_width - draw_w) / 2
            y = (page_height - draw_h) / 2
            temp_path = f"_temp_pdf_{i}.jpg"
            save_image(img, temp_path)
            pdf.drawImage(temp_path, x, y, width=draw_w, height=draw_h)
        pdf.save()
        for i in range(len(self.pages)):
            temp = f"_temp_pdf_{i}.jpg"
            if os.path.exists(temp):
                os.remove(temp)
        self._show_toast("PDF exported.")
Common Issues & Edge Cases
- Binary filter inversion: DCV may return inverted 8-bit binary data where white pixels are 0 and black pixels are 255. The
image_data_to_nphelper detectsIPF_BINARY_8_INVERTEDand flips the values back to black-text-on-white. - No document detected: If
detect_documentreturnsNoneduring capture, the app saves the original frame instead of failing, so the user never loses a shot. - Long-image stitching failures: When the overlap estimator cannot find a confident match, it treats the overlap as zero and concatenates images without blending, preserving all content.
Conclusion
This project gives you a full-featured desktop document scanner built with Python, PySide6, and Dynamsoft Capture Vision. From real-time boundary detection to PDF export, the code shows how to combine DCV’s preset templates with a responsive Qt UI. Try adjusting the stabilization thresholds in the settings dialog or adding your own export formats next.
Source Code
Get the complete PySide6 desktop document scanner source code on GitHub