


How to Build a JavaScript Multi-Page Document Scanner Web App with Auto-Capture and PDF Export
Scanning physical documents with a phone or laptop camera—and getting a clean, de-skewed result instantly—is a common requirement in expense-management, healthcare, and contract-signing workflows. The Dynamsoft Capture Vision SDK handles the heavy lifting (boundary detection, perspective normalization) entirely in the browser via WebAssembly, so no server-side component is needed.
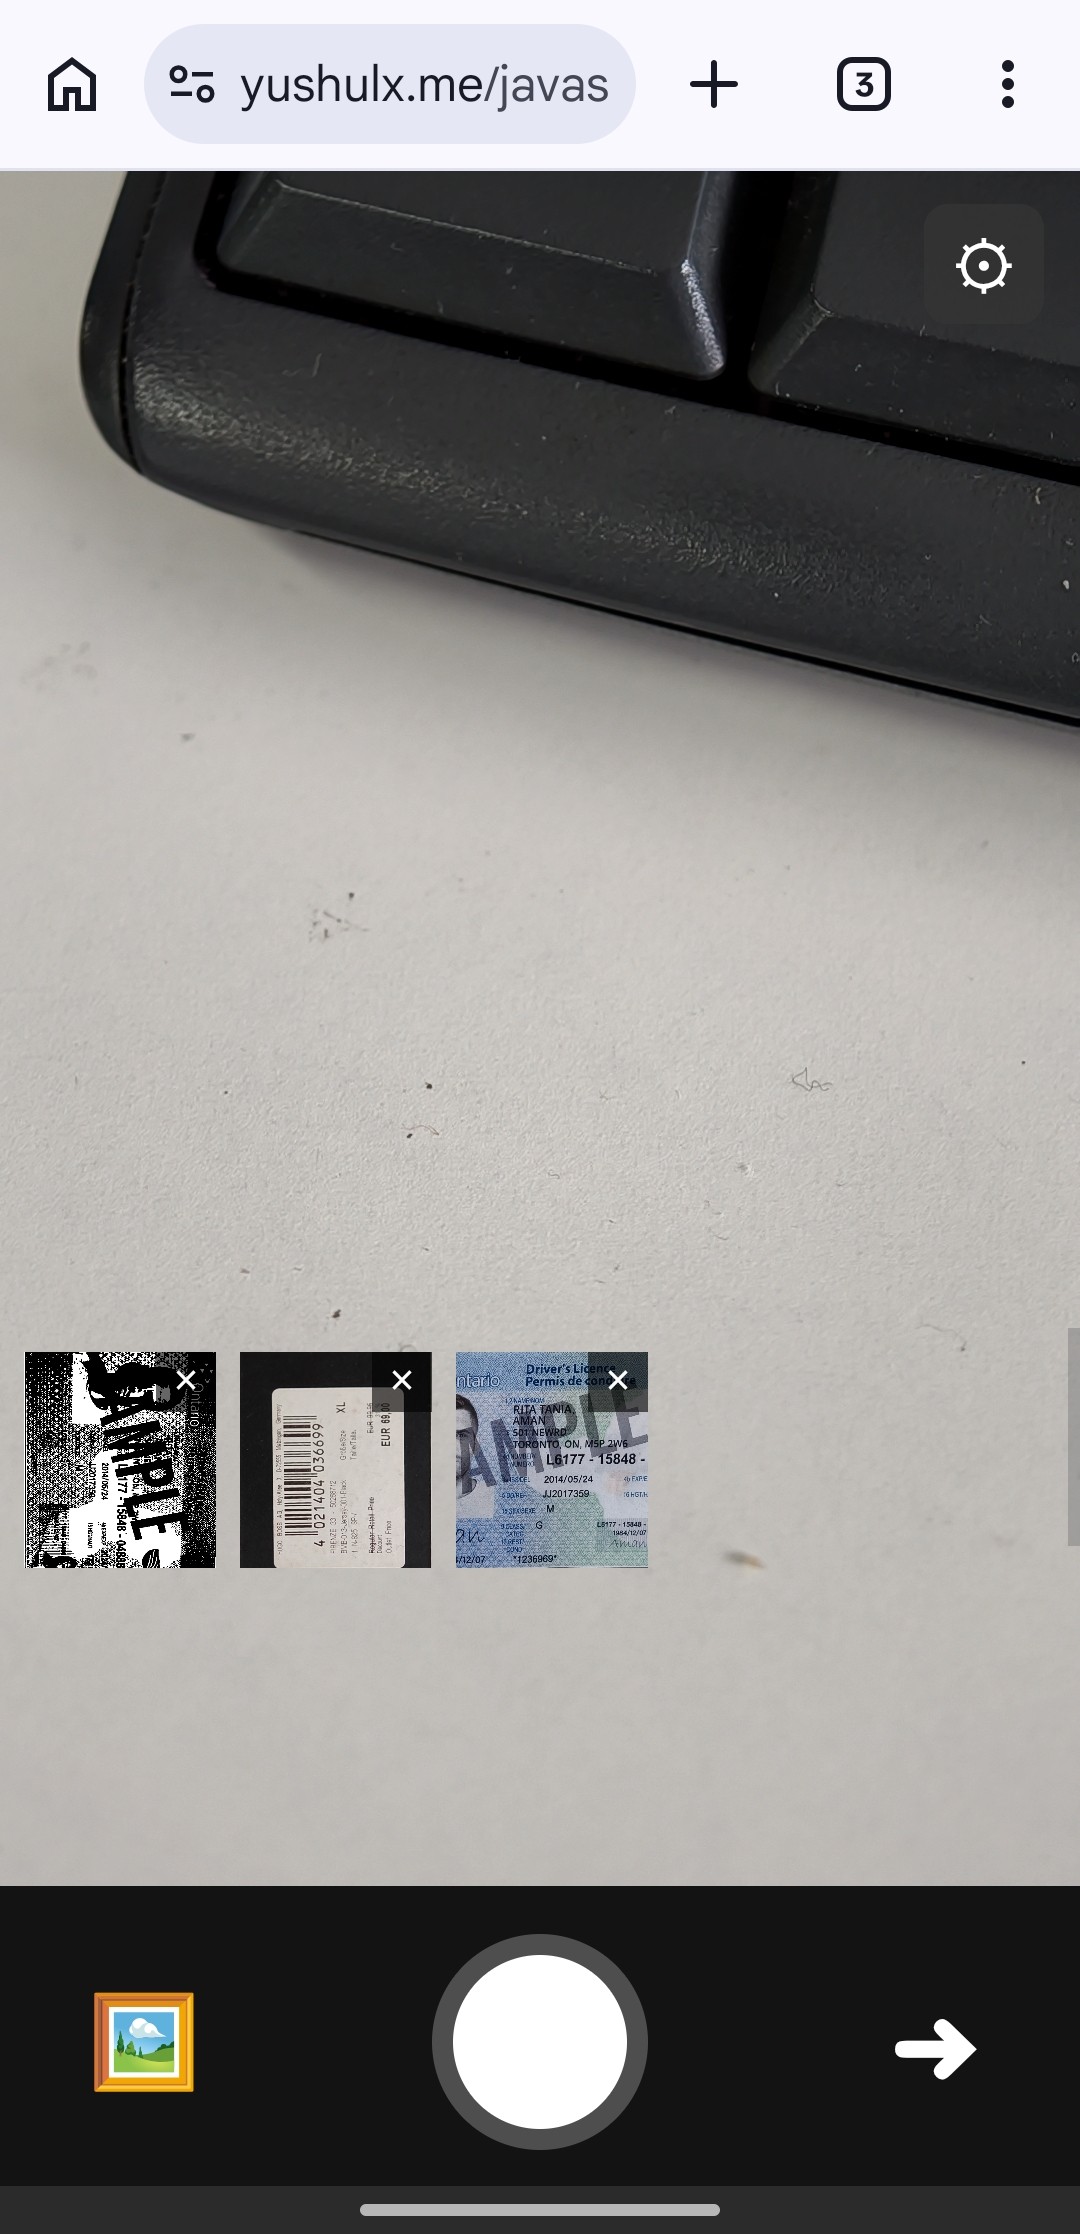
What you’ll build: A vanilla-JavaScript web app that opens the device camera, automatically detects document boundaries frame-by-frame, captures and normalizes multi-page documents, lets users edit corners, apply image filters, reorder pages, and export the result as a PDF or individual PNGs — powered by Dynamsoft Capture Vision Bundle v3.2.5000.
This article is Part 2 in a 5-Part Series.
- Part 1 - How to Build an Android Document Scanner with Auto-Capture and PDF Export
- Part 2 - How to Build a JavaScript Multi-Page Document Scanner Web App with Auto-Capture and PDF Export
- Part 3 - How to Build a Flutter Document Scanner App with Edge Detection, Editing, and PDF Export
- Part 4 - Build a SwiftUI iOS Document Scanner with Stable Auto Capture and PDF Export
- Part 5 - How to Build a Desktop Document Scanner with Python, PySide6, and Dynamsoft Capture Vision
Key Takeaways
- This tutorial shows how to detect, normalize, and export multi-page documents entirely in the browser using the Dynamsoft Capture Vision JS SDK.
- The
CaptureVisionRouterAPI drives both boundary detection (DetectDocumentBoundaries_Default) and perspective normalization (NormalizeDocument_Default) through a single unified interface. - An IoU + area-delta stabilizer prevents premature captures when the camera or document is still moving, giving a significantly better automatic-capture experience.
- The technique applies directly to any scenario where users need to digitize paperwork on-device: insurance claims, legal contracts, medical intake forms, and similar workflows.
Common Developer Questions
- How do I detect document boundaries from a live camera feed using JavaScript without a server?
- Why does
CaptureVisionRouter.capture()need both a detection template and a normalization template? - How can I prevent the auto-capture from firing while the document is still moving?
Online Demo
https://yushulx.me/javascript-barcode-qr-code-scanner/examples/multi-document-capture/
Demo Video: Multi-Page Document Scanner in Action
Prerequisites
- A modern browser with camera access (Chrome, Edge, Safari, Firefox).
- Node.js and any static HTTP server (Python’s
http.server,npx serve, etc.) for local development. - A Dynamsoft Capture Vision license key.
Get a 30-day free trial license for Dynamsoft Capture Vision.
Step 1: Load the SDK via CDN
The entire SDK is delivered as a single bundle from jsDelivr — no npm install required. Add both the Dynamsoft Capture Vision bundle and jsPDF to the <head> of index.html:
<script src="https://cdn.jsdelivr.net/npm/dynamsoft-capture-vision-bundle@3.2.5000/dist/dcv.bundle.min.js"></script>
<script src="https://cdn.jsdelivr.net/npm/jspdf@2.5.1/dist/jspdf.umd.min.js"></script>
The bundle includes the Document Detection & Normalization (DDN) module, the CaptureVisionRouter, and the LicenseManager — everything needed to go from raw camera frames to normalized document images.
Step 2: Initialize the License and CaptureVisionRouter
After the user submits a license key on the start screen, initSDK activates the license, loads the DDN WebAssembly module, creates a CaptureVisionRouter instance, and loads the preset template file that defines the detection and normalization tasks:
const TEMPLATE_PATH = "./DBR_and_DDN_detect_PresetTemplates.json";
const DETECT_TEMPLATE = "DetectDocumentBoundaries_Default";
const NORMALIZE_TEMPLATE = "NormalizeDocument_Default";

async function initSDK(licenseKey) {
    updateInitStatus("Activating license...");
    await Dynamsoft.License.LicenseManager.initLicense(licenseKey, true);

    updateInitStatus("Loading modules...");
    await Dynamsoft.Core.CoreModule.loadWasm(["DDN"]);

    updateInitStatus("Initializing scanner...");
    cvr = await Dynamsoft.CVR.CaptureVisionRouter.createInstance();
    await cvr.initSettings(TEMPLATE_PATH);

    updateInitStatus("Opening camera...");
    await initCamera();
}
The initSettings call registers DetectDocumentBoundaries_Default and NormalizeDocument_Default as named tasks so they can be invoked by name later.
Step 3: Run the Frame-by-Frame Detection Loop
The scan loop calls cvr.capture() on each animation frame, passing the live <video> element and the detection template name. When a four-point quad is returned, it is drawn on an overlay <canvas> and fed into the stabilizer:
async function scanLoop() {
    if (!isScanning) return;

    if (isProcessingFrame || isCaptureInProgress) {
        scanLoopId = requestAnimationFrame(scanLoop);
        return;
    }

    isProcessingFrame = true;
    try {
        const result = await cvr.capture(videoElement, DETECT_TEMPLATE);
        let quad = null;

        for (const item of result.items || []) {
            if (item.location && item.location.points && item.location.points.length === 4) {
                quad = item.location.points;
                break;
            }
        }

        if (quad) {
            latestDetectedQuad = quad;
            drawOverlay(quad);
            // ... stabilizer logic and auto-capture
        } else {
            clearOverlay();
            resetStabilizer();
        }
    } catch (_) {
        clearOverlay();
    }

    isProcessingFrame = false;
    if (isScanning) {
        scanLoopId = requestAnimationFrame(scanLoop);
    }
}
The isProcessingFrame guard prevents concurrent captures on devices where WebAssembly inference takes longer than a single animation frame.
Step 4: Stabilize the Detected Quad Before Auto-Capture
Firing a capture the instant a quad is detected produces blurry or mis-framed results. The stabilizer compares consecutive quads using Intersection over Union (IoU) and an area-delta check; only after stableFrameCount consecutive stable frames is the capture triggered automatically:
const quadStabilizer = {
    enabled: true,
    iouThreshold: 0.85,
    areaDeltaThreshold: 0.15,
    stableFrameCount: 3,
};

function isQuadStable(current, previous) {
    if (!current || !previous || current.length !== 4 || previous.length !== 4) return false;
    const boxA = pointsToBoundingBox(current);
    const boxB = pointsToBoundingBox(previous);
    const iou = computeIoU(boxA, boxB);

    const areaA = polygonArea(current);
    const areaB = polygonArea(previous);
    const areaDelta = areaB === 0 ? 1 : Math.abs(areaA - areaB) / areaB;

    return iou >= quadStabilizer.iouThreshold && areaDelta <= quadStabilizer.areaDeltaThreshold;
}
All three thresholds (iouThreshold, areaDeltaThreshold, stableFrameCount) are exposed in an in-app settings panel so users can tune them for their environment.
Step 5: Normalize the Document with Perspective Correction
Once a stable quad is confirmed (or the user taps the capture button), normalizeDocument projects the detected boundary points back into cvr to perform perspective de-skew and returns the corrected image as a <canvas>:
async function normalizeDocument(frameCanvas, points) {
    try {
        const settings = await cvr.getSimplifiedSettings(NORMALIZE_TEMPLATE);
        settings.roi.points = points;
        settings.roiMeasuredInPercentage = 0;
        await cvr.updateSettings(NORMALIZE_TEMPLATE, settings);

        const normalizedResult = await cvr.capture(frameCanvas, NORMALIZE_TEMPLATE);
        for (const item of normalizedResult.items || []) {
            if (item.toCanvas && typeof item.toCanvas === "function") {
                return item.toCanvas();
            }
        }
        return null;
    } catch (_) {
        return null;
    }
}
Setting roiMeasuredInPercentage = 0 tells the router that settings.roi.points are pixel coordinates in the source frame, not percentages.
Step 6: Apply Image Filters Per Page
After capture, each page can be rendered in color, grayscale, or binary mode. The filter is applied client-side using getImageData / putImageData on a scratch canvas, leaving the original baseCanvas untouched:
function buildFilteredCanvas(page) {
    const src = page.baseCanvas;
    const out = document.createElement("canvas");
    out.width = src.width;
    out.height = src.height;
    const ctx = out.getContext("2d", { willReadFrequently: true });
    ctx.drawImage(src, 0, 0);

    if (page.filter === "color") {
        return out;
    }

    const image = ctx.getImageData(0, 0, out.width, out.height);
    const data = image.data;
    for (let i = 0; i < data.length; i += 4) {
        const gray = Math.round(data[i] * 0.299 + data[i + 1] * 0.587 + data[i + 2] * 0.114);
        if (page.filter === "grayscale") {
            data[i] = gray;
            data[i + 1] = gray;
            data[i + 2] = gray;
        } else {
            const binary = gray > 140 ? 255 : 0;
            data[i] = binary;
            data[i + 1] = binary;
            data[i + 2] = binary;
        }
    }
    ctx.putImageData(image, 0, 0);
    return out;
}
Step 7: Edit the Document Quad After Capture
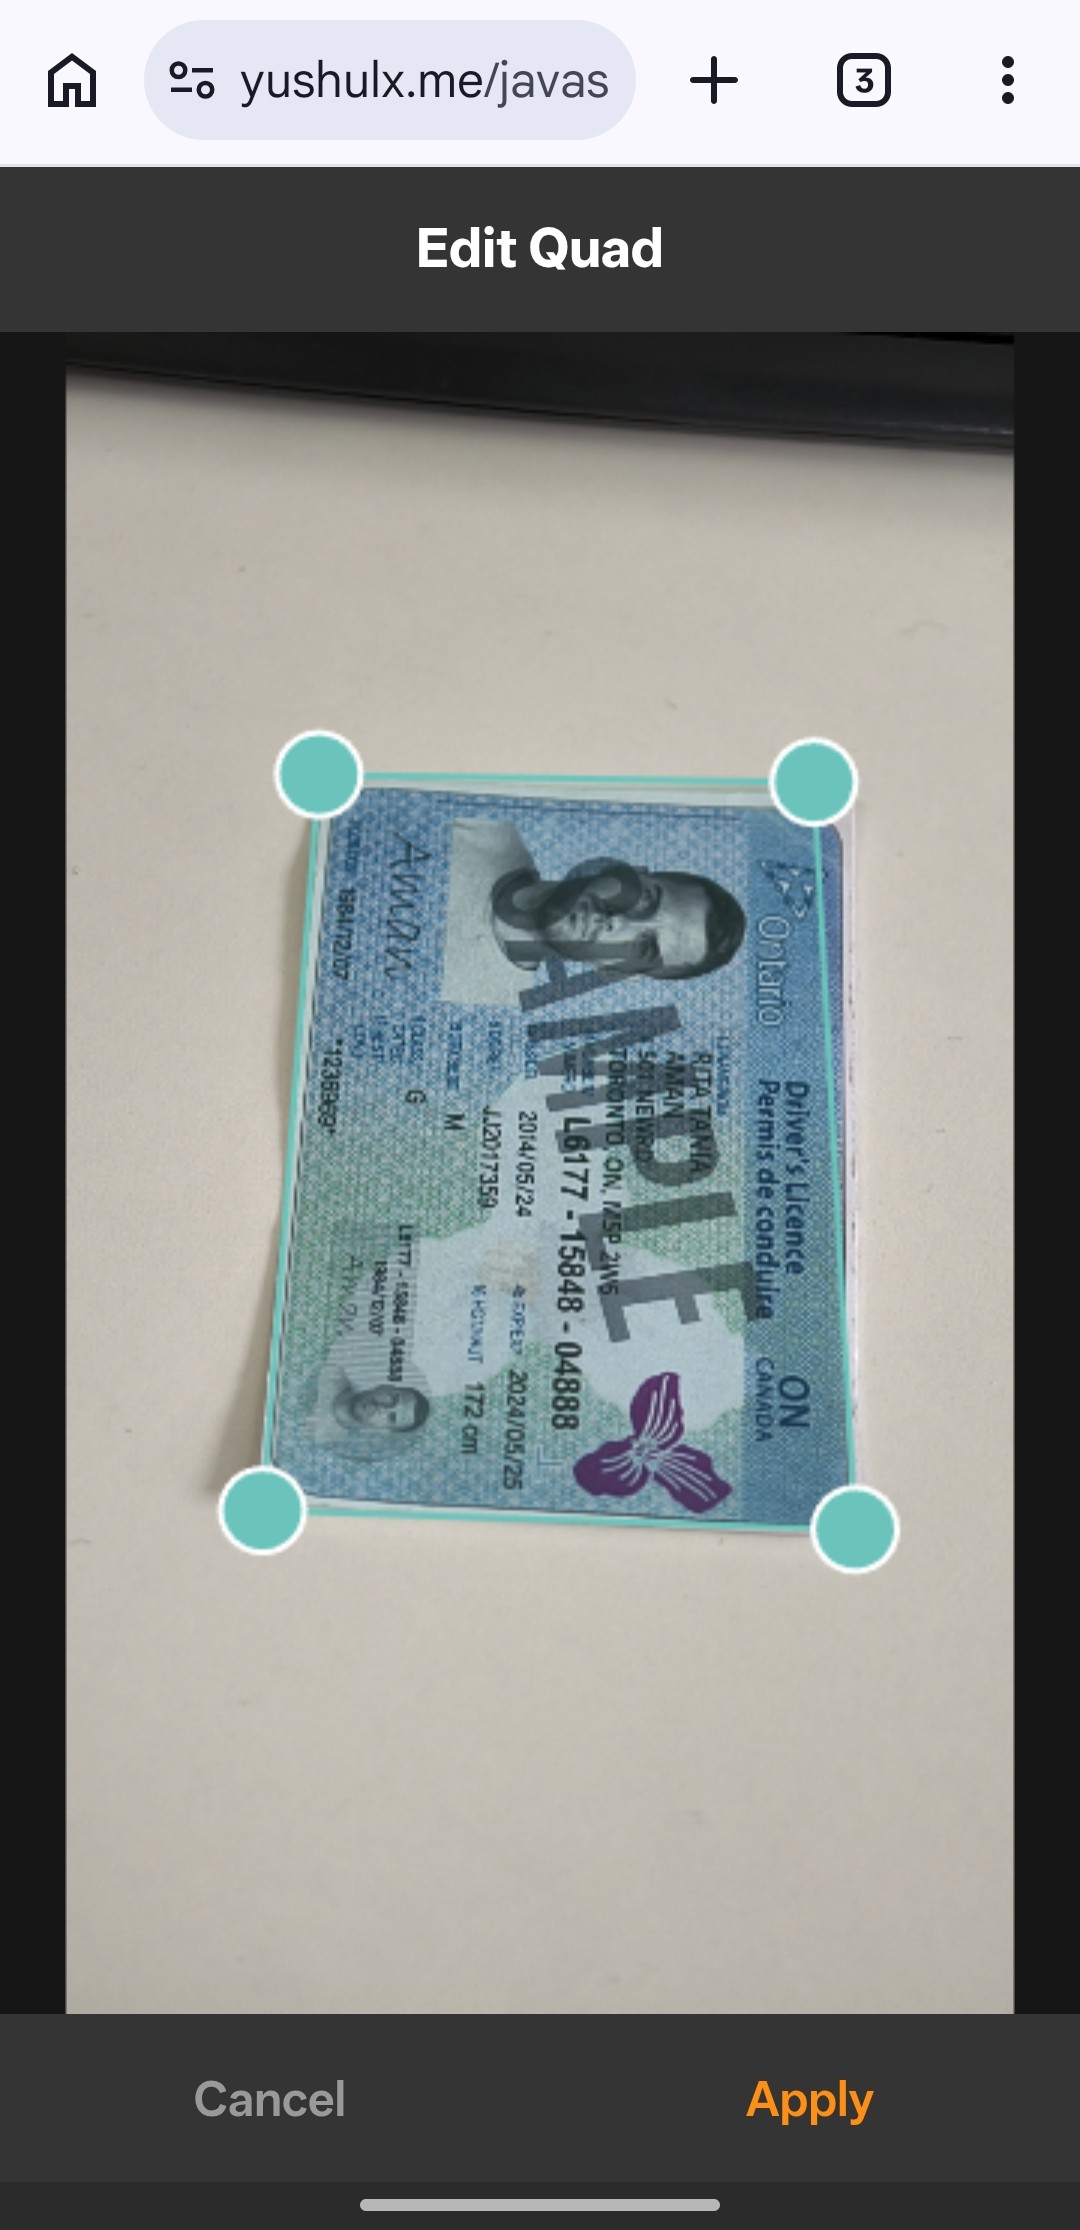
If the auto-detected corners are inaccurate, the user can open the edit screen for any captured page, drag the four corner handles to the correct positions, and re-apply perspective normalization without recapturing. openEdit loads the stored originalCanvas and quadPoints into editState, then renderEditCanvas draws the image and overlays draggable 14 px circular handles:
function openEdit() {
    const page = pages[currentPageIndex];
    if (!page.originalCanvas || !page.quadPoints) {
        showToast("No quad data available for editing.");
        return;
    }
    editState = {
        originalCanvas: page.originalCanvas,
        quadPoints: page.quadPoints.map(p => ({ x: p.x, y: p.y })),
        draggingCorner: -1,
        imgRect: null,
    };
    resultScreen.classList.add("hidden");
    editScreen.classList.remove("hidden");
    requestAnimationFrame(renderEditCanvas);
}

function renderEditCanvas() {
    if (!editState) return;
    const rect = editCanvasEl.getBoundingClientRect();
    const cw = Math.round(rect.width);
    const ch = Math.round(rect.height);
    if (cw === 0 || ch === 0) return;
    editCanvasEl.width = cw;
    editCanvasEl.height = ch;

    const img = editState.originalCanvas;
    const scale = Math.min(cw / img.width, ch / img.height);
    const imgW = Math.round(img.width * scale);
    const imgH = Math.round(img.height * scale);
    const imgX = Math.round((cw - imgW) / 2);
    const imgY = Math.round((ch - imgH) / 2);
    editState.imgRect = { x: imgX, y: imgY, w: imgW, h: imgH };

    editCtx2.clearRect(0, 0, cw, ch);
    editCtx2.drawImage(img, imgX, imgY, imgW, imgH);

    const pts = editState.quadPoints.map(p => ({
        x: imgX + (p.x / img.width) * imgW,
        y: imgY + (p.y / img.height) * imgH,
    }));

    editCtx2.beginPath();
    editCtx2.moveTo(pts[0].x, pts[0].y);
    for (let i = 1; i < 4; i++) editCtx2.lineTo(pts[i].x, pts[i].y);
    editCtx2.closePath();
    editCtx2.fillStyle = "rgba(106,196,187,0.2)";
    editCtx2.fill();
    editCtx2.strokeStyle = "#6ac4bb";
    editCtx2.lineWidth = 2;
    editCtx2.stroke();

    const HANDLE_R = 14;
    pts.forEach((p, i) => {
        editCtx2.beginPath();
        editCtx2.arc(p.x, p.y, HANDLE_R, 0, Math.PI * 2);
        editCtx2.fillStyle = i === editState.draggingCorner ? "#fe8e14" : "#6ac4bb";
        editCtx2.fill();
        editCtx2.strokeStyle = "#fff";
        editCtx2.lineWidth = 2;
        editCtx2.stroke();
    });
}
When the user taps Apply, applyEdit calls normalizeDocument with the updated corner coordinates and replaces the stored baseCanvas in-place — the page is corrected without affecting any other page:
async function applyEdit() {
    if (!editState) return;
    editApplyBtn.disabled = true;
    try {
        const normalized = await normalizeDocument(editState.originalCanvas, editState.quadPoints);
        if (!normalized) {
            showToast("Normalization failed. Adjust corners and try again.");
            return;
        }
        pages[currentPageIndex].baseCanvas = copyCanvas(normalized);
        pages[currentPageIndex].quadPoints = editState.quadPoints.map(p => ({ x: p.x, y: p.y }));
        editState = null;
        editScreen.classList.add("hidden");
        resultScreen.classList.remove("hidden");
        renderResult();
        updateThumbnailBar();
    } catch (e) {
        console.error(e);
        showToast("Edit failed: " + (e?.message || "Unknown error"));
    } finally {
        editApplyBtn.disabled = false;
    }
}
Step 8: Reorder Pages with Drag-and-Drop
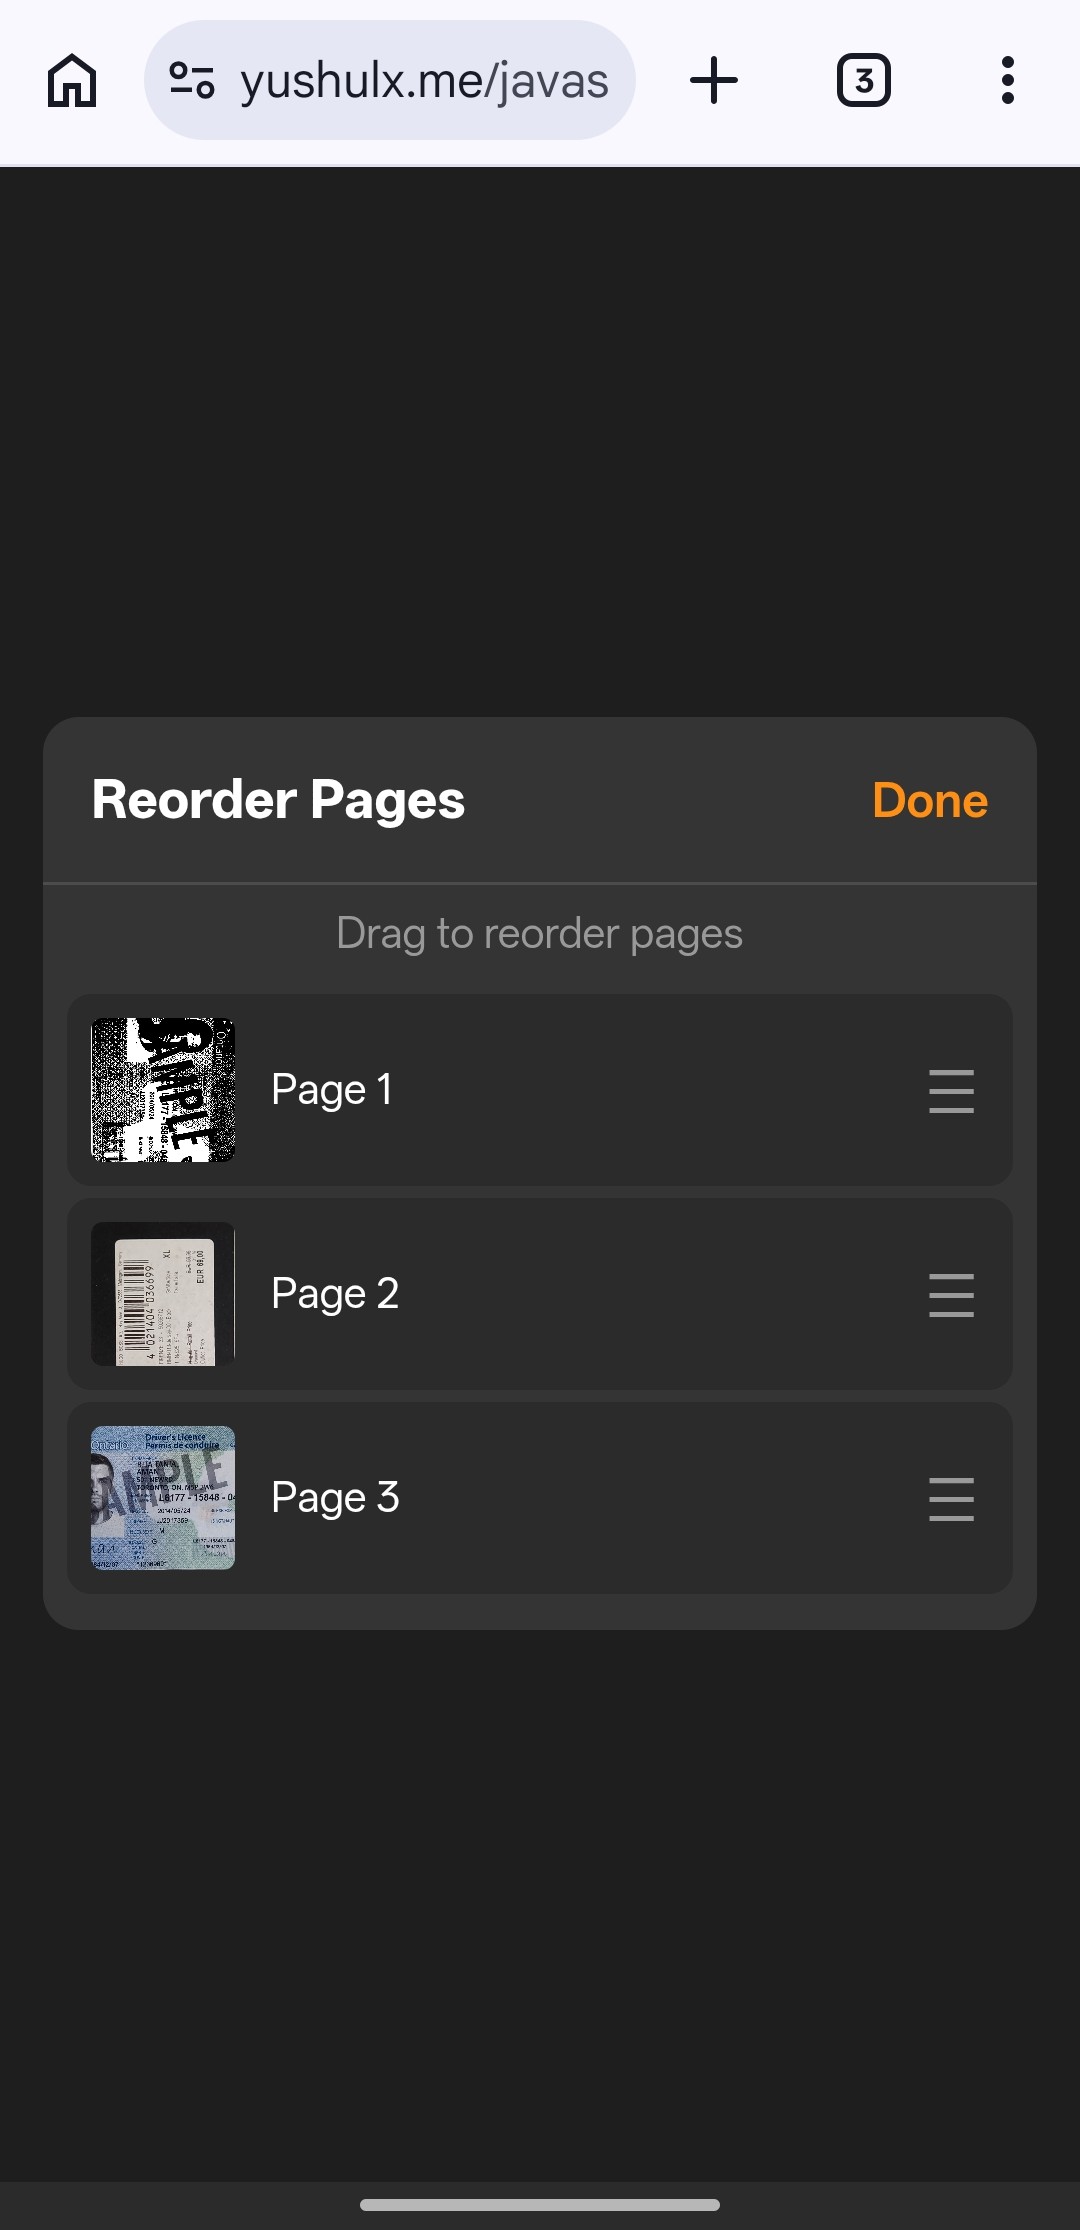
For multi-page sessions, the sort overlay lets users drag thumbnail cards into the desired order. The implementation supports both mouse (dragstart / drop) and touch (touchstart / touchmove / touchend) events. A floating clone follows the finger during a touch drag, and document.elementFromPoint identifies the drop target:
function openSort() {
    if (pages.length < 2) {
        showToast("Need at least 2 pages to reorder.");
        return;
    }
    const workingOrder = pages.map((_, i) => i);
    let dragIdx = -1;

    function rebuild() {
        sortList.innerHTML = "";
        workingOrder.forEach((pageIdx, pos) => {
            const item = document.createElement("div");
            item.className = "sort-item";
            item.draggable = true;
            item.dataset.pos = pos;

            item.addEventListener("dragstart", (e) => {
                dragIdx = pos;
                item.classList.add("dragging");
                e.dataTransfer.effectAllowed = "move";
            });
            item.addEventListener("drop", (e) => {
                e.preventDefault();
                item.classList.remove("drag-over");
                const dropPos = Number(item.dataset.pos);
                if (dragIdx >= 0 && dragIdx !== dropPos) {
                    const [moved] = workingOrder.splice(dragIdx, 1);
                    workingOrder.splice(dropPos, 0, moved);
                    rebuild();
                }
            });

            // Touch drag support
            let touchClone = null;
            item.addEventListener("touchstart", (e) => {
                dragIdx = pos;
                const touch = e.touches[0];
                touchClone = item.cloneNode(true);
                touchClone.style.cssText = `position:fixed;left:${touch.clientX - 30}px;top:${touch.clientY - 24}px;width:${item.offsetWidth}px;opacity:0.8;z-index:200;pointer-events:none`;
                document.body.appendChild(touchClone);
                item.classList.add("dragging");
            }, { passive: true });
            item.addEventListener("touchend", (e) => {
                item.classList.remove("dragging");
                if (touchClone) { touchClone.remove(); touchClone = null; }
                const touch = e.changedTouches[0];
                const overItem = document.elementFromPoint(touch.clientX, touch.clientY)?.closest(".sort-item");
                if (overItem) {
                    const dropPos = Number(overItem.dataset.pos);
                    if (dragIdx >= 0 && dragIdx !== dropPos) {
                        const [moved] = workingOrder.splice(dragIdx, 1);
                        workingOrder.splice(dropPos, 0, moved);
                        rebuild();
                    }
                }
                dragIdx = -1;
            });
            sortList.appendChild(item);
        });
    }

    rebuild();
    sortOverlay.classList.remove("hidden");

    sortDoneBtn.onclick = () => {
        pages = workingOrder.map(i => pages[i]);
        currentPageIndex = 0;
        sortOverlay.classList.add("hidden");
        renderResult();
        updateThumbnailBar();
    };
}
When the user taps Done, workingOrder (an index remapping array) is applied to pages in a single .map() call, making the reorder non-destructive until confirmed.
Step 9: Export the Scanned Pages as a PDF
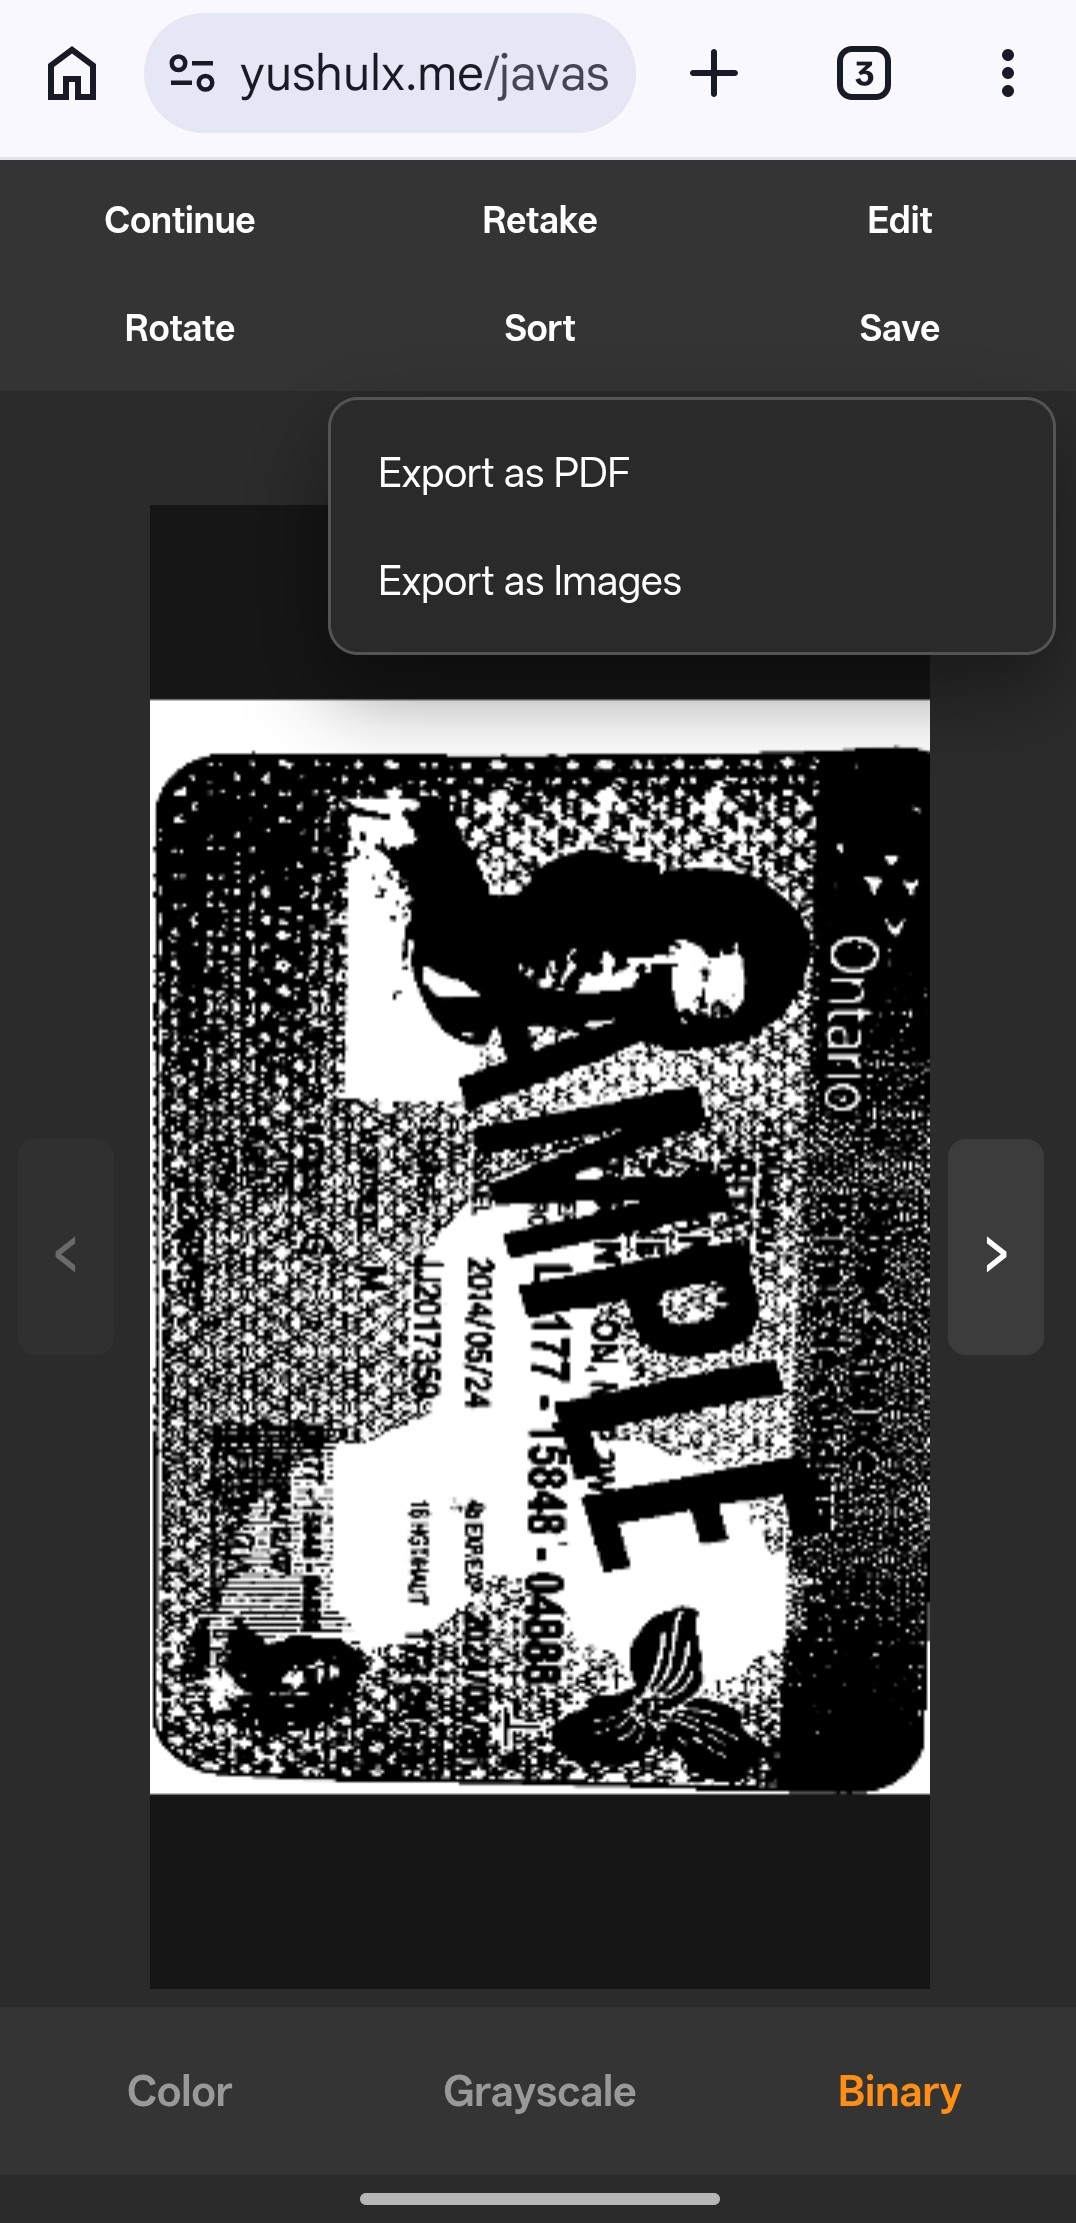
All captured pages (with filters applied) are packed into a single multi-page PDF using jsPDF. Each page is centered and scaled to fit A4:
async function exportPdf() {
    if (!pages.length || !window.jspdf) return;
    const { jsPDF } = window.jspdf;
    const pdf = new jsPDF({ unit: "pt", format: "a4" });

    for (let i = 0; i < pages.length; i++) {
        const canvas = buildFilteredCanvas(pages[i]);
        const imageData = canvas.toDataURL("image/jpeg", 0.95);
        if (i > 0) pdf.addPage("a4", "portrait");

        const pageWidth = pdf.internal.pageSize.getWidth();
        const pageHeight = pdf.internal.pageSize.getHeight();
        const ratio = Math.min(pageWidth / canvas.width, pageHeight / canvas.height);
        const drawWidth = canvas.width * ratio;
        const drawHeight = canvas.height * ratio;
        const x = (pageWidth - drawWidth) / 2;
        const y = (pageHeight - drawHeight) / 2;

        pdf.addImage(imageData, "JPEG", x, y, drawWidth, drawHeight);
    }

    const blob = pdf.output("blob");
    const blobUrl = URL.createObjectURL(blob);
    window.open(blobUrl, "_blank", "noopener,noreferrer");
}
Individual pages can also be downloaded as PNG files via the Export as Images option, which calls canvas.toDataURL("image/png") for each page.
Common Issues & Edge Cases
- Camera access denied on HTTPS-less deployments: Browser camera APIs require a secure context. Use
localhostfor local development; deploy behind HTTPS in production. Safari enforces this strictly even on LAN IP addresses. - Normalization returns
nullon very small or heavily occluded quads: ThenormalizeDocumentfallback returns the raw frame canvas in this case, so the page is still added. The user can open the edit-quad view to manually adjust the four corner handles and re-apply normalization. - Auto-capture fires too early or too late: Raise
iouThreshold(tighter positional match required) orstableFrameCount(more consecutive stable frames needed) via the in-app settings panel. On slow devices, reducingstableFrameCountavoids the user having to hold very still for a long time.
Conclusion
This project shows how to combine the CaptureVisionRouter detection and normalization pipelines from the Dynamsoft Capture Vision JS SDK into a fully browser-side multi-page document scanner with quad stabilization, per-page editing, and PDF export. From here, you can extend the app with OCR (using the Dynamsoft Label Recognizer module in the same bundle) or integrate it into an existing React or Vue project by wrapping the camera lifecycle and CVR calls in component hooks. Full API reference is available at Dynamsoft Capture Vision JS documentation.