How to Integrate MRZ Recognition into a Blazor Web Application
Machine Readable Zones (MRZ) are vital components of passports, visas, and other identification documents. Typically located at the bottom of a document’s front page, MRZs contain essential information such as the document type, holder’s name, issuing country, and expiration date. In today’s digital landscape, MRZ recognition is an invaluable tool for automating data entry and enhancing efficiency. In this article, we’ll explore how to integrate MRZ recognition capabilities into your Blazor web application using the Dynamsoft Capture Vision SDK.
This article is Part 4 in a 5-Part Series.
- Part 1 - Blazor WebAssembly: Building Web Apps for Digitizing Documents with C# and .NET
- Part 2 - How to Build a .NET Blazor Application for Scanning Barcode and QR Code
- Part 3 - How to Create a Blazor Web App for Document PDF Viewing and Annotation
- Part 4 - How to Integrate MRZ Recognition into a Blazor Web Application
- Part 5 - How to Digitize Documents in a Blazor Web App Using TWAIN, WIA, SANE, ICA, and eSCL Scanners
Blazor MRZ Reader & Scanner Demo Video
Try Online Demo
https://yushulx.me/blazor-barcode-mrz-document-scanner/
Prerequisites
-
Dynamsoft Capture Vision Bundle: This comprehensive package includes all of Dynamsoft’s vision algorithms, such as Barcode, MRZ, Document recognition, and more. You can find it on npm.

-
Dynamsoft Capture Vision Trial License: Obtain a 30-day free trial license for testing purposes by clicking here.
Step 1: Set Up Dynamsoft Capture Vision SDK in a Blazor Project
- Create a Blazor Web Project: Use the Blazor WebAssembly template in Visual Studio to scaffold a new project.
- Include the Capture Vision Bundle script: Add the Dynamsoft Capture Vision Bundle script to your
wwwroot/index.htmlfile:<script src="https://cdn.jsdelivr.net/npm/dynamsoft-capture-vision-bundle@3.0.3001/dist/dcv.bundle.min.js"></script> - Create a JavaScript File for C# Interop: To enable interaction between JavaScript and C#, create a
jsInterop.jsfile in thewwwrootdirectory and include it in yourindex.html:<script src="jsInterop.js"></script> - Configure Resource Paths and License Key: In
wwwroot/jsInterop.js, define JavaScript functions to initialize the Dynamsoft Capture Vision SDK and set the license key:window.jsFunctions = { setLicense: async function setLicense(license) { if (isInitialized) return true; try { Dynamsoft.Core.CoreModule.engineResourcePaths.rootDirectory = "https://cdn.jsdelivr.net/npm"; Dynamsoft.License.LicenseManager.initLicense(license, true); await Dynamsoft.Core.CoreModule.loadWasm(["DLR"]); cvr = await Dynamsoft.CVR.CaptureVisionRouter.createInstance(); isInitialized = true; } catch (e) { alert(e); return false; } return true; }, ... }; -
Update the Blazor Page to Activate the SDK: Modify the
Pages/Home.razorfile to include HTML and C# code that allows users to activate the SDK with a valid license key:@page "/" @inject IJSRuntime JSRuntime <PageTitle>Home</PageTitle> <p>Click <a href="https://www.dynamsoft.com/customer/license/trialLicense/?product=dcv&package=cross-platform" target="_blank">here</a> to obtain a Dynamsoft Capture Vision Trial License.</p> <EditForm Model="@this"> <InputText @bind-Value="LicenseKey" placeholder="Enter your license key" /> <button type="button" class="btn btn-primary" @onclick="SetLicenseKey">Activate the SDK</button> </EditForm> @code { Boolean initialized = false; private string LicenseKey = "LICENSE-KEY"; private async Task SetLicenseKey() { initialized = await JSRuntime.InvokeAsync<Boolean>("jsFunctions.setLicense", LicenseKey); StateHasChanged(); } } -
Prepare an MRZ Template File: Copy the mrz.json file to the
wwwroot/templatefolder. This file contains the MRZ template namedReadMRZ, which is used for recognizing MRZ fields. To use the template, call theinitSettingsmethod after instantiating theCaptureVisionRouterobject:async function initMRZ() { await Dynamsoft.DCP.CodeParserModule.loadSpec("MRTD_TD1_ID"); await Dynamsoft.DCP.CodeParserModule.loadSpec("MRTD_TD2_FRENCH_ID"); await Dynamsoft.DCP.CodeParserModule.loadSpec("MRTD_TD2_ID"); await Dynamsoft.DCP.CodeParserModule.loadSpec("MRTD_TD2_VISA"); await Dynamsoft.DCP.CodeParserModule.loadSpec("MRTD_TD3_PASSPORT"); await Dynamsoft.DCP.CodeParserModule.loadSpec("MRTD_TD3_VISA"); await Dynamsoft.CVR.CaptureVisionRouter.appendModelBuffer("MRZCharRecognition"); await Dynamsoft.CVR.CaptureVisionRouter.appendModelBuffer("MRZTextLineRecognition"); cvr = await Dynamsoft.CVR.CaptureVisionRouter.createInstance(); parser = await Dynamsoft.DCP.CodeParser.createInstance(); let ret = await cvr.initSettings('template/mrz.json'); console.log(ret); }Explanation
- The
loadSpecmethod loads different MRZ specifications for various document types, ensuring comprehensive MRZ recognition. - The
loadRecognitionDatamethod loads the necessary data for the label recognizer to process MRZ fields. - The
initSettingsmethod initializes theCaptureVisionRouterwith the MRZ template, enabling it to recognize and parse MRZ data.
- The
Step 2: Implement an MRZ Reader Page
In this step, we’ll create a page in your Blazor application that allows users to upload an image containing MRZ data and extract information from it using the Dynamsoft Capture Vision SDK.
-
Create a Razor Component: Create a new Razor component named
MrzReader.razorin thePagesdirectory and add it to your navigation menu inNavMenu.razor:<div class="nav-item px-3"> <NavLink class="nav-link" href="mrzreader"> <span class="bi bi-list-nested-nav-menu" aria-hidden="true"></span> MRZ Reader </NavLink> </div> -
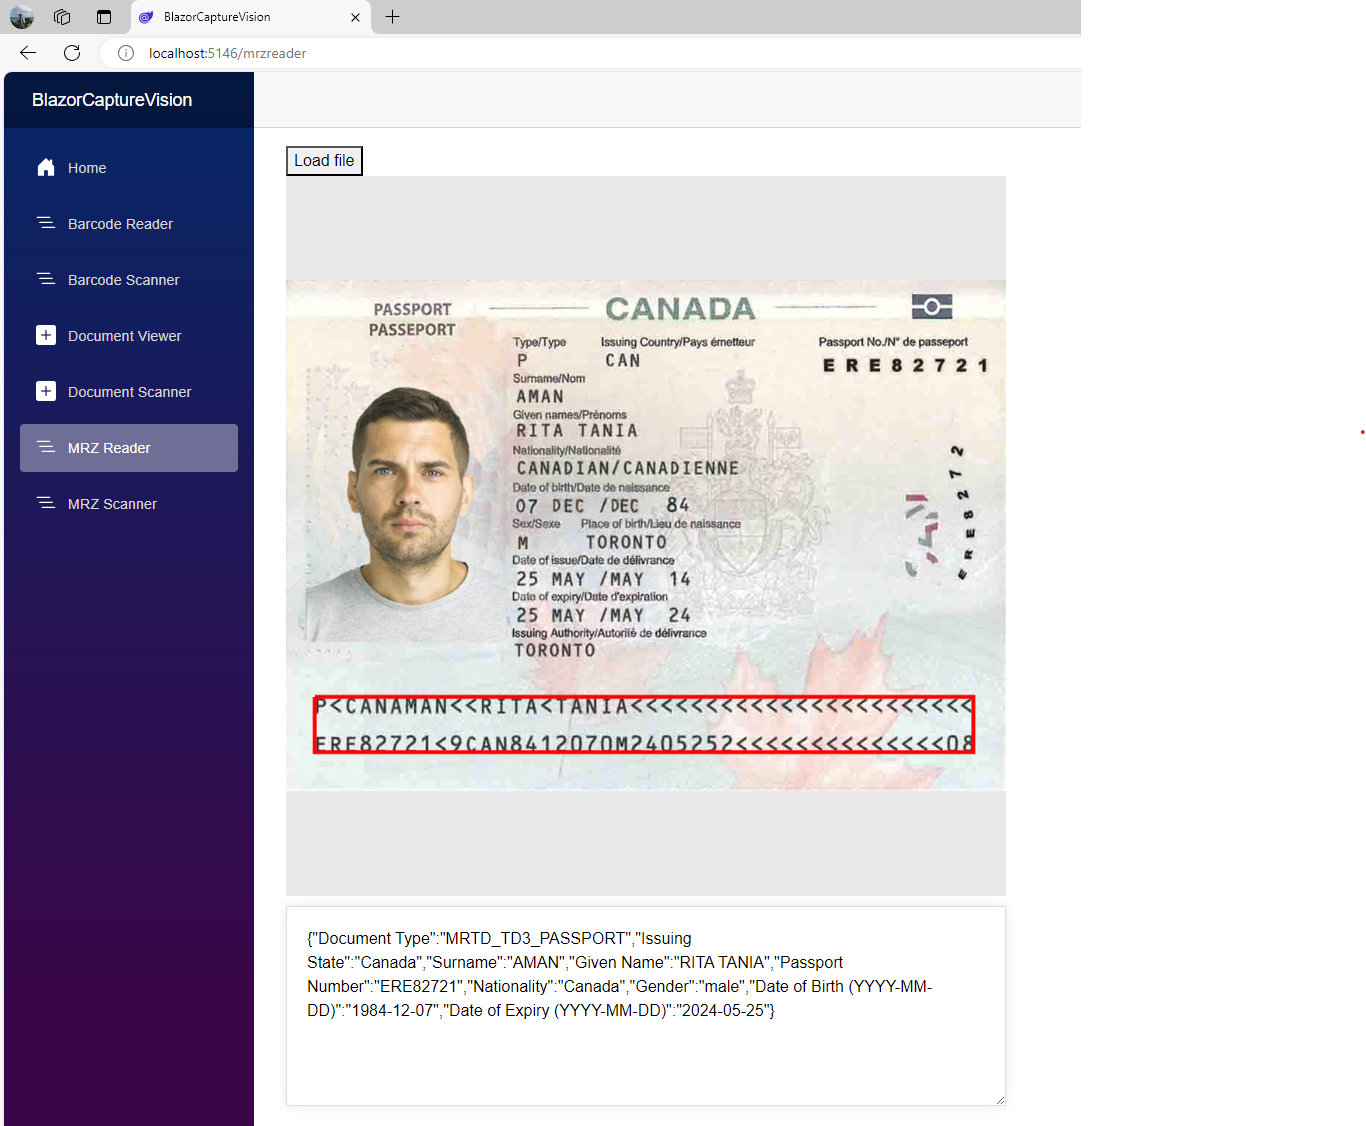
Implement the MRZ Reader: Add the following code to
MrzReader.razorto enable MRZ recognition from an uploaded image:@page "/mrzreader" @inject IJSRuntime JSRuntime @if (isLoading) { <div id="loading-indicator" class="loading-indicator"> <div class="spinner"></div> </div> } <button @onclick="ReadMrz">Select an image</button> <div id="imageview"> <img id="@imageId" /> <canvas id="@overlayId"></canvas> </div> <div> <textarea @bind="result"></textarea> </div> @code { private Boolean isLoading = true; private string result = string.Empty; private DotNetObjectReference<MrzReader>? objRef; private String imageId = "image"; private String overlayId = "overlay"; protected override async Task OnAfterRenderAsync(bool firstRender) { if (firstRender) { objRef = DotNetObjectReference.Create(this); await JSRuntime.InvokeVoidAsync("jsFunctions.initMrzReader", objRef); isLoading = false; StateHasChanged(); } } public async Task ReadMrz() { await JSRuntime.InvokeVoidAsync( "jsFunctions.selectFile", objRef, overlayId, imageId, VisionTypes.MRZ); } [JSInvokable] public void ReturnMrzResultsAsync(string results) { result = results; StateHasChanged(); } public void Dispose() { objRef?.Dispose(); } }Explanation
@page "/mrzreader"specifies the route for the MRZ reader page.OnAfterRenderAsync()is called after the component has been rendered. It initializes the MRZ reader.ReadMrz()invokes a JavaScript function to select and process an image.ReturnMrzResultsAsync()receives the MRZ results from JavaScript and updates the UI.
-
Add JavaScript Functions to jsInterop.js: In your
wwwroot/jsInterop.jsfile, add the following JavaScript functions to handle MRZ recognition:async function showMrzResults(result, dotnetRef) { clearOverlay(); let txts = []; try { let localization; let items = result.items; if (items.length > 0) { for (var i = 0; i < items.length; ++i) { if (items[i].type !== Dynamsoft.Core.EnumCapturedResultItemType.CRIT_TEXT_LINE) { continue; } let item = items[i]; txts.push(item.text); localization = item.location; drawOverlay( localization, '' ); let parseResults = await parser.parse(item.text); if (dotnetRef) { dotnetRef.invokeMethodAsync('ReturnMrzResultsAsync', JSON.stringify(handleMrzParseResult(parseResults))); } break; } } } catch (e) { alert(e); } } function decodeImage(dotnetRef, url, visionType) { const img = new Image() img.onload = () => { updateOverlay(img.width, img.height); if (cvr) { if (visionType === 'barcode') { cvr.capture(url, templateName).then((result) => { showBarcodeResults(result, dotnetRef); }); } else if (visionType === 'mrz') { cvr.capture(url, templateName).then((result) => { showMrzResults(result, dotnetRef); }); } } } img.src = url } window.jsFunctions = { ... initMrzReader: async function () { if (!isInitialized) { alert("Please set the license first."); return; } try { templateName = 'ReadMRZ'; dispose(); await initMRZ(); } catch (e) { console.log(e); } }, selectFile: async function (dotnetRef, overlayId, imageId, visionType) { if (cameraEnhancer) { cameraEnhancer.dispose(); cameraEnhancer = null; } initOverlay(document.getElementById(overlayId)); if (cvr) { let input = document.createElement("input"); input.type = "file"; input.onchange = async function () { try { let file = input.files[0]; var fr = new FileReader(); fr.onload = function () { let image = document.getElementById(imageId); image.src = fr.result; image.style.display = 'block'; decodeImage(dotnetRef, fr.result, visionType); } fr.readAsDataURL(file); } catch (ex) { alert(ex.message); throw ex; } }; input.click(); } else { alert("The barcode reader is still initializing."); } }, },Explanation
initMrzReader()initializes the Capture Vision Router and loads the MRZ template.decodeImage()decodes MRZ from the selected image.showMrzResults()displays the MRZ results on the page.selectFile()opens a file dialog for selecting an image file and decodes the MRZ information from the image.
-
Run and Test the MRZ Reader: Run the Blazor application and navigate to the MRZ Reader page.

Step 3: Implement an MRZ Scanner Page
In this step, we’ll create a page in your Blazor application that allows users to scan Machine Readable Zone (MRZ) information directly from camera stream.
-
Create a Razor Component: Create a new Razor component called
MrzScanner.razorin thePagesdirectory and add it to your navigation menu inNavMenu.razor:<div class="nav-item px-3"> <NavLink class="nav-link" href="mrzscanner"> <span class="bi bi-list-nested-nav-menu" aria-hidden="true"></span> MRZ Scanner </NavLink> </div> -
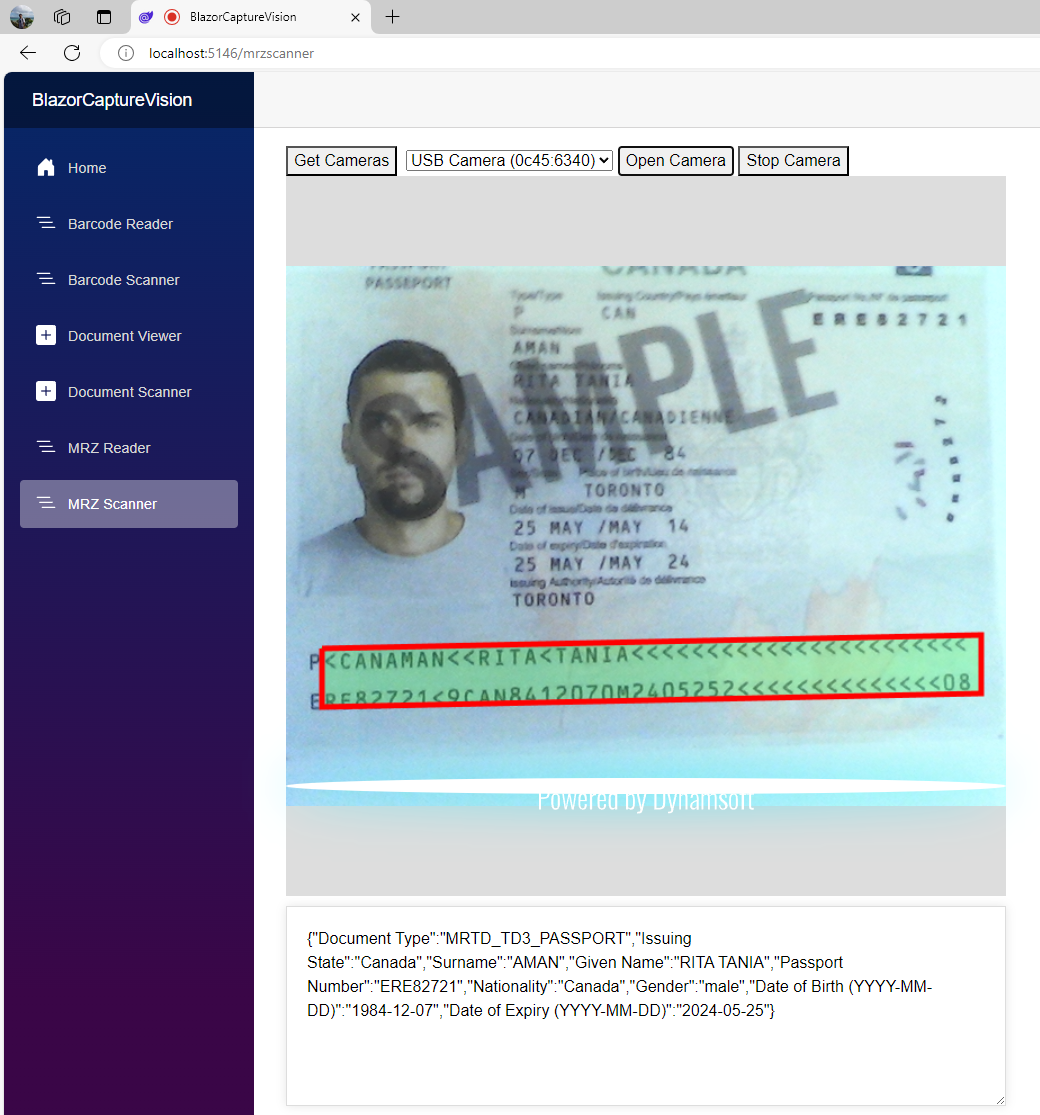
Implement the MRZ Scanner Page: Add the following code to
MrzScanner.razorto enable MRZ scanning from camera stream:@page "/mrzscanner" @inject IJSRuntime JSRuntime @if (isLoading) { <div id="loading-indicator" class="loading-indicator"> <div class="spinner"></div> </div> } <div class="select"> <button @onclick="GetCameras">Get Cameras</button> <label for="videoSource"></label> <select id="@videoSourceId"></select> <button @onclick="StartCamera">Open Camera</button> <button @onclick="StopCamera">Stop Camera</button> </div> <div id="videoview"> <div class="dce-video-container" id="@videoContainerId"></div> <canvas id="@overlayId"></canvas> </div> <div> <textarea @bind="result"></textarea> </div> @code { private Boolean isLoading = true; private string result = string.Empty; private DotNetObjectReference<MrzScanner>? objRef; private string videoSourceId = "videoSource"; private string overlayId = "overlay"; private string videoContainerId = "videoContainer"; protected override async Task OnAfterRenderAsync(bool firstRender) { if (firstRender) { objRef = DotNetObjectReference.Create(this); await JSRuntime.InvokeVoidAsync("jsFunctions.initMrzScanner", objRef, videoContainerId, videoSourceId, overlayId); isLoading = false; StateHasChanged(); } } [JSInvokable] public void ReturnMrzResultsAsync(string results) { result = results; StateHasChanged(); } public void Dispose() { objRef?.Dispose(); } public async Task GetCameras() { await JSRuntime.InvokeVoidAsync("jsFunctions.getCameras"); } public async Task StartCamera() { await JSRuntime.InvokeVoidAsync("jsFunctions.startCamera"); } public async Task StopCamera() { await JSRuntime.InvokeVoidAsync("jsFunctions.stopCamera"); } }Explanation
@page "/mrzscanner"specifies the route for the MRZ scanner page.OnAfterRenderAsync()is called after the component has been rendered. It initializes the MRZ scanner.ReturnMrzResultsAsync()receives the MRZ results from JavaScript and updates the UI.GetCameras(),StartCamera(), andStopCamera()are methods that control the camera via JavaScript interop.
-
Add JavaScript Functions in jsInterop.js: Add the corresponding JavaScript functions in your
jsInterop.jsfile:async function openCamera() { clearOverlay(); try { let deviceId = videoSelect.value; if (cameraEnhancer && deviceId !== "") { await cameraEnhancer.selectCamera(deviceId); await cameraEnhancer.open(); cvr.startCapturing(templateName); } } catch(e) { alert(e); } } window.jsFunctions = { ... getCameras: async function () { if (cameraEnhancer) { let cameras = await cameraEnhancer.getAllCameras(); listCameras(cameras); } }, startCamera: async function() { openCamera(); }, stopCamera: async function () { try { if (cameraEnhancer) { cameraEnhancer.pause(); } if (cvr) { cvr.stopCapturing(); } } catch (e) { alert(e); } }, initMrzScanner: async function (dotnetRef, videoId, selectId, overlayId) { if (!isInitialized) { alert("Please set the license first."); return; } let canvas = document.getElementById(overlayId); initOverlay(canvas); videoSelect = document.getElementById(selectId); videoSelect.onchange = openCamera; try { templateName = 'ReadMRZ'; dispose(); await initMRZ(); let cameraView = await Dynamsoft.DCE.CameraView.createInstance(); cameraEnhancer = await Dynamsoft.DCE.CameraEnhancer.createInstance(cameraView); let uiElement = document.getElementById(videoId); uiElement.append(cameraView.getUIElement()); cameraView.getUIElement().shadowRoot?.querySelector('.dce-sel-camera')?.setAttribute('style', 'display: none'); cameraView.getUIElement().shadowRoot?.querySelector('.dce-sel-resolution')?.setAttribute('style', 'display: none'); cvr.setInput(cameraEnhancer); cvr.addResultReceiver({ onCapturedResultReceived: (result) => { showMrzResults(result, dotnetRef); }, }); cameraEnhancer.on('played', () => { updateResolution(); }); } catch (e) { alert(e); result = false; } return true; }, }Explanation
initMrzScanner()initializes the Capture Vision Router, MRZ template and the camera view.getCameras()retrieves the available cameras.startCamera()opens the camera view.stopCamera()stops the camera view.onCapturedResultReceived()returns the MRZ results from the camera view and displays them on the page.
-
Run and Test the MRZ Scanner: Run the Blazor application and navigate to the MRZ Scanner page.

Source Code
https://github.com/yushulx/blazor-barcode-mrz-document-scanner


