How to Build a Document Scanner Web App Using JavaScript and Flutter
Dynamsoft Capture Vision provides a set of APIs for detecting document edges and normalizing documents based on detected quadrilaterals. The JavaScript edition of the SDK is available on npm. In this article, we’ll first demonstrate how to use the JavaScript APIs in a web application, and then show how to build a Flutter document scanning plugin based on the JavaScript SDK. This enables developers to easily integrate document edge detection and normalization features into their Flutter web applications.
This article is Part 1 in a 4-Part Series.
- Part 1 - How to Build a Document Scanner Web App Using JavaScript and Flutter
- Part 2 - Building a Flutter Document Scanning Plugin for Windows and Linux
- Part 3 - How to Create a Flutter Document Scanning Plugin for Android and iOS
- Part 4 - How to Build a Cross-platform Document Scanner App with Flutter
Demo Video: Flutter Web Document Scanner
Flutter Document Scan SDK
https://pub.dev/packages/flutter_document_scan_sdk
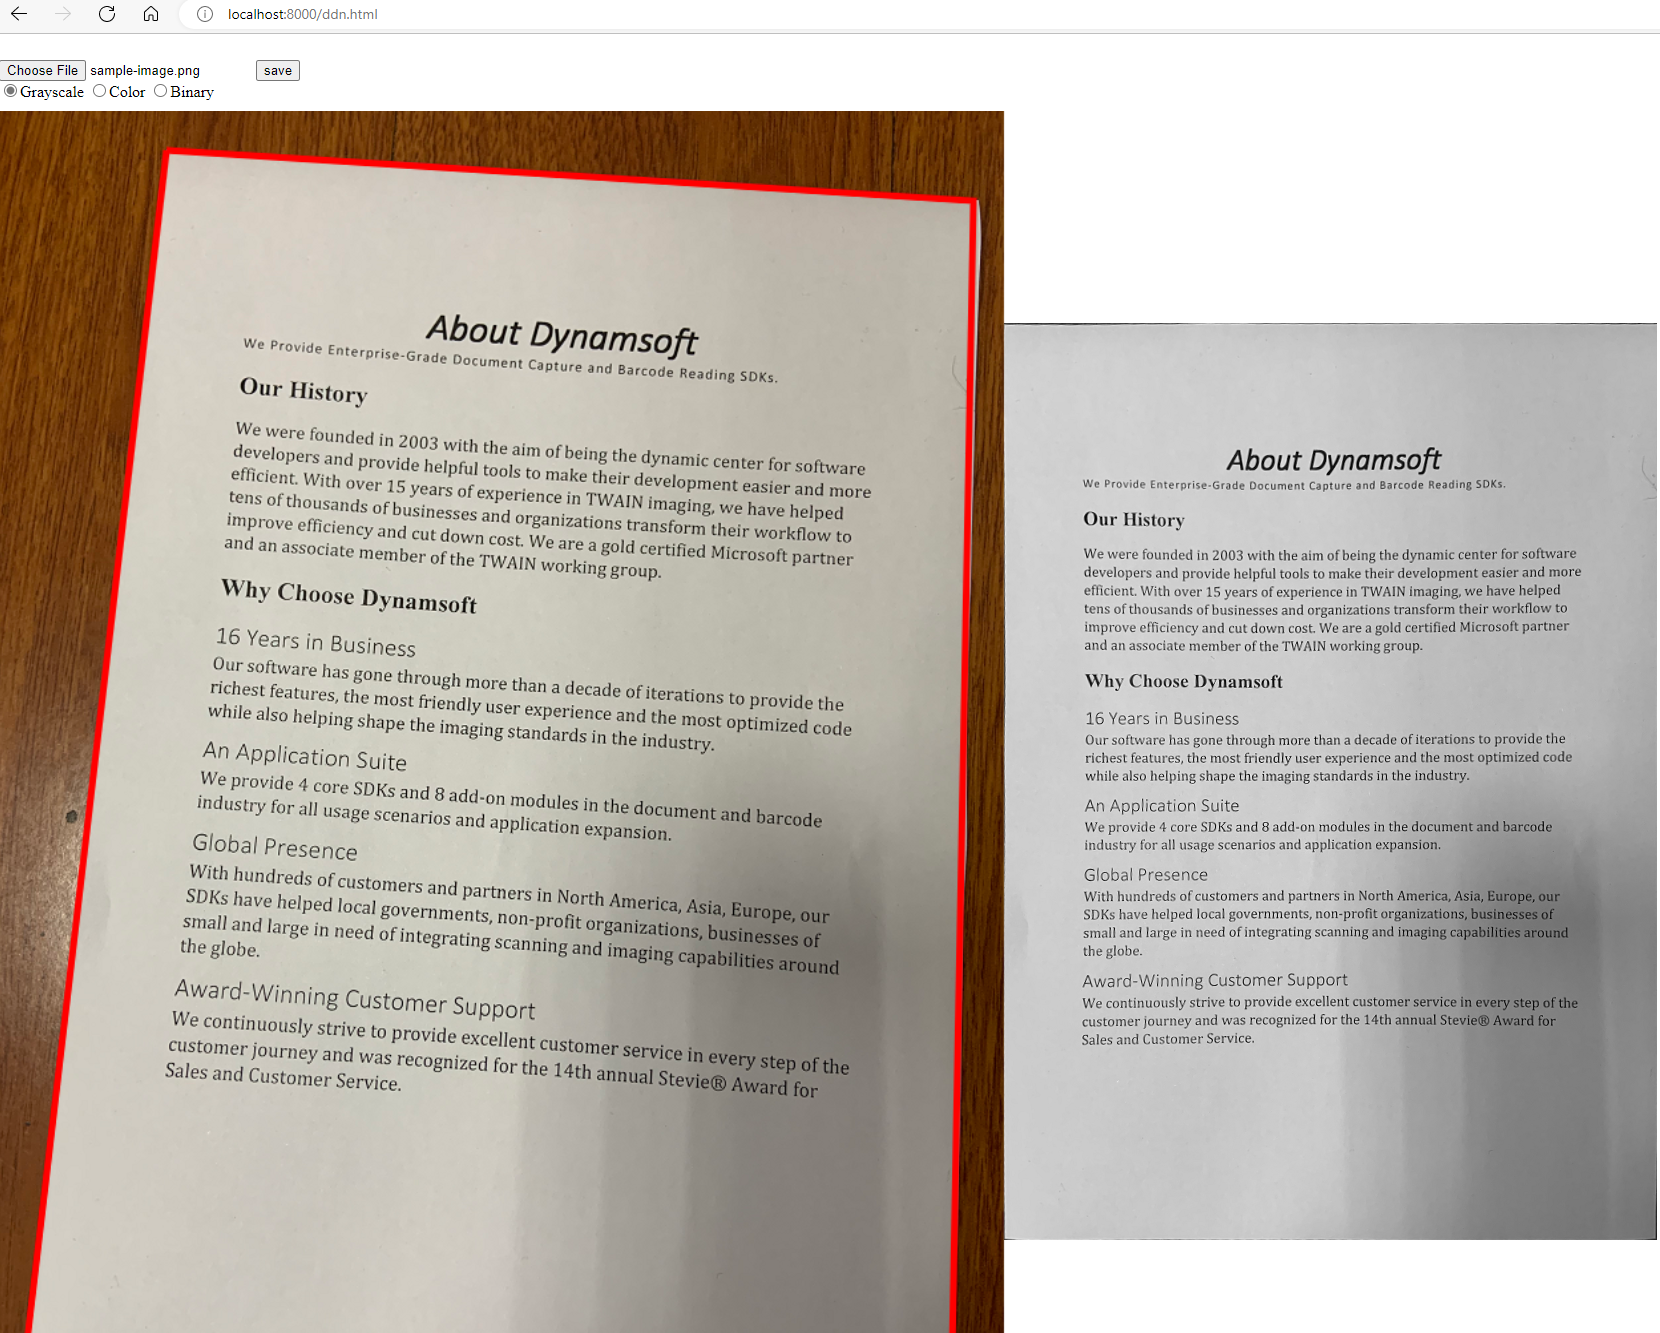
Using the JavaScript API for Document Edge Detection and Perspective Transformation
With just a few lines of JavaScript, you can quickly build a web-based document scanner using the Dynamsoft Capture Vision SDK. Follow these steps:
-
Include the JavaScript SDK in your HTML file:
<script src="https://cdn.jsdelivr.net/npm/dynamsoft-capture-vision-bundle@3.0.3001/dist/dcv.bundle.min.js"></script> -
Apply for a trial license from the Dynamsoft Customer Portal and set the license key in your code:
await Dynamsoft.License.LicenseManager.initLicense('LICENSE-KEY', true); -
Initialize the SDK asynchronously:
(async () => { try { await Dynamsoft.License.LicenseManager.initLicense(license, true); await Dynamsoft.Core.CoreModule.loadWasm(["ddn"]); cvRouter = await Dynamsoft.CVR.CaptureVisionRouter.createInstance(); } catch (error) { console.error(error); } })(); -
Load a document image and detect its edges using the
capture()method:<input type="file" id="file" accept="image/*" /> document.getElementById("file").addEventListener("change", function () { let file = this.files[0]; let fr = new FileReader(); fr.onload = function () { let image = document.getElementById('image'); image.src = fr.result; target["file"] = fr.result; const img = new Image(); img.onload = () => { if (cvRouter) { (async () => { const result = await cvRouter.capture(image, "DetectDocumentBoundaries_Default"); for (let item of result.items) { if (item.type !== Dynamsoft.Core.EnumCapturedResultItemType.CRIT_DETECTED_QUAD) { continue; } points = item.location.points; drawQuad(points); break; } })(); } } img.src = fr.result; } fr.readAsDataURL(file); }); -
Normalize the document using the detected points:
 function normalize(file, points) {
     (async () => {
         if (cvRouter) {
             let params = await cvRouter.getSimplifiedSettings("NormalizeDocument_Default");
             params.roi.points = points;
             params.roiMeasuredInPercentage = 0;
             await cvRouter.updateSettings("NormalizeDocument_Default", params);

             const result = await cvRouter.capture(file, "NormalizeDocument_Default");
             for (let item of result.items) {
                 if (item.type !== Dynamsoft.Core.EnumCapturedResultItemType.CRIT_NORMALIZED_IMAGE) {
                     continue;
                 }

                 let blob = await item.toBlob();
                 return blob;
             }
         }

     })();
 }
After completing the steps above, you can test the HTML file by running the following command in your terminal:
python -m http.server

Encapsulating the Dynamsoft Capture Vision JavaScript SDK into a Flutter Plugin
We scaffolded a Flutter web-only plugin project using the following command:
flutter create --org com.dynamsoft --template=plugin --platforms=web flutter_document_scan_sdk
Next, add the js package as a dependency in the pubspec.yaml file. The Flutter JS plugin allows Dart code to interoperate with JavaScript:
dependencies:
  ...
  js: ^0.7.1
Navigate to the lib folder and create a new file named web_ddn_manager.dart. In this file, define the classes and methods that enable interoperability with the JavaScript SDK.
@JS('Dynamsoft')
library dynamsoft;

import 'package:flutter/foundation.dart';
import 'package:flutter_document_scan_sdk/flutter_document_scan_sdk_platform_interface.dart';
import 'package:flutter_document_scan_sdk/normalized_image.dart';
import 'package:flutter_document_scan_sdk/shims/dart_ui_real.dart';
import 'package:js/js.dart';
import 'document_result.dart';
import 'utils.dart';
import 'dart:js_util';

@JS()
@anonymous
class ImageData {
  external Uint8List get bytes;
  external int get format;
  external int get height;
  external int get stride;
  external int get width;
}

@JS()
@anonymous
class DetectedResult {
  external List<DetectedItem> get items;
}

@JS()
@anonymous
class DetectedItem {
  external int get type;
  external Location get location;
  external int get confidenceAsDocumentBoundary;
}

@JS()
@anonymous
class NormalizedResult {
  external List<NormalizedItem> get items;
}

@JS()
@anonymous
class NormalizedItem {
  external int get type;
  external Location get location;
  external Image toImage();
  external ImageData get imageData;
}

@JS()
@anonymous
class Location {
  external List<Point> get points;
}

@JS()
@anonymous
class Point {
  external num get x;
  external num get y;
}

@JS('License.LicenseManager')
class LicenseManager {
  external static PromiseJsImpl<void> initLicense(
      String license, bool executeNow);
}

@JS('Core.CoreModule')
class CoreModule {
  external static PromiseJsImpl<void> loadWasm(List<String> modules);
}

@JS('CVR.CaptureVisionRouter')
class CaptureVisionRouter {
  external static PromiseJsImpl<CaptureVisionRouter> createInstance();

  external PromiseJsImpl<dynamic> capture(dynamic data, String template);

  external PromiseJsImpl<dynamic> getSimplifiedSettings(String templateName);

  external PromiseJsImpl<void> updateSettings(
      String templateName, dynamic settings);

  external PromiseJsImpl<dynamic> outputSettings(String templateName);

  external PromiseJsImpl<void> initSettings(String settings);
}
After that, create a DDNManager class to implement Flutter-specific methods.
class DDNManager {
  CaptureVisionRouter? _cvr;

  Future<int> init(String key) async {
    try {
      await handleThenable(LicenseManager.initLicense(key, true));
      await handleThenable(CoreModule.loadWasm(["DDN"]));

      _cvr = await handleThenable(CaptureVisionRouter.createInstance());
    } catch (e) {
      return -1;
    }

    return 0;
  }

  Future<int> setParameters(String params) async {
    if (_cvr != null) {
      await handleThenable(_cvr!.initSettings(params));
      return 0;
    }

    return -1;
  }

  Future<String> getParameters() async {
    if (_cvr != null) {
      dynamic settings = await handleThenable(_cvr!.outputSettings(""));
      return stringify(settings);
    }

    return '';
  }

  Future<NormalizedImage?> normalizeFile(
      String file, dynamic points, ColorMode color) async {
    List<dynamic> jsOffsets = points.map((Offset offset) {
      return {'x': offset.dx, 'y': offset.dy};
    }).toList();

    NormalizedImage? image;
    if (_cvr != null) {
      try {
        dynamic rawSettings = await handleThenable(
            _cvr!.getSimplifiedSettings("NormalizeDocument_Default"));
        dynamic params = dartify(rawSettings);
        params['roi']['points'] = jsOffsets;
        params['roiMeasuredInPercentage'] = 0;
        params['documentSettings']['colourMode'] = color.index;
        await handleThenable(
            _cvr!.updateSettings("NormalizeDocument_Default", jsify(params)));
      } catch (e) {
        return image;
      }

      NormalizedResult normalizedResult =
          await handleThenable(_cvr!.capture(file, "NormalizeDocument_Default"))
              as NormalizedResult;

      image = _createNormalizedImage(normalizedResult);
    }

    return image;
  }

  Future<NormalizedImage?> normalizeBuffer(
      Uint8List bytes,
      int width,
      int height,
      int stride,
      int format,
      dynamic points,
      int rotation,
      ColorMode color) async {
    List<dynamic> jsOffsets = points.map((Offset offset) {
      return {'x': offset.dx, 'y': offset.dy};
    }).toList();

    NormalizedImage? image;
    if (_cvr != null) {
      try {
        dynamic rawSettings = await handleThenable(
            _cvr!.getSimplifiedSettings("NormalizeDocument_Default"));
        dynamic params = dartify(rawSettings);
        params['roi']['points'] = jsOffsets;
        params['roiMeasuredInPercentage'] = 0;
        params['documentSettings']['colourMode'] = color.index;

        await handleThenable(
            _cvr!.updateSettings("NormalizeDocument_Default", jsify(params)));
      } catch (e) {
        return image;
      }

      final dsImage = jsify({
        'bytes': bytes,
        'width': width,
        'height': height,
        'stride': stride,
        'format': format,
        'orientation': rotation
      });

      NormalizedResult normalizedResult = await handleThenable(
              _cvr!.capture(dsImage, "NormalizeDocument_Default"))
          as NormalizedResult;

      image = _createNormalizedImage(normalizedResult);
    }

    return image;
  }

  Future<List<DocumentResult>> detectFile(String file) async {
    if (_cvr != null) {
      DetectedResult detectedResult = await handleThenable(
              _cvr!.capture(file, "DetectDocumentBoundaries_Default"))
          as DetectedResult;
      return _createContourList(detectedResult.items);
    }

    return [];
  }

  Future<List<DocumentResult>> detectBuffer(Uint8List bytes, int width,
      int height, int stride, int format, int rotation) async {
    if (_cvr != null) {
      final dsImage = jsify({
        'bytes': bytes,
        'width': width,
        'height': height,
        'stride': stride,
        'format': format,
        'orientation': rotation
      });

      DetectedResult detectedResult = await handleThenable(
              _cvr!.capture(dsImage, 'DetectDocumentBoundaries_Default'))
          as DetectedResult;

      return _createContourList(detectedResult.items);
    }

    return [];
  }

  NormalizedImage? _createNormalizedImage(NormalizedResult normalizedResult) {
    NormalizedImage? image;
    if (normalizedResult.items.isNotEmpty) {
      for (NormalizedItem result in normalizedResult.items) {
        if (result.type != 16) continue;
        ImageData imageData = result.imageData;
        image = NormalizedImage(
            convertToRGBA32(imageData), imageData.width, imageData.height);
      }
    }

    return image;
  }

  List<DocumentResult> _createContourList(List<dynamic> results) {
    List<DocumentResult> output = [];

    for (DetectedItem result in results) {
      if (result.type != 8) continue;
      int confidence = result.confidenceAsDocumentBoundary;
      List<Point> points = result.location.points;
      List<Offset> offsets = [];
      for (Point point in points) {
        double x = point.x.toDouble();
        double y = point.y.toDouble();
        offsets.add(Offset(x, y));
      }

      DocumentResult documentResult = DocumentResult(confidence, offsets);
      output.add(documentResult);
    }

    return output;
  }

  Uint8List convertToRGBA32(ImageData imageData) {
    final Uint8List input = imageData.bytes;
    final int width = imageData.width;
    final int height = imageData.height;
    final int format = imageData.format;

    final Uint8List output = Uint8List(width * height * 4);

    int dataIndex = 0;

    if (format == ImagePixelFormat.IPF_RGB_888.index) {
      for (int i = 0; i < height; i++) {
        for (int j = 0; j < width; j++) {
          final int index = (i * width + j) * 4;

          output[index] = input[dataIndex]; // R
          output[index + 1] = input[dataIndex + 1]; // G
          output[index + 2] = input[dataIndex + 2]; // B
          output[index + 3] = 255; // A

          dataIndex += 3;
        }
      }
    } else if (format == ImagePixelFormat.IPF_GRAYSCALED.index ||
        format == ImagePixelFormat.IPF_BINARY_8_INVERTED.index ||
        format == ImagePixelFormat.IPF_BINARY_8.index) {
      for (int i = 0; i < height; i++) {
        for (int j = 0; j < width; j++) {
          final int index = (i * width + j) * 4;
          final int gray = input[dataIndex];

          output[index] = gray;
          output[index + 1] = gray;
          output[index + 2] = gray;
          output[index + 3] = 255;

          dataIndex += 1;
        }
      }
    } else {
      throw UnsupportedError('Unsupported format: $format');
    }

    return output;
  }
}
Explanation of the DDNManager Class
init(): Initializes the SDK with a license key.detectFile(): Detects the edges of a document from an image file.detectBuffer(): Detects document edges from an image buffer.normalizeFile(): Normalizes the document image using detected quadrilaterals.normalizeBuffer(): Normalizes the document image based on detected quadrilaterals in an image buffer.
The detected quadrilaterals and normalized document image are represented by the DocumentResult and NormalizedImage classes, respectively:
class DocumentResult {
  final int confidence;

  final List<Offset> points;

  DocumentResult(this.confidence, this.points);
}

class NormalizedImage {
  final Uint8List data;

  final int width;

  final int height;

  NormalizedImage(this.data, this.width, this.height);
}
In the flutter_document_scan_sdk_platform_interface.dart file, we define the method interfaces to be implemented by the plugin. These will be called by Flutter applications.
Future<int?> init(String key) {
    throw UnimplementedError('init() has not been implemented.');
}

Future<NormalizedImage?> normalizeFile(
    String file, List<Offset> points, ColorMode color) {
  throw UnimplementedError('normalizeFile() has not been implemented.');
}

Future<NormalizedImage?> normalizeBuffer(
    Uint8List bytes,
    int width,
    int height,
    int stride,
    int format,
    List<Offset> points,
    int rotation,
    ColorMode color) {
  throw UnimplementedError('normalizeBuffer() has not been implemented.');
}

Future<List<DocumentResult>?> detectFile(String file) {
  throw UnimplementedError('detectFile() has not been implemented.');
}

Future<int?> setParameters(String params) {
  throw UnimplementedError('setParameters() has not been implemented.');
}

Future<String?> getParameters() {
  throw UnimplementedError('getParameters() has not been implemented.');
}

Future<List<DocumentResult>> detectBuffer(Uint8List bytes, int width,
    int height, int stride, int format, int rotation) {
  throw UnimplementedError('detectBuffer() has not been implemented.');
}
The corresponding implementations for the web platform are provided in the flutter_document_scan_sdk_web.dart file:
@override
Future<int?> init(String key) async {
  return _ddnManager.init(key);
}

@override
Future<List<DocumentResult>?> detectFile(String file) async {
  return _ddnManager.detectFile(file);
}

@override
Future<List<DocumentResult>> detectBuffer(Uint8List bytes, int width,
    int height, int stride, int format, int rotation) async {
  return _ddnManager.detectBuffer(
      bytes, width, height, stride, format, rotation);
}

@override
Future<NormalizedImage?> normalizeFile(
    String file, List<Offset> points, ColorMode color) async {
  return _ddnManager.normalizeFile(file, points, color);
}

@override
Future<NormalizedImage?> normalizeBuffer(
    Uint8List bytes,
    int width,
    int height,
    int stride,
    int format,
    List<Offset> points,
    int rotation,
    ColorMode color) async {
  return _ddnManager.normalizeBuffer(
      bytes, width, height, stride, format, points, rotation, color);
}
So far, we have completed the implementation of the Flutter document scanning plugin. In the next section, we’ll demonstrate how to create a Flutter app to test the plugin.
Steps to Build a Flutter Web Application for Document Scanning
Before proceeding, obtain a license key from here.
Step 1: Install the Dynamsoft Capture Vision JavaScript SDK and Flutter Document Scan Plugin
-
Install the Flutter Document Scan Plugin:
flutter pub add flutter_document_scan_sdk -
Include the JavaScript SDK in the
index.htmlfile.<script src="https://cdn.jsdelivr.net/npm/dynamsoft-capture-vision-bundle@3.0.3001/dist/dcv.bundle.min.js"></script>
Step 2: Initialize the Flutter Document Scan Plugin
In the global.dart file, initialize the plugin with your license key:
FlutterDocumentScanSdk docScanner = FlutterDocumentScanSdk();
bool isLicenseValid = false;

Future<int> initDocumentSDK() async {
  int? ret = await docScanner.init(
      'LICENSE-KEY');
  if (ret == 0) isLicenseValid = true;
  return ret ?? -1;
}
Step 3: Load Image Files and Normalize Documents in Flutter
Use the image_picker package to load image files from the gallery. Once the image is loaded, decode it and convert it into RGBA byte data:
final picker = ImagePicker();

XFile? photo = await picker.pickImage(source: ImageSource.gallery);

if (photo == null) {
  return;
}

Uint8List fileBytes = await photo.readAsBytes();

ui.Image image = await decodeImageFromList(fileBytes);

ByteData? byteData =
    await image.toByteData(format: ui.ImageByteFormat.rawRgba);
After loading the image, detect document edges and normalize the document image:
List<DocumentResult>? results = await docScanner.detectBuffer(
      byteData.buffer.asUint8List(),
      image.width,
      image.height,
      byteData.lengthInBytes ~/ image.height,
      ImagePixelFormat.IPF_ARGB_8888.index,
      ImageRotation.rotation0.value);

NormalizedImage? normalizedImage = await docScanner.normalizeBuffer(bytes, width, height,
        stride, format, points, ImageRotation.rotation0.value, color);
Step 4: Draw Custom Shapes and Images with Flutter CustomPaint
To verify the detection and normalization results, it’s best to visualize them using UI elements.
Convert the selected XFile to a ui.Image using decodeImageFromList():
Future<ui.Image> loadImage(XFile file) async {
  final data = await file.readAsBytes();
  return await decodeImageFromList(data);
}
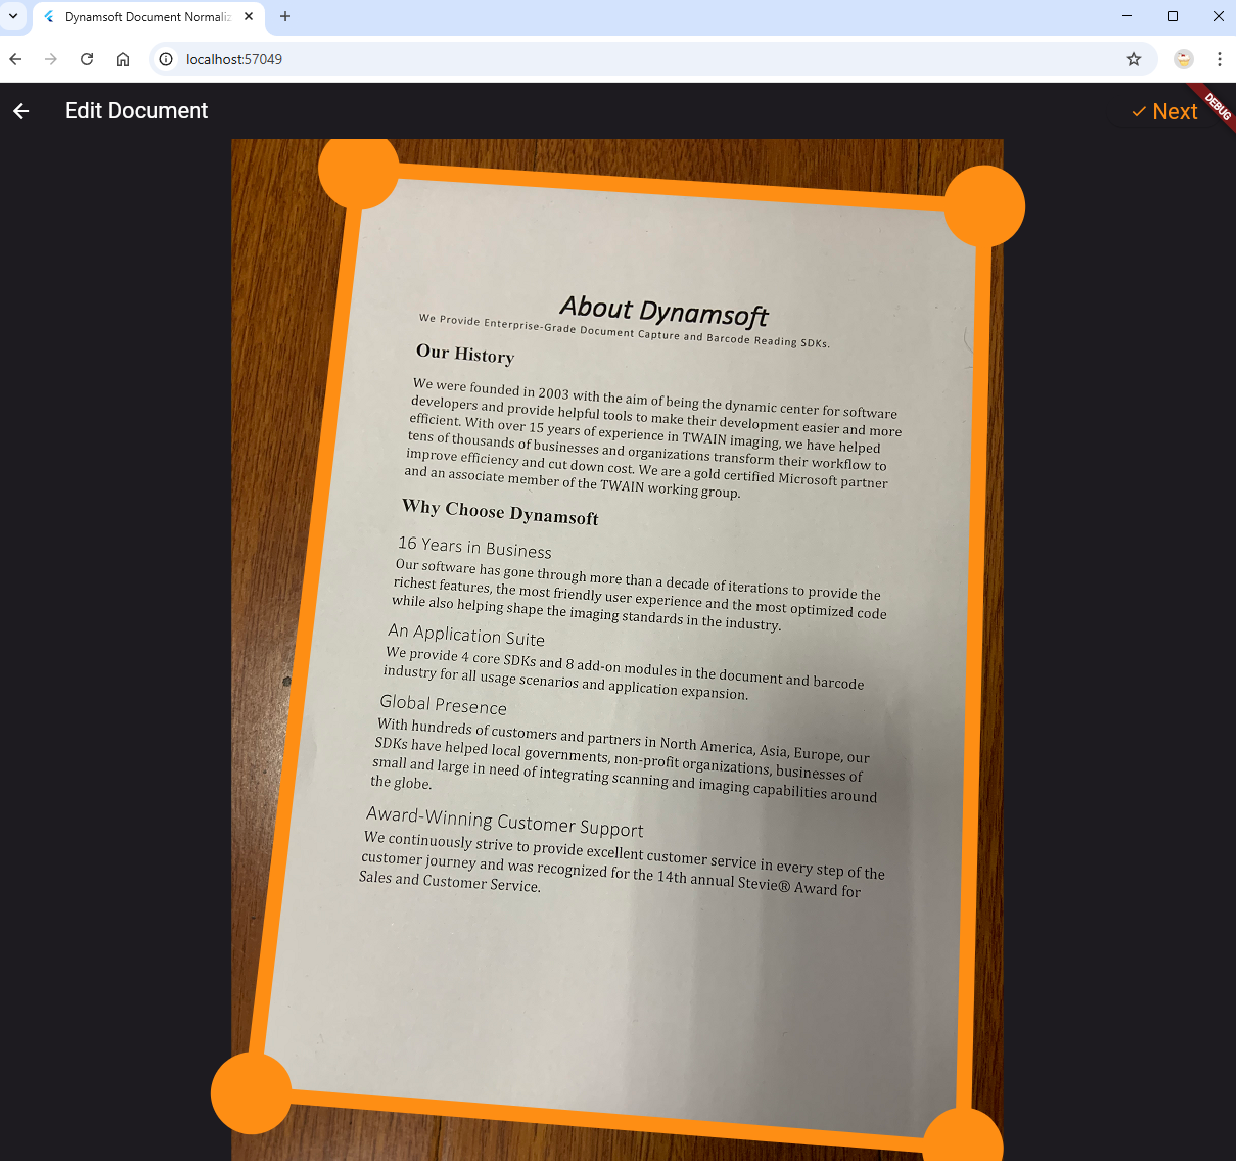
Since the Image widget does not support drawing custom shapes, use the CustomPaint widget instead. It allows you to overlay shapes on the image. The code example below demonstrates how to draw detected edges and highlight the corners of the detected document:
class OverlayPainter extends CustomPainter {
  ui.Image? image;
  List<DocumentResult>? results;

  OverlayPainter(this.image, this.results);

  @override
  void paint(Canvas canvas, Size size) {
    final paint = Paint()
      ..color = colorOrange
      ..strokeWidth = 15
      ..style = PaintingStyle.stroke;

    if (image != null) {
      canvas.drawImage(image!, Offset.zero, paint);
    }

    Paint circlePaint = Paint()
      ..color = colorOrange
      ..strokeWidth = 30
      ..style = PaintingStyle.fill;

    if (results == null) return;

    for (var result in results!) {
      canvas.drawLine(result.points[0], result.points[1], paint);
      canvas.drawLine(result.points[1], result.points[2], paint);
      canvas.drawLine(result.points[2], result.points[3], paint);
      canvas.drawLine(result.points[3], result.points[0], paint);

      if (image != null) {
        double radius = 40;
        canvas.drawCircle(result.points[0], radius, circlePaint);
        canvas.drawCircle(result.points[1], radius, circlePaint);
        canvas.drawCircle(result.points[2], radius, circlePaint);
        canvas.drawCircle(result.points[3], radius, circlePaint);
      }
    }
  }

  @override
  bool shouldRepaint(OverlayPainter oldDelegate) => true;
}
Step 5: Run the Flutter Web Document Scanning Application
flutter run -d chrome
Document Edge Detection

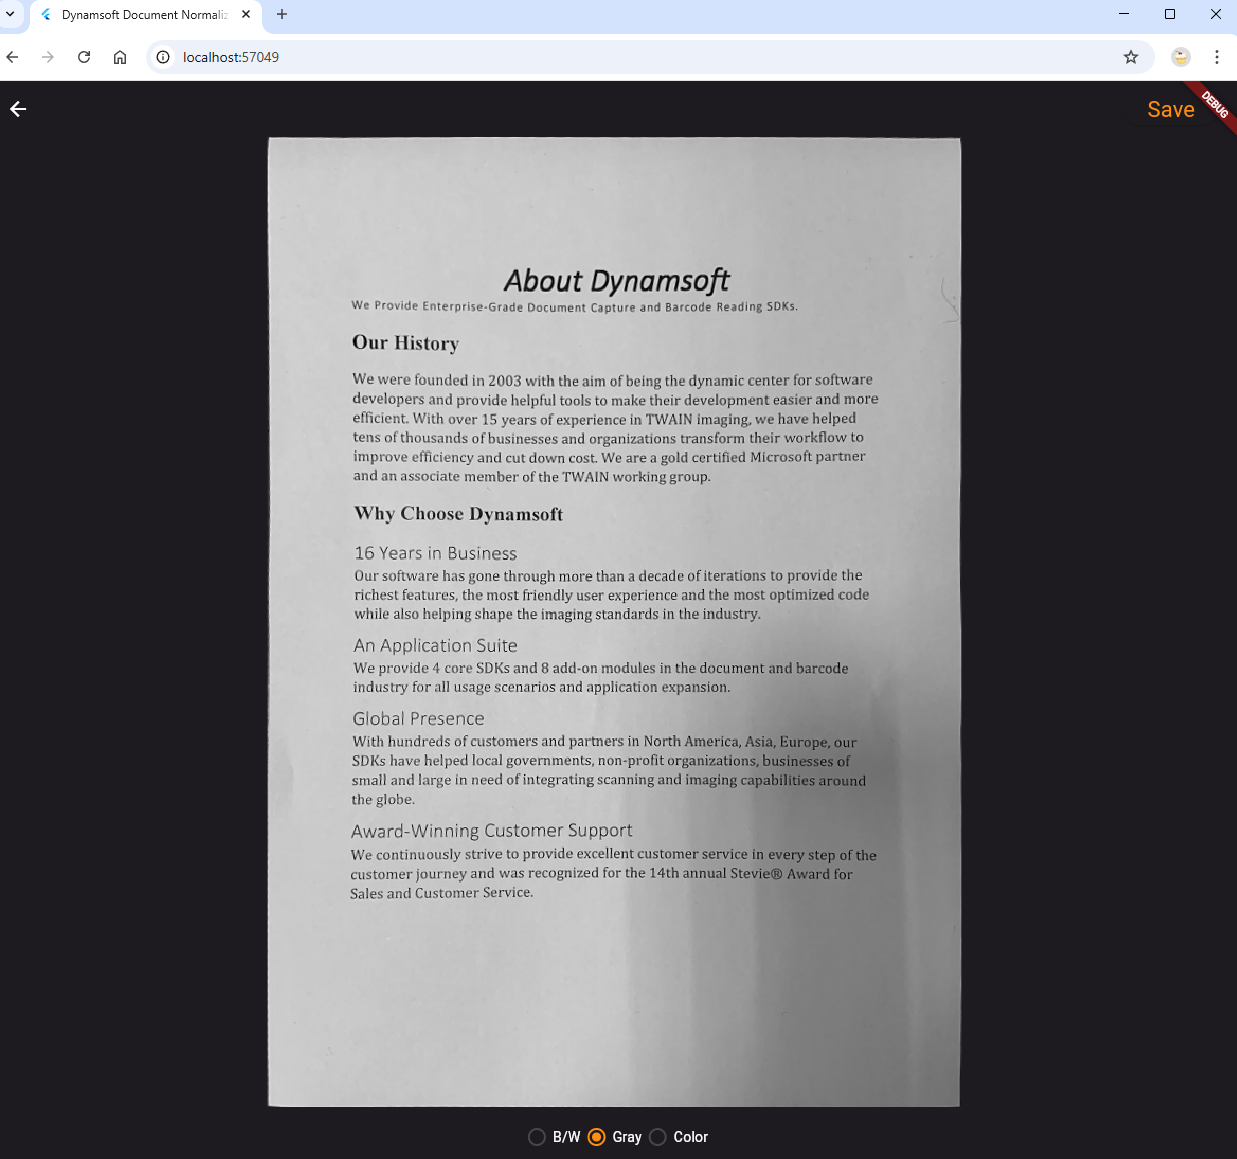
Document Normalization


