


How to Build a Node.js Camera SDK and Barcode Scanner
The litecam Node.js camera SDK lets you capture webcam frames and process them in server-side JavaScript. It wraps the LiteCam C++ camera library as a native Node.js addon built with node-gyp and node-addon-api, and it runs on Windows, Linux, and macOS. In this article, you will build the camera addon from scratch and then combine it with Dynamsoft Capture Vision (the dynamsoft-capture-vision-for-node package) to create a desktop multi-barcode scanner that decodes QR Code, DataMatrix, PDF417, Aztec, DotCode, and linear barcodes from a live webcam stream. In a previous article we built the same pipeline as a Python camera SDK.
What you’ll build: A Node.js native addon (litecam) that wraps the C++ LiteCam camera library with node-gyp, exposing open, captureFrame, showFrame, drawContour, and drawText, plus a real-time multi-barcode scanner (app.js) that feeds each captured frame into Dynamsoft Capture Vision and overlays decoded barcode locations on the preview window.
Key Takeaways
- A Node.js addon lets JavaScript call a C++ camera library through N-API:
node-gypcompileslitecam.ccinto a.nodenative module, andnode-addon-apiprovides the C++ wrapper around N-API. - The
litecampackage exposesgetDeviceList()andsaveJpeg()as global functions and aNodeCamclass with camera methods (open,listMediaTypes,setResolution,captureFrame,release,getWidth,getHeight) and window methods (createWindow,waitKey,showFrame,drawContour,drawText). - Barcode decoding in
app.jsuses Dynamsoft Capture Vision:CaptureVisionRouter.captureAsync(imageData, EnumPresetTemplate.PT_READ_BARCODES)accepts a raw RGB frame and returnsbarcodeResultItemswith the decoded text and four location points. - Each captured frame is a
Bufferof RGB data; pass the frame’swidth,height, andstride = width * 3withEnumImagePixelFormat.IPF_RGB_888so the Capture Vision SDK can decode it. - The addon ships precompiled
litecamlibraries per platform underplatforms/;binding.gyplinks and copies the matching library (.dll,.so, or.dylib) intobuild/Release/so the package works on Windows, Linux, and macOS.
Common Developer Questions
How do you build a Node.js camera SDK from C++?
Create a Node.js addon project with binding.gyp and node-gyp: add src/litecam.cc as the only source file, include node-addon-api and the Node headers, and link the precompiled LiteCam library (litecam.lib on Windows, liblitecam.so on Linux, liblitecam.dylib on macOS). Run node-gyp configure and node-gyp build, then load the resulting build/Release/litecam.node through index.js.
How do you read multiple barcodes from a webcam in Node.js?
Install litecam and dynamsoft-capture-vision-for-node, open the camera with nodecamera.open(0), capture each frame with captureFrame(), and pass the RGB buffer to CaptureVisionRouter.captureAsync() inside a display loop. The result contains one barcodeResultItems entry per detected barcode, each with text and four location.points, which you can draw onto the preview window with drawContour() and drawText().
How is Dynamsoft Capture Vision used to decode frames in the Node.js example?
The example imports LicenseManager, CaptureVisionRouter, EnumPresetTemplate, and EnumImagePixelFormat from dynamsoft-capture-vision-for-node. It calls CaptureVisionRouter.captureAsync(imageData, EnumPresetTemplate.PT_READ_BARCODES) with an image object that declares stride = width * 3 and format = EnumImagePixelFormat.IPF_RGB_888, and iterates over results.barcodeResultItems to read item.text and item.location.points.
This article is Part 5 in a 6-Part Series.
- Part 1 - How to Read Barcodes from a Linux Camera in C++ Without OpenCV
- Part 2 - C++ Windows Webcam Barcode Scanner Tutorial: Windows Media Foundation API and Dynamsoft SDK
- Part 3 - How to Build a macOS Camera Barcode Scanner in C++ Using AVFoundation
- Part 4 - How to Read Multiple Barcodes from a Camera Using Python and Dynamsoft Barcode Reader
- Part 5 - How to Build a Node.js Camera SDK and Barcode Scanner
- Part 6 - How to Build a Lightweight Flutter Camera Plugin for Windows, Linux, and macOS
Node.js Multi-Barcode Scanner Demo Video
Prerequisites
- Node.js: Install the current LTS release from the Node.js website.
- Dynamsoft Capture Vision SDK: The
dynamsoft-capture-vision-for-nodenpm package and its model package are used for barcode decoding. Get a 30-day free trial license and update theLicenseManager.initLicense("LICENSE-KEY")line inapp.jswith your own key. - C++ build toolchain for compiling the native addon:
- Windows: Visual Studio with the Desktop development with C++ workload.
- Linux:
build-essential(g++) and Python 3 fornode-gyp. - macOS: Xcode Command Line Tools (
xcode-select --install).
Step 1: Prepare the Development Environment
Install the tools used to compile native addon modules for Node.js:
npm install -g node-gyp
npm install -g node-addon-api
node-gypis a tool used to compile native addon modules for Node.js. It enables you to compile C++ or C code into a native Node.js addon, allowing integration of low-level C or C++ code with Node.js applications.node-addon-apiis a header-only C++ API that provides a modern C++ interface for developing native Node.js addons. It wraps the N-API (Node.js C API) to make it easier and safer to write native addons.
The litecam package runs these checks automatically: its preinstall script (scripts/checkGlobalDeps.js) verifies that node-gyp and node-addon-api are installed globally and installs them if they are missing, its install script runs node-gyp configure and node-gyp build, and its postinstall script (scripts/postinstall.js) runs install_name_tool on macOS to fix the dynamic library path.
Step 2: Scaffold the Node.js Camera Addon Project
Create a Node.js addon project with the following structure:
nodejs-lite-camera
│
│── examples
│   ├── barcode/
│── platforms
│   ├── linux
│   │   ├── liblitecam.so
│   ├── macos
│   │   ├── liblitecam.dylib
│   ├── windows
│   │   ├── litecam.dll
│   │   ├── litecam.lib
│── scripts
│   ├── checkGlobalDeps.js
│   ├── postinstall.js
├── src
│   ├── Camera.h
│   ├── CameraPreview.h
│   ├── litecam.cc
│   ├── nodecam.h
│   ├── stb_image_write.h
│── binding.gyp
│── index.d.ts
│── index.js
│── macos_build.sh
│── package.json
Explanation:
examples: Contains the image processing application. Thebarcodedirectory holds the multi-barcode scanner (app.js) that we build in Step 5.platforms: Contains the precompiled C++ camera library for Windows, Linux, and macOS.scripts: Since the addon is built from source when the package is installed, thecheckGlobalDeps.jsscript checks and preinstalls the global dependencies. Thepostinstall.jsscript performs post-installation tasks, such as runninginstall_name_toolon macOS to fix the dynamic library path.src:Camera.h,CameraPreview.h, andstb_image_write.hare header files for the camera library.litecam.ccis the main source file for the camera addon.nodecam.his the header file for the Node.js addon.binding.gyp: The build configuration file for the Node.js addon.index.d.ts: Exports the TypeScript type definitions for the addon.index.js: The main entry file for the addon.macos_build.sh: A script to build the addon on macOS. Runchmod +x macos_build.shto make it executable.package.json: The package configuration file.
Step 3: Define the Native Class and Methods for the Node Camera Addon
Based on the header files Camera.h and CameraPreview.h, we define the native class and methods for the camera addon in nodecam.h:
#ifndef NodeCamera_H
#define NodeCamera_H

#include <napi.h>
#include <string>
#include <uv.h>
#include <vector>

#include "Camera.h"
#include "CameraPreview.h"

using namespace std;

Napi::String ConvertWCharToJSString(Napi::Env env, const wchar_t *wideStr)
{
    std::wstring wstr(wideStr);

    std::string utf8Str(wstr.begin(), wstr.end());

    return Napi::String::New(env, utf8Str);
}

class NodeCam : public Napi::ObjectWrap<NodeCam>
{
public:
    static Napi::Object Init(Napi::Env env, Napi::Object exports);
    NodeCam(const Napi::CallbackInfo &info);
    ~NodeCam();

    // Camera
    Napi::Value open(const Napi::CallbackInfo &info);
    Napi::Value listMediaTypes(const Napi::CallbackInfo &info);
    Napi::Value release(const Napi::CallbackInfo &info);
    Napi::Value setResolution(const Napi::CallbackInfo &info);
    Napi::Value captureFrame(const Napi::CallbackInfo &info);
    Napi::Value getWidth(const Napi::CallbackInfo &info);
    Napi::Value getHeight(const Napi::CallbackInfo &info);

    // Window
    Napi::Value createWindow(const Napi::CallbackInfo &info);
    Napi::Value waitKey(const Napi::CallbackInfo &info);
    Napi::Value showPreview(const Napi::CallbackInfo &info);
    Napi::Value showFrame(const Napi::CallbackInfo &info);
    Napi::Value drawContour(const Napi::CallbackInfo &info);
    Napi::Value drawText(const Napi::CallbackInfo &info);

private:
    Camera *pCamera;
    CameraWindow *pCameraWindow;

    static Napi::FunctionReference constructor;
};
#endif
Explanation
ConvertWCharToJSString: Converts a wide character string (used in the Windows environment) to a UTF-8 string that JavaScript can handle.NodeCam: The native class for the camera addon. It wraps theCameraandCameraWindowclasses, allowing JavaScript to interact with the camera and window functionalities.
Step 4: Implement the Node Camera Addon
In the litecam.cc file, we implement all the methods defined in nodecam.h.
4.1 Node Module Initialization
The NODE_API_MODULE macro is used to initialize the Node module. It exports the getDeviceList and saveJpeg functions, as well as the NodeCam class.
Napi::Object Init(Napi::Env env, Napi::Object exports)
{
	exports.Set("getDeviceList", Napi::Function::New(env, getDeviceList));
	exports.Set("saveJpeg", Napi::Function::New(env, saveJpeg));
	NodeCam::Init(env, exports);
	return exports;
}

NODE_API_MODULE(litecam, Init)
The getDeviceList() function returns the available camera devices. On Windows it first converts the Unicode device name to a JavaScript string.
Napi::Value getDeviceList(const Napi::CallbackInfo &info)
{
	Napi::Env env = info.Env();

	Napi::Array deviceList = Napi::Array::New(env);

	std::vector<CaptureDeviceInfo> devices = ListCaptureDevices();

	for (size_t i = 0; i < devices.size(); i++)
	{
		CaptureDeviceInfo &device = devices[i];

#ifdef _WIN32
		Napi::String jsFriendlyName = ConvertWCharToJSString(env, device.friendlyName);
#else
		Napi::String jsFriendlyName = Napi::String::New(env, device.friendlyName);
#endif

		deviceList.Set(i, jsFriendlyName);
	}

	return deviceList;
}
The saveJpeg() function saves RGB data as a JPEG image using saveFrameAsJPEG, which is implemented with the bundled stb_image_write.h header.
Napi::Value saveJpeg(const Napi::CallbackInfo &info)
{
	Napi::Env env = info.Env();

	std::string filename = info[0].As<Napi::String>();
	int width = info[1].As<Napi::Number>().Int32Value();
	int height = info[2].As<Napi::Number>().Int32Value();
	Napi::Buffer<unsigned char> buffer = info[3].As<Napi::Buffer<unsigned char>>();

	unsigned char *data = buffer.Data();
	saveFrameAsJPEG(data, width, height, filename.c_str());

	return env.Undefined();
}
The NodeCam class registers the methods for the camera and window operations.
Napi::Object NodeCam::Init(Napi::Env env, Napi::Object exports)
{
	Napi::Function camerafunc = DefineClass(env, "NodeCam", {InstanceMethod("open", &NodeCam::open), InstanceMethod("listMediaTypes", &NodeCam::listMediaTypes), InstanceMethod("release", &NodeCam::release), InstanceMethod("setResolution", &NodeCam::setResolution), InstanceMethod("captureFrame", &NodeCam::captureFrame), InstanceMethod("getWidth", &NodeCam::getWidth), InstanceMethod("getHeight", &NodeCam::getHeight), InstanceMethod("createWindow", &NodeCam::createWindow), InstanceMethod("waitKey", &NodeCam::waitKey), InstanceMethod("showFrame", &NodeCam::showFrame), InstanceMethod("drawContour", &NodeCam::drawContour), InstanceMethod("drawText", &NodeCam::drawText), InstanceMethod("showPreview", &NodeCam::showPreview)});

	NodeCam::constructor = Napi::Persistent(camerafunc);
	NodeCam::constructor.SuppressDestruct();

	exports.Set("NodeCam", camerafunc);

	return exports;
}
4.2 Camera and Window Methods
Camera:
-
open(index): Opens the camera with the specified index.
Napi::Value NodeCam::open(const Napi::CallbackInfo &info) { Napi::Env env = info.Env(); int index = info[0].As<Napi::Number>().Int32Value(); bool ret = false; if (pCamera) { ret = pCamera->Open(index); } return Napi::Boolean::New(env, ret); } -
listMediaTypes(): Lists supported media types, each with
width,height, andmediaTypefields.Napi::Value NodeCam::listMediaTypes(const Napi::CallbackInfo &info) { Napi::Env env = info.Env(); Napi::Array list = Napi::Array::New(env); std::vector<MediaTypeInfo> mediaTypes = pCamera->ListSupportedMediaTypes(); for (size_t i = 0; i < mediaTypes.size(); i++) { MediaTypeInfo &mediaType = mediaTypes[i]; int width = mediaType.width; int height = mediaType.height; #ifdef _WIN32 Napi::String jsMediaType = ConvertWCharToJSString(env, mediaType.subtypeName); #else Napi::String jsMediaType = Napi::String::New(env, mediaType.subtypeName); #endif Napi::Object obj = Napi::Object::New(env); obj.Set("width", Napi::Number::New(env, width)); obj.Set("height", Napi::Number::New(env, height)); obj.Set("mediaType", jsMediaType); list.Set(i, obj); } return list; } -
setResolution(int width, int height): Sets the resolution for the camera.
Napi::Value NodeCam::setResolution(const Napi::CallbackInfo &info) { Napi::Env env = info.Env(); int width = info[0].As<Napi::Number>().Int32Value(); int height = info[1].As<Napi::Number>().Int32Value(); bool ret = false; if (pCamera) { ret = pCamera->SetResolution(width, height); } return Napi::Boolean::New(env, ret); } -
captureFrame(): Captures a single RGB frame and copies it into a Node.js
Bufferso it can be passed to the barcode decoder.Napi::Value NodeCam::captureFrame(const Napi::CallbackInfo &info) { Napi::Env env = info.Env(); if (pCamera) { FrameData frame = pCamera->CaptureFrame(); if (frame.rgbData) { Napi::Object res = Napi::Object::New(env); int width = frame.width; int height = frame.height; int size = frame.size; unsigned char *rgbData = frame.rgbData; Napi::Buffer<unsigned char> buffer = Napi::Buffer<unsigned char>::New(env, size); memcpy(buffer.Data(), rgbData, size); res.Set("width", Napi::Number::New(env, width)); res.Set("height", Napi::Number::New(env, height)); res.Set("data", buffer); ReleaseFrame(frame); return res; } } return env.Undefined(); } -
release(): Closes the camera and releases resources.
Napi::Value NodeCam::release(const Napi::CallbackInfo &info) { Napi::Env env = info.Env(); if (pCamera) { pCamera->Release(); } return env.Undefined(); } -
getWidth(): Returns the width of the frame.
Napi::Value NodeCam::getWidth(const Napi::CallbackInfo &info) { Napi::Env env = info.Env(); if (pCamera) { int width = pCamera->frameWidth; return Napi::Number::New(env, width); } return env.Undefined(); } -
getHeight(): Returns the height of the frame.
  Napi::Value NodeCam::getHeight(const Napi::CallbackInfo &info)
  {
  	Napi::Env env = info.Env();
  	if (pCamera)
  	{
  		int height = pCamera->frameHeight;
  		return Napi::Number::New(env, height);
  	}

  	return env.Undefined();
  }
Window:
-
createWindow(width, height, title): Creates a window with the specified dimensions and title.
Napi::Value NodeCam::createWindow(const Napi::CallbackInfo &info) { Napi::Env env = info.Env(); int width = info[0].As<Napi::Number>().Int32Value(); int height = info[1].As<Napi::Number>().Int32Value(); string title = info[2].As<Napi::String>().Utf8Value(); pCameraWindow = new CameraWindow(width, height, title.c_str()); if (pCameraWindow->Create()) { pCameraWindow->Show(); } return env.Undefined(); } -
waitKey(key): Waits for user input; returns
falseif the specified key is pressed or the window is closed.Napi::Value NodeCam::waitKey(const Napi::CallbackInfo &info) { if (!pCameraWindow) return info.Env().Undefined(); Napi::Env env = info.Env(); std::string key = info[0].As<Napi::String>(); bool ret = pCameraWindow->WaitKey(key[0]); return Napi::Boolean::New(env, ret); } -
showFrame(width, height, rgbdata): Displays a frame in the window.
Napi::Value NodeCam::showFrame(const Napi::CallbackInfo &info) { if (!pCameraWindow) return info.Env().Undefined(); Napi::Env env = info.Env(); int width = info[0].As<Napi::Number>().Int32Value(); int height = info[1].As<Napi::Number>().Int32Value(); Napi::Buffer<unsigned char> buffer = info[2].As<Napi::Buffer<unsigned char>>(); unsigned char *data = buffer.Data(); pCameraWindow->ShowFrame(data, width, height); return env.Undefined(); } -
drawContour(points): Draws contours on the preview window.
Napi::Value NodeCam::drawContour(const Napi::CallbackInfo &info) { if (!pCameraWindow) return info.Env().Undefined(); Napi::Env env = info.Env(); std::vector<std::pair<int, int>> points = {}; Napi::Array arr = info[0].As<Napi::Array>(); for (size_t i = 0; i < arr.Length(); i++) { Napi::Value tupleValue = arr.Get(i); Napi::Array tupleArray = tupleValue.As<Napi::Array>(); int x = tupleArray.Get(uint32_t(0)).As<Napi::Number>().Int32Value(); int y = tupleArray.Get(uint32_t(1)).As<Napi::Number>().Int32Value(); points.push_back(std::make_pair(x, y)); } pCameraWindow->DrawContour(points); return env.Undefined(); } -
drawText(text, x, y, fontSize, color): Draws text on the preview window.
  Napi::Value NodeCam::drawText(const Napi::CallbackInfo &info)
  {
  	Napi::Env env = info.Env();

  	string text = info[0].As<Napi::String>().Utf8Value();
  	int x = info[1].As<Napi::Number>().Int32Value();
  	int y = info[2].As<Napi::Number>().Int32Value();
  	int fontSize = info[3].As<Napi::Number>().Int32Value();
  	Napi::Array colorArr = info[4].As<Napi::Array>();

  	CameraWindow::Color color;

  	color.r = colorArr.Get(uint32_t(0)).As<Napi::Number>().Int32Value();
  	color.g = colorArr.Get(uint32_t(1)).As<Napi::Number>().Int32Value();
  	color.b = colorArr.Get(uint32_t(2)).As<Napi::Number>().Int32Value();

  	pCameraWindow->DrawText(text, x, y, fontSize, color);

  	return env.Undefined();
  }
4.3 Configure and Build the Addon
binding.gyp declares the target litecam, lists src/litecam.cc as the source file, includes node-addon-api and the Node headers, and, per platform, links the LiteCam library and copies it into build/Release/:
{
    "variables": {
        "arch": ["<!(node -e \"console.log(process.arch);\")"]
    },
    "targets": [
        {
            "target_name": "litecam",
            "sources": ["src/litecam.cc"],
            "defines": [
                "NAPI_DISABLE_CPP_EXCEPTIONS"
            ],
            "include_dirs": [
                "./",
                "<!(node -e \"try { require.resolve('node-addon-api'); console.log(require('node-addon-api').include); } catch (e) { console.log(require('child_process').execSync('npm root -g').toString().trim() + '/node-addon-api'); }\")"
            ],
            "conditions": [
                ["OS=='linux'", {
                    "cflags": ["-std=c++11", "-DNAPI_CPP_EXCEPTIONS", "-fexceptions"],
                    "cflags_cc": ["-std=c++11", "-DNAPI_CPP_EXCEPTIONS", "-fexceptions"],
                    "ldflags": ["-Wl,-rpath,'$$ORIGIN'"],
                    "libraries": [
                        "-llitecam", "-L../platforms/linux"
                    ],
                    "copies": [
                        {
                            "destination": "build/Release/",
                            "files": [
                                "./platforms/linux/liblitecam.so",
                            ]
                        }
                    ]
                }],
                ["OS=='win'", {
                    "defines": ["NAPI_CPP_EXCEPTIONS"],
                    "libraries": [
                        "-l../platforms/windows/litecam.lib"
                    ],
                    "copies": [
                        {
                            "destination": "build/Release/",
                            "files": [
                                "./platforms/windows/litecam.dll",
                            ]
                        }
                    ]
                }],
                ["OS=='mac'", {
                    "cflags": ["-std=c++11", "-DNAPI_CPP_EXCEPTIONS"],
                    "cflags_cc": ["-std=c++11", "-DNAPI_CPP_EXCEPTIONS"],
                    "link_settings": {
                        "libraries": [
                            "-Wl,-rpath,@loader_path",
                            "-llitecam", "-L../platforms/macos"
                        ],
                    },
                    "copies": [
                        {
                            "destination": "build/Release/",
                            "files": [
                                "./platforms/macos/liblitecam.dylib",
                            ]
                        }
                    ]
                }]
            ]
        }
    ]
}
Compile the addon:
node-gyp configure
node-gyp build
The compiled litecam.node ends up in build/Release/, and index.js loads it and exports the public API:
const addon = require('./build/Release/litecam');

module.exports = {
    NodeCam: addon.NodeCam,
    getDeviceList: addon.getDeviceList,
    saveJpeg: addon.saveJpeg
};
Step 5: Create a Multi-Barcode Scanner Application using Node.js
To test the camera addon, we will create an image processing application that captures frames from the camera and decodes barcodes in real-time using Dynamsoft Capture Vision.
5.1 Initialize the Project and Install Dependencies
- Create an empty directory and run
npm init -yto create a new Node.js project. -
Install the
litecamcamera addon, thedynamsoft-capture-vision-for-nodeSDK, and its model package:npm install dynamsoft-capture-vision-for-node dynamsoft-capture-vision-for-node-model litecamdynamsoft-capture-vision-for-nodeis the Node.js wrapper for the Dynamsoft Capture Vision SDK. It supports a range of barcode formats, including QR Code, Data Matrix, PDF417, Aztec Code, and linear barcodes. -
Create a new file named
app.jsand add the following code:const { LicenseManager, CaptureVisionRouter, EnumPresetTemplate, EnumImagePixelFormat } = require('dynamsoft-capture-vision-for-node'); LicenseManager.initLicense("LICENSE-KEY"); const litecam = require('litecam'); const nodecamera = new litecam.NodeCam(); console.log(litecam.getDeviceList()); var isWorking = false; var results = null; async function decode(buffer, width, height) { if (isWorking) { return; } isWorking = true; let imageData = {}; imageData.bytes = buffer; imageData.width = width; imageData.height = height; imageData.stride = width * 3; imageData.format = EnumImagePixelFormat.IPF_RGB_888; results = await CaptureVisionRouter.captureAsync(imageData, EnumPresetTemplate.PT_READ_BARCODES); isWorking = false; } function show() { if (nodecamera.waitKey('q')) { let frame = nodecamera.captureFrame(); if (frame) { nodecamera.showFrame(frame['width'], frame['height'], frame['data']); decode(frame['data'], frame['width'], frame['height']); if (results) { for (let item of results.barcodeResultItems) { let points = item.location.points; let contour_points = [[points[0].x, points[0].y], [points[1].x, points[1].y], [points[2].x, points[2].y], [points[3].x, points[3].y]]; nodecamera.drawContour(contour_points) nodecamera.drawText(item.text, points[0].x, points[0].y, 24, [255, 0, 0]) } } } setTimeout(show, 30); } else { nodecamera.release(); (async () => { await CaptureVisionRouter.terminateIdleWorkers(); })(); } } if (nodecamera.open(0)) { let mediaTypes = nodecamera.listMediaTypes(); console.log(mediaTypes); nodecamera.createWindow(nodecamera.getWidth(), nodecamera.getHeight(), "Camera Stream"); show(); }Replace
LICENSE-KEYwith the license key you obtained in the Prerequisites section. -
Run the application:
node app.js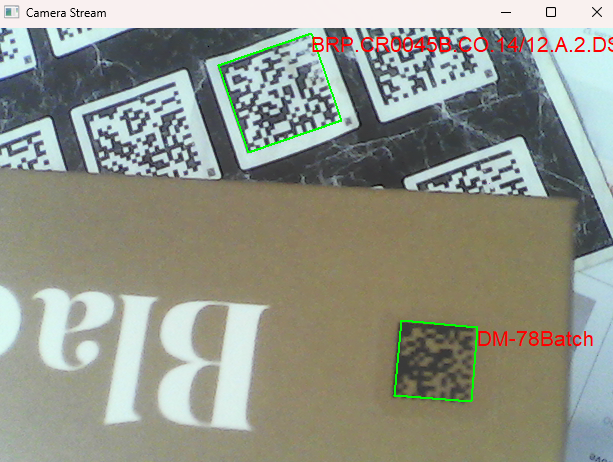
5.2 How the Demo Works
LicenseManager.initLicense()activates the Dynamsoft Capture Vision license for the current machine.nodecamera.open(0)opens the default webcam andnodecamera.listMediaTypes()prints the supported resolutions.nodecamera.createWindow(width, height, "Camera Stream")creates the preview window, andshow()is called repeatedly at ~30 FPS viasetTimeout(show, 30).- Each iteration calls
captureFrame(), displays the frame withshowFrame(), and starts an asynchronous decode withCaptureVisionRouter.captureAsync(). TheisWorkingflag prevents overlapping decode calls while a capture is still running. - When results arrive,
results.barcodeResultItemscontains one item per detected barcode. The fourlocation.pointsare turned into a polygon and passed todrawContour(), anddrawText()prints the decodeditem.textabove the barcode in red. - Pressing
q(or closing the window) exits the loop:nodecamera.release()closes the camera, andCaptureVisionRouter.terminateIdleWorkers()shuts down the internal worker pool so the process can exit cleanly.
Common Issues & Edge Cases
node-gypcannot find Python or a C++ compiler: On Windows, install Visual Studio with the Desktop development with C++ workload; on Linux, installbuild-essentialplus Python 3; on macOS, runxcode-select --install.node-gypneeds these to compile the native addon.- The addon fails to load at runtime with a missing-library error: On Windows,
litecam.dllmust be next tolitecam.node; on Linux, the-Wl,-rpath,'$$ORIGIN'flag resolvesliblitecam.sofrom the same directory; on macOS, thepostinstall.jsstep runsinstall_name_toolsoliblitecam.dylibis found via@loader_path. If you built manually, re-runnode-gyp configure && node-gyp buildand runnpm run postinstallon macOS. - Barcodes are not detected even though the camera preview works: Check the pixel format and stride. The example sets
stride = width * 3andformat = EnumImagePixelFormat.IPF_RGB_888becausecaptureFrame()returns RGB bytes — passing a different format (such as BGR) without adjusting the stride produces failed or empty results. - The demo decodes one frame at a time and skips frames: The
isWorkingguard intentionally drops decode calls while a previouscaptureAsync()is still pending, so the UI loop never blocks. If you need a higher frame rate, capture the frame and kick off the decode with a balanced worker queue instead of awaiting in the display loop. - The process does not exit after pressing
q: CallCaptureVisionRouter.terminateIdleWorkers()afternodecamera.release()— the Capture Vision worker pool keeps the event loop alive otherwise.
Source Code
Get the complete sample project source code on GitHub: nodejs-lite-camera. Use the examples/barcode directory for the multi-barcode scanner, and the accompanying LiteCam C++ camera library if you need to rebuild the native library from source.