


How to Build a macOS Camera Barcode Scanner in C++ Using AVFoundation
This is the final article in a series on building a lightweight C++ camera library across multiple platforms. We’ve already covered Windows and Linux, and now it’s time to dive into macOS. In this article, we’ll tap into AVFoundation to handle camera capture under the hood and leverage Cocoa for our UI essentials. You’ll see how to bridge Objective-C with C++ to build a camera library, and then integrate it with the Dynamsoft Barcode Reader SDK to create a barcode scanner on macOS.
What you’ll build: A native macOS barcode scanner application that uses AVFoundation for camera capture, Cocoa for the preview window, and Dynamsoft Barcode Reader SDK for real-time barcode decoding — all written in C++ with Objective-C bridging.
Key Takeaways
- AVFoundation’s
AVCaptureSessionandAVCaptureVideoDataOutputprovide direct camera access on macOS without requiring OpenCV. - Objective-C++ (
.mmfiles) lets you mix Objective-C framework calls with C++ application logic in a single translation unit. - BGRA-to-RGB pixel conversion is required when passing AVFoundation frames to barcode SDKs that expect RGB input.
- The Dynamsoft Barcode Reader SDK integrates with any raw-frame pipeline — pass the RGB buffer and receive decoded barcode results.
Common Developer Questions
How do I access the macOS camera from C++ without OpenCV?
Use AVFoundation for device discovery and frame capture, then expose that functionality to the C++ side through Objective-C++ methods. This gives you direct macOS camera access without pulling in OpenCV just for preview frames.
How do I bridge Objective-C and C++ to use AVFoundation in a CMake project?
Implement the camera-facing source files as .mm so they can mix Objective-C framework calls with C++ classes, then compile and link those files from the same CMake target. That bridge lets the C++ app own the high-level logic while AVFoundation stays behind the Objective-C++ boundary.
How do I build a real-time barcode scanner on macOS using AVFoundation and Dynamsoft Barcode Reader?
Capture frames through AVCaptureSession, convert the BGRA buffers to the RGB format expected by the Dynamsoft Barcode Reader SDK, and run decode calls continuously inside the camera loop. The same preview window can then render both the live image and decoded barcode feedback.
This article is Part 3 in a 4-Part Series.
- Part 1 - How to Read Barcodes from a Linux Camera in C++ Without OpenCV
- Part 2 - C++ Windows Webcam Barcode Scanner Tutorial: Windows Media Foundation API and Dynamsoft SDK
- Part 3 - How to Build a macOS Camera Barcode Scanner in C++ Using AVFoundation
- Part 4 - How to Read Multiple Barcodes from a Camera Using Python and Dynamsoft Barcode Reader
Prerequisites
- macOS 11.0 or later
- Xcode with command-line tools installed
- CMake 3.10 or later
- Dynamsoft Barcode Reader SDK — Get a 30-day free trial license
macOS Camera Demo Video
Implement Camera Capture with AVFoundation
Let’s review the camera-related functions that need to be implemented for macOS:
std::vector<CaptureDeviceInfo> ListCaptureDevices(): Enumerates available cameras.bool Open(int cameraIndex): Activates a specified camera.void Release(): Releases the camera.FrameData CaptureFrame(): Captures a frame from the camera.
Update the Camera Header File for macOS
Open the Camera.h header file and add the following changes:
class CAMERA_API Camera
{
public:
#ifdef _WIN32
    ...
#elif __APPLE__
    Camera() noexcept;
    ~Camera();
#endif

    ...

private:
    ...

#ifdef __APPLE__
    void *captureSession;
    void *videoOutput;
#endif
};

#endif
Explanation
noexceptis used to indicate that the function does not throw exceptions.captureSessionandvideoOutputare used to manage the camera capture session and video output.
Enumerate Available Cameras
Enumerate available cameras using the AVFoundation API:
std::vector<CaptureDeviceInfo> ListCaptureDevices()
{
    @autoreleasepool {
        std::vector<CaptureDeviceInfo> devicesInfo;

        NSArray<AVCaptureDevice *> *devices = [AVCaptureDevice devicesWithMediaType:AVMediaTypeVideo];
        for (AVCaptureDevice *device in devices)
        {
            CaptureDeviceInfo info = {};
            strncpy(info.friendlyName, [[device localizedName] UTF8String], sizeof(info.friendlyName) - 1);
            devicesInfo.push_back(info);
        }

        return devicesInfo;
    }
}
Explanation
AVCaptureDevicerepresents a physical capture device.AVMediaTypeVideospecifies the video media type.localizedNameretrieves the device’s name.
Open a Camera with AVCaptureSession
The steps to open a camera are as follows:
- Get the available capture devices.
- Create a device input and a capture session.
- Configure the video output.
- Start the capture session.
bool Camera::Open(int cameraIndex)
{
    @autoreleasepool {
        NSArray<AVCaptureDevice *> *devices = [AVCaptureDevice devicesWithMediaType:AVMediaTypeVideo];
        if (cameraIndex >= [devices count])
        {
            std::cerr << "Camera index out of range." << std::endl;
            return false;
        }

        AVCaptureDevice *device = devices[cameraIndex];

        NSError *error = nil;
        AVCaptureDeviceInput *input = [AVCaptureDeviceInput deviceInputWithDevice:device error:&error];
        if (!input)
        {
            std::cerr << "Error creating device input: " << [[error localizedDescription] UTF8String] << std::endl;
            return false;
        }

        AVCaptureSession *cs = [[AVCaptureSession alloc] init];
        captureSession = (void *)cs;
        if (![cs canAddInput:input])
        {
            std::cerr << "Cannot add device input to session." << std::endl;
            return false;
        }
        [cs addInput:input];

        AVCaptureVideoDataOutput *output = [[AVCaptureVideoDataOutput alloc] init];
        output.videoSettings = @{(NSString *)kCVPixelBufferPixelFormatTypeKey: @(kCVPixelFormatType_32BGRA)};
        output.alwaysDiscardsLateVideoFrames = YES;

        videoOutput = (void *)output;

        if (![cs canAddOutput:output])
        {
            std::cerr << "Cannot add video output to session." << std::endl;
            return false;
        }
        [cs addOutput:output];

        [cs startRunning];

        return true;
    }
}
Explanation
AVCaptureDeviceInputcaptures data from the chosen camera device.AVCaptureSessionmanages the flow of data from the device to the output. We store it incaptureSession.AVCaptureVideoDataOutputprovides the raw video frames from the capture device. We store it invideoOutput.kCVPixelBufferPixelFormatTypeKeyspecifies the pixel format type.
Release the Camera Session
Stop the capture session and release the resources:
void Camera::Release()
{
    if (captureSession)
    {
        AVCaptureSession *session = (__bridge AVCaptureSession *)captureSession;

        if (videoOutput)
        {
            AVCaptureVideoDataOutput *output = (__bridge AVCaptureVideoDataOutput *)videoOutput;
            [session removeOutput:output];
            videoOutput = nil;
        }

        [session stopRunning];
        captureSession = nil;
    }
}
Capture a Video Frame as RGB Data
Capture a frame from the camera using the AVCaptureVideoDataOutputSampleBufferDelegate protocol:
@interface CaptureDelegate : NSObject <AVCaptureVideoDataOutputSampleBufferDelegate>
{
    FrameData *frame;
    dispatch_semaphore_t semaphore;
}

- (instancetype)initWithFrame:(FrameData *)frame semaphore:(dispatch_semaphore_t)semaphore;

@end

@implementation CaptureDelegate

- (instancetype)initWithFrame:(FrameData *)frame semaphore:(dispatch_semaphore_t)semaphore {
    self = [super init];
    if (self) {
        self->frame = frame;
        self->semaphore = semaphore;
    }
    return self;
}

- (void)captureOutput:(AVCaptureOutput *)output
didOutputSampleBuffer:(CMSampleBufferRef)sampleBuffer
       fromConnection:(AVCaptureConnection *)connection {

    CVImageBufferRef imageBuffer = CMSampleBufferGetImageBuffer(sampleBuffer);

    if (!imageBuffer) {
        std::cerr << "Failed to get image buffer." << std::endl;
        dispatch_semaphore_signal(semaphore);
        return;
    }

    CVPixelBufferLockBaseAddress(imageBuffer, kCVPixelBufferLock_ReadOnly);
    void *baseAddress = CVPixelBufferGetBaseAddress(imageBuffer);
    size_t bytesPerRow = CVPixelBufferGetBytesPerRow(imageBuffer);
    size_t height = CVPixelBufferGetHeight(imageBuffer);
    size_t width = CVPixelBufferGetWidth(imageBuffer);

    frame->width = width;
    frame->height = height;
    frame->size = width * height * 3;
    frame->rgbData = new unsigned char[frame->size];

    OSType pixelFormat = CVPixelBufferGetPixelFormatType(imageBuffer);

    if (pixelFormat == kCVPixelFormatType_32BGRA) {
        unsigned char *src = (unsigned char *)baseAddress;
        unsigned char *dst = frame->rgbData;

        for (size_t y = 0; y < height; ++y) {
            for (size_t x = 0; x < width; ++x) {
                size_t offset = y * bytesPerRow + x * 4;
                dst[0] = src[offset + 2];
                dst[1] = src[offset + 1];
                dst[2] = src[offset + 0];
                dst += 3;
            }
        }
    } else {
        std::cerr << "Unsupported pixel format." << std::endl;
    }

    CVPixelBufferUnlockBaseAddress(imageBuffer, kCVPixelBufferLock_ReadOnly);
    dispatch_semaphore_signal(semaphore);
}


@end

FrameData Camera::CaptureFrame()
{
    @autoreleasepool {
        FrameData frame = {};

        if (!captureSession || !videoOutput) {
            std::cerr << "Capture session is not initialized." << std::endl;
            return frame;
        }

        AVCaptureSession *session = (__bridge AVCaptureSession *)captureSession;
        AVCaptureVideoDataOutput *vo = (__bridge AVCaptureVideoDataOutput *)videoOutput;

        dispatch_semaphore_t semaphore = dispatch_semaphore_create(0);

        [vo setSampleBufferDelegate:[[CaptureDelegate alloc] initWithFrame:&frame semaphore:semaphore]
                                       queue:dispatch_get_global_queue(DISPATCH_QUEUE_PRIORITY_HIGH, 0)];

        dispatch_semaphore_wait(semaphore, DISPATCH_TIME_FOREVER);

        frameWidth = frame.width;
        frameHeight = frame.height;
        return frame;
    }
}
Explanation
setSampleBufferDelegatesets the object that will receive frames from theAVCaptureVideoDataOutput.FrameData *framepoints to a struct where the captured image data is stored (width, height, and the RGB buffer).dispatch_semaphore_t semaphoreis used for synchronization. Once the frame is processed, the delegate signals the semaphore so the calling code knows the frame is ready.- In
captureOutput:didOutputSampleBuffer:fromConnection, we extract the pixel buffer and convert BGRA to RGB (3 bytes per pixel). CMSampleBufferGetImageBuffer(sampleBuffer)returns aCVImageBufferRefcontaining the pixel data.CVPixelBufferLockBaseAddressandCVPixelBufferUnlockBaseAddressensure thread safety during reading.dispatch_semaphore_signal(semaphore)notifies whoever is waiting on this semaphore that the frame data is now ready.
Build the Cocoa Preview Window
Update the CameraPreview Header for macOS
Add macOS-specific members to the CameraPreview.h header file:
class CAMERA_API CameraWindow
{
public:
    ...

#ifdef _WIN32
    ...
#elif __APPLE__
    void *nsWindow;
    void *contentView;
#endif
};
Explanation
nsWindowandcontentVieware used to manage the window and the corresponding content view on macOS.
Create a Custom NSView for Rendering Frames, Contours, and Text
Create a custom NSView subclass to handle drawing:
struct CameraContentViewImpl {
    std::vector<unsigned char> rgbData;
    int frameWidth = 0;
    int frameHeight = 0;
    int x = 0;
    int y = 0;
    int fontSize = 0;
    std::vector<std::pair<int, int>> contourPoints;
    std::string displayText;
    CameraWindow::Color textColor;
};

@interface CameraContentView : NSView
{
    CameraContentViewImpl* impl;
}
- (void)updateFrame:(const unsigned char*)data width:(int)width height:(int)height;
- (void)updateContour:(const std::vector<std::pair<int, int>>&)points;
- (void)updateText:(const std::string&)text
                x:(int)x
                y:(int)y
         fontSize:(int)fontSize
            color:(const CameraWindow::Color&)color;
@end

@implementation CameraContentView

- (instancetype)initWithFrame:(NSRect)frameRect {
    self = [super initWithFrame:frameRect];
    if (self) {
        impl = new CameraContentViewImpl();
    }
    return self;
}

- (void)dealloc {
    delete impl;
    [super dealloc];
}

- (void)updateFrame:(const unsigned char*)data width:(int)width height:(int)height {
    impl->rgbData.assign(data, data + (width * height * 3));
    impl->frameWidth = width;
    impl->frameHeight = height;
    [self setNeedsDisplay:YES];
}

- (void)updateContour:(const std::vector<std::pair<int, int>>&)points {
    impl->contourPoints = points;
    [self setNeedsDisplay:YES];
}

- (void)updateText:(const std::string&)text
                x:(int)x
                y:(int)y
         fontSize:(int)fontSize
            color:(const CameraWindow::Color&)color {
    impl->displayText = text;
    impl->textColor = color;
    impl->x = x;
    impl->y = y;
    impl->fontSize = fontSize;
    impl->textColor = color;
    [self setNeedsDisplay:YES];
}

- (void)drawRect:(NSRect)dirtyRect {
    [super drawRect:dirtyRect];

    NSRect bounds = [self bounds];
    CGContextRef context = [[NSGraphicsContext currentContext] CGContext];
    if (impl->rgbData.empty() || impl->frameWidth == 0 || impl->frameHeight == 0) {
        return;
    }

    CGFloat scaleX = bounds.size.width / impl->frameWidth;
    CGFloat scaleY = bounds.size.height / impl->frameHeight;

    CGFloat scale = MIN(scaleX, scaleY);

    CGFloat offsetX = (bounds.size.width - (impl->frameWidth * scale)) / 2.0;
    CGFloat offsetY = (bounds.size.height - (impl->frameHeight * scale)) / 2.0;

    CGContextSaveGState(context);

    CGContextTranslateCTM(context, offsetX, offsetY);
    CGContextScaleCTM(context, scale, scale);

    CGColorSpaceRef colorSpace = CGColorSpaceCreateDeviceRGB();
    CGDataProviderRef provider = CGDataProviderCreateWithData(NULL, impl->rgbData.data(), impl->rgbData.size(), NULL);
    CGImageRef image = CGImageCreate(impl->frameWidth, impl->frameHeight, 8, 24, impl->frameWidth * 3, colorSpace, kCGBitmapByteOrderDefault | kCGImageAlphaNone, provider, NULL, false, kCGRenderingIntentDefault);

    CGRect rect = CGRectMake(0, 0, impl->frameWidth, impl->frameHeight);
    CGContextDrawImage(context, rect, image);

    CGImageRelease(image);
    CGDataProviderRelease(provider);
    CGColorSpaceRelease(colorSpace);

    if (!impl->contourPoints.empty()) {
        CGContextSaveGState(context);

        CGContextSetLineWidth(context, 3.0 / scale);
        CGContextSetStrokeColorWithColor(context, [[NSColor yellowColor] CGColor]);

        auto firstPoint = impl->contourPoints[0];
        CGContextMoveToPoint(context, firstPoint.first, impl->frameHeight - firstPoint.second);

        for (size_t i = 1; i < impl->contourPoints.size(); ++i) {
            auto point = impl->contourPoints[i];
            CGContextAddLineToPoint(context, point.first, impl->frameHeight - point.second);
        }

        CGContextClosePath(context);
        CGContextStrokePath(context);

        CGContextRestoreGState(context);

        impl->contourPoints.clear();
    }

    CGContextRestoreGState(context);

    if (!impl->displayText.empty()) {
        CGContextSaveGState(context);

        CGFloat scaledX = impl->x * scale + offsetX;
        CGFloat scaledY = impl->y * scale + offsetY;

        NSColor *color = [NSColor colorWithRed:impl->textColor.r / 255.0 green:impl->textColor.g / 255.0 blue:impl->textColor.b / 255.0 alpha:1.0];

        NSDictionary *attributes = @{
            NSFontAttributeName : [NSFont systemFontOfSize:impl->fontSize * scale],
            NSForegroundColorAttributeName : color
        };

        NSPoint point = NSMakePoint(scaledX, bounds.size.height - scaledY - (impl->fontSize * scale));
        NSString *nsText = [NSString stringWithUTF8String:impl->displayText.c_str()];
        [nsText drawAtPoint:point withAttributes:attributes];

        CGContextRestoreGState(context);

        impl->displayText.clear();
    }
}

@end
Explanation
CameraContentViewImplholds all the data required for rendering (frame data, text, etc.).CameraContentViewis anNSViewsubclass that draws the camera frame, contours, and text.- Calling
setNeedsDisplay:triggers a redraw, which in turn callsdrawRect. - In
drawRect:, the scaling factors and offsets are calculated to maintain aspect ratio and center the image.
Handle Window Close Events
Create a custom NSWindowDelegate to handle window events:
@interface CameraWindowDelegate : NSObject <NSWindowDelegate>
@end

@implementation CameraWindowDelegate
- (BOOL)windowShouldClose:(id)sender {
    [NSApp terminate:nil];
    return YES;
}
@end
Initialize the NSWindow and Content View
Initialize the window and content view, and store them in nsWindow and contentView:
bool CameraWindow::Create() {
    @autoreleasepool {
        if (NSApp == nil) {
            [NSApplication sharedApplication];
            [NSApp setActivationPolicy:NSApplicationActivationPolicyRegular];
            [NSApp finishLaunching];
        }

        NSRect contentRect = NSMakeRect(100, 100, width, height);
        NSUInteger styleMask = NSWindowStyleMaskTitled | NSWindowStyleMaskClosable | NSWindowStyleMaskResizable;
        NSWindow *window = [[NSWindow alloc] initWithContentRect:contentRect
                                                       styleMask:styleMask
                                                         backing:NSBackingStoreBuffered
                                                           defer:NO];
        if (!window) {
            return false;
        }

        [window setTitle:[NSString stringWithUTF8String:title.c_str()]];
        [window makeKeyAndOrderFront:nil];

        CameraContentView *cv = [[CameraContentView alloc] initWithFrame:contentRect];
        [window setContentView:cv];
        contentView = cv;

        CameraWindowDelegate *delegate = [[CameraWindowDelegate alloc] init];
        [window setDelegate:delegate];

        nsWindow = (void *)window;
        return true;
    }
}
Display the Window
Bring the application to the front and make it active:
void CameraWindow::Show() {
    @autoreleasepool {
        [NSApp activateIgnoringOtherApps:YES];
    }
}
Listen for Keyboard Input
Capture keyboard input events:
bool CameraWindow::WaitKey(char key)
{
    @autoreleasepool {
        NSEvent *event = [NSApp nextEventMatchingMask:NSEventMaskAny
                                           untilDate:[NSDate distantPast]
                                              inMode:NSDefaultRunLoopMode
                                             dequeue:YES];
        if (event) {
            [NSApp sendEvent:event];

            if (event.type == NSEventTypeKeyDown) {
                NSString *characters = [event charactersIgnoringModifiers];
                if ([characters length] > 0) {
                    char pressedKey = [characters characterAtIndex:0];
                    if (key == '\0' || pressedKey == key || pressedKey == std::toupper(key)) {
                        return false;
                    }
                }
            }
        }
        return true;
    }
}
Draw the Camera Frame, Contours, and Text
Update the camera frame, contours, and text as follows:
void CameraWindow::ShowFrame(const unsigned char *rgbData, int frameWidth, int frameHeight) {
    if (contentView) {
        [contentView updateFrame:rgbData width:frameWidth height:frameHeight];
    }
}

void CameraWindow::DrawContour(const std::vector<std::pair<int, int>> &points) {
    if (contentView) {
        [contentView updateContour:points];
    }
}

void CameraWindow::DrawText(const std::string &text, int x, int y, int fontSize, const CameraWindow::Color &color) {
    if (contentView) {
        [contentView updateText:text x:x y:y fontSize:fontSize color:color];
    }
}
Configure CMakeLists.txt for macOS Frameworks
To build the library on macOS, update the CMakeLists.txt:
...

if (WIN32)
    ...
elseif (UNIX AND NOT APPLE)
    ...
elseif (APPLE)
    set(LIBRARY_SOURCES
        src/CameraMacOS.mm
        src/CameraPreviewMacOS.mm
    )
    set_source_files_properties(src/CameraMacOS.mm src/CameraPreviewMacOS.mm PROPERTIES COMPILE_FLAGS "-x objective-c++")
    set_source_files_properties(src/main.cpp PROPERTIES COMPILE_FLAGS "-x objective-c++")
endif()
...

if (UNIX AND NOT APPLE)
    ...
elseif (APPLE)
    find_library(COCOA_LIBRARY Cocoa REQUIRED)
    find_library(AVFOUNDATION_LIBRARY AVFoundation REQUIRED)
    find_library(COREMEDIA_LIBRARY CoreMedia REQUIRED)
    find_library(COREVIDEO_LIBRARY CoreVideo REQUIRED)
    find_library(OBJC_LIBRARY objc REQUIRED)  # Add the Objective-C runtime library

    target_link_libraries(litecam PRIVATE
        ${COCOA_LIBRARY}
        ${AVFOUNDATION_LIBRARY}
        ${COREMEDIA_LIBRARY}
        ${COREVIDEO_LIBRARY}
        ${OBJC_LIBRARY}  # Link the Objective-C runtime
    )
elseif (WIN32)
    ...
endif()
...

if (APPLE)
    target_link_libraries(camera_capture PRIVATE
        ${COCOA_LIBRARY}
        ${AVFOUNDATION_LIBRARY}
        ${COREMEDIA_LIBRARY}
        ${COREVIDEO_LIBRARY}
        ${OBJC_LIBRARY}  # Link the Objective-C runtime
    )
endif()
Explanation
-x objective-c++ensures source files are compiled as Objective-C++.- On macOS, link against the Cocoa framework, AVFoundation, and the Objective-C runtime.
Build and Run the macOS Barcode Scanner
To build a barcode scanner, no changes are needed for the barcode scanning logic. Follow these steps:
-
Update the
CMakeLists.txtfile to include the macOS-specific configuration.... if(WIN32) ... elseif(APPLE) set(CMAKE_CXX_FLAGS "-std=c++11 -O3 -Wl,-rpath,@executable_path") set(CMAKE_INSTALL_RPATH "@executable_path") link_directories( ${CMAKE_CURRENT_SOURCE_DIR}/../../dist/lib/macos ${CMAKE_CURRENT_SOURCE_DIR}/../../../examples/10.x/sdk/platforms/macos ) set(DBR_LIBS "DynamsoftCore" "DynamsoftLicense" "DynamsoftCaptureVisionRouter" "DynamsoftUtility" "pthread" ) elseif(UNIX) ... endif() ... if(WIN32) ... elseif(APPLE) add_custom_command(TARGET BarcodeScanner POST_BUILD COMMAND ${CMAKE_COMMAND} -E copy_directory ${CMAKE_CURRENT_SOURCE_DIR}/../../../examples/10.x/sdk/platforms/macos $<TARGET_FILE_DIR:BarcodeScanner> ) elseif(UNIX) ... endif() -
Build the application using CMake.
 mkdir build
 cd build
 cmake ..
 cmake --build .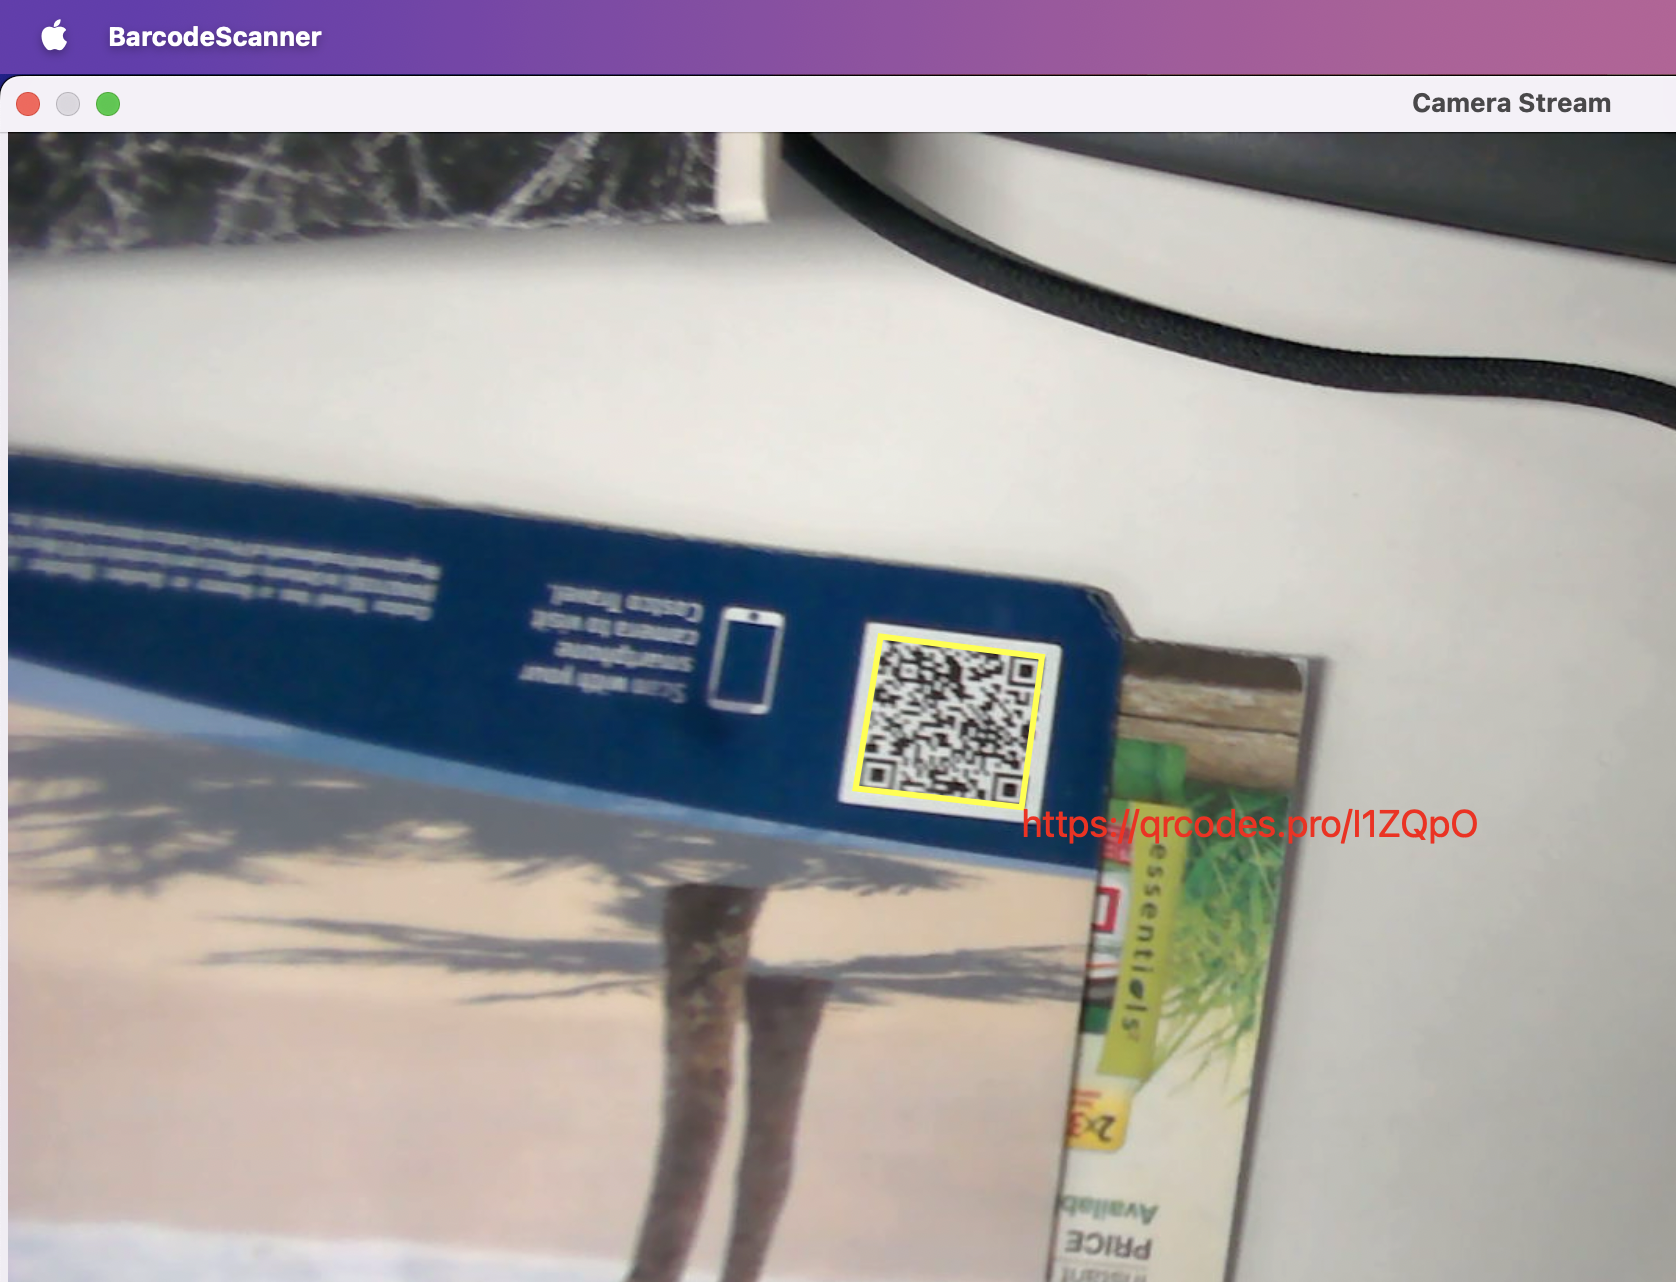
Common Issues and Edge Cases
- Camera permission denied: macOS requires a camera usage description in your
Info.plist. If your app does not includeNSCameraUsageDescription, the system will silently deny camera access. Add<key>NSCameraUsageDescription</key><string>This app needs camera access to scan barcodes.</string>to yourInfo.plist. - Black frames on Apple Silicon: Some M-series Macs deliver the first few frames as blank buffers. Skip frames where
CVPixelBufferGetBaseAddressreturns all zeros, or add a short warm-up delay after calling[session startRunning]. - Linking errors for Objective-C runtime: If you get
Undefined symbols for architectureerrors referencingobjc_msgSend, ensure you link theobjcruntime library (find_library(OBJC_LIBRARY objc REQUIRED)) and pass-x objective-c++to the compiler for.mmfiles.
FAQ
How do I access the macOS camera from C++ without OpenCV?
Use AVFoundation via Objective-C++ (.mm files). Create an AVCaptureSession, attach an AVCaptureDeviceInput for the camera, and route output through AVCaptureVideoDataOutput to receive raw BGRA frames in a C++ callback.
What pixel format does AVFoundation deliver, and how do I convert it for barcode decoding?
AVFoundation delivers frames in BGRA by default when you set kCVPixelFormatType_32BGRA. Convert to RGB by swapping the blue and red channels (offset +2 → R, offset +1 → G, offset +0 → B) in a per-pixel loop.
Why does my CMake build fail with “Undefined symbols” on macOS?
You need to link the Cocoa, AVFoundation, CoreMedia, CoreVideo, and objc frameworks. Also ensure .mm source files have the -x objective-c++ compile flag set via set_source_files_properties in CMakeLists.txt.