


Build a Raspberry Pi 4 Barcode Scanner with C++ and Dynamsoft Capture Vision (Headless, No OpenCV)
A Raspberry Pi 4 can be turned into a standalone barcode scanner with a small headless C++ program: it grabs frames from a USB webcam with Video4Linux2 (V4L2), decodes them with the Dynamsoft Capture Vision C++ SDK, and shows the result on an optional SSD1306 OLED display or on the console. On a Raspberry Pi 4 Model B (Raspberry Pi OS 64-bit) the sample decodes a QR code at 640x480 with roughly 25 frames per second — no OpenCV, no desktop environment, no external SDK downloads required.
This article is Part 2 in a 6-Part Series.
- Part 1 - How to Link MSVC-Compiled DLLs with MinGW GCC Using a C Shim DLL
- Part 2 - Build a Raspberry Pi 4 Barcode Scanner with C++ and Dynamsoft Capture Vision (Headless, No OpenCV)
- Part 3 - How to Scan Barcodes in a C++ Win32 Application with Dynamsoft Barcode SDK
- Part 4 - Build a Rust CLI Barcode Scanner with Dynamsoft Capture Vision SDK
- Part 5 - Read Barcodes from a Desktop Webcam in C++ with OpenCV and CMake
- Part 6 - How to Build a Cross-Platform C++ Barcode and QR Code Reader with Dynamsoft Capture Vision v11
What You’ll Build
- A headless command-line barcode reader (
barcode_reader) for the Raspberry Pi 4 - V4L2 camera capture written from scratch — no OpenCV dependency
- Barcode decoding with the Dynamsoft Capture Vision SDK (
ccapturevisionrouter-based, ~40 lines) - Optional SSD1306 OLED output with automatic display detection
- A decoding loop that always stops:
qkey, Ctrl+C, or a configurable--duration
Key Takeaways
- The Dynamsoft Capture Vision C++ SDK is already checked into the repository (
dcv/), including the Linux aarch64 and x64 libraries, templates and models. There is nothing else to download; building only requirescmakeand a C/C++ compiler. CCaptureVisionRouter::Capture()is a synchronous per-frame API — a clean fit for a framewise decoding loop that calls it once per video frame.- The V4L2 capture class streams YUYV frames through memory-mapped buffers and converts them to RGB888 in ~40 lines, replacing the usual OpenCV dependency.
- The SSD1306 display is optional and auto-detected over
/dev/i2c-1at address0x3C(--no-oledskips it). The display driver uses plain i2c-dev ioctls — no WiringPi. - The program cannot run forever: it exits on
q, SIGINT/SIGTERM, or the default 120-second--durationlimit. - You can test the full decode pipeline without a webcam using a v4l2loopback virtual camera.
Prerequisites
- Raspberry Pi 4 (2GB/4GB/8GB), flashed with 64-bit Raspberry Pi OS
- USB Webcam (UVC)
- Raspberry Pi RGB Cooling HAT with adjustable fan and OLED display (optional — any SSD1306 128x32 display works, or skip the OLED entirely with
--no-oled) - Get a 30-day free trial license for Dynamsoft Capture Vision if you prefer a private key — the sample ships with a free public trial license that requires a network connection
Step 1: Install the Build Tools
Only cmake and a C/C++ compiler are required. Enable the I2C interface only if
you plan to use the OLED display (sudo raspi-config → Interface Options → I2C):
sudo apt update
sudo apt install -y build-essential cmake
sudo usermod -aG i2c $USER
Step 2: Get the Source Code and Explore the Project
git clone https://github.com/yushulx/cmake-cpp-barcode-qrcode
cd cmake-cpp-barcode-qrcode/examples/raspberry_pi_oled
The project is made of four parts:
| File | Purpose |
|---|---|
main.cxx |
Decoding loop, license initialization, OLED output |
v4l2_capture.cpp, v4l2_capture.h |
Minimal V4L2 camera capture (YUYV → RGB888) |
ssd1306_i2c.c, ssd1306_i2c.h, oled_fonts.h |
SSD1306 display driver over /dev/i2c-1 |
CMakeLists.txt |
Builds barcode_reader and copies the Dynamsoft libraries |
Capturing Camera Frames with V4L2
The program opens the webcam via Video4Linux2 with memory-mapped buffers. Here is a simplified version of the capture class:
#include <linux/videodev2.h>
#include <sys/ioctl.h>
#include <sys/mman.h>
#include <fcntl.h>

static int xioctl(int fd, int request, void *arg)
{
    int ret;
    do
    {
        ret = ioctl(fd, request, arg);
    } while (ret == -1 && errno == EINTR);
    return ret;
}

bool open(const char *device, int width, int height)
{
    fd_ = open(device, O_RDWR | O_NONBLOCK, 0);

    v4l2_format fmt;
    fmt.type = V4L2_BUF_TYPE_VIDEO_CAPTURE;
    fmt.fmt.pix.width = width;
    fmt.fmt.pix.height = height;
    fmt.fmt.pix.pixelformat = V4L2_PIX_FMT_YUYV;
    xioctl(fd_, VIDIOC_S_FMT, &fmt);

    v4l2_requestbuffers req = {0};
    req.count = 4;
    req.type = V4L2_BUF_TYPE_VIDEO_CAPTURE;
    req.memory = V4L2_MEMORY_MMAP;
    xioctl(fd_, VIDIOC_REQBUFS, &req);

    // mmap each buffer and queue them ...
    enum v4l2_buf_type type = V4L2_BUF_TYPE_VIDEO_CAPTURE;
    xioctl(fd_, VIDIOC_STREAMON, &type);
}
The camera delivers YUYV frames, which are converted to RGB888 in-place so the SDK can consume them:
// YUYV: Y0 U Y1 V  ->  RGB888: R0 G0 B0 R1 G1 B1
int c = y - 16, d = u - 128, e = v - 128;
r = (298 * c + 409 * e + 128) >> 8;
g = (298 * c - 100 * d - 208 * e + 128) >> 8;
b = (298 * c + 516 * d + 128) >> 8;
Decoding Barcodes with Dynamsoft Capture Vision
First, initialize the license. The sample ships with a free public trial license, which requires a network connection (see Prerequisites if you prefer a private key):
#include "DynamsoftCaptureVisionRouter.h"
#include "DynamsoftLicense.h"

using namespace dynamsoft::license;
using namespace dynamsoft::cvr;
using namespace dynamsoft::dbr;

char errorMsg[512] = {0};
CLicenseManager::InitLicense(LICENSE_KEY, errorMsg, 512);

// Create the Capture Vision Router
CCaptureVisionRouter *cvr = new CCaptureVisionRouter;

// Feed a frame and get the decoded barcodes
CFileImageTag tag(nullptr, 0, 0);
tag.SetImageId(frameId++);
CImageData imageData(rgb.size(), rgb.data(), width, height,
                     width * 3, IPF_RGB_888, 0, &tag);

CCapturedResult *result = cvr->Capture(&imageData, CPresetTemplate::PT_READ_BARCODES);

CDecodedBarcodesResult *barcodeResult = result->GetDecodedBarcodesResult();
for (int i = 0; i < barcodeResult->GetItemsCount(); i++)
{
    const CBarcodeResultItem *item = barcodeResult->GetItem(i);
    printf("%s -> %s\n", item->GetFormatString(), item->GetText());
}
barcodeResult->Release();
result->Release();
Keep in mind that Capture() is synchronous: it returns the result for that
frame directly, which makes it a great fit for a framewise decoding loop.
Showing Results on the Optional OLED Display
The SSD1306 display is connected to the Raspberry Pi I2C bus at address 0x3C.
We can drive it directly through /dev/i2c-1 with ioctl — no WiringPi
required:
#include <linux/i2c-dev.h>
#include <sys/ioctl.h>
#include <fcntl.h>
#include <unistd.h>

int i2cd = open("/dev/i2c-1", O_RDWR);
ioctl(i2cd, I2C_SLAVE, 0x3C);

// control byte 0x00: command, 0x40: frame-buffer data
unsigned char data[2];
data[0] = 0x00;               // Co = 0, D/C = 0
data[1] = command;            // e.g. SSD1306_DISPLAYON
write(i2cd, data, 2);
The display is optional: ssd1306_begin() probes the bus by writing a
command and returns 0 when no display responds, so the program simply keeps
running with console output only. Pass --no-oled to skip the probe
altogether.
Knowing When to Stop the Decoding Loop
The program never runs forever. It exits gracefully when any of the following happens:
- The
qkey is pressed - Ctrl+C is received (SIGINT/SIGTERM)
- The run duration (
--duration, default 120 seconds) is reached
while (!gStopped)
{
    if (durationSeconds > 0 &&
        elapsed >= durationSeconds)
        break;
    if (quitRequested())        // 'q' key, non-blocking stdin poll
        break;

    if (!camera.readFrame(frameRGB))
        continue;

    CCapturedResult *result = cvr->Capture(&imageData, CPresetTemplate::PT_READ_BARCODES);
    // ... print and show the result on the OLED
}
It prints the outcome each time a barcode is found:
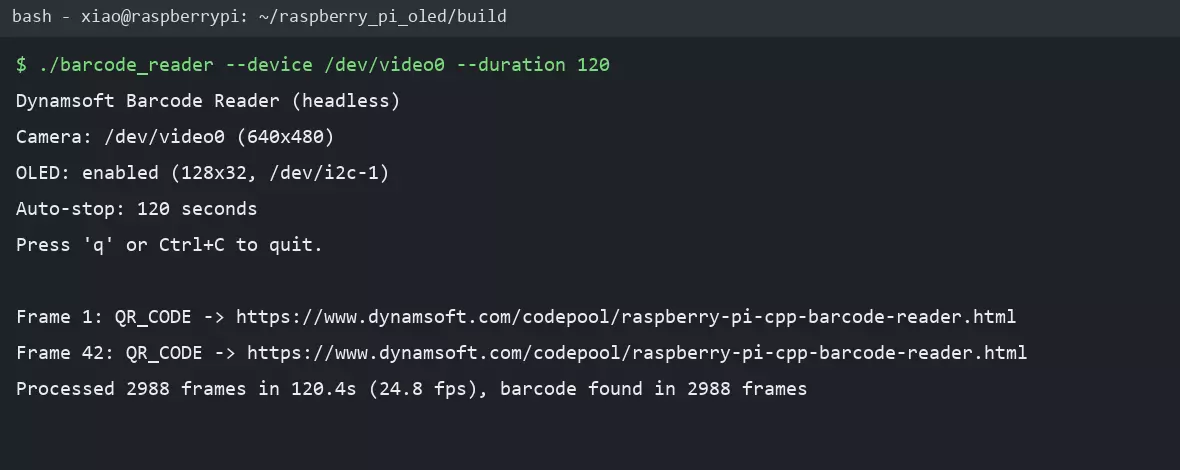
and shows the barcode type and value on the OLED:
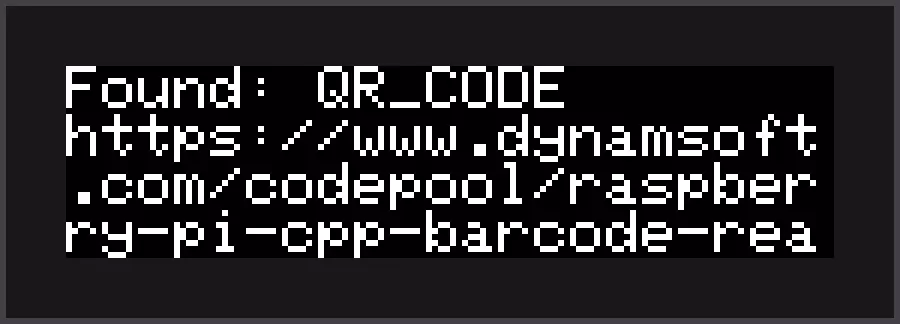
Step 3: Build and Run
mkdir build
cd build
cmake ..
make
./barcode_reader --duration 120
CMakeLists.txt copies the Dynamsoft .so libraries, Models and Templates
next to the binary, and the executable uses an $ORIGIN-based RPATH so
everything resolves out of the box.
Command line options:
| Option | Default | Description |
|---|---|---|
--device |
/dev/video0 |
Camera capture device |
--width, --height |
640 480 |
Camera resolution |
--duration |
120 |
Auto stop (seconds, 0 disables the timer) |
--no-oled |
off | Skip the OLED display entirely |
Step 4: Test Without a Webcam Using a Virtual Camera
No physical webcam nearby? Create a virtual V4L2 camera with v4l2loopback and feed any barcode image into it:
sudo apt install -y v4l2loopback-dkms ffmpeg
sudo modprobe v4l2loopback exclusive_caps=1 video_nr=2

# Show the QR code image to "the camera" at about 25 fps
ffmpeg -re -loop 1 -i qr.png -vf scale=640:480 -pix_fmt yuyv422 -f v4l2 /dev/video2
Then point the reader at the virtual device:
./barcode_reader --device /dev/video2 --duration 30
The QR code is decoded on the first frame — this is exactly how the demo video
at the top of this article was produced. Find the loopback device number with
v4l2-ctl --list-devices if it differs.
Run as a Service (Optional)
To launch the barcode scanner automatically after boot without a desktop environment, create a systemd service:
sudo nano /lib/systemd/system/barcode-reader.service
[Unit]
Description=Raspberry Pi Barcode Reader

[Service]
Type=simple
User=xiao
WorkingDirectory=/home/xiao/cmake-cpp-barcode-qrcode/examples/raspberry_pi_oled/build
ExecStart=/home/xiao/cmake-cpp-barcode-qrcode/examples/raspberry_pi_oled/build/barcode_reader --duration 30
Restart=on-failure

[Install]
WantedBy=multi-user.target
Then enable it:
sudo systemctl enable barcode-reader
sudo systemctl start barcode-reader
journalctl -u barcode-reader -f
Common Developer Questions
Do I need OpenCV or WiringPi to build this Raspberry Pi barcode scanner?
No. Camera frames are grabbed directly through V4L2 (memory-mapped buffers,
YUYV→RGB888 conversion), and the SSD1306 display is driven through plain
/dev/i2c-1 ioctls. The only system dependencies are a C/C++ compiler, cmake,
and the Dynamsoft libraries checked into the repository.
Does the program require an OLED display?
No. On startup ssd1306_begin() probes /dev/i2c-1 at address 0x3C. If no
display responds, the program prints a notice and keeps running with results on
the console only. Use --no-oled to skip the probe when you do not have a
display attached.
Can I test the program without a webcam?
Yes. Install v4l2loopback-dkms, load the module and stream a barcode image
into the virtual camera with ffmpeg — step 4 shows the full sequence. The
reader cannot tell a virtual camera from a real one.
How can I stop the headless program?
Press q in the terminal, send Ctrl+C (SIGINT/SIGTERM), or let the default
--duration of 120 seconds elapse. The summary line always reports the number
of processed frames and the measured frames per second.
What license does the sample use and does it need internet?
The sample ships with a free public trial license based on the Dynamsoft
organization ID, which requires a network connection at startup. For a private
30-day key, request one with the link in the Prerequisites section and replace
LICENSE_KEY in main.cxx.
Common Issues & Edge Cases
License initialization fails with “24-hour Temporary license expired”
The licensing library caches the temporary license per device. If a previously
issued license expired, clear the cache (for example /var/tmp/.Dynamsoft) and
run the program again with the public trial key; the key needs a working
network connection to the Dynamsoft license server.
The webcam is unplugged: “cannot open /dev/video0”
Check ls /dev/video* and the kernel log (dmesg | grep -i usb). A USB
disconnect removes the device nodes without any message from the program.
Reconnect the webcam or use the virtual camera from step 4.
No SSD1306 display found at 0x3C even though the display is connected
Enable I2C (sudo raspi-config → Interface Options → I2C), add your user to the
i2c group, and run i2cdetect -y 1 to confirm that 0x3C is listed. If the
display is not stuck on the bus, use --no-oled and rely on the console.
The frame rate is much lower than expected
640x480 YUYV with 4 mmap buffers decodes at about 25 fps on a Raspberry Pi 4
Model B. A slower SD card, USB sharing, or a higher resolution reduces the
throughput; lower --width/--height to speed it up.