


Build a Web Document Scanner with JavaScript: File, Camera, and TWAIN Scanner Support
Dynamic Web TWAIN Service is the core component of the Dynamic Web TWAIN SDK. It enables you to acquire documents from document scanners over a local network using REST API. This API overcomes the limitations of traditional browser-based scanning solutions by allowing you to capture documents from scanners connected to any machine on the same local network. This article will guide you through the process of setting up and using the Dynamic Web TWAIN Service to acquire documents from document scanners using HTML5 and JavaScript.
What you’ll build: A browser-based document management app that lets users acquire documents from a TWAIN/SANE/WIA scanner over a local network, capture images from a webcam, or load files — all integrated into Dynamsoft Document Viewer using the Dynamic Web TWAIN Service REST API.
Key Takeaways
- The Dynamic Web TWAIN Service REST API enables browser-based document scanning from TWAIN/SANE/WIA scanners connected anywhere on the local network — no plugins required.
- JavaScript’s
getUserMediaAPI can be combined with TWAIN scanner acquisition to create a unified multi-source document capture interface. - The Dynamic Web TWAIN Service must be bound to a local IP address (via
http://127.0.0.1:18625/) to accept requests from other machines on the same network. - All scanned pages and captured images are loaded into Dynamsoft Document Viewer as blobs, enabling annotation and PDF export in the browser.
Common Developer Questions
How do I scan documents from a TWAIN scanner over a local network using JavaScript?
Bind Dynamic Web TWAIN Service to the host machine’s LAN IP, then call its REST endpoints from JavaScript to enumerate scanners and create jobs. The scanned blobs can be inserted directly into the browser-side viewer once the service returns each page.
How do I capture images from a webcam and load them into a document viewer in HTML5?
Open a camera popup with getUserMedia, capture frames into blobs, and add those blobs to Dynamsoft Document Viewer the same way you add scanned pages. This keeps webcam capture and scanner capture in one shared document workflow.
How do I build a web document scanner that supports file upload, camera, and physical scanner input?
Use one input selector that branches into three acquisition flows: local file import, webcam capture, and REST-based scanner acquisition. After each source returns an image blob, load it into the same document viewer so annotation and PDF export work consistently.
This article is Part 8 in a 8-Part Series.
- Part 1 - How to Build a Document Scanning REST API in Node.js
- Part 2 - How to Scan Documents from TWAIN, WIA, and eSCL Scanners in a Flutter App
- Part 3 - How to Scan Documents in Java Using TWAIN, WIA, eSCL, and SANE via REST API
- Part 4 - Build a Cross-Platform Python Document Scanner with TWAIN, WIA, and SANE
- Part 5 - How to Build a Cross-Platform .NET C# Document Scanner with TWAIN, WIA, SANE, and eSCL Support
- Part 6 - How to Scan Documents from a Web Page Using the Dynamic Web TWAIN REST API
- Part 7 - Build a SwiftUI Remote Document Scanner for macOS and iOS Using the Dynamic Web TWAIN REST API
- Part 8 - Build a Web Document Scanner with JavaScript: File, Camera, and TWAIN Scanner Support
See the Web Document Scanner in Action
Prerequisites
- Install Dynamic Web TWAIN Service on your host machine.
- Request a free trial license for Dynamic Web TWAIN Service.
Enable Local Network Access for the REST API
By default, the Dynamic Web TWAIN Service only accepts requests from localhost. To enable access over your local network, bind the service to your machine’s IP address via the configuration page http://127.0.0.1:18625/ in your web browser.

Explore the REST API and Scanner Parameters
To integrate scanning capabilities in your web app, refer to the official REST API documentation:
Build a Web Document Scanner: File, Camera, and TWAIN in JavaScript
To save time, download the sample code that demonstrates how to use the Dynamsoft Document Viewer. In this tutorial, you’ll learn how to extend the sample by integrating the following features:
- Popup Window for Managing Document Scanners: This window allows users to select a scanner, configure scan settings, and initiate the scanning process via a REST API. Scanned images are automatically added to the Dynamsoft Document Viewer for further processing, such as annotation or saving as PDF.
- Popup Window for Capturing Images from the Camera: Using the
getUserMediaAPI, this window enables users to capture multiple images with the device’s built-in or connected camera. Captured images can then be viewed and annotated in the Document Viewer. - Dropdown Menu for Selecting Input Source (File, Camera, Scanner): This menu allows users to choose the input method. Based on the selection, the appropriate popup interface is launched for image acquisition.
Step 1: Add TWAIN Scanner Support via the REST API

To enable document scanning from a local or network scanner:
-
In
index.html, add the following code snippet. The layout includes a dropdown to select the scanner source, options for resolution, and an auto feeder checkbox. The buttons will trigger the scanning process or cancel it.<div id="pop-scanner" class="overlay"> <div class="popup"> <div class="form-group"> <label for="sources">Scanner Source:</label> <select id="sources"> </select> </div> <div class="form-group"> <label> <input type="checkbox" id="ADF" checked="checked">Auto Feeder</label> <select id="Resolution"> <option value="100">100</option> <option value="150">150</option> <option value="200">200</option> <option value="300">300</option> </select> </div> <button class="button" id="acquireDocument">OK</button> <button class="button" id="cancelCapture">Cancel</button> </div> </div> -
In
main.js, add the following JavaScript code.let host = "http://127.0.0.1:18622"; const acquireDocumentButton = document.getElementById('acquireDocument'); const cancelCaptureButton = document.getElementById('cancelCapture'); cancelCaptureButton.addEventListener('click', () => { document.getElementById("pop-scanner").style.display = "none"; }); acquireDocumentButton.addEventListener('click', async () => { document.getElementById("pop-scanner").style.display = "none"; let select = document.getElementById('sources'); let scanner = select.value; if (scanner == null || scanner.length == 0) { alert('Please select a scanner.'); return; } let license = document.getElementById('licensekey').value; let resolutionSelect = document.getElementById('Resolution'); let adfCheck = document.getElementById('ADF'); let parameters = { license: license, device: JSON.parse(scanner)['device'], }; parameters.config = { PixelType: 2, Resolution: parseInt(resolutionSelect.value), IfFeederEnabled: adfCheck.checked, }; let url = host + '/api/device/scanners/jobs'; try { let response = await fetch(url, { method: 'POST', headers: { 'Content-Type': 'application/json' }, body: JSON.stringify(parameters) }); if (response.ok) { let job = await response.json(); let jobId = job.jobuid; let blobs = []; let url = host + '/api/device/scanners/jobs/' + jobId + '/next-page'; while (true) { try { let response = await fetch(url); if (response.status == 200) { const arrayBuffer = await response.arrayBuffer(); const blob = new Blob([arrayBuffer], { type: response.type }); await load(blob, ''); } else { break; } } catch (error) { console.error('No more images.'); break; } } } } catch (error) { alert(error); } }); async function popScanner() { toggleLoading(true); try { let url = host + '/api/device/scanners'; let response = await fetch(url); if (response.ok) { let devices = await response.json(); let select = document.getElementById('sources'); select.innerHTML = ''; for (let i = 0; i < devices.length; i++) { let device = devices[i]; let option = document.createElement("option"); option.text = device['name']; option.value = JSON.stringify(device); select.add(option); }; } } catch (error) { alert(error); return ""; } toggleLoading(false); document.getElementById("pop-scanner").style.display = "flex"; }Explanation:
- The
/api/device/scannersendpoint is used to list all available scanners on the host machine. The response will include the scanner names and device information, which will be populated in the dropdown menu (<select id="sources">). - The
/api/device/scanners/jobsendpoint is used to create a new scanning job. The request body includes the license key, device information, and scanning parameters (pixel type, resolution, and whether to use the auto feeder). - Once the job is created, the job ID is returned in the response. This job ID is then used to fetch the scanned images using the
/api/device/scanners/jobs/{jobId}/next-pageendpoint. - All fetched images are encoded as blobs and loaded into the Dynamsoft Document Viewer using the
loadfunction. This allows you to view and annotate the scanned images within the viewer.
- The
Step 2: Add Camera Capture Using getUserMedia
To add camera capture functionality:
-
In
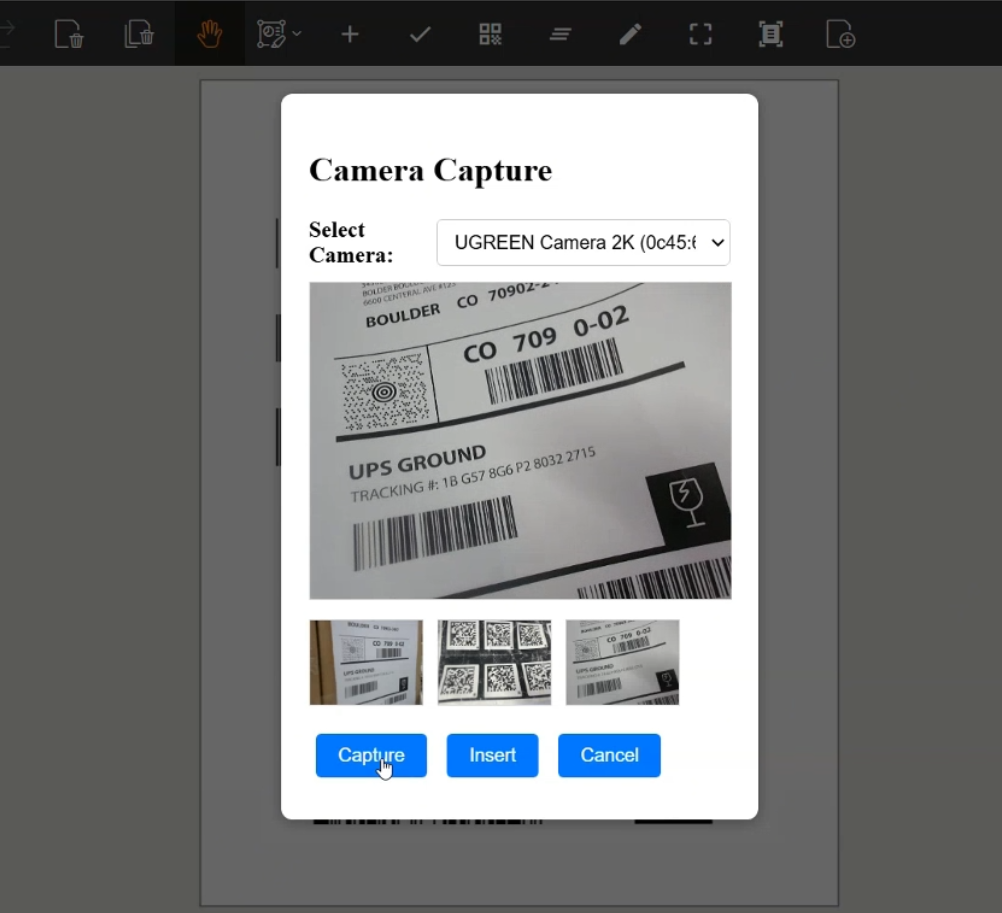
index.html, add the following code snippet for the camera capture popup window.<div id="camera-popup" class="overlay"> <div class="popup"> <h2>Camera Capture</h2> <div class="form-group"> <label for="cameraSelect">Select Camera:</label> <select id="cameraSelect" style="width: 100%"></select> </div> <video id="camera-preview" autoplay playsinline style="width: 100%; border: 1px solid #ccc;"></video> <div id="captured-thumbnails" style="margin: 10px 0; display: flex; gap: 10px; overflow-x: auto;"></div> <div class="popup-buttons" style="margin-top: 10px;"> <button id="captureFrameBtn">Capture</button> <button id="insertFramesBtn">Insert</button> <button id="cancelCameraBtn">Cancel</button> </div> </div> </div> -
In
main.js, add the following JavaScript code to handle camera access and image capture:let stream = null; let capturedBlobs = []; let currentDeviceId = null; const cameraSelect = document.getElementById("cameraSelect"); const video = document.getElementById("camera-preview"); const thumbnailContainer = document.getElementById("captured-thumbnails"); const captureBtn = document.getElementById("captureFrameBtn"); const insertBtn = document.getElementById("insertFramesBtn"); const cancelBtn = document.getElementById("cancelCameraBtn"); const cameraPopup = document.getElementById("camera-popup"); async function listCameras() { const devices = await navigator.mediaDevices.enumerateDevices(); const videoDevices = devices.filter(device => device.kind === "videoinput"); cameraSelect.innerHTML = ""; videoDevices.forEach((device, index) => { const option = document.createElement("option"); option.value = device.deviceId; option.text = device.label || `Camera ${index + 1}`; cameraSelect.appendChild(option); }); if (videoDevices.length > 0) { currentDeviceId = videoDevices[0].deviceId; cameraSelect.value = currentDeviceId; } } async function startCamera(deviceId) { if (stream) { stream.getTracks().forEach(track => track.stop()); } try { stream = await navigator.mediaDevices.getUserMedia({ video: { deviceId: { exact: deviceId } } }); video.srcObject = stream; currentDeviceId = deviceId; } catch (err) { console.error("Failed to start camera:", err); alert("Unable to access selected camera."); } } async function showCameraPopup() { await listCameras(); await startCamera(currentDeviceId); capturedBlobs = []; thumbnailContainer.innerHTML = ""; cameraPopup.style.display = "flex"; } function hideCameraPopup() { if (stream) stream.getTracks().forEach(track => track.stop()); video.srcObject = null; cameraPopup.style.display = "none"; capturedBlobs = []; thumbnailContainer.innerHTML = ""; } cameraSelect.addEventListener("change", () => { const selectedId = cameraSelect.value; if (selectedId !== currentDeviceId) { startCamera(selectedId); } }); captureBtn.addEventListener("click", () => { const canvas = document.createElement("canvas"); canvas.width = video.videoWidth; canvas.height = video.videoHeight; canvas.getContext("2d").drawImage(video, 0, 0, canvas.width, canvas.height); canvas.toBlob((blob) => { if (blob) { capturedBlobs.push(blob); const img = document.createElement("img"); img.src = URL.createObjectURL(blob); img.style.width = "80px"; img.style.height = "60px"; img.style.objectFit = "cover"; img.style.border = "1px solid #ccc"; thumbnailContainer.appendChild(img); } }, "image/jpeg"); }); insertBtn.addEventListener("click", async () => { if (!capturedBlobs.length) { alert("Please capture at least one frame."); return; } for (const blob of capturedBlobs) { await load(blob); } hideCameraPopup(); }); cancelBtn.addEventListener("click", hideCameraPopup);Explanation:
- The
listCamerasfunction enumerates the available video input devices (cameras) and populates the<select>dropdown with the camera options. - The
startCamerafunction initiates the camera stream using the selected device ID and sets it as the source for the<video>element. - The
showCameraPopupfunction displays the camera popup and initializes the camera stream. - The
hideCameraPopupfunction stops the camera stream and hides the popup. - The
captureBtncaptures a frame from the video stream, converts it to a blob, and adds it to thecapturedBlobsarray. It also displays a thumbnail of the captured image in the popup. - The
insertBtniterates over the captured blobs and loads each one into the Dynamsoft Document Viewer using theloadfunction. After inserting the images, it hides the camera popup.
- The
Step 3: Add a Source Selection Dropdown (File, Camera, Scanner)
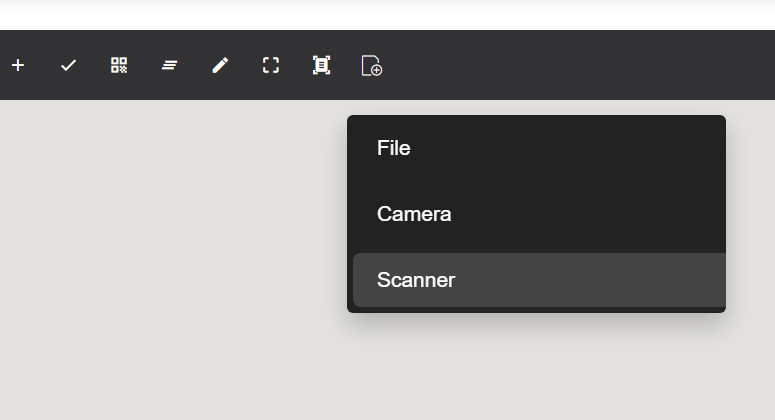
You can integrate a dropdown menu directly into the existing UI layout to allow users to choose how they want to acquire documents:
-
Create a dropdown button and insert it into the pre-built UI layout.
let dropdownButton = { type: Dynamsoft.DDV.Elements.Button, className: "ddv-button ddv-load-image", tooltip: "Sources: File, Camera, Scanner", events: { click: "toggleDropdown", }, }; const pcEditViewerUiConfig = { type: Dynamsoft.DDV.Elements.Layout, flexDirection: "column", className: "ddv-edit-viewer-desktop", children: [ { type: Dynamsoft.DDV.Elements.Layout, className: "ddv-edit-viewer-header-desktop", children: [ { type: Dynamsoft.DDV.Elements.Layout, children: [ ... dropdownButton, ], }, ... ], }, Dynamsoft.DDV.Elements.MainView, ], }; -
Find the JS path of the dropdown button using Developer Tools . Since there is no API available for customizing a dropdown menu in Dynamsoft Document Viewer, a workaround is to locate the
divelement and dynamically append a custom dropdown menu below it.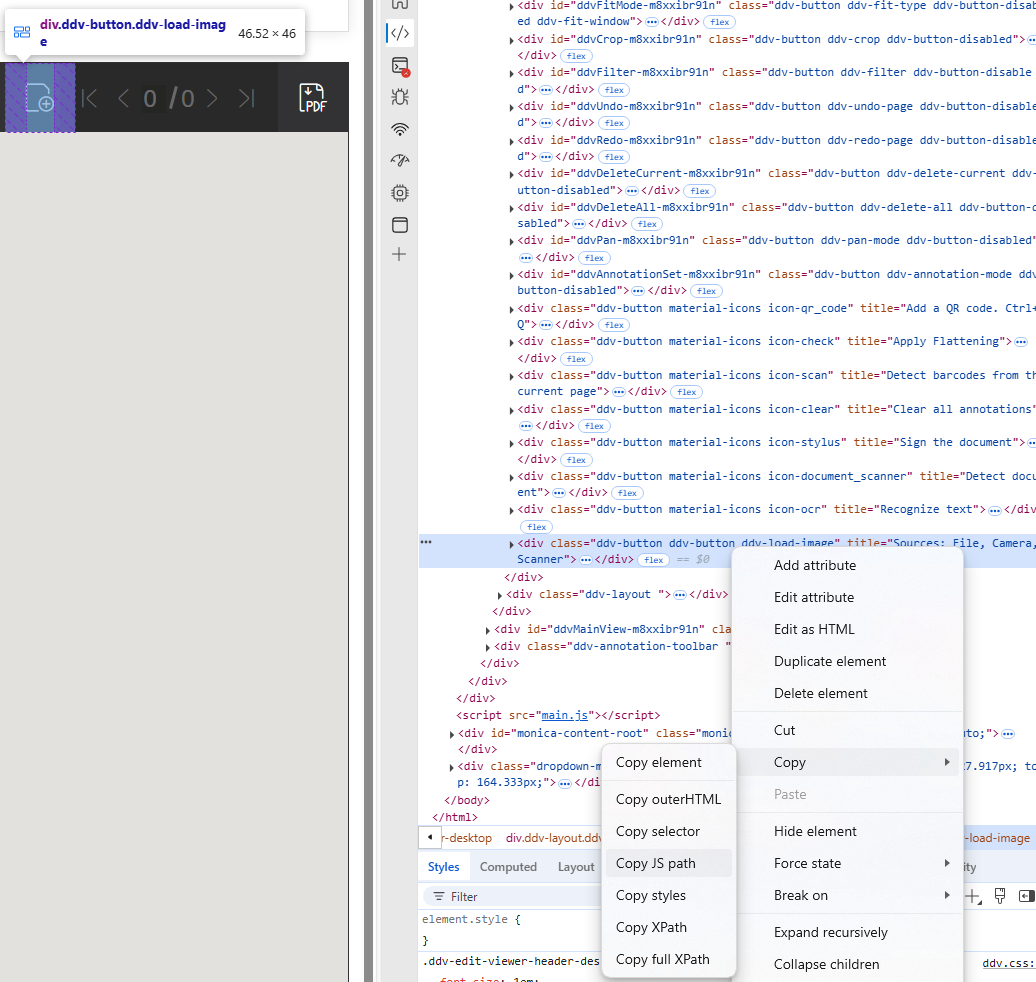
- Define the CSS for the dropdown menu in
main.cssto ensure its styling aligns consistently with the rest of your application..dropdown-menu { display: none; position: absolute; top: 100%; left: 0; background-color: #222; min-width: 160px; box-shadow: 0px 8px 16px rgba(0, 0, 0, 0.2); z-index: 1; border-radius: 4px; overflow: hidden; margin-top: 5px; } .dropdown-menu.show { display: block; } .dropdown-menu button { color: white; padding: 10px 16px; text-align: left; background-color: transparent; border: none; width: 100%; cursor: pointer; font-size: 14px; } .dropdown-menu button:hover, .dropdown-menu .selected { background-color: #444; } -
Add the JavaScript code to handle the dropdown menu’s functionality in
main.js:let dropdown = null; async function showViewer() { ... let button; if (isMobile()) { button = document.querySelector("#edit-viewer > div > div.ddv-layout.ddv-edit-viewer-footer-mobile > div.ddv-button.ddv-button.ddv-load-image") } else { button = document.querySelector("#edit-viewer > div > div.ddv-layout.ddv-edit-viewer-header-desktop > div:nth-child(1) > div.ddv-button.ddv-button.ddv-load-image") } button.addEventListener("click", (event) => { event.stopPropagation(); if (!dropdown) { dropdown = createDropdownMenu(); dropdown.style.position = "absolute"; } dropdown.style.display = dropdown.style.display === "block" ? "none" : "block"; const rect = button.getBoundingClientRect(); dropdown.style.left = `${rect.left}px`; dropdown.style.top = `${rect.bottom + 5}px`; }); } function createDropdownMenu() { const dropdown = document.createElement("div"); dropdown.classList.add("dropdown-menu"); dropdown.innerHTML = ` <button onclick="handleDropdownSelect(this)">File</button> <button onclick="handleDropdownSelect(this)">Camera</button> <button class="selected" onclick="handleDropdownSelect(this)">Scanner</button> `; document.body.appendChild(dropdown); return dropdown; } window.handleDropdownSelect = function (btn) { document.querySelectorAll(".dropdown-menu button").forEach(el => el.classList.remove("selected")); btn.classList.add("selected"); console.log("Selected:", btn.textContent); dropdown.style.display = "none"; if (btn.textContent === "File") { loadDocument(); } else if (btn.textContent === "Camera") { showCameraPopup(); } else if (btn.textContent === "Scanner") { popScanner(); } }; window.addEventListener("click", () => { if (dropdown) dropdown.style.display = "none"; });Explanation:
- The
toggleDropdownfunction toggles the visibility of the custom dropdown menu. - The
createDropdownMenufunction creates the dropdown menu with three options: File, Camera, and Scanner. Each button has anonclickevent that calls thehandleDropdownSelectfunction when clicked.
- The
Common Issues & Edge Cases
- CORS errors when calling the REST API from a remote browser: The Dynamic Web TWAIN Service must be explicitly configured to allow cross-origin requests. Bind the service to your machine’s IP (not just
localhost) viahttp://127.0.0.1:18625/and ensure the correct IP is used as thehostvalue in your JavaScript. - Camera not listed or stream fails to start: Some browsers require a secure context (HTTPS or
localhost) to accessgetUserMedia. Serve your app over HTTPS when testing on a remote device, or uselocalhostfor local development. - Scanner returns no pages when Auto Feeder is enabled: If
IfFeederEnabledistruebut no paper is loaded in the ADF, the API may return an empty job. The polling loop handles this viaresponse.status !== 200— ensure your error handler breaks the loop cleanly rather than retrying indefinitely.