How to Create a Cross-platform MRZ Scanner App Using Flutter and Dynamsoft Capture Vision
Machine-Readable Zone (MRZ) scanner applications are used for quick and automated data entry from identification documents such as passports, visas, ID cards, and other types of travel documents. Some industries such as banking, healthcare, hospitality, and transportation require MRZ scanning to verify the identity of their customers. With the increasing need for efficient and secure identity verification, MRZ scanning has become an essential feature for many applications. In this article, we will walk you through the steps to create a production-ready MRZ scanner app using Flutter and Dynamsoft Capture Vision. The Flutter project can be compiled to run on Windows, Linux, Android, iOS and Web platforms.
This article is Part 5 in a 11-Part Series.
- Part 1 - How to Turn Smartphone into a Wireless Keyboard and Barcode QR Scanner in Flutter
- Part 2 - How to Build Windows Desktop Barcode QR Scanner in Flutter
- Part 3 - Scan Documents Using Camera on Multiple Platforms: A Flutter Guide for Windows, Android, iOS, and Web
- Part 4 - How to Build a Prototype for a Last-Mile Delivery App with Flutter and Dynamsoft Vision SDKs
- Part 5 - How to Create a Cross-platform MRZ Scanner App Using Flutter and Dynamsoft Capture Vision
- Part 6 - How to Build a Barcode Scanner App with Flutter Step by Step
- Part 7 - Building an AR-Enhanced Pharma Lookup App with Flutter, Dynamsoft Barcode SDK and Database
- Part 8 - Implementing Flutter Barcode Scanner with Kotlin and CameraX for Android
- Part 9 - Building Multiple Barcode, QR Code and DataMatrix Scanner with Flutter for Inventory Management
- Part 10 - Implementing Flutter QR Code Scanner with Swift and AVFoundation for iOS
- Part 11 - Building a Cross-Platform Barcode Scanner for Mobile, Desktop, and Web with Flutter
Demo Video
Needed Flutter Plugins
- flutter_ocr_sdk: Wraps Dynamsoft Capture Vision with MRZ detection model.
- image_picker: Supports picking images from the image library, and taking new pictures with the camera.
- shared_preferences: Wraps platform-specific persistent storage for simple data.
- camera: Provides camera preview for Android, iOS and web.
- camera_windows: Provides camera preview for Windows.
- share_plus: Shares content from your Flutter app via the platform’s share dialog.
- url_launcher: Launches a URL.
Procedure to Develop a MRZ Scanner Application Using Flutter
The initial step involves setting up a new Flutter project, installing the necessary dependencies and initializing the MRZ detection SDK with a valid license key. The license key can be obtained from the Dynamsoft Customer Portal:
- Create a new Flutter project.
flutter create mrzscanner - Add the following dependencies to the
pubspec.yamlfile.dependencies: flutter: sdk: flutter flutter_ocr_sdk: ^2.0.4 cupertino_icons: ^1.0.2 image_picker: ^1.0.0 shared_preferences: ^2.1.1 camera: ^0.10.5+2 flutter_lite_camera: ^0.0.1 share_plus: ^7.0.2 url_launcher: ^6.1.11 - Replace the contents in
lib/main.dartwith the following code:// main.dart import 'package:flutter/material.dart'; import 'tab_page.dart'; import 'dart:async'; import 'global.dart'; Future<void> main() async { runApp(const MyApp()); } class MyApp extends StatelessWidget { const MyApp({super.key}); Future<int> loadData() async { return await initMRZSDK(); } @override Widget build(BuildContext context) { return MaterialApp( title: 'Dynamsoft MRZ Detection', theme: ThemeData( scaffoldBackgroundColor: colorMainTheme, ), home: FutureBuilder<int>( future: loadData(), builder: (BuildContext context, AsyncSnapshot<int> snapshot) { if (!snapshot.hasData) { return const CircularProgressIndicator(); } Future.microtask(() { Navigator.pushReplacement(context, MaterialPageRoute(builder: (context) => const TabPage())); }); return Container(); }, ), ); } } // global.dart import 'package:flutter/material.dart'; import 'package:flutter_ocr_sdk/flutter_ocr_sdk.dart'; import 'package:flutter_ocr_sdk/mrz_line.dart'; FlutterOcrSdk mrzDetector = FlutterOcrSdk(); Future<int> initMRZSDK() async { await mrzDetector.init( "LICENSE-KEY"); return await mrzDetector.loadModel() ?? -1; }
In the subsequent sections, we will adhere to the UI design guidelines to fully develop the MRZ scanner application.
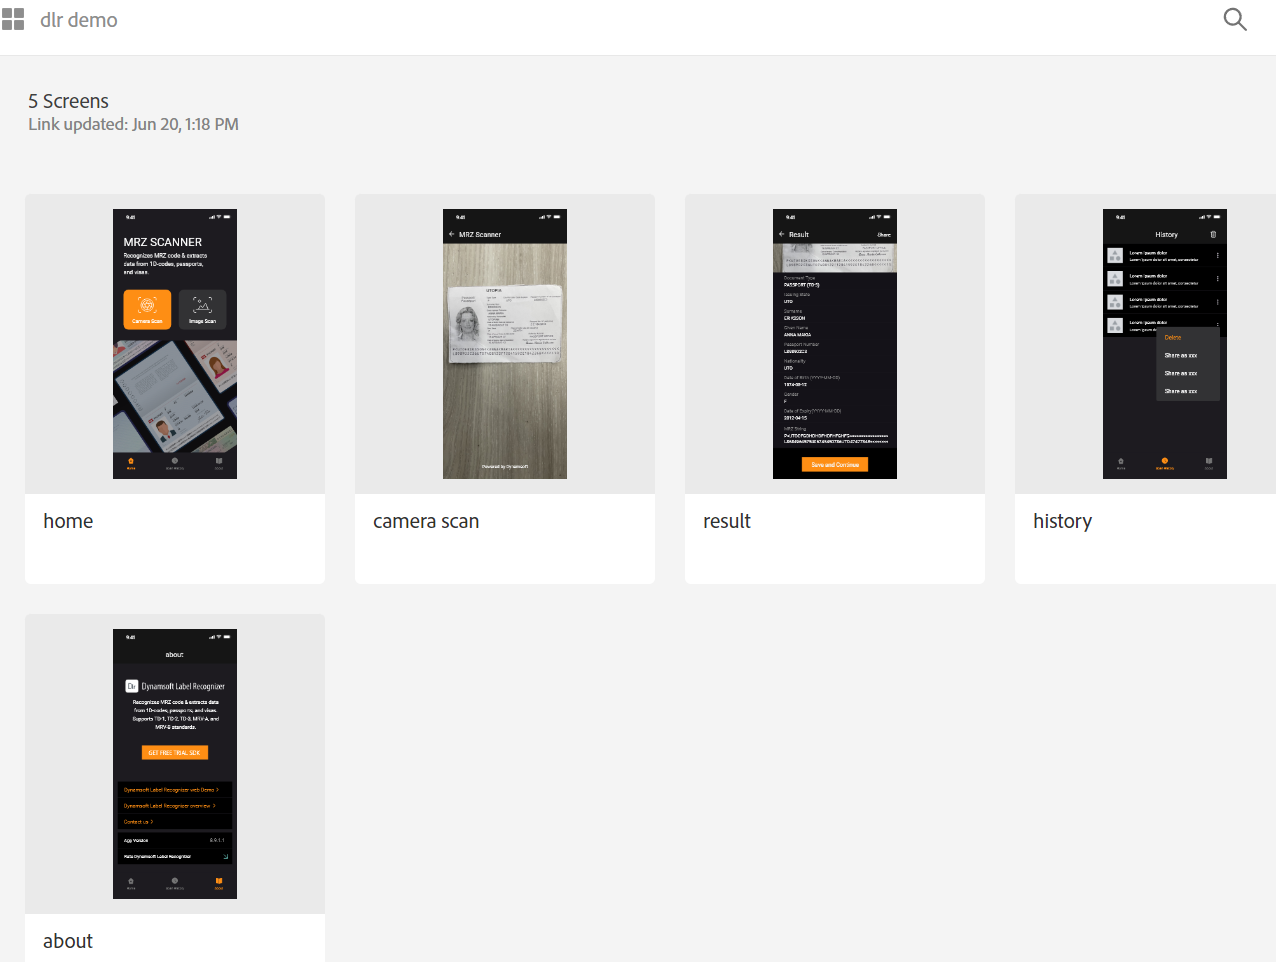
Home Page
The Home page contains a title, a description, a pair of buttons, a banner, and a bottom tab bar.
- Title:
final title = Row( children: [ Container( padding: const EdgeInsets.only( top: 30, left: 33, ), child: const Text('MRZ SCANNER', style: TextStyle( fontSize: 36, color: Colors.white, ))) ], ); -
Description:
final description = Row( children: [ Container( padding: const EdgeInsets.only(top: 6, left: 33, bottom: 44), child: const SizedBox( width: 271, child: Text( 'Recognizes MRZ code & extracts data from 1D-codes, passports, and visas.', style: TextStyle( fontSize: 18, color: Colors.white, )), )) ], ); - Buttons
final buttons = Row( mainAxisAlignment: MainAxisAlignment.spaceEvenly, children: [ GestureDetector( onTap: () { if (!kIsWeb && Platform.isLinux) { showAlert(context, "Warning", "${Platform.operatingSystem} is not supported"); return; } Navigator.push(context, MaterialPageRoute(builder: (context) { return const CameraPage(); })); }, child: Container( width: 150, height: 125, decoration: BoxDecoration( color: colorOrange, borderRadius: BorderRadius.circular(10.0), ), child: Column( mainAxisAlignment: MainAxisAlignment.center, children: <Widget>[ Image.asset( "images/icon-camera.png", width: 90, height: 60, ), const Text( "Camera Scan", overflow: TextOverflow.ellipsis, style: TextStyle(fontSize: 16, color: Colors.white), ) ], ), )), GestureDetector( onTap: () { scanImage(); }, child: Container( width: 150, height: 125, decoration: BoxDecoration( color: colorBackground, borderRadius: BorderRadius.circular(10.0), ), child: Column( mainAxisAlignment: MainAxisAlignment.center, children: <Widget>[ Image.asset( "images/icon-image.png", width: 90, height: 60, ), const Text( "Image Scan", overflow: TextOverflow.ellipsis, style: TextStyle(fontSize: 16, color: Colors.white), ) ], ), )) ], ); -
Banner:
final image = Expanded(
      child: Image.asset(
    "images/image-mrz.png",
    width: MediaQuery.of(context).size.width,
    fit: BoxFit.cover,
  ));
The tab bar is implemented with the TabBarView widget, which is created separately in the TabPage class. The TabPage class is defined as follows:
class TabPage extends StatefulWidget {
  const TabPage({super.key});

  @override
  State<TabPage> createState() => _TabPageState();
}

class _TabPageState extends State<TabPage> with SingleTickerProviderStateMixin {
  late TabController _tabController;
  final List<CustomTab> myTabs = <CustomTab>[
    CustomTab(
        text: 'Home',
        icon: 'images/icon-home-gray.png',
        selectedIcon: 'images/icon-home-orange.png'),
    CustomTab(
        text: 'History',
        icon: 'images/icon-history-gray.png',
        selectedIcon: 'images/icon-history-orange.png'),
    CustomTab(
        text: 'About',
        icon: 'images/icon-about-gray.png',
        selectedIcon: 'images/icon-about-orange.png'),
  ];

  int selectedIndex = 0;

  @override
  void initState() {
    super.initState();
    _tabController = TabController(vsync: this, length: 3);
  }

  @override
  Widget build(BuildContext context) {
    return Scaffold(
        body: TabBarView(
          controller: _tabController,
          children: const [
            HomePage(),
            HistoryPage(),
            AboutPage(),
          ],
        ),
        bottomNavigationBar: SizedBox(
          height: 83,
          child: TabBar(
            labelColor: Colors.blue,
            controller: _tabController,
            onTap: (index) {
              setState(() {
                selectedIndex = index;
              });
            },
            tabs: myTabs.map((CustomTab tab) {
              return MyTab(
                  tab: tab, isSelected: myTabs.indexOf(tab) == selectedIndex);
            }).toList(),
          ),
        ));
  }
}
As a tab is selected, the corresponding page is displayed. The MyTab class is a custom widget that displays the tab icon and text:
class MyTab extends StatelessWidget {
  final CustomTab tab;
  final bool isSelected;

  const MyTab({super.key, required this.tab, required this.isSelected});

  @override
  Widget build(BuildContext context) {
    return Tab(
      child: Column(
        mainAxisAlignment: MainAxisAlignment.center,
        children: <Widget>[
          Image.asset(
            isSelected ? tab.selectedIcon : tab.icon,
            width: 48,
            height: 32,
          ),
          Text(tab.text,
              overflow: TextOverflow.ellipsis,
              style: TextStyle(
                fontSize: 9,
                color: isSelected ? colorOrange : colorSelect,
              ))
        ],
      ),
    );
  }
}

class CustomTab {
  final String text;
  final String icon;
  final String selectedIcon;

  CustomTab(
      {required this.text, required this.icon, required this.selectedIcon});
}
Camera Page
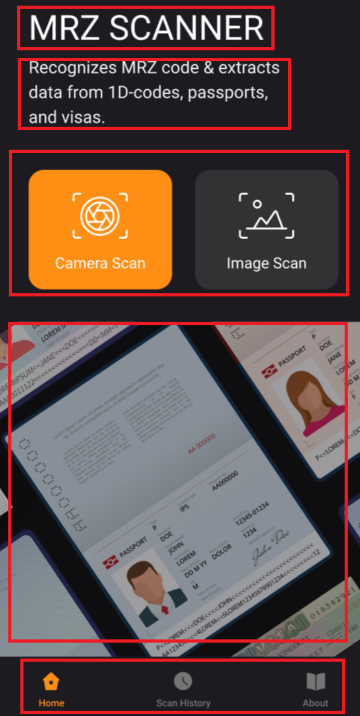
The Camera page features a full-screen camera preview along with an indicator that displays the scanning orientation. Given that OCR is orientation-sensitive, the role of the indicator is to guide users in adjusting the camera orientation, ensuring the MRZ code is scanned accurately.
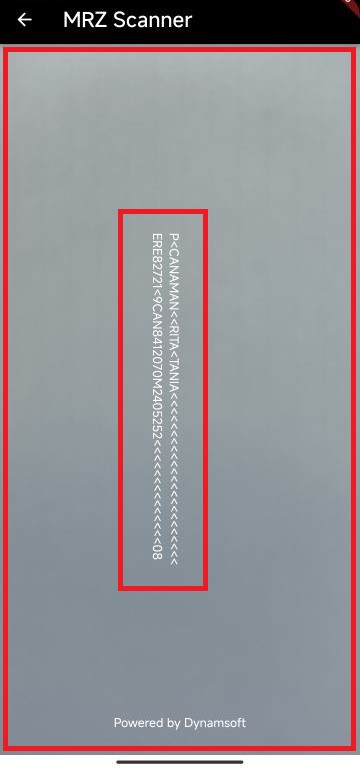
The UI of the camera page is built as follows:
class CameraPage extends StatefulWidget {
  const CameraPage({super.key});

  @override
  State<CameraPage> createState() => _CameraPageState();
}

class _CameraPageState extends State<CameraPage> with WidgetsBindingObserver {
  late CameraManager _mobileCamera;

  @override
  void initState() {
    super.initState();
    WidgetsBinding.instance.addObserver(this);

    _mobileCamera = CameraManager(
        context: context,
        cbRefreshUi: refreshUI,
        cbIsMounted: isMounted,
        cbNavigation: navigation);
    _mobileCamera.initState();
  }
  ...

  List<Widget> createCameraPreview() {
    if (_mobileCamera.controller != null && _mobileCamera.previewSize != null) {
      return [
        SizedBox(
            width: MediaQuery.of(context).size.width <
                    MediaQuery.of(context).size.height
                ? _mobileCamera.previewSize!.height
                : _mobileCamera.previewSize!.width,
            height: MediaQuery.of(context).size.width <
                    MediaQuery.of(context).size.height
                ? _mobileCamera.previewSize!.width
                : _mobileCamera.previewSize!.height,
            child: _mobileCamera.getPreview()),
        Positioned(
          top: 0.0,
          right: 0.0,
          bottom: 0,
          left: 0.0,
          child: createOverlay(
            _mobileCamera.mrzLines,
          ),
        ),
      ];
    }
  }

  @override
  Widget build(BuildContext context) {
    const hint = Text(
        'P<CANAMAN<<RITA<TANIA<<<<<<<<<<<<<<<<<<<<<<<\nERE82721<9CAN8412070M2405252<<<<<<<<<<<<<<08',
        maxLines: 2,
        overflow: TextOverflow.ellipsis,
        textAlign: TextAlign.start,
        style: TextStyle(
          fontSize: 12,
          color: Colors.white,
        ));

    return WillPopScope(
        onWillPop: () async {
          return true;
        },
        child: Scaffold(
          appBar: AppBar(
            backgroundColor: Colors.black,
            title: const Text(
              'MRZ Scanner',
              style: TextStyle(color: Colors.white),
            ),
          ),
          body: Stack(
            children: <Widget>[
              if (_mobileCamera.controller != null &&
                  _mobileCamera.previewSize != null)
                Positioned(
                  top: 0,
                  right: 0,
                  left: 0,
                  bottom: 0,
                  child: FittedBox(
                    fit: BoxFit.cover,
                    child: Stack(
                      children: createCameraPreview(),
                    ),
                  ),
                ),
              const Positioned(
                left: 122,
                right: 122,
                bottom: 28,
                child: Text('Powered by Dynamsoft',
                    textAlign: TextAlign.center,
                    style: TextStyle(
                      fontSize: 12,
                      color: Colors.white,
                    )),
              ),
              Positioned(
                bottom: (MediaQuery.of(context).size.height - 41 * 3) / 2,
                left: !kIsWeb && (Platform.isAndroid)
                    ? 0
                    : (MediaQuery.of(context).size.width - 41 * 9) / 2,
                child: !kIsWeb && (Platform.isAndroid)
                    ? Transform.rotate(
                        angle: pi / 2,
                        child: hint,
                      )
                    : hint,
              ),
            ],
          ),
        ));
  }
}
The CameraManager class controls camera access and returns camera frames for MRZ detection.
-
Start camera preview:
Future<void> startVideo() async { mrzLines = null; isFinished = false; cbRefreshUi(); if (kIsWeb) { webCamera(); } else if (Platform.isAndroid || Platform.isIOS) { mobileCamera(); } } -
Stop camera preview:
Future<void> stopVideo() async { if (controller == null) return; if (!kIsWeb && (Platform.isAndroid || Platform.isIOS)) { await controller!.stopImageStream(); } controller!.dispose(); controller = null; } -
The methods of acquiring camera frames differ across Windows, Android, iOS, and Web platforms:
// Web Future<void> webCamera() async { if (controller == null || isFinished || cbIsMounted() == false) return; XFile file = await controller!.takePicture(); // process image if (!isFinished) { webCamera(); } } // Windows Future<void> _captureFrames() async { if (!_isCameraOpened || !_shouldCapture || !cbIsMounted()) return; try { Map<String, dynamic> frame = await _flutterLiteCameraPlugin.captureFrame(); if (frame.containsKey('data')) { Uint8List rgbBuffer = frame['data']; _decodeFrame(rgbBuffer, frame['width'], frame['height']); await _convertBufferToImage(rgbBuffer, frame['width'], frame['height']); } } catch (e) { // print("Error capturing frame: $e"); } // Schedule the next frame if (_shouldCapture) { Future.delayed(const Duration(milliseconds: 30), _captureFrames); } } // Android & iOS Future<void> mobileCamera() async { await controller!.startImageStream((CameraImage availableImage) async { assert(defaultTargetPlatform == TargetPlatform.android || defaultTargetPlatform == TargetPlatform.iOS); // process image }); } -
Recognize MRZ by invoking the
recognizeBuffermethod of theFlutterOcrSdkclass:void processId( Uint8List bytes, int width, int height, int stride, int format) { cbRefreshUi(); int rotation = 0; if (MediaQuery.of(context).size.width < MediaQuery.of(context).size.height) { if (Platform.isAndroid) { rotation = ImageRotation.rotation90.value; } } mrzDetector .recognizeBuffer(bytes, width, height, stride, format, rotation) .then((results) { ... }); }
Result Page
The Result page contains the extracted MRZ data, a button to share the data with other applications and a button to save the data to the local storage.
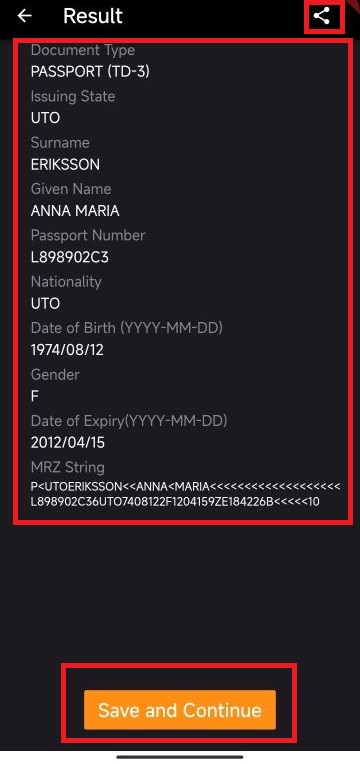
The Share button is located in the AppBar widget.
AppBar(
  backgroundColor: Colors.black,
  title: const Text(
    'Result',
    style: TextStyle(color: Colors.white),
  ),
  actions: [
    Padding(
      padding: const EdgeInsets.only(right: 20),
      child: IconButton(
        onPressed: () {
          Map<String, dynamic> jsonObject =
              widget.information.toJson();
          String jsonString = jsonEncode(jsonObject);
          Share.share(jsonString);
        },
        icon: const Icon(Icons.share, color: Colors.white),
      ),
    )
  ],
)
The extracted MRZ data is displayed in the Column widget.
Column(
  crossAxisAlignment: CrossAxisAlignment.start,
  children: [
    Text("Document Type", style: keyStyle),
    const SizedBox(
      height: 3,
    ),
    Text(widget.information.type!, style: valueStyle),
    const SizedBox(
      height: 6,
    ),
    Text("Issuing State", style: keyStyle),
    const SizedBox(
      height: 3,
    ),
    Text(widget.information.issuingCountry!, style: valueStyle),
    const SizedBox(
      height: 6,
    ),
    Text("Surname", style: keyStyle),
    const SizedBox(
      height: 3,
    ),
    Text(widget.information.surname!, style: valueStyle),
    const SizedBox(
      height: 6,
    ),
    Text("Given Name", style: keyStyle),
    const SizedBox(
      height: 3,
    ),
    Text(widget.information.givenName!, style: valueStyle),
    const SizedBox(
      height: 6,
    ),
    Text("Passport Number", style: keyStyle),
    const SizedBox(
      height: 3,
    ),
    Text(widget.information.passportNumber!, style: valueStyle),
    const SizedBox(
      height: 6,
    ),
    Text("Nationality", style: keyStyle),
    const SizedBox(
      height: 3,
    ),
    Text(widget.information.nationality!, style: valueStyle),
    const SizedBox(
      height: 6,
    ),
    Text("Date of Birth (YYYY-MM-DD)", style: keyStyle),
    const SizedBox(
      height: 3,
    ),
    Text(widget.information.birthDate!, style: valueStyle),
    const SizedBox(
      height: 6,
    ),
    Text("Gender", style: keyStyle),
    const SizedBox(
      height: 3,
    ),
    Text(widget.information.gender!, style: valueStyle),
    const SizedBox(
      height: 6,
    ),
    Text("Date of Expiry(YYYY-MM-DD)", style: keyStyle),
    const SizedBox(
      height: 3,
    ),
    Text(widget.information.expiration!, style: valueStyle),
    const SizedBox(
      height: 6,
    ),
    Text("MRZ String", style: keyStyle),
    const SizedBox(
      height: 3,
    ),
    Text(widget.information.lines!,
        style: const TextStyle(
            color: Colors.white,
            fontSize: 11,
            overflow: TextOverflow.ellipsis)),
    const SizedBox(
      height: 6,
    ),
  ],
)
The Save button is located at the bottom of the page. As the button is tapped, the MRZ data is saved as a JSON string to the local storage.
MaterialButton(
  minWidth: 208,
  height: 45,
  onPressed: () async {
    Map<String, dynamic> jsonObject = widget.information.toJson();
    String jsonString = jsonEncode(jsonObject);
    final SharedPreferences prefs =
        await SharedPreferences.getInstance();
    var results = prefs.getStringList('mrz_data');
    if (results == null) {
      prefs.setStringList('mrz_data', <String>[jsonString]);
    } else {
      results.add(jsonString);
      prefs.setStringList('mrz_data', results);
    }

    close();
  },
  color: colorOrange,
  child: const Text(
    'Save and Continue',
    style: TextStyle(color: Colors.white, fontSize: 18),
  ),
)
History Page
The History page presents a list of MRZ data that has been saved to the local storage. All data can be deleted by tapping the Delete button.
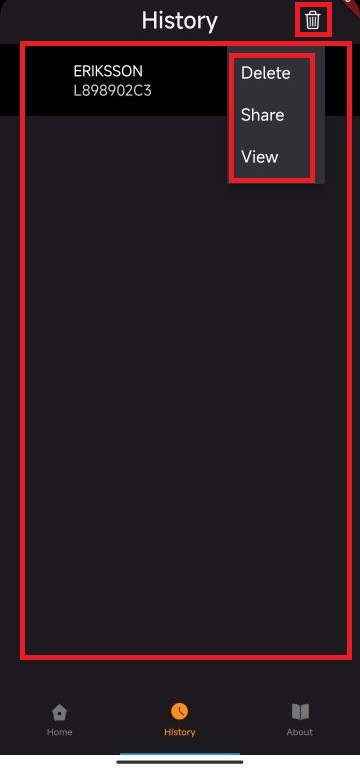
The ListView widget is used to display the list of MRZ data:
ListView.builder(
  itemCount: _mrzHistory.length,
  itemBuilder: (context, index) {
    return MyCustomWidget(
        result: _mrzHistory[index],
        cbDeleted: () async {
          _mrzHistory.removeAt(index);
          final SharedPreferences prefs =
              await SharedPreferences.getInstance();
          List<String> data =
              prefs.getStringList('mrz_data') as List<String>;
          data.removeAt(index);
          prefs.setStringList('mrz_data', data);
          setState(() {});
        },
        cbOpenResultPage: () {
          Navigator.push(
              context,
              MaterialPageRoute(
                builder: (context) => ResultPage(
                  information: _mrzHistory[index],
                  isViewOnly: true,
                ),
              ));
        });
  })
The item of the list view is defined as MyCustomWidget, which contains two lines of MRZ data and a More button that opens a context menu. The context menu provides three options: delete, share and view.
class MyCustomWidget extends StatelessWidget {
  final MrzResult result;
  final Function cbDeleted;
  final Function cbOpenResultPage;

  const MyCustomWidget({
    super.key,
    required this.result,
    required this.cbDeleted,
    required this.cbOpenResultPage,
  });

  @override
  Widget build(BuildContext context) {
    return DecoratedBox(
        decoration: const BoxDecoration(color: Colors.black),
        child: Padding(
            padding: const EdgeInsets.only(top: 18, bottom: 16, left: 84),
            child: Row(
              children: [
                Column(
                  crossAxisAlignment: CrossAxisAlignment.start,
                  children: [
                    Text(
                      result.surname!,
                      style: const TextStyle(color: Colors.white),
                    ),
                    Text(
                      result.passportNumber!,
                      style: TextStyle(color: colorSubtitle),
                    ),
                  ],
                ),
                Expanded(child: Container()),
                Padding(
                  padding: const EdgeInsets.only(right: 27),
                  child: IconButton(
                    icon: const Icon(Icons.more_vert),
                    color: Colors.white,
                    onPressed: () async {
                      final RenderBox button =
                          context.findRenderObject() as RenderBox;

                      final RelativeRect position = RelativeRect.fromLTRB(
                        100,
                        button.localToGlobal(Offset.zero).dy,
                        40,
                        0,
                      );

                      final selected = await showMenu(
                        context: context,
                        position: position,
                        color: colorBackground,
                        items: [
                          const PopupMenuItem<int>(
                              value: 0,
                              child: Text(
                                'Delete',
                                style: TextStyle(color: Colors.white),
                              )),
                          const PopupMenuItem<int>(
                              value: 1,
                              child: Text(
                                'Share',
                                style: TextStyle(color: Colors.white),
                              )),
                          const PopupMenuItem<int>(
                              value: 2,
                              child: Text(
                                'View',
                                style: TextStyle(color: Colors.white),
                              )),
                        ],
                      );

                      if (selected != null) {
                        if (selected == 0) {
                          // delete
                          cbDeleted();
                        } else if (selected == 1) {
                          // share
                          Map<String, dynamic> jsonObject = result.toJson();
                          String jsonString = jsonEncode(jsonObject);
                          Share.share(jsonString);
                        } else {
                          // view
                          cbOpenResultPage();
                        }
                      }
                    },
                  ),
                ),
              ],
            )));
  }
}
About Page
The About page showcases a title, a version number, a description, a button, and two links to the Dynamsoft website.
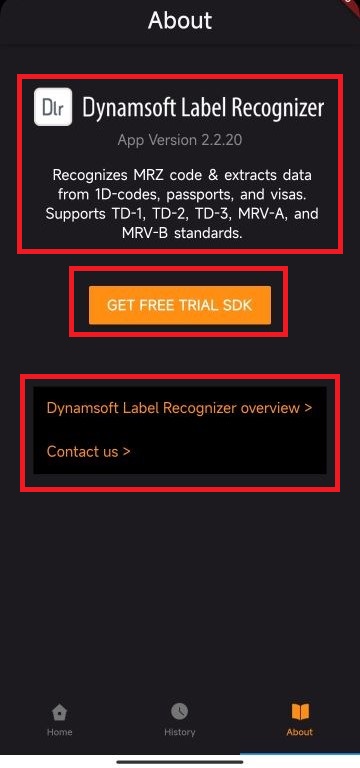
- Title:
final title = Container( padding: const EdgeInsets.only(top: 50, left: 39, bottom: 5, right: 39), child: Row( children: [ Image.asset( "images/logo-dlr.png", width: MediaQuery.of(context).size.width - 80, ), ], ), ); - Version number:
final version = Container( height: 40, padding: const EdgeInsets.only(left: 15, right: 15), child: Text( 'App Version 2.2.20', style: TextStyle(color: colorText), ), ); - Description:
final description = Container( padding: const EdgeInsets.only(left: 44, right: 39), child: const Center( child: Text( 'Recognizes MRZ code & extracts data from 1D-codes, passports, and visas. Supports TD-1, TD-2, TD-3, MRV-A, and MRV-B standards.', style: TextStyle(color: Colors.white, wordSpacing: 2), textAlign: TextAlign.center, ), )); - Button:
final button = Container( padding: const EdgeInsets.only(top: 48, left: 91, right: 91, bottom: 69), child: MaterialButton( minWidth: 208, height: 44, color: colorOrange, onPressed: () { launchUrlString('https://www.dynamsoft.com/downloads/'); }, child: const Text( 'GET FREE TRIAL SDK', style: TextStyle(color: Colors.white), ), ), ); - Links:
final links = Container(
    padding: const EdgeInsets.only(
      left: 15,
      right: 15,
    ),
    decoration: const BoxDecoration(color: Colors.black),
    child: Column(
      crossAxisAlignment: CrossAxisAlignment.start,
      children: [
        Padding(
          padding: const EdgeInsets.only(top: 13, bottom: 15),
          child: InkWell(
              onTap: () {
                launchUrlString(
                    'https://www.dynamsoft.com/label-recognition/overview/');
              },
              child: Text(
                'Dynamsoft Capture Vision overview >',
                style: TextStyle(color: colorOrange),
              )),
        ),
        Padding(
          padding: const EdgeInsets.only(top: 13, bottom: 15),
          child: InkWell(
              onTap: () {
                launchUrlString('https://www.dynamsoft.com/company/about/');
              },
              child: Text(
                'Contact us >',
                style: TextStyle(color: colorOrange),
              )),
        ),
      ],
    ),
  );
Source Code
https://github.com/yushulx/flutter_ocr_sdk/tree/main/example


